How To Replace Rear Brakes & Rotors 2002-2011 Honda CRV

HTML-код
- Опубликовано: 11 авг 2019
- Here are some of the tools that jimthecarguy uses
www.amazon.com/shop/jimthecarguy
Nothing will be left out. Easy to follow step by step advice. Come along as I show you how to replace rear brakes and rotors on this 2006 Honda CRV.
Due to factors beyond the control of jimthecarguy, it cannot guarantee against unauthorized modifications of this information,. jimthecarguy assumes no liability for property damage or injury incurred as a result of any of the information contained in this video. jimthecarguy recommends safe practices when working with power tools, automotive lifts, lifting tools, jack stands, electrical equipment, chemicals, or any other tools or equipment seen or implied in this video. Due to factors beyond the control of jimthecarguy, no information contained in this video shall create any express or implied warranty or guarantee of any particular result. Any injury, damage or loss that may result from improper use of these tools, equipment, or the information contained in this video is the sole responsibility of the user and not jimthecarguy.  Авто/Мото


I did my brakes and rotors recently had to use a 20lb sludge hammer to remove, I used enough anti seize to keep it from happening. My front end has new ones but when I press my brakes I can hear a clamping noice any idea.
My rotors get replaced every other year here in Pennsylvania
Contact me you are the winner jimthecarguy1@gmail.com .
@@jimthecarguy I wonder if he ever replied
@@chickennugget6611probably not:(
Jim you saved me a lot of money , even my wife is finally impressed with me 😁
One of the best videos I've seen here. Clear instructions, list of tools, socket sizes, ..., the works. Great site.
Easily the best CRV rear brake video on RUclips…no comparison!
Thanks Jim - keeping it simple, step by step. Like the way you show the parts that are a bit problematical, like getting clips to locate properly, rather than missing that part of the video and pretending it was all easy!
Greetings from CA Jim! Perfect timing as my aunts CRV needs the brake pads changed. Thank you for the detailed video!
You need to keep doing videos. Many people can replace parts but not too many are good teachers. You are a good teacher. Keep up the good work and thanks for all your help
Marc here, I've learned a lot from this channel and saved a ton of $$$. Thanks, Jim for all the videos and insight. Idaho
Jim, one of the best how-to videos I have ever seen! Made my brake job on the honda so much smoother and less frustrating. Very professional- thank you!
...by the way Jim I missed hearing the street sounds of traffic and people walking by in your shop videos, lol you’re the Real Deal Jim!
Thank you again
Tony
Thank you for giving back/paying it forward!!! Great instructional video Jim-
Thank you
Tony in Chicago
Thanks Jim, you’re like the father I never had walking me through the entire process. Excellent video!!
Glad you enjoyed it.Thanks for watching.
Another great video. Old school on the ground with hand tools. Love it! McKeesport Pennsylvania
Jim, I couldn’t have done it without you, seriously!
I couldn’t get the rotor off on one side.
One side was a challenge, the other side was not possible. I just beat the heck out of the second side and it finally came off, both sides done. New pads, rotors and calipers.
For this job I had to use a bolt extractor and an impact tool, I was very skeptical but both worked great.
Very very professional job, I love to learn from people that really knows what are they doing 👍
From Austin Texas. I love your videos and I have learned alot from watching them.
@jimthecarguy I cannot thank you enough for the trick about using a drift to loosen up the two screws on the rotors! I have used your videos to change the brakes out on our Highlander and now our CRV, and I don’t even want to tell you what I did on my wife’s 1998 Honda Civic when I tried to change her rotors out. It has been a while, but I think I actually went to a confession to apologize for some of the words I used.
Please keep on keeping on with your videos and sharing of knowledge. Sincerely, the universe.
I just want to thank you Jim, after watching your video a couple of times I replaced the rear brake rotors and pads on my wife’s 2012 CRV. Come to fine out the person that did it last time bent the tabs over on the pads that fit into the caliper piston. Thanks Jim again, from Northwestern Vermont
Just finished mine. Took me 5 hours but I got it done. Props to you sir!
Thank you! I’m was in the middle of a brake job on my CRV and forgot how the stainless clips were installed. I appreciate you Sir.
I like your warning speech about the burning smell. I give the same speech every time I do a rotor replacement. New York
This is the most informative video on this procedure I've seen; good job!
Glad it was helpful!
Was just looking for a refresher and found this, great video and very well explained...thank you !!!
Hailing from Virginia. Love your videos Jim. They have been very helpful to me.
Jim you're an absolute champ, easy to follow and manage to successfully change both rears on my 2002 CR-V.
Thanks for watching.
Love your videos. Always informative. Keep up the great work. El paso, Texas
Awesome job Mr. Jim! Like how thorough your videos are. Joe Villa, El Paso Tx.
Your a great mechanic very smart and I’ve been following you for ever thanks Jim I live in Pennsylvania!!!
Excellent video. You must be an instructor being so clear and methodical. Thank you.
Wow, thank you!
JIm , Thanks for a great video. I just purchased a 2006 CR V and want to do the brakes myself. I've never done a brake job before but your step by step video really teaches how to do it right. I also have subscribed to your channel
Thanks again!
Glad it helped. If you run into any problems let me know I will try to help.
@@jimthecarguy Thanks so much Jim.
Love how you teach! Helped me many times! Minnesota
Thank you for another informative video, having the ability to do your own work can save people a lot of money. Washington.
Really great videos. Appreciate your experience and clear method to both the videos and the example.
Great video as always greetings from Rochester New York
Always enjoy your videos, Jim. John -- North Carolina
Thank you soooooo so much for going into detail about removing the rotor. Helped me alot now that i got stuck!
Well done video!!! First time ever someone didn't cut the corners on the small stuff....
I just ordered the key fob tester thing you used in one of your videos because my car isn't working due to imobilizer issue! Love your videos! Thank you so much! ❤
Tisa Sanders in Arkansas!
Great job! Thanks for the chance to get your gift. Richard from Ft.Worth, Texas!
Always love watching your videos Jim! N.Y.
Jim, thank you for another helpful video.
Joe from California
Great vid Jim, greetings from HOT Georgia!
Thanks Jim for this new brake job. Virginia
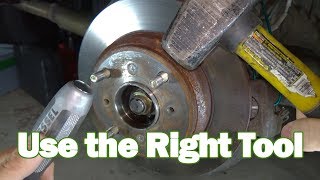
Dude this video saved my ass! Those little screws that hold the rotor to the hub I could not bust them loose even with an impact driver, I done like you showed in the video and whacked on them a few times with a 3/8 extensions and a hammer and they came right loose, THANK YOU!
Great instructions Jim, greetings from Michigan!
Don’t forget anti seize on hub face.
Remove car from jack stands before test driving!!!!
Excellent how to video, thanks.
Always helpful and appreciate the shop talks. Florida
Thanks Jimbo... I can now do my 2011 CRV.. Texas here.
Excellent job explaining everything. Thanks so much!
Great video! Such detailed information and much appreciated for your job well done. Thanks.
Yo Jim your videos rock brother! Thanks!
Great tutorial. Made the job a quick one.
You did a great description of installation of the brakes! I could have used the torque numbers, but otherwise a great job!
14:22 As previously mentioned, everything about your video is great but the Torque spec's would have been better. Thanks for your help.
Very nice video. Excellent explanation. Thanks
Just dropping in to say great video as always. I am from the state of confusion! Thanks Jim.
LOL LOL LOL LOL I thought Ohio was the land of confusion. Your near Pittsburgh right?
@@lonwillis783 actually other side of state.
Really good job on the video. Thanks!
Another great video. From South Carolina.
Bloody good vid mate very informative cheers!!!
Great video! Nice step-for-step.
Glad it was helpful!
Hi Jim, really good tutorial, easy to follow and precise information. Wonder if you have a video to replace the brake shoes, also how to adjust them.
Nice work Jim! from Pennsylvania
Thanks Jim, will help me on my 2006 CRV !
Keep up the good work Jim, very interesting . Thanks, JohnG Indiana
Rotors are like my 08 Kia Rondo. Thanks btw for that video. The rears are a pain in the butt.
Thank you for this wonderful and very helpful video
Glad it was helpful!
Very helpful. Thank you Jim
Thank you so much. Great video, very helpful
Great video Jim, thank you!
Glad you enjoyed it
Good video Jim. I always replace the rubber boots and slide pins on the caliber. Many pad kits comes with the boots and the pins are only $10 extra. This is especially important if the slide pin has a rubber ring at the bottom of the pin, those normally get swallon over time and make the slide get stuck.
Thanks for watching. Hope all is well with you.
Thank You Jim I am in Ohio It is the same for Honda element. I know its harder to work at home on something... Thank You So much for everything you do. and I ABSOLUTELY LOVED HEARING THE BIRDS SING IN THE BACKGROUND!
Commenting in the right place now.
- Mike from Tennessee
This giveaway was held last night. In a few days there will be another one starting. Subscribe and hit the bell for notifications.
Thanks Jim awesome video!
You are very welcome
great video. Thank you!
You make it look so easy. Maryland.
Great informative video! Texas.
Thank you for doing this. Very thorough. I undid the two 12mm screws and the caliper is loose but i can't pull it off.
Could it have something to do with the piston?
Great video. Detailed.
Hi from Austin TX nice work
Another great video. FL
Very good video. Just did mine for the first time. One question: shouldn’t I be using copper anti-seize on all of the metal-to-metal instead of silicone paste, just using the past for the guide pins?
Thank you Jim, the middle anti rattle clip; does it have to be changed every time? if not, does it need any kind of adjustments?
Another good video Jim. Chris from California. By the way, where’s your JACK STAND? that scissor jack had me nervous 😬
Great video, I just bought a 2004 crv and I can’t wait to do it myself...btw you have a video on how to adjust the valve lifters on 04 crv? Danny New York
Great info, Georgia
Great video. I would also check the brake fluid level after doing this😉
The fluid level should be checked before and after, if it's very full it could spill over when the caliper piston is pressed back.
Very good video! How many lbs of torque did you apply to the caliper bolts?
Thx Jim, excellent video. Do I need to torque the bolts to a certain pressure?
classic yt goodness. thanks
Glad you enjoyed it
one more good vid. Texas usa
Great video thanks .
Thanks great explanation.
Very good information!
Iowa.
Batting a 1.000 on the positive comments. And for good reason. Nice vid, super helpful.
Appreciate it!Thanks for watching.
Nice detail! New York.
Great video, thank you !What are the torque specs?
like your videos, ron from new jersey
As always a great video in great detail. Thank you for sharing your video. I truly hope you are having a Blessed Summer. I would like to inter in the camera contest also. MARYLAND. USA.
Good tutorial. New York.
Great instruction, thanks. One thing that could have been helpful, but not mentioned: there are two THREADED holes in the rotors. Had I seen them, I would have screwed two bolts into them, and tightened them against the end of the axle, to push the rotors off. Not knowing that, I had to pound all around the drum. then tap one the edge of the rotor, while turning it, to overcome the rust and get it off.
When pushing the inner pad and clips into the brake caliper piston, HOW DO YOU MAKE SURE ITS ORIENTED/ALIGNED properly to mate with the brake disc,caliper hardware? Do the clips slide into CHANNELS INSIDE THE CALIPER PISTON? Please reply if you can ?