What an informative video. I had never heard of JIS and as a proud owner of both a Toyota and Honda I feel like this is something a lot of people are unaware of and should know.
I bought the Vessal 980P3150 off of your link. Thank you, it took care of my problem: the rear rotors on an '03 Acura RSX with 291k miles on it. It seems as though they had never been removed and therefore had about 20 years to rust-in-place. Someone else mentioned letting some WD40 soak on it for about 30 min. or so and I also tightened the bolt closest to the screw to (possibly) help remove pressure on the screw. Whether or not this last trick made any difference or not, all 4 of my rusted in screws came out after that step. Just mentioning it in case anyone else wants to try it...
I couldn’t find this screwdriver at my local auto parts store, so I used your Amazon link and bought one (and an 8 pack of rotor screws). Thank you for making this video. Much appreciated!
Holy shit man, thank you so much. I have no idea why this isn't talked about more. I've watched a dozen Civic brake install videos in preparation for doing it myself, and not a single person has mentioned this. And nearly every video, they struggle getting the screw out. Makes perfect sense why lol. I had no idea this even existed, but I really appreciate you for making this video!!
I also needed a special caliper compression tool that spins and push. The standard caliper compression tool for the front does not work for the rear Honda.
I had this problem with both screw on the on rotor. Didn't matter how many times I banged on the rotor, the screw wouldn't come off. I was using a traditional Philip head screw driver and started to damage the bolt, making it harder to unscrew each time I applied force. Found this video and decided to buy this screw/impact driver. Spent 16 bucks and waited 3 days. Man, when it came, I took those bolt off with ease. It was so fast lol. Make sure to buy this tool. It's a saves you from a lot of hassle.
This video provided valuable information as opposed to other videos on this subject that incorrectly mentions using a Phillips head to remove these screws. Thanks for making this video, also appreciated the tip about drilling the center of the screw.
I was a career mechanic and I just found out about the type of screw not long ago and I also bought the correct screwdriver and it's a serious time saver.
Excellent video showing the difference between the JIS and Phillips. Other videos just said those screw are JIS but never explained or showed why. I kept wondering why the JIS is different as it looks quite similar to the Phillips. Thanks.
Do not attempt without the proper screwdriver. Just found this out a few months ago by a friend. If you're working on Japanese products it's a Must Have! Good info!
Wish I had seen this video this past weekend. I wasted hours on getting these piece of crap screws out with a metal punch tool/chisel after breaking a couple of screw extractor bits on them and lots of penetrating oil. Ugh! Thanks for sharing. Lesson learned.
Pro tip: the screws do not need to be replaced. They’re only there for keeping the rotors on during manufacturing. The wheel studs offer miles more clamping than the screws.
thanks a million. stumbled across this while preparing to do a brake job on my civic rescue. and another major thanks for linking the tool in the description. None of the auto shops around here know what I am talking about.
That JIS screw driver isn't really the right tool either because the screw might be rusted in there and then the tool wouldn't work. The right tool is a screw driver punch. It's a tool that comes with multiple bits (including a JIS bit) and while applying pressure in the direction you want to turn the screw, you hit the end of the tool with a mallet or hammer. This simultaneously turns the screw and ensures that the driver doesn't cam out and strip the bolt.
Got the p3 vessel impacta because of this video to remove my 7 y/o rotors to install drilled and slotted. It didn't work. I was very disappointed. I smacked the crap out of that thing with a hammer for like 20 minutes, but the screw didn't budge, it started to strip a little and I got tired and frustrated. I sprayed some pb blaster on the screw and let it marinate for about 5 minutes. Pissed off and running out of daylight I used my makita impact gun with a p3 pozidriv bit since that's the closest to the jis head. Came right out on both sides. The vessel didn't work for me. But at least this guided me not to use a Philips head. I think the pb blaster with the pozidriv p3 is gonna be my jam for this repair. Returning the vessel to Amazon. Also there was a video that my wife found that was comparing the vessel impacta to just an impact gun with jis bit. Dino's tinkershed on youtube. Impact gun with the jis bit won. Impacta came highly touted, but didn't deliver for this type of job. If it wasn't for the impact gun I'd probably still be out there smacking the vessel with a hammer. Freaking irritating.
Thank you for this. I plan to be AH deep in an all 4s brake and rotor job on a Honda Pilot this weekend. I have already been victimized by this when I had to change out a door lock mechanism. What an ordeal to drill out those screws!
Thanks for the JIS info. In the past I just ground the tip down on the standard Philips until it fit well in the screw, and used my impact drill driver. Worked every time. I learned this hack while repairing the Philips screw driver bits that wear and cam out causing striped screw heads. You can generally get two more uses from them before finally tossing them out.
for a backwoods Shave tree like myself, Ive been upgrade ing my tools. Glad I watched this video. I'm getting one of those drivers for our Vans! I have 2 of these vans. I have had a lot of vehicles. from hot rods to today's 2001 honda. And I feel like they are dependable. If you can afford maintence. Up keep. which ain't alot of money like some vehicle's
Thank you so much for this video it makes such complete sense when looking at the screws on the rotors my first thought was that their shape wouldn't fit any Phillips head screwdriver that I have who knew the reason behind it? Well you did obviously and I appreciate you making this video
Say less... just order from the link in the description. But I did strip a screw so I'll be searching another video to remove that. Most likely with a drill bit Screw Out kit. Thanks for this detailed information! You're the man!
Makes you wonder why manufacturers don't stick to using flat head screws, even hex key slots can round off if they are seized. Those bolts are low torque yet still cause problems, it's a lack of lubricant and under engineered implementation that creates the issue in the first place. If the head of the bolt and the depth of the hex slot was deeper there would be much less of an issue getting them off.
I’ve taken out several of these screws by putting the lug nuts back on very tight thereby releasing torque on the screw, and then unscrewing it easily.
Hi there, its very easy to shear off the head of a screw with an impact driver, this driver seems much better option!! Thanks for sharing, kindest regards. Joe.
Immediately got myself a couple of these from Amazon for my 7th gen Accord. Also it baffles me that most of the automotive channels I follow on RUclips don't seem to know about this special screwdriver. I won't spill names but some of the channels with huge following also don't seem to endorse it. It's all the same soak it on PB blaster, whack it a few times with an impact and the drill method
I've looked at a few Neanderthal videos on screw removal. Some were painful to see. I appreciate your modern human( frontal cortex engaged) video. I have found illumination. Thank you Mr. Studio VRM.
Been Struggling with Phillips screws on Honda's all my life. Thank You for this video, The Right Tool for the Right Job! I usually ended up using my impact driver bit tool set to remove the seized phillips screws. I thought that it was just an under engineered design or mismatch of the screw head design and the screw driver design. Thank You Thank You Thank You!
did my front brakes yesterday, i borrowed one of those from a friend as i didnt have a #3 screwdriver/bit.. i had to buy bits before using, attempted using #3 bit on ratchet - worked fine.
That impact driver kit from harbor freight did not work on my Honda Pilot 2006 and I wish to own it if it works because it is so cheap with 20% Off coupon. I ended up to get the expensive one from Autozone ($13) to remove these nuts from my Honda Pilot successfully.
The distributor rotor screws on Honda vehicles were of the same configuration during the 90's when cars had distributors. I used to file standard screwdrivers to get those set screws out while tuning up those vintage Honda's.
Vessel also make a JIS bit set that can be used with a traditional manual impact driver. The manual impact driver is more powerful than an Impacta screw driver. I have both. I've had cases where the Impacta would not budge a screw bit that the impact driver with JIS bit removed first try. That case was lock latch screws.
Well presented video, so many You Tubers get this wrong and I wish I knew this when I was younger, all the times I cut a slot into these screws to remove them and end up having to buy new ones 🥴
Excellent video! There are other RUclips presenters out that don't know about the use of JIS screws and describe the difficulties of removing Phillips screws.
Another way to do it which always works for me is to take a can of air duster. Flip it upside down so the liquid gas comes out. Try to get it nice and cold so it shrinks. Comes right out 9 out of 10 times without hesitation.
Shit, no wonder there's two slot for the screws but there's only one screw fasten to the rotors. And no one told us people after you do the first rotor don't ever replace them again. Great news to me...
@@ghost-4230 You don't need the screws. They're only there to make it easier for the manufacturer to put on brake rotors during assembly. I had one that was so rusted that I had no choice but to drill it out and throw it away. Never needed them since when replacing brakes.
Bought the same screwdriver and had zero luck on my 2011 rotors. Mine are way more rusty and had 108k miles. Slapped new brake pads and called it a day. Will try one more time in few years=)
You need to put the lug nuts back on and tighten them before attempting screw removal. Tighten lug bolts or lug nuts to clamp the rotor and hub together. This decreases any preload on the screw making it much easier to remove.
@@neil3858excellent question: This can happen if studs not threaded all the way or if using lug bolts instead of lug nuts. Just find appropriate material to use as spacer to be able to generate clamping force from the existing lug/stud system. Stack of washers? cut a couple pieces of small pipe? Have any closed end wrenches laying around, hang them over the stud like washers. You may only need to clamp/tighten lugs on each side of retaining screw. I always have various open ended lugnuts available or grinder end off old one. edit: only tighten lugs either side of retainer screw. If still bound up, remove and tighten lug ONLY exactly opposite screw and tap lightly with hammer, then loosen and only tighten lugs either side screw again. The metal flexes and you can stretch and then release the "preload" tension binding on the screw surfaces. Also, when reinstalling screw, LIGHTLY tighten lugs either side of screw, lightly tighten screw, remove lugs and bingo, perfectly tight set retainer screw.
I wish that I had watched this before almost "screwing over" my screws which almost reduced me to tears. One of the simplest Brakes jobs to do ever turned into over an hour long fight with two .60 screws. The right tools and some heavy hitting and pop, they both shifted easily. It's no wonder those particular screws got a dedicated RUclips Video.
Outstanding video! Where were you 20 years ago when being the dumb hick I'd use a Phillips to remove JIS screws...Lot'sa cursing and drilling. Thanks again. FYI, I use my small impact screwdriver and since then I also never round a screw head anymore! Cheers
good info here but also note that these screws are made of soft steel so they are easy to drill out and as noted by another comenter they don't need to be replaced
I just replaced the rear brakes on a CRV and used KROIL penetrating oil 2 applications about 10 minutes apart, let sit overnight and then used a Phillips bit I got in a verity pack from Milwaukee and my little 10.8V Makita impact driver the screws came right out BTW the Phillips bit fit perfectly zero play...it wasn't a hassle at all, when I reassembled I used anti seize on those screws.
I must be the luckiest bloke alive. All four of mine came off with an impact driver, and minimal effort. Unbelievable. Good call on the screw head though 👍
These screws are used to hold the rotors in place during the assembly process. You do not have to use them again, the lug nuts hold everything together. So take them off with your fancy 14$ JIS screwdriver and toss them in the trash
Working at a Japanese car dealership there are upsides to the rotor screws not just because they hold the rotor in place through the assembly line but when you’re trying to cut rotors using an on car brake lathe they maintain the rotor in position and you don’t have to fight too much to get the brake lathe hub on. If you’re a do it your selfer you toss them cause generally you’ll replace the rotors or take them somewhere to be cut
You are correct. Had aNeon that used just a push clip. Removed it, it breaks. Not required except to keep the rotor from falling off on the assembly line. The lug nuts hold everything together.
Japanese Industrial Standard...I remember dealing with these on my 79 GL1000 on the oil pump cover. Lotta smart old guys working on those, found out really quick they were #3 JIS. I counter bored some of the seats over sized to fit SHCS when I put it back on cuase you know, why not. Interesting to note, I found out that early on there were several different types of cross head drivers and screws that were patented. Very interesting.
@@ChrisMosesBrownMind basically anywhere in the Upper Midwest especially Michigan where the salt is so bad the only thing that keeps some people from having a Flintstone car is the placemat
Impact screw driver worked partially for me, it broke two #3 Philips impact bits trying to remove the set screws. I even tried heat and that didn’t work so I ended up having to drill them out. But it did work on maybe 2 out of the 8 set screws. Sometimes rust wins
Use a regular screwdriver or regular impact drill with regular Phillips head on it. Just put a rubber band on top of the screw head before you put the screwdriver in. It will fill all the gaps and add more grip
you can replace the screws with different head and same tread. There are screws with hex hole in the head which allows to use Alen keys. Available at hardware store.
I actually found a low profile head hex head fastener that's the same length, pitch, bevel, and class as the OEM Honda screws. You could use a 1/4" ratchet and a small socket and unscrew it right out. The problem is that they were 3x more expensive than the OEM ones from Honda.
Re install the lugs nuts backwards apply anti seize to the threads dont over tighten also you can use an impact driver that you hit with a hammer i have found that re istalling the lug nuts backwards works quite well
Most Phillips drivers these days are ISO/DIN anyway, which is functionally identical to JIS. The ISO/DIN standard falls within the allowable variance of JIS, with tighter tolerances. In fact they're so similar that JIA withdrew JIS B 4633 ("Screwdriver for cross recessed head screws") in favor of ISO 8764-1.
Just did this last night... Used an impact driver to start, 13 year old screws just don't wanna budge, good to know those were NOT Phillips... We ended up drilling it since those screws really are not needed but it was a painful process to say the least :'(
StudioVRM you are a life saver! I didn't buy the right tool I just ground off the tip of a regular screw head and it worked like a charm, getting off a rotor on my 2001 Honda which hasn't been replaced since it left the factory without any problems. I don't know what I would have done if I had not watched this great video.
This kinda worked, i stripped one screw and had to drill it out, the second time I hammered for like 15 min, no movement, was about to drill it out, then i gripped the handle with both my hands and twisted the screw out, so it did work on the second screw.
pencil blowtorch, and centre pot punch, one strike on horizontal to provide location, then undo with pin punch struck downwards in anti clockwise direction, mine had threadlock on too,job done, then throw them away
Is it weird that I drilled these out yesterday on my wife's Element and then see this today? They were already way stripped out though. I didn't know that about those screws though. So thank you.
I have an easy way to get them off and you can reuse the screw: 1. Spray with penetrating oil (or WD-40). 2. Use a 2mm drill bit like he showed, and just drill in 4-5 mm - you don't have to go that deep. 3. Take a socket that has a small 3 mm square or hex drive bit and hammer it in the drill hole (just a few taps and it's in). 4. Gently apply pressure and turn the socket wrench to the left. Out it comes, every time. This works on Kia and Hyundai as well as other models. For BMW and other "Allen Head" screws use a larger diameter torx bit (and drill and hammer that in). Easy peasy.
@@james1795 James, notice the "OR"... I have both penetrating oils, and WD-40. I find both are helpful, but penetrating oils are superior. But if you have WD-40 (as everyone does) you can use that too. Thanks, Tom the Switz
@@TheSwitzAutomotive. Duhh???...I noticed the "or" when I first read your comment. I'm sorry I ruffled your sensitive feathers. You can calm down now, no one will think you are some kind of a dummy. PS. Which "both" penetrating oils do you have?.
I have a set of vessel "Philips" screw bits. I use the #3 bit in a generic hex bit holder that's 1/4" drive. I attach that to two adapters up to 1/2" drive, and stick the whole assembly onto a impact gun. Works excellent.


What an informative video. I had never heard of JIS and as a proud owner of both a Toyota and Honda I feel like this is something a lot of people are unaware of and should know.
I bought the Vessal 980P3150 off of your link. Thank you, it took care of my problem: the rear rotors on an '03 Acura RSX with 291k miles on it. It seems as though they had never been removed and therefore had about 20 years to rust-in-place. Someone else mentioned letting some WD40 soak on it for about 30 min. or so and I also tightened the bolt closest to the screw to (possibly) help remove pressure on the screw. Whether or not this last trick made any difference or not, all 4 of my rusted in screws came out after that step. Just mentioning it in case anyone else wants to try it...
I couldn’t find this screwdriver at my local auto parts store, so I used your Amazon link and bought one (and an 8 pack of rotor screws). Thank you for making this video. Much appreciated!
Holy shit man, thank you so much. I have no idea why this isn't talked about more. I've watched a dozen Civic brake install videos in preparation for doing it myself, and not a single person has mentioned this. And nearly every video, they struggle getting the screw out. Makes perfect sense why lol. I had no idea this even existed, but I really appreciate you for making this video!!
Thank you!! Best $14 I have spent in a while. Did the front rotors and pads in 90 mins thanks to this little gem!
Kris Kjellquist just heat it up and it will come right off 👍🏻
I also needed a special caliper compression tool that spins and push. The standard caliper compression tool for the front does not work for the rear Honda.
I had this problem with both screw on the on rotor. Didn't matter how many times I banged on the rotor, the screw wouldn't come off. I was using a traditional Philip head screw driver and started to damage the bolt, making it harder to unscrew each time I applied force. Found this video and decided to buy this screw/impact driver. Spent 16 bucks and waited 3 days. Man, when it came, I took those bolt off with ease. It was so fast lol. Make sure to buy this tool. It's a saves you from a lot of hassle.
This video provided valuable information as opposed to other videos on this subject that incorrectly mentions using a Phillips head to remove these screws. Thanks for making this video, also appreciated the tip about drilling the center of the screw.
I was a career mechanic and I just found out about the type of screw not long ago and I also bought the correct screwdriver and it's a serious time saver.
I lost my Japanese screw driver 38 years ago been looking for it ever since, so now I just use American Standard drill bit it's is a real time saver.
Been into Honda's my whole life and never noticed this. Thank you lol
Excellent video showing the difference between the JIS and Phillips. Other videos just said those screw are JIS but never explained or showed why. I kept wondering why the JIS is different as it looks quite similar to the Phillips. Thanks.
Thx to the person who owned my wife's Honda before hand and threw them away
They're used to hold rotor on during assembly. I think I maybe wrong.
@@brianw4brian they do but there's no reason for them
brian willoughby you are correct , peace and God Bless
Oops I put mine back on lol. Guess they aren’t needed.
You lucky duck
Do not attempt without the proper screwdriver. Just found this out a few months ago by a friend. If you're working on Japanese products it's a Must Have! Good info!
Wish I had seen this video this past weekend. I wasted hours on getting these piece of crap screws out with a metal punch tool/chisel after breaking a couple of screw extractor bits on them and lots of penetrating oil. Ugh! Thanks for sharing. Lesson learned.
Pro tip: the screws do not need to be replaced. They’re only there for keeping the rotors on during manufacturing. The wheel studs offer miles more clamping than the screws.
thanks a million. stumbled across this while preparing to do a brake job on my civic rescue. and another major thanks for linking the tool in the description. None of the auto shops around here know what I am talking about.
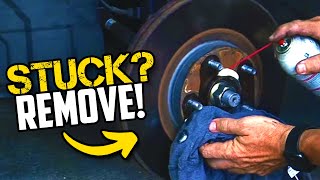
That JIS screw driver isn't really the right tool either because the screw might be rusted in there and then the tool wouldn't work. The right tool is a screw driver punch. It's a tool that comes with multiple bits (including a JIS bit) and while applying pressure in the direction you want to turn the screw, you hit the end of the tool with a mallet or hammer. This simultaneously turns the screw and ensures that the driver doesn't cam out and strip the bolt.
this explains a lot, always hated those little screws when you live in a rusty state.
Got the p3 vessel impacta because of this video to remove my 7 y/o rotors to install drilled and slotted. It didn't work. I was very disappointed. I smacked the crap out of that thing with a hammer for like 20 minutes, but the screw didn't budge, it started to strip a little and I got tired and frustrated. I sprayed some pb blaster on the screw and let it marinate for about 5 minutes. Pissed off and running out of daylight I used my makita impact gun with a p3 pozidriv bit since that's the closest to the jis head. Came right out on both sides. The vessel didn't work for me. But at least this guided me not to use a Philips head. I think the pb blaster with the pozidriv p3 is gonna be my jam for this repair. Returning the vessel to Amazon. Also there was a video that my wife found that was comparing the vessel impacta to just an impact gun with jis bit. Dino's tinkershed on youtube. Impact gun with the jis bit won. Impacta came highly touted, but didn't deliver for this type of job. If it wasn't for the impact gun I'd probably still be out there smacking the vessel with a hammer. Freaking irritating.
Thank you for this. I plan to be AH deep in an all 4s brake and rotor job on a Honda Pilot this weekend. I have already been victimized by this when I had to change out a door lock mechanism. What an ordeal to drill out those screws!
Good tip on drilling a relief hole on Realy stuck screws and I've never reinstall those screws on Honda either
Thanks for the JIS info. In the past I just ground the tip down on the standard Philips until it fit well in the screw, and used my impact drill driver. Worked every time. I learned this hack while repairing the Philips screw driver bits that wear and cam out causing striped screw heads. You can generally get two more uses from them before finally tossing them out.
for a backwoods Shave tree like myself, Ive been upgrade ing my tools. Glad I watched this video. I'm getting one of those drivers for our Vans! I have 2 of these vans. I have had a lot of vehicles. from hot rods to today's 2001 honda. And I feel like they are dependable. If you can afford maintence. Up keep. which ain't alot of money like some vehicle's
Just did all four rotors on my Odyssey and the screws came out no problem. Had been on there at least 90,000 miles.
Thank you so much for this video it makes such complete sense when looking at the screws on the rotors my first thought was that their shape wouldn't fit any Phillips head screwdriver that I have who knew the reason behind it? Well you did obviously and I appreciate you making this video
Good video. Good to know about the different driver and head. Don't worry about the negative comments.
Say less... just order from the link in the description. But I did strip a screw so I'll be searching another video to remove that. Most likely with a drill bit Screw Out kit. Thanks for this detailed information! You're the man!
after this video, I bought this screwdriver and keep it in my tool cart it works fantastic
Me too. My #2 and #3 Vessel Impactas are amongst my favorite accidental tool finds.
For those extra stubborn rotor screws, I use a cutoff wheel to make a notch in the screw head & then a big flathead screwdriver to remove the screw
Makes you wonder why manufacturers don't stick to using flat head screws, even hex key slots can round off if they are seized. Those bolts are low torque yet still cause problems, it's a lack of lubricant and under engineered implementation that creates the issue in the first place. If the head of the bolt and the depth of the hex slot was deeper there would be much less of an issue getting them off.
Nice video to come across before I tackle front pads/rotors on my 2018 accord, thanks for the tips!!
I’ve taken out several of these screws by putting the lug nuts back on very tight thereby releasing torque on the screw, and then unscrewing it easily.
This worked for me! Thank you so much for posting this technique :D
@@markusstaff3857 im retarded i drilled them out.
Wow gonna try that, thanks in advance
Sweet! I'll try your method.
This worked great! Thanks
Hi there, its very easy to shear off the head of a screw with an impact driver, this driver seems much better option!! Thanks for sharing, kindest regards. Joe.
Immediately got myself a couple of these from Amazon for my 7th gen Accord.
Also it baffles me that most of the automotive channels I follow on RUclips don't seem to know about this special screwdriver. I won't spill names but some of the channels with huge following also don't seem to endorse it. It's all the same soak it on PB blaster, whack it a few times with an impact and the drill method
I use and impact hammer from snap on and never had a problem with those, been a Honda Technician for 20 years...
I've looked at a few Neanderthal videos on screw removal. Some were painful to see. I appreciate your modern human( frontal cortex engaged) video. I have found illumination. Thank you Mr. Studio VRM.
Always nice to have the right tool for the job. Thanks for introducing us to Vessel. Cheers from Canada
Been Struggling with Phillips screws on Honda's all my life. Thank You for this video, The Right Tool for the Right Job! I usually ended up using my impact driver bit tool set to remove the seized phillips screws. I thought that it was just an under engineered design or mismatch of the screw head design and the screw driver design. Thank You Thank You Thank You!
This guy has a relaxing voice, even though the subject matter had me mad as hell! You should look into doing some relaxing ASMR videos.
did my front brakes yesterday, i borrowed one of those from a friend as i didnt have a #3 screwdriver/bit.. i had to buy bits before using, attempted using #3 bit on ratchet - worked fine.
I just bought a $10 impact driver from harbor freight to get these off. I threw the screws away as well.
That impact driver kit from harbor freight did not work on my Honda Pilot 2006 and I wish to own it if it works because it is so cheap with 20% Off coupon. I ended up to get the expensive one from Autozone ($13) to remove these nuts from my Honda Pilot successfully.
Is it safe to keep the screw out?.
@@davidflooor5964 Yes
You just saved me hours of frustration. I had the right bit in a little ikea set of all things - they all came right out! Thank you!
The distributor rotor screws on Honda vehicles were of the same configuration during the 90's when cars had distributors. I used to file standard screwdrivers to get those set screws out while tuning up those vintage Honda's.
Vessel also make a JIS bit set that can be used with a traditional manual impact driver. The manual impact driver is more powerful than an Impacta screw driver. I have both. I've had cases where the Impacta would not budge a screw bit that the impact driver with JIS bit removed first try. That case was lock latch screws.
Well presented video, so many You Tubers get this wrong and I wish I knew this when I was younger, all the times I cut a slot into these screws to remove them and end up having to buy new ones 🥴
Amazing video on the matter! Wish I had watched your video before I had to drill the stripped screws.
Excellent video! There are other RUclips presenters out that don't know about the use of JIS screws and describe the difficulties of removing Phillips screws.
#3 phillips and an impact driver, works every time.
Great info thx - one additional tip: add a touch of valve grinding compound to the tip to increase friction and reduce slippage.
Another trick we used at the dealership: moderate taps on the screwhead with a punch with loosen the rust on the threads and then unscrew.
Thank you for such a clear and informative video. Great information!
Spot on those SOB screws on Honda. Tool worked perfect just have to beat on it! THANK YOU!!!
everybody is talking about how their way works, stfu already 😂 yeah we know. He’s just trying to put us on game. fire video thank you
I swear, this guy is a professional voice instructor. A good teacher.
You sir, are far too kind.
No no, your voice and camera angle is clear, that was my point.
Have a nice day! :)
Great piece of info mate. Thanks for the excellent advice.
Another way to do it which always works for me is to take a can of air duster. Flip it upside down so the liquid gas comes out. Try to get it nice and cold so it shrinks. Comes right out 9 out of 10 times without hesitation.
Factory is only putting one screw on now instead of two. Though not to make it easier for you, but because it will save 5 cents per car.
Yep GM puts in 1, I take 1 out and throw it away!
Shit, no wonder there's two slot for the screws but there's only one screw fasten to the rotors. And no one told us people after you do the first rotor don't ever replace them again. Great news to me...
That makes Honda’s only worth $.05 now.
Can't you just not use the screws
@@ghost-4230 You don't need the screws. They're only there to make it easier for the manufacturer to put on brake rotors during assembly. I had one that was so rusted that I had no choice but to drill it out and throw it away. Never needed them since when replacing brakes.
Bought the same screwdriver and had zero luck on my 2011 rotors. Mine are way more rusty and had 108k miles. Slapped new brake pads and called it a day. Will try one more time in few years=)
You need to put the lug nuts back on and tighten them before attempting screw removal. Tighten lug bolts or lug nuts to clamp the rotor and hub together. This decreases any preload on the screw making it much easier to remove.
put lug nuts on tighten without the tire on?
@@SoutherRebelDoUFunDu Yes, Clamp brake rotor tightly to hub using lug nuts to remove tension clamping load from retaining screw.
Hell yea, Worth the try, thanks for sharing. Makes sense too
The lug nuts bottom out before any contact will be made to the rotor….
@@neil3858excellent question: This can happen if studs not threaded all the way or if using lug bolts instead of lug nuts. Just find appropriate material to use as spacer to be able to generate clamping force from the existing lug/stud system. Stack of washers? cut a couple pieces of small pipe? Have any closed end wrenches laying around, hang them over the stud like washers. You may only need to clamp/tighten lugs on each side of retaining screw. I always have various open ended lugnuts available or grinder end off old one. edit: only tighten lugs either side of retainer screw. If still bound up, remove and tighten lug ONLY exactly opposite screw and tap lightly with hammer, then loosen and only tighten lugs either side screw again. The metal flexes and you can stretch and then release the "preload" tension binding on the screw surfaces. Also, when reinstalling screw, LIGHTLY tighten lugs either side of screw, lightly tighten screw, remove lugs and bingo, perfectly tight set retainer screw.
Superb video, learned something new. Thanks mate!
I wish that I had watched this before almost "screwing over" my screws which almost reduced me to tears. One of the simplest Brakes jobs to do ever turned into over an hour long fight with two .60 screws. The right tools and some heavy hitting and pop, they both shifted easily. It's no wonder those particular screws got a dedicated RUclips Video.
You can also use an electric impact driver with #2 Phillips bit.
TOP NOTCH PUBLIC SERVICE VIDEO!
Very good and enlightening lessons!
Outstanding video! Where were you 20 years ago when being the dumb hick I'd use a Phillips to remove JIS screws...Lot'sa cursing and drilling. Thanks again. FYI, I use my small impact screwdriver and since then I also never round a screw head anymore! Cheers
Great video 👍🏻
I usually use a Dremel tool to cut a slit into the head and then use a flathead screwdriver instead. And yes, never put them back in.
A very good video, thank you. Most people don't know about JIS.
good info here but also note that these screws are made of soft steel so they are easy to drill out and as noted by another comenter they don't need to be replaced
Left hand cobalt bits work perfectly. Every time 👍
I just replaced the rear brakes on a CRV and used KROIL penetrating oil 2 applications about 10 minutes apart, let sit overnight and then used a Phillips bit I got in a verity pack from Milwaukee and my little 10.8V Makita impact driver the screws came right out BTW the Phillips bit fit perfectly zero play...it wasn't a hassle at all, when I reassembled I used anti seize on those screws.
M18 fuel impact driver and #3 philips impact bit. High volume shop and never a problem. Milwaukee #3 philips fits like a glove
John Pilgrim thats exactly what I used... no problem!!
I must be the luckiest bloke alive. All four of mine came off with an impact driver, and minimal effort. Unbelievable. Good call on the screw head though 👍
You learn something new everyday THANKS!
These screws are used to hold the rotors in place during the assembly process. You do not have to use them again, the lug nuts hold everything together. So take them off with your fancy 14$ JIS screwdriver and toss them in the trash
Denis You are so right you don’t need those screws to hold the rotors on.
Two weeks after you put the new rotor on, it’ll be stuck on the hub. It’s not going anywhere.
Exactly! I would put some anti-seize lubricant on those threads.
Working at a Japanese car dealership there are upsides to the rotor screws not just because they hold the rotor in place through the assembly line but when you’re trying to cut rotors using an on car brake lathe they maintain the rotor in position and you don’t have to fight too much to get the brake lathe hub on. If you’re a do it your selfer you toss them cause generally you’ll replace the rotors or take them somewhere to be cut
You are correct. Had aNeon that used just a push clip. Removed it, it breaks. Not required except to keep the rotor from falling off on the assembly line. The lug nuts hold everything together.
at my dealership where I work if you do this every day it is a good idea to keep a little box of extras they come in mighty handy at times
Japanese Industrial Standard...I remember dealing with these on my 79 GL1000 on the oil pump cover. Lotta smart old guys working on those, found out really quick they were #3 JIS. I counter bored some of the seats over sized to fit SHCS when I put it back on cuase you know, why not. Interesting to note, I found out that early on there were several different types of cross head drivers and screws that were patented. Very interesting.
He clearly doesn't live in the rust belt
Lol where’s the rust belt? It sounds like where bad mechanics go when they die.
@@ChrisMosesBrownMind basically anywhere in the Upper Midwest especially Michigan where the salt is so bad the only thing that keeps some people from having a Flintstone car is the placemat
Bacardi Jr. 🤣🤣🤣
Bacardi Jr. Thanks! Never too old to learn!
@Semper Fi all the pickups 1980s up have toasted missing floorboards alot. in the real rust belt here..
Impact screw driver worked partially for me, it broke two #3 Philips impact bits trying to remove the set screws. I even tried heat and that didn’t work so I ended up having to drill them out. But it did work on maybe 2 out of the 8 set screws. Sometimes rust wins
I wish I saw this before inserting my Phillips head screw driver and impact screwdriver. RUclips algorithm, you let me down.
Now these are the gems I’ll hold forever and tell everyone and their mother 🤣 I’ve struggled with Honda bolts this just made sense perfect 🤌🏾
Use a regular screwdriver or regular impact drill with regular Phillips head on it. Just put a rubber band on top of the screw head before you put the screwdriver in. It will fill all the gaps and add more grip
you can replace the screws with different head and same tread. There are screws with hex hole in the head which allows to use Alen keys. Available at hardware store.
I actually found a low profile head hex head fastener that's the same length, pitch, bevel, and class as the OEM Honda screws. You could use a 1/4" ratchet and a small socket and unscrew it right out. The problem is that they were 3x more expensive than the OEM ones from Honda.
No needs cuz you don't need them anymore. Toss the sucker and never worry about it again...ever!
Re install the lugs nuts backwards apply anti seize to the threads dont over tighten also you can use an impact driver that you hit with a hammer i have found that re istalling the lug nuts backwards works quite well
Very good information. Thank you for creating this video. And for inspiring a few good comments.
YOU ARE A HERO!
Thanks for the tip. I bought the screwdriver and it is fantastic!
Good job explaining the difference. I just stumbled on this video, very informative. It sounds like you're chewing on a sponge though. Still well put
The linked screwdriver at Amazon is listed as a P3x150. A Phillips, not a JIS.
It fits both.
Most Phillips drivers these days are ISO/DIN anyway, which is functionally identical to JIS. The ISO/DIN standard falls within the allowable variance of JIS, with tighter tolerances. In fact they're so similar that JIA withdrew JIS B 4633 ("Screwdriver for cross recessed head screws") in favor of ISO 8764-1.
@@Azlehria Good info, thanks.
Just did this last night... Used an impact driver to start, 13 year old screws just don't wanna budge, good to know those were NOT Phillips... We ended up drilling it since those screws really are not needed but it was a painful process to say the least :'(
Thank you for the video!
StudioVRM you are a life saver! I didn't buy the right tool I just ground off the tip of a regular screw head and it worked like a charm, getting off a rotor on my 2001 Honda which hasn't been replaced since it left the factory without any problems. I don't know what I would have done if I had not watched this great video.
Very educational. Thank you for sharing.
This kinda worked, i stripped one screw and had to drill it out, the second time I hammered for like 15 min, no movement, was about to drill it out, then i gripped the handle with both my hands and twisted the screw out, so it did work on the second screw.
pencil blowtorch, and centre pot punch, one strike on horizontal to provide location, then undo with pin punch struck downwards in anti clockwise direction, mine had threadlock on too,job done, then throw them away
Is it weird that I drilled these out yesterday on my wife's Element and then see this today? They were already way stripped out though. I didn't know that about those screws though. So thank you.
It's not weird!!! It's Google in your head and Fucking with you!!!
I found this out the hard way. Had to drill the screw out. But I did change the screwdriver bit. Sprayed it with wd and it came out.
When i got to the US i couldn't believe this wasn't common knowledge! motorcycle tech turned car tech. lol
I just did a set of brakes on an odyssey. Use an electric impact and a #1 philips bit. Worked great.
I have an easy way to get them off and you can reuse the screw: 1. Spray with penetrating oil (or WD-40). 2. Use a 2mm drill bit like he showed, and just drill in 4-5 mm - you don't have to go that deep. 3. Take a socket that has a small 3 mm square or hex drive bit and hammer it in the drill hole (just a few taps and it's in). 4. Gently apply pressure and turn the socket wrench to the left. Out it comes, every time. This works on Kia and Hyundai as well as other models. For BMW and other "Allen Head" screws use a larger diameter torx bit (and drill and hammer that in). Easy peasy.
WD-40 is NOT a penetrating oil! Just so ya' know.
@@james1795 James, notice the "OR"... I have both penetrating oils, and WD-40. I find both are helpful, but penetrating oils are superior. But if you have WD-40 (as everyone does) you can use that too. Thanks, Tom the Switz
@@TheSwitzAutomotive. Duhh???...I noticed the "or" when I first read your comment. I'm sorry I ruffled your sensitive feathers. You can calm down now, no one will think you are some kind of a dummy.
PS. Which "both" penetrating oils do you have?.
I just did this yesterday and drilled it out like a boss. I didn't even attempt to unscrew it.
Xanhorn yeah.... Skip the foreplay. ...👍
LuLz
I have a set of vessel "Philips" screw bits. I use the #3 bit in a generic hex bit holder that's 1/4" drive. I attach that to two adapters up to 1/2" drive, and stick the whole assembly onto a impact gun. Works excellent.