can you guys ship me one? In argentina we still have a tax made by our last government, the one I found here is $327 (of course you'll understand I'm only joking I dont want anyone to send me stuff
@@thelightdesigner4490 pretty sure graphics cards do unless you use your cpu to render which is not smart for people with small cpus. Most of the time it is a lot smarter to use your graphics card to render which means that a better graphics card will decrease your render times by a lot.
This was amazing. I never thought something so cool could come out of a 2D picture in just over 5 minutes. I will watch all of your tutorials, Blender Guru.
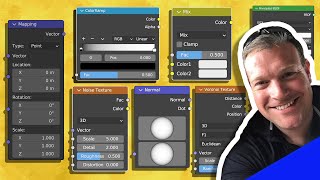
To Add to Hotoke: 1) switch the render engine to "Cycles Render" (dropdown at the top of the window, default is "Blender Render") 2) add a new material (right side of the window, checkered sphere; if you don't see it use the mouse wheel to scroll through the available options) 3) switch to the Node Editor (you can add another viewport by dragging the bottom left edge of the current one; switch editor type via drop down at the bottom left of the viewport) 4) add textures and shaders (Shift + A hotkey or use menu) 5) unwrap the plane or you won't see the texture (select plane via right click, enter "Edit Mode" via Tab, select all via A, press U and select "Unwrap") Proceed similiarly with the sphere (material "Surface" need to be set to "Emission"). NOW WE CREATING A BUMP MAP Import original Texture.jpg file into photoshop Convert to grey scale Play with levels to make moderatley contrasted image (render will read darks as dips and white as bumps) Save as Texture_Bump.jpg Go back to node editor Shift A/Texture/Image Texture/Open File/Texture Bump.jpg (switch color to non color data) Shift A/Vector/Bump Connect the image texture color to the bump height Then on the right side of the bump, connect the normal purple circle to the normal circle of the diffuse and glossy shader NOW WE CREATE A REFLECTION (OR SPECULARITY MAP: which parts are shiny and which parts are not) Again, add the Shift A/Texture/Image Texture/Open File/Texture Reflection.jpg (switch color to non color data) Connect this to the FAC of the Mix shader NOW WE CREATE A DISPLACEMENT MAP (Creates large scale details by distorting the geometry of the model) We first have to subdivide the plane (why? no idea) Click on plane/ Tab to get into edit mode Hit w/subdivide/number of cuts: 100 click wrench/add modifier/subdivision surface/change view to 3 and render to 3 Change levels so that the Texture.jpg is now like high contrasted, save as Texture_Displacement Add Modifier/Displace/Click Texture: + New Now go to the checkerboard tab (its right next to the checkered circle) Click the Image Texture and scroll down to change to the Displace (has a weird triangle thing next to it) Now go down to Open/Texture_Displacement.jpg (he does not show this in the video) Go back to wrench tap and adjust strength of displacement to something low like .002 Once you click out of edit mode, you should see a more modeled surface RENDERING TAKES FOREVER
This video 6 years ago changed my life and is the reason I work in visual effects today. Algorhythm gods decided to send me a throwback haha. Anyway don't know if you'll ever ready this but thanks a lot andrew.
A huge 'thanks' for sharing all of your excellent tutorials - I was about to give up on Blender until finding them. I learn more from a few minutes of watching one of your videos than I would from a week of experimentation. They are clear, concise and very well thought out... please keep up the fantastic work, I'm sure there are thousands like me who find them invaluable.
Important note: if you are applying subdivision modifier to a NON-PLANE object, blender will probably get rid of the edges. For textures porpouse, only use SIMPLE subdivision, not Catmull-Clark.
I'm brand new to Blender... and found this *very* helpful! I'm in 2.93 and the only hiccup I could find was getting the emission to display! turns out I had to switch it to cycles... everything else is still pretty much similar enough to follow!!! thanks again!
how did you get nodes to work for you because for some reason the texture node editor isn't working I cant seem to figure out why, did this happen to you if so, how did you fix it?
I often find that the use of a gloss or roughness map can be more important than a spec map. Spec maps are better utilized per blend in physical material (rust, moss, etc) while roughness should be used for things such as scratches, smudges and polish. I would recommend to anyone trying to create realistic textures to convert their workflow over to PBR (personally prefer the metal approach.)
I'm just about as novice as it comes regarding Blender. I only picked it up and used it about a total of a week. I've seen lots of people complaining about it not being beginner-friendly. While it's true that this video is obviously for people familiar with the program... I've paused plenty of times, googled a few quick things like (shift+z) previewing render and, though it took paying close attention to the settings used but not mentioned, I followed it just fine. It takes some work but I've learned a massive amount of tricks in a short period of time thanks to this video.
Oh my god that website is heaven to me now I am definitely going to take the premium version after some more experience with the site. Also the response time is soooooo good and friendly 💓Thank you for this Andrew Price....
No reason to dislike this video, I'm still in High School but I'm sure that you also saved a lot of time to people studying something related to 3D modeling... Thank you for this video, it helps a lot!
Missed an important step at 3:17 - adjusting the strength and distance of the bump node. My renders turned out really dark and I couldn't figure out why. Adjusting to those values helped. Great tutorial anyway!
As someone who's been living and breathing Adobe After Effects for the last year and a half, the best compliment I can think of is to say that you are Blender's Kramer to me!
Thank you SOOOOOOOOOOO much for all of your tutorials but especially this one. This tutorial has really inspired me to do lots more texturing and cool lighting and I am so thankful that this channel exists =D
I watched Realistic Texturing 2 years ago and today, then watched this. This video is so awesome, it's like an update of that video made simple and fast. I think this is pretty exciting. Hectic!
Andrew, I sincerely want to thank you. I mess around with Blender, to learn and to hopefully model good enough for my 3 printer. I chose the tools because I can't afford a proper education and have a career right now. I have always been frustrated with texturing, because what I see in my mind, doesn't translate great to rending. This is another learned skill. Thank you again! I liked and subscribed!
***** I did the tutorial with great success. However, I am having issues applying textures to a new model, not plane, a mesh of a knife I created. Any general thoughts? It is unwrapped and the blade and handle have separate assignments. I can't think of why it is not working. Same steps followed. Feel free to contact me on hangout, if you are willing to help. Thanks.
Andrew, Thank you for not using CrazyBump in this tutorial. I was really annoyed when the creator locked out all the free versions and added a hefty price tag. Although, a spinoff program, Insane Bump, does an ok job. Thanks for all the great tutorials!!!
PowerSports420 Remember guys, that nobody wants to work for free. How do you eat and pay the rent? If the author offered it for free before and now does not anymore, you can reasonably criticize him for that, it just does not make sense. Andrew offers his tutorials for free, but he does not HAVE TO. Sometimes people cannot offer things for free anymore, because they need money and maybe don't get any appreciation for having done it for free before. You have to realize that all content creators face a lot of free loaders that instead of saying thank you for free content, they criticize and moan, which turns somebody off from giving stuff for free. Modesty and being grateful for other peoples work is a very important virtue in every human.
Just thought I would share quick tip so other intro-level users do not get stumped for hours as i did. If you do not have any nodes in your node editor after creating your inital mesh, ensure that the drop-down menu at the top of your screen is set to 'Cycles Render' as mine defaulted to 'Blender Render'. Also ensure that the 'Use Nodes' option in the bottom toolbar next to your selected material is checked.
and I found more. "Live Normal" in Android Store(maybe iPhone too). You can make maps in anywhere with your Smartphone!!! It is the magic. fountain of inspiration. (Con:it is really heavy calculating app. high-end device only)
Moved away from Blender few years ago, but i watched all the tutorial to remember the good old days of waiting all night long to render that 3 sec animation that always lacked realism :). Nice to see you are still making blender tutorial Andrew .
My textures are all grainy. I have increased the sampling, but it makes no difference. I think I've narrowed it down to an issue with the bump node, but tweaking still gives bad, pixely results.
What a brilliant tute. Just getting into Blender, about to slap some downloaded textures onto blocks, then I saw this, and no third-party tools except Photoshop. Wicked stuff!!!
This is my go to reference when I wanna remember all details of the basics of texturing/rendering, glad to see it's still a strong video. For some reason, with a different texture, my bump map seems to mix with the diffuse and turn grey even though it's set not to use colour data from the bump map texture image :/ What could the problem be?
***** hey Andrew, when i try to uv unwrap my mesh, blender hangs and become unresponsive. the mesh has nearly 35000 faces. it is a subdivided sphere which i used for sculpting. but if i first unwrap the sphere and then subdivide it, and it doesn't hang this time. so is this the right way to do uv unwrapping ?
***** Fascinating. Background: I make programming tutorials on my channel. It's how I make my living. I have no problem with Andrew monetizing or marketing. Good on him. However, I can't fathom the audacity to tell someone to cancel a series. Everything is a remix. People watch my tutorials because they connect with me. They like the way I speak, or I'm best at explaining things in a way that they understand. This is why I've never been afraid of all these venture capital backed online education sites. I think some content creators believe they're analogous to big tech companies like Apple and Samsung. When in truth we're all just a bunch of local restaurants. Just because there's a grocery store in the neighborhood doesn't mean you can't open a successful restaurant in the area. My thoughts.
Thank you! I'm entering into a 3d competition, and before, I only knew how to use diffuse textures and normal maps, but now I'm able to make MUCH more realistic textures. Thank you again!
Every video of yours that I have watched always inspired me and gaved me new ideas. Every little boring details of your videos really helps me a lot. I know this is a old video, but keep it up.
Hey, I'm all for fast, short and concise tutorials, but you've skipped a critical step: changing the render engine to CYCLES RENDER... You still need to specify this "obvious" detail as stoopid Blender (even the latest version) doesn't use it by default... To do this, open a new Blender project, change the Engine to Cycles Engine, then in the render section (on the right) select GPU Compute. Then File > Save Startup File (Ctrl + U). That's it!
The problem with a lot of textures (including this one) is that bright doesn't always mean "up" in the original that is converted into a bump map. You can see that some of the crevices are whiter than the tile surface, so in the render some of the "crevices" seem to stick out. To avoid this, you should probably either make some corrections by hand, or in this particular case copy the "correct" squares over the "inverted" ones for the bump (and probably specularity) map. What I'm trying to say is that often it's not enough to just convert the original into black & white and adjust the levels because light might have behaved in all kinds of ways in the original image (and was almost certainly different from the light we are using in our scene).
I feel like a pro right now, this is the first time that i open blender and i could do everything xD it took me like half hour but was worth it, good tutorial c: i subscribe.
You'll need to invert the gloss map and feed it to the principled shader's roughness setting. That's about it. You can also plug in the displacement map to the material output node instead of using a modifier, but the modifier still works.
RSpudieD To add the texture like in the video you need to 1) switch the render engine to "Cycles Render" (dropdown at the top of the window, default is "Blender Render") 2) add a new material (right side of the window, checkered sphere; if you don't see it use the mouse wheel to scroll through the available options) 3) switch to the Node Editor (you can add another viewport by dragging the bottom left edge of the current one; switch editor type via drop down at the bottom left of the viewport) 4) add textures and shaders (Shift + A hotkey or use menu) 5) unwrap the plane or you won't see the texture (select plane via right click, enter "Edit Mode" via Tab, select all via A, press U and select "Unwrap") Proceed similiarly with the sphere (material "Surface" need to be set to "Emission"). Hope that helps!
For some reason when i add the sphere put the emission and all... the light effect is not the same as his.. its like it spreads light everywhere ??And its very noisy like, and it colors my whole floor in blue.
If you still are doing this, what I did was what igitpu33i mentioned, however all i added was a mix shader between the glossy bsdf and the bump. That seemed to fix it.
Hey guru I've actually been having a problem trying to find several nodes that you have used in the video. I am not sure if its because of the updates or what but if you can, do you think you can let me know how I can find them. I think the changes made to the software is causing confusion.
it's because you need to add a new material or texture (with blender it's usually done at the same time) depending on what you want to do. If you just create a plane and go to the rendered view it'll just be gray.
Another slightly-unrelated tip is that you don't need to bother with UVs if you use the object position from the texture coordinates node. If you plug it into a mapping node you can control the scale of the texture. Assuming you've applied the scale with ctrl+a you may not need to adjust it with a mapping node, but it's good to use one since I find my textures always come out a bit large. This works great for floors and walls, though for walls you'll need to use two separate materials with different rotations applied at the mapping node.
I think that's still in the process of being determined. If you sign up with CGFort to get notifications you're sent an email that takes you to a survey. In the survey you're given multiple choices of how much you'd pay for a subscription, etc.
***** I'm assuming he took the photos himself, as he usually does with textures. However, I agree, you can get free textures easily off other places, and I'd rather spend some time making these textures myself from the diffuse instead of paying money for it.
I'm coming from video world and just started learning basics of Blender few days ago. This is the technique and exact result I was looking for and it's even simpler then I expected. I just didn't know how to call it, where to look for it :) You're Andrew Kramer of Blender! Awesome video.
Shaders have changed, now instead of BSDF with only 4 options, we have Principled BSDF which has all the options you'd ever need for creating a texture, it also applies Fresnel automatically. If you wanna use this tutorial on the new Principled BSDF shader, connect the texture image (albedo) to the base color, connect the roughness map to the roughness panel, and connect the bump map to the "height" panel on a bump node which you need to add, then connect that bump node to the normals panel on Principled BSDF. Remember to use Non-color for both the roughness and the bump map :)
Same here. Looks nothing like in the tutorial. Just a grainy mess on the tiles. EDIT: I think I've traced it to the connection between the bump node and glossy node. That just makes the tiles really noisy/grainy.
For all of the future beginners of Blender and happen to stumble upon this Tutorial...You must be in Cycles Render mode to fully use the Node Editor...I hope this helps.
Oeuf, I have to agree with the other recent comments here, in the current time 2.8/2.9 this tutorial is severely outdated. A lot of the mechanics you mentioned are already a part of blender by default like Principled BSDF and everything in the interface is so drastically different, that it's unfollowable for someone new trying to learn how to use the software. Though those with experience in blender for a while can still follow a little bit, but the workflow could be more smoother with the newer updates.
i'd like a day if you can do a tutorial about bake , create a model and bake it , becouse i did a weapon but i have a lot of problems on bake ... and i can't find tutorials about that..
I've never been a fan of people calling Normal Maps, Bump Maps. They don't actually add bumps to the surface, they only add the illusion of bumps by playing with the normal vectors along the surface. Displacement/Height Maps on the other hand, they can create bumps on the surface by changing the position of the vertices. Shoot, even that Bump node that you use has an output that's been named Normal because that's what it generates. I know that the reason for this is because we started using normal maps to add (the illusion of) bumps on surfaces well before we had the ability to tessellate and displace new vertices with a Height Map. And, by that point, we were already stuck referring to Normal Maps as Bump Maps. I just really wish that the term "Bump Map" would die off so that we could have a clear distinction between Normal Maps and Height Maps. Although, I should probably refer to Height Maps as Displacement Maps simply because new technology is now able to displace the verts along all three axes instead of just the normal axis.
You blast through the first few stages without any explanation of what you're actually doing in each stage. I'm new to Blender (after using Max, Maya and LightWave for 15 years) and I literally have no idea what you're doing. It's a combination of the speed you go through it at, and the terrible interface in Blender. Please. Do another one of these, but slowly and with an explanation of what you're doing and pressing.
I know this is three years late, but this video isn't meant to teach you how to use blender, but how to make good textures. If you don't know what he's doing with the material nodes, go watch his material node video in the beginner series.
+PhazonSouffle This is more along the lines of FreddyWong's videos for After Effects, it's the basics of how to get a good texture, assuming you know the program. If you don't know the program, you should probably find other tutorials for that first, no offense.
+PhazonSouffle Indeed, this is for people who already know how to use Blender. For me in my case, this video helped me tremendously because before I only knew how to paste an image to an object (as he described early in the video), but since I also know nodes, UV unwrapping, etc., this video really improved my render. I think that was more the intention, not "A Beginner's Guide to Advanced Texturing".
+PhazonSouffle I agree. I added the plane and did the UV unwrap, then struggled to get that second panel, then when I switched to the node editors there were no default shaders and shift-A wouldn't add textures. I got lost and just gave up from following this tutorial. It should not be as rushed as it is.
Maker Linux Again, this was not intended to be "A Beginner's Guide to Advanced Texturing". Learn how to use the program first, then learn how to texture objects, then learn what cycles is, then learn how to use nodes, then come back to this video and I guarantee it will help you.
I am sorry, your skills are very good as we as the video but as a tutorial it is very hard to follow up. For example, in minute 1:36 you open the node editor and there are already a couple of nodes and in my blender they don't show up... If I were supposed to know how or when to make them, then I am screw because I don't know how nor when. So thanks for nothing.
Texturing was one of the main reasons I went to Modo and Blender with Cycles was already far more friendly and usable than the Hyper Shader (hate that thing with a passion) or the 3DS Max Material Editor; I know many people despise Modo's shader tree but when you know how it works (and it's basically as siimple as Photoshop layers) it's a breezeto use. The load of preset materials that come with Modo, is an ieal starting point or save you a lot of time for a quick previs. And when you think UV unrwapping is simple in Blender (and it is very good in Blender) than you are smiling when you use Modo. And the whole tweaking in Photoshop that Andrew explained here so well is done automagically in Modo when you take your diffuse and duplicate it and turn it into a bump or reflection or displace. I wish though that Modo had a project from view that is as simple as Blender where you don't need camera projection and bake unwrap and bake the diffuse out -- or simply keep a dozen projection cameras for each card in your scene without moving them.
Little tip for people who don't have there textures applying properly. Get an Texture Coordinate node, and link Generated to Vector, on all the Image Textures.
***** Holy texture! I really like your new style of tutorial. Informative, easy to understand and short enough to keep the viewers with short attentionspan(aka. Me). And the music, just a wonderful touch. Very good job Andrew!
This tutorial is great. Just one thing I missed at first, your environment texture is helluh darker than default, that helped alot. Now if I could just figure out how to bake in cycles so I can use it for Unreal Engine 4 lol


Nice Tutorial. I mean, the displacement map almost destroyed my computer, but other than that nice tutorial
Jaden Fox time to throw in $1200 for a 2080ti
A 1050 ti only costs around $150 so I highly recommend it.
can you guys ship me one? In argentina we still have a tax made by our last government, the one I found here is $327 (of course you'll understand I'm only joking I dont want anyone to send me stuff
@@thelightdesigner4490 pretty sure graphics cards do unless you use your cpu to render which is not smart for people with small cpus. Most of the time it is a lot smarter to use your graphics card to render which means that a better graphics card will decrease your render times by a lot.
@@thelightdesigner4490 they do.If they don't affect blender,then why is there a segment dedicated to rendering gpu in the preferences?
This was amazing. I never thought something so cool could come out of a 2D picture in just over 5 minutes. I will watch all of your tutorials, Blender Guru.
To Add to Hotoke:
1) switch the render engine to "Cycles Render" (dropdown at the top of the window, default is "Blender Render")
2) add a new material (right side of the window, checkered sphere; if you don't see it use the mouse wheel to scroll through the available options)
3) switch to the Node Editor (you can add another viewport by dragging the bottom left edge of the current one; switch editor type via drop down at the bottom left of the viewport)
4) add textures and shaders (Shift + A hotkey or use menu)
5) unwrap the plane or you won't see the texture (select plane via right click, enter "Edit Mode" via Tab, select all via A, press U and select "Unwrap")
Proceed similiarly with the sphere (material "Surface" need to be set to "Emission").
NOW WE CREATING A BUMP MAP
Import original Texture.jpg file into photoshop
Convert to grey scale
Play with levels to make moderatley contrasted image (render will read darks as dips and white as bumps)
Save as Texture_Bump.jpg
Go back to node editor
Shift A/Texture/Image Texture/Open File/Texture Bump.jpg (switch color to non color data)
Shift A/Vector/Bump
Connect the image texture color to the bump height
Then on the right side of the bump, connect the normal purple circle to the normal circle of the diffuse and glossy shader
NOW WE CREATE A REFLECTION (OR SPECULARITY MAP: which parts are shiny and which parts are not)
Again, add the Shift A/Texture/Image Texture/Open File/Texture Reflection.jpg (switch color to non color data)
Connect this to the FAC of the Mix shader
NOW WE CREATE A DISPLACEMENT MAP (Creates large scale details by distorting the geometry of the model)
We first have to subdivide the plane (why? no idea)
Click on plane/ Tab to get into edit mode
Hit w/subdivide/number of cuts: 100
click wrench/add modifier/subdivision surface/change view to 3 and render to 3
Change levels so that the Texture.jpg is now like high contrasted, save as Texture_Displacement
Add Modifier/Displace/Click Texture: + New
Now go to the checkerboard tab (its right next to the checkered circle)
Click the Image Texture and scroll down to change to the Displace (has a weird triangle thing next to it)
Now go down to Open/Texture_Displacement.jpg (he does not show this in the video)
Go back to wrench tap and adjust strength of displacement to something low like .002
Once you click out of edit mode, you should see a more modeled surface
RENDERING TAKES FOREVER
Cool
This video 6 years ago changed my life and is the reason I work in visual effects today. Algorhythm gods decided to send me a throwback haha. Anyway don't know if you'll ever ready this but thanks a lot andrew.
4:46 is a point where I always go back to.
A huge 'thanks' for sharing all of your excellent tutorials - I was about to give up on Blender until finding them. I learn more from a few minutes of watching one of your videos than I would from a week of experimentation. They are clear, concise and very well thought out... please keep up the fantastic work, I'm sure there are thousands like me who find them invaluable.
Important note: if you are applying subdivision modifier to a NON-PLANE object, blender will probably get rid of the edges. For textures porpouse, only use SIMPLE subdivision, not Catmull-Clark.
8 years later and this video is still helping! Thanks
I'm brand new to Blender... and found this *very* helpful! I'm in 2.93 and the only hiccup I could find was getting the emission to display! turns out I had to switch it to cycles... everything else is still pretty much similar enough to follow!!! thanks again!
how did you get nodes to work for you because for some reason the texture node editor isn't working I cant seem to figure out why, did this happen to you if so, how did you fix it?
Amazing. After 4 years of messing with Blender, you still taught me something new. Thanks
you're the best ♥
No u! Sorry I wanted to reply. You wrote this 4 years ago...
Agreed
I am looking for the basics of texturing in Blender and this is the first result. This is 2022 and this video is still the best explanation, thanks!
I often find that the use of a gloss or roughness map can be more important than a spec map. Spec maps are better utilized per blend in physical material (rust, moss, etc) while roughness should be used for things such as scratches, smudges and polish. I would recommend to anyone trying to create realistic textures to convert their workflow over to PBR (personally prefer the metal approach.)
***** You can use any program that will get the same results. I believe there are levels in gimp.
I'm just about as novice as it comes regarding Blender. I only picked it up and used it about a total of a week. I've seen lots of people complaining about it not being beginner-friendly. While it's true that this video is obviously for people familiar with the program... I've paused plenty of times, googled a few quick things like (shift+z) previewing render and, though it took paying close attention to the settings used but not mentioned, I followed it just fine.
It takes some work but I've learned a massive amount of tricks in a short period of time thanks to this video.
This made a massive difference to my texturing THANK YOU AGAIN!
Man, this tutorial on texturing explains the whole deal a lot better than the part in the doughnut tutorial. Thanks a lot!
Oh my god that website is heaven to me now I am definitely going to take the premium version after some more experience with the site. Also the response time is soooooo good and friendly 💓Thank you for this Andrew Price....
No reason to dislike this video, I'm still in High School but I'm sure that you also saved a lot of time to people studying something related to 3D modeling... Thank you for this video, it helps a lot!
Missed an important step at 3:17 - adjusting the strength and distance of the bump node. My renders turned out really dark and I couldn't figure out why. Adjusting to those values helped. Great tutorial anyway!
As someone who's been living and breathing Adobe After Effects for the last year and a half, the best compliment I can think of is to say that you are Blender's Kramer to me!
Thank you SOOOOOOOOOOO much for all of your tutorials but especially this one. This tutorial has really inspired me to do lots more texturing and cool lighting and I am so thankful that this channel exists =D
I watched Realistic Texturing 2 years ago and today, then watched this.
This video is so awesome, it's like an update of that video made simple and fast.
I think this is pretty exciting.
Hectic!
Me: *applies displacement map*
My computer: "SO YOU HAVE CHOSEN DEATH"
Andrew, I sincerely want to thank you. I mess around with Blender, to learn and to hopefully model good enough for my 3 printer. I chose the tools because I can't afford a proper education and have a career right now. I have always been frustrated with texturing, because what I see in my mind, doesn't translate great to rending. This is another learned skill. Thank you again! I liked and subscribed!
***** I did the tutorial with great success. However, I am having issues applying textures to a new model, not plane, a mesh of a knife I created. Any general thoughts? It is unwrapped and the blade and handle have separate assignments. I can't think of why it is not working. Same steps followed. Feel free to contact me on hangout, if you are willing to help. Thanks.
Me: Subdivides the plane by 100.
Computer: What the cuz?
My computer: Wha-
My laptop: AÆÆÆĒËÅÆ
So simple and useful tutorial i don't even know what to say except BRAVO MY GOOD MAN, BRAVO!
Andrew,
Thank you for not using CrazyBump in this tutorial. I was really annoyed when the creator locked out all the free versions and added a hefty price tag. Although, a spinoff program, Insane Bump, does an ok job.
Thanks for all the great tutorials!!!
I disagree.
PowerSports420 Remember guys, that nobody wants to work for free. How do you eat and pay the rent? If the author offered it for free before and now does not anymore, you can reasonably criticize him for that, it just does not make sense. Andrew offers his tutorials for free, but he does not HAVE TO. Sometimes people cannot offer things for free anymore, because they need money and maybe don't get any appreciation for having done it for free before. You have to realize that all content creators face a lot of free loaders that instead of saying thank you for free content, they criticize and moan, which turns somebody off from giving stuff for free. Modesty and being grateful for other peoples work is a very important virtue in every human.
get shader map
just pirate it lol
Just thought I would share quick tip so other intro-level users do not get stumped for hours as i did. If you do not have any nodes in your node editor after creating your inital mesh, ensure that the drop-down menu at the top of your screen is set to 'Cycles Render' as mine defaulted to 'Blender Render'. Also ensure that the 'Use Nodes' option in the bottom toolbar next to your selected material is checked.
My computer already cried when he says
"Subdivide by 100"
8 years later and this is still sooo helpful!
today, we can use "Materialize".(bounding box software)
it is the super cool freeware to make the entire maps flexibly from one picture.
and I found more.
"Live Normal" in Android Store(maybe iPhone too).
You can make maps in anywhere with your Smartphone!!!
It is the magic. fountain of inspiration.
(Con:it is really heavy calculating app. high-end device only)
I use Materialize, and it works as well
Moved away from Blender few years ago, but i watched all the tutorial to remember the good old days of waiting all night long to render that 3 sec animation that always lacked realism :). Nice to see you are still making blender tutorial Andrew .
My textures are all grainy. I have increased the sampling, but it makes no difference. I think I've narrowed it down to an issue with the bump node, but tweaking still gives bad, pixely results.
+Nathaniel Le Sage same
+Nathaniel Le Sage did you solve it? I have the same problem u.u
Kotsenre K Yes, but in a different project.
+Nathaniel Le Sage I also have that problem
Try increasing the clamp value (next to samples in the menu).
What a brilliant tute. Just getting into Blender, about to slap some downloaded textures onto blocks, then I saw this, and no third-party tools except Photoshop. Wicked stuff!!!
For some reason, this image made me want to go play Portal. Great tutorial!
This actually seriosly helped me alot with my renders. Ive only started blender 2 months ago and now i can make this stuff! Thanks @Blender Guru!
i dont know what happened but i for some reason cant use nodes and couldnt find anything online to help me
@@81fiths mind giving me more detail about your problem
This is my go to reference when I wanna remember all details of the basics of texturing/rendering, glad to see it's still a strong video.
For some reason, with a different texture, my bump map seems to mix with the diffuse and turn grey even though it's set not to use colour data from the bump map texture image :/ What could the problem be?
The new "Style" for Tutorials is awesome! Its Short and you can learn everything you want to know! Far better than the old Texture Tutorial :)
the sad thing my floor in my house dosent have bumps its literally a flat picture painted on to some material
man call the builder and make him add displacement... or else
i find myself coming back to this video again and again, its so helpful
***** Don't forget to add the so CGFort is clickable in the description.
***** hey Andrew, when i try to uv unwrap my mesh, blender hangs and become unresponsive. the mesh has nearly 35000 faces. it is a subdivided sphere which i used for sculpting. but if i first unwrap the sphere and then subdivide it, and it doesn't hang this time. so is this the right way to do uv unwrapping ?
***** Go on... I'm curious. What has Andrew done?
***** Fascinating. Background: I make programming tutorials on my channel. It's how I make my living. I have no problem with Andrew monetizing or marketing. Good on him.
However, I can't fathom the audacity to tell someone to cancel a series.
Everything is a remix. People watch my tutorials because they connect with me. They like the way I speak, or I'm best at explaining things in a way that they understand.
This is why I've never been afraid of all these venture capital backed online education sites.
I think some content creators believe they're analogous to big tech companies like Apple and Samsung. When in truth we're all just a bunch of local restaurants. Just because there's a grocery store in the neighborhood doesn't mean you can't open a successful restaurant in the area.
My thoughts.
***** you do know someone could have stolen his texture and put it on google, right?
Wild Academy I clicked edit mode and unwrapped my plane but nothing appears in Node Editor, please explain more!!
Thank you! I'm entering into a 3d competition, and before, I only knew how to use diffuse textures and normal maps, but now I'm able to make MUCH more realistic textures. Thank you again!
2:15 "WHOA THAT LOOKS SUPER REALI-oh it's an actual picture"
or is it???
@@Jarsia *vsauce music plays *
Every video of yours that I have watched always inspired me and gaved me new ideas. Every little boring details of your videos really helps me a lot. I know this is a old video, but keep it up.
Hey, I'm all for fast, short and concise tutorials, but you've skipped a critical step: changing the render engine to CYCLES RENDER... You still need to specify this "obvious" detail as stoopid Blender (even the latest version) doesn't use it by default... To do this, open a new Blender project, change the Engine to Cycles Engine, then in the render section (on the right) select GPU Compute. Then File > Save Startup File (Ctrl + U). That's it!
The problem with a lot of textures (including this one) is that bright doesn't always mean "up" in the original that is converted into a bump map. You can see that some of the crevices are whiter than the tile surface, so in the render some of the "crevices" seem to stick out. To avoid this, you should probably either make some corrections by hand, or in this particular case copy the "correct" squares over the "inverted" ones for the bump (and probably specularity) map. What I'm trying to say is that often it's not enough to just convert the original into black & white and adjust the levels because light might have behaved in all kinds of ways in the original image (and was almost certainly different from the light we are using in our scene).
Ohhh. I really need a node editor tutorial. I'm confused when trying to do this :v
Not only a well written tutorial, but also fascinating to watch for the passer-by. Great stuff!
thanks - great tutorial. I had an "Aha" moment! Thanks again :)
I feel like a pro right now, this is the first time that i open blender and i could do everything xD it took me like half hour but was worth it, good tutorial c: i subscribe.
So how do we do this with the new principled BSDF shader instead of 2 separate diffused/glossy nodes?
You'll need to invert the gloss map and feed it to the principled shader's roughness setting. That's about it. You can also plug in the displacement map to the material output node instead of using a modifier, but the modifier still works.
Your tutorials always teaches me alot
I've been thinking recently that I need to learn this, and poof, here it is.
Love the pace of the video.
you go way too fast in this. I'm stuck at the "add texture" thing, and I can't seem to find it
RSpudieD I've got the same problem :/ Should've explained it more detailed :/
RSpudieD To add the texture like in the video you need to
1) switch the render engine to "Cycles Render" (dropdown at the top of the window, default is "Blender Render")
2) add a new material (right side of the window, checkered sphere; if you don't see it use the mouse wheel to scroll through the available options)
3) switch to the Node Editor (you can add another viewport by dragging the bottom left edge of the current one; switch editor type via drop down at the bottom left of the viewport)
4) add textures and shaders (Shift + A hotkey or use menu)
5) unwrap the plane or you won't see the texture (select plane via right click, enter "Edit Mode" via Tab, select all via A, press U and select "Unwrap")
Proceed similiarly with the sphere (material "Surface" need to be set to "Emission").
Hope that helps!
Hotoke thank you!
+Hotoke Thank you very much! This was much more helpful than the entire video! (I didn't unwrap it and I didn't know where did I go wrong)
+Hotoke Thanks for that own little tutorial ;D
Just as a tip, you can just drag and drop the image into the node editor and it creates the image texture node with the image for you.
For some reason when i add the sphere put the emission and all... the light effect is not the same as his.. its like it spreads light everywhere ??And its very noisy like, and it colors my whole floor in blue.
Alexander Petrov You need to add a low rough glossy shader and indirect clamp to 3 to remove the noise. It's very easy
If you still are doing this, what I did was what igitpu33i mentioned, however all i added was a mix shader between the glossy bsdf and the bump. That seemed to fix it.
activate bloom in evee settings
Good luck on the texture site. It will be a godsend for so many people including me.
Great tutorial as always!!
Hey guru I've actually been having a problem trying to find several nodes that you have used in the video. I am not sure if its because of the updates or what but if you can, do you think you can let me know how I can find them. I think the changes made to the software is causing confusion.
+Tyler Gutierrez Change the "render" in the top middle to "Cycles Render" and add a material. Then u will get the nodes
+Max G Thank you so much
Max G It took me a while to notice what I had to do before you mentioned it but I appreciate the help man.
Tyler gutierrez do you know why my plane goes all colorless (in render view) once I add the normal?
it's because you need to add a new material or texture (with blender it's usually done at the same time) depending on what you want to do. If you just create a plane and go to the rendered view it'll just be gray.
Absolutely 100% helpfull tutorial... Thank you Mr. Andrew Price. You're the best blender tutor in the world.
plz help i unwrraped the plane but nothing happens in the node editor
Are you in cycles?
yeah but i have figured out the problem now
plss tell meee
You have to add a texture to it, it can be empty
I fixed it with adding a material for plane
Finally a simple (and quick) tutorial for those aspects of modeling I didn't really understand! Thanks :D
please answer:
my texture doesnt even show up on a plane. and its very bad render!
flat solid color? unwrap the object in edit mode
you gotta add a texture coordinate node then use a Mapping node to change how many times its tiled on the plane
@@Naara. thanks man :)
@@Naara. Dude, thanks a lot. It was getting pretty frustrating following all the steps without getting any of the same results.
Another slightly-unrelated tip is that you don't need to bother with UVs if you use the object position from the texture coordinates node. If you plug it into a mapping node you can control the scale of the texture. Assuming you've applied the scale with ctrl+a you may not need to adjust it with a mapping node, but it's good to use one since I find my textures always come out a bit large.
This works great for floors and walls, though for walls you'll need to use two separate materials with different rotations applied at the mapping node.
My displacement map doesn't line up with the texture and I'm confused.
make sure they have same mapping transform
@@yudhaxn1195 im a month late but still thanks
I love the format on this video *****, very slick.
Andrew, how much the textures will cost on CGFort?
I think that's still in the process of being determined. If you sign up with CGFort to get notifications you're sent an email that takes you to a survey. In the survey you're given multiple choices of how much you'd pay for a subscription, etc.
***** I'm assuming he took the photos himself, as he usually does with textures.
However, I agree, you can get free textures easily off other places, and I'd rather spend some time making these textures myself from the diffuse instead of paying money for it.
Andrew Price, Thanks for making this tutorial. I used this tutorial to help me create a ceramic tile image for my Typography class.
am I the only one who doesn't have photoshop??
You can get the crack
but be careful.... they're watching q ⚆ ᨓ ⚆ p
lol me I don't get allowance
Use Gimp Its free and guddd
Or use Krita.
Why not try the new Paint 3D? ( ͡° ͜ʖ ͡°)
Dude, this tutorial is your best one! Clear, neat, to the point....
The textures, my mortals enemy, we meet again!
I'm coming from video world and just started learning basics of Blender few days ago. This is the technique and exact result I was looking for and it's even simpler then I expected. I just didn't know how to call it, where to look for it :) You're Andrew Kramer of Blender! Awesome video.
Me: *does as he said
Blender: Let me make it look super weird and grainy!
Please make an updated version because of the UI changes
Shaders have changed, now instead of BSDF with only 4 options, we have Principled BSDF which has all the options you'd ever need for creating a texture, it also applies Fresnel automatically.
If you wanna use this tutorial on the new Principled BSDF shader, connect the texture image (albedo) to the base color, connect the roughness map to the roughness panel, and connect the bump map to the "height" panel on a bump node which you need to add, then connect that bump node to the normals panel on Principled BSDF.
Remember to use Non-color for both the roughness and the bump map :)
Here's a small explanation of the changed in shaders
ruclips.net/video/4H5W6C_Mbck/видео.html
Thank you!
@@LemonadeGoddess You're welcome buddy, keep on Blendering!
best video i ever seen yet in your video.short and meanful.thanks alot.
Doesn't work in 2.77a. I only get a crappy noisy render.
Same here. Looks nothing like in the tutorial. Just a grainy mess on the tiles.
EDIT: I think I've traced it to the connection between the bump node and glossy node. That just makes the tiles really noisy/grainy.
Just change the Distance value in the Bump node to 0, or something really small. I think the renderer has some bug over here
Removing the connection between the bump and glossy nodes has fixed it. Thank you.
Or just update to 2.78, problem fixed
Thanks. I'll have to redo everything from scratched anyway as I've messed up all the settings since lol
I love the sound of your voice. I just know it's gonna be a great tutorial.
*edit: never mind me I fucked up*
I tried it in blender 2.75a. the texture doesnt appear
( ´థ౪థ)σ
( ´థ౪థ)σ
( ´థ౪థ)σ
+TheWatcher _ I'm having the same problem
MrMeatStalker12 Videos & Commentary have you unwrapped it?
For all of the future beginners of Blender and happen to stumble upon this Tutorial...You must be in Cycles Render mode to fully use the Node Editor...I hope this helps.
Oeuf, I have to agree with the other recent comments here, in the current time 2.8/2.9 this tutorial is severely outdated.
A lot of the mechanics you mentioned are already a part of blender by default like Principled BSDF and everything in the interface is so drastically different, that it's unfollowable for someone new trying to learn how to use the software.
Though those with experience in blender for a while can still follow a little bit, but the workflow could be more smoother with the newer updates.
This just shattered my mind into a million pieces
i'd like a day if you can do a tutorial about bake , create a model and bake it , becouse i did a weapon but i have a lot of problems on bake ... and i can't find tutorials about that..
He made a tutorial about baking the textures :)
Yes but not about a weapon texture
o' rabbit What's the difference? Still a texture.
If you have to edit the texture in a program like photoshop and often apply that to the mesh ... it isn't the same thing
I've never been a fan of people calling Normal Maps, Bump Maps. They don't actually add bumps to the surface, they only add the illusion of bumps by playing with the normal vectors along the surface. Displacement/Height Maps on the other hand, they can create bumps on the surface by changing the position of the vertices. Shoot, even that Bump node that you use has an output that's been named Normal because that's what it generates.
I know that the reason for this is because we started using normal maps to add (the illusion of) bumps on surfaces well before we had the ability to tessellate and displace new vertices with a Height Map. And, by that point, we were already stuck referring to Normal Maps as Bump Maps. I just really wish that the term "Bump Map" would die off so that we could have a clear distinction between Normal Maps and Height Maps. Although, I should probably refer to Height Maps as Displacement Maps simply because new technology is now able to displace the verts along all three axes instead of just the normal axis.
You blast through the first few stages without any explanation of what you're actually doing in each stage. I'm new to Blender (after using Max, Maya and LightWave for 15 years) and I literally have no idea what you're doing. It's a combination of the speed you go through it at, and the terrible interface in Blender.
Please. Do another one of these, but slowly and with an explanation of what you're doing and pressing.
I know this is three years late, but this video isn't meant to teach you how to use blender, but how to make good textures. If you don't know what he's doing with the material nodes, go watch his material node video in the beginner series.
Old but gold..still working.
This isn't very good for beginners. You made sweeping steps without explaining the details.
+PhazonSouffle This is more along the lines of FreddyWong's videos for After Effects, it's the basics of how to get a good texture, assuming you know the program. If you don't know the program, you should probably find other tutorials for that first, no offense.
+PhazonSouffle Indeed, this is for people who already know how to use Blender. For me in my case, this video helped me tremendously because before I only knew how to paste an image to an object (as he described early in the video), but since I also know nodes, UV unwrapping, etc., this video really improved my render. I think that was more the intention, not "A Beginner's Guide to Advanced Texturing".
+PhazonSouffle I agree. I added the plane and did the UV unwrap, then struggled to get that second panel, then when I switched to the node editors there were no default shaders and shift-A wouldn't add textures. I got lost and just gave up from following this tutorial. It should not be as rushed as it is.
Maker Linux Again, this was not intended to be "A Beginner's Guide to Advanced Texturing". Learn how to use the program first, then learn how to texture objects, then learn what cycles is, then learn how to use nodes, then come back to this video and I guarantee it will help you.
+Jace Cotton The name says "The Basics to good texturing with blender" so i would assume that its simple.
This is an amazing tutorial, nice job. I used my own texture to see if I could make my own twist, and it went great!
I am sorry, your skills are very good as we as the video but as a tutorial it is very hard to follow up. For example, in minute 1:36 you open the node editor and there are already a couple of nodes and in my blender they don't show up... If I were supposed to know how or when to make them, then I am screw because I don't know how nor when. So thanks for nothing.
+Johan Hernández Go to bottom of page then add matieral.
Probably you're using blender render instead of cycles.
They are automatically created
Amazing tutorial Andrew! Thank you for finally making this simple. Of all the videos I have seen on texturing, this one made me get it.
Texturing was one of the main reasons I went to Modo and Blender with Cycles was already far more friendly and usable than the Hyper Shader (hate that thing with a passion) or the 3DS Max Material Editor; I know many people despise Modo's shader tree but when you know how it works (and it's basically as siimple as Photoshop layers) it's a breezeto use.
The load of preset materials that come with Modo, is an ieal starting point or save you a lot of time for a quick previs. And when you think UV unrwapping is simple in Blender (and it is very good in Blender) than you are smiling when you use Modo.
And the whole tweaking in Photoshop that Andrew explained here so well is done automagically in Modo when you take your diffuse and duplicate it and turn it into a bump or reflection or displace.
I wish though that Modo had a project from view that is as simple as Blender where you don't need camera projection and bake unwrap and bake the diffuse out -- or simply keep a dozen projection cameras for each card in your scene without moving them.
Little tip for people who don't have there textures applying properly. Get an Texture Coordinate node, and link Generated to Vector, on all the Image Textures.
***** Holy texture! I really like your new style of tutorial. Informative, easy to understand and short enough to keep the viewers with short attentionspan(aka. Me). And the music, just a wonderful touch. Very good job Andrew!
i need cg fort, and this tutorial is much better than your previous texturing tutorial
im so happy i found this channel
Thank you so much for the work you put in. These tutorials are amazing and I have learnt so much in a short space of time.
Thank you so much for this. Just getting back into blender and having to relearn it all.
This tutorial is great. Just one thing I missed at first, your environment texture is helluh darker than default, that helped alot. Now if I could just figure out how to bake in cycles so I can use it for Unreal Engine 4 lol
I like that you give the link for the texture... thats crucial.
Andrew! I love your tutorials! Thanks for giving back so much great information!
Thank You! You put all things to places in my mind!
Oh my god! Thank you so much! You should offer like, private lessons to people.