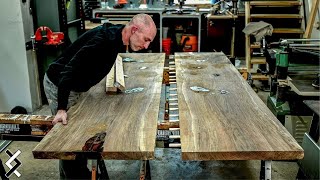
EPOXY RIVER TABLE // DIY Walnut Wood Restoration

HTML-код
- Опубликовано: 31 янв 2019
- This BYOT DIY project is all about how to refinish a live edge slab with a large epoxy pour to create a beautiful river table. With wall mounted hardware we are also able to make this a floating shelf woodworking projects. The wood restoration transformation on this DIY wood projects is quite the spectacle. Bring Your Own Tools (BYOTools #46).
Do you link the videos and want to treat Brent to a cup of coffee? ko-fi.com/byotools
BYOT News Letter (Automatically Entered into Yearly Giveaways) byotools.me
BYOTee Shirts Available NOW! teespring.com/byotools
Patron Page / byotools
Instagram / byotools
Facebook / byotools
TikTok / byotools
Material List:
-Walnut Live Edge Slab
-Rubio Wood Finish goo.gl/xXSTHM
-Epoxy amzn.to/3av0shV
-Epoxy Pigment (Pearl) amzn.to/3cEI1ZD
-Epoxy Mixer goo.gl/JoNUDM
-Sand Paper goo.gl/R1H4HP
-Fine Grit Sand Paper goo.gl/CQhChg
-Cotton cloth goo.gl/xjJZ7b
-Miniral Spirits goo.gl/Sr7M3J
-Floor Protection goo.gl/thMTd5
Tool List:
-DeWalt Planer goo.gl/bneDKs
-DeWalt Router goo.gl/yN3csf
-Router Bit goo.gl/fjqRTq
-Drill Bit Gide goo.gl/9uS5tF
-Floating Shelf Hardware goo.gl/gvktqd
-Tape Measure goo.gl/nguoOO
-Circular Saw goo.gl/itL8ST
-Orbital Sander goo.gl/ycZp3P
-Cheese Cloth goo.gl/rskfKf
-Foam Brush goo.gl/tJmwea
-Sanding Pads goo.gl/fjmH0l
#byot #diy #howto  Хобби
Хобби


I thoroughly enjoyed this video SO much. Looks so awesome. Can't wait to try my hand at a river project when it gets a bit warmer out this summer
I loved it, thanks. Very informative.
Enjoyable to watch, great humor.
Great idea for your router guide. Simple and very effective. Great job the table looks awesome
I cld watch resin pour for hrs too. Great job!
I have just discovered this channel and I am amazed by the depth of skill and attention to detail. I am looking forward to be a regular here.
The ending outcome was amazing!
Ur wood art is really good!
Love n respect
Thanks for all the love and support Shaima.
Hey! Love your videos :) Going to make my own desk so i'm binging on your content!! Thank you for your details and great editing! Well done!! I know how much time making these great videos could take!
Good work! Well done!
Great video lots of advice i am planning to make one and this video was very helpful
Great job. Great communication skills!!
This is what I needed, someone explaining what finish they're using. I'm new to this stuff and with limited tools too, so I'm restricted to smaller projects. Your project looks beautiful, like marble. I've mostly been sticking to see-through colorants (that's probably not what they're called) but you totally changed my mind on pearlescent ones.
Love these types of comments. Always try to show all of the steps needed for a project and glad to hear this video helped. Thanks for watching
beautiful shelf
I love it
Beautiful 👍
Your router sled is ingenious and thank you for sharing it. I never thought to use right angle iron. Awesome job on the table, it came out great!
Great to hear Joseph. Thanks for watching.
Amazing! 👍🏼👍🏼
Brother its amazingly awesome.
Great job !!
Great to hear mike and thanks so much for watching. Hope you subscribed.
thats a great planer sled idea, im stealing it for sure
Great Narration on the process😎 nice job on the shelve.
Awesome
Love the finish, a one off piece of a quality shelf, really enjoyable video, unfortunately i have no woodworking skills, you are a very skilled woodworker.
william mcmonagle thanks for watching and all of the support. Never to late to star :)
Wow, very 👍
Great to hear Greg. Thanks so much for watching and hope you subscribed.
It Looks AMAZING!! Great Work :)
beautiful outcome!
Thanks for watching Buddy!
Love the shelf and your sense of human!!! Subscribed for the pup though... gotta have that baby make more cameo appearances lol
damn that came out like a work of art!
thanks for the informative video gj
Really cool work. Although a router works well to get the warp out, a planer does work and is a lot faster! I’ve used both.
You’ll have to teach me your tricks with the planet beau haha. I tried but with no luck which is why I made a router sled. Thanks for watching and the support.
Lol just found this channel and this guy was hilarious, yet explained everything beautifully
Looks good... YEAHHHHH!....
Love it. Keep it up. This is my next project
Great to hear. Thanks for watching and the support Bawi.
2:02 - Hysterical!
Liked & Subscribed.
Real Beauty!
I love your humor and personality. Great job. Thank you. I learned a lot.
Great to hear and thanks so much for watching and appreciating those parts of the video. Hope your subscribed Angela :)
"...sorry ladies." LOL! 😂 The shelf looks fantastic. Your quick router jig is genius.
Great to hear Ted. Thanks for watching and glad you enjoyed the router jig.
"I'm only working with 1/4 inch shank. Sorry ladies.". Lol
i love it
Man...that looks amazing ! Great job !
Great to hear and thanks for watching BLP. If you liked this one check out this video: ruclips.net/video/s3aDc-ML9Mg/видео.html Same piece of wood but it is a matching side table with wireless charging port. LOVE IT!
If you use your router sled to remove the bow in the wood before you send it through the planer, you only have to flatten that 1 side, the planer will bring the other side parallel reducing the amount of labor with the router. Also remember to leave enough length so you can cut off the snipe at the end that the planer leaves.
AWESOME VIDEO BRO!!! Great comitating and you had me intrested with you humor the whole time. I cant wait for the next one 👍🏽👍🏽
"yeah"... lol cool
When you use linoleum on the bottom of the mold. so the board will peel off beautifully
awesome
Love the flattening mill. Is there anything you would have done different? Seems like it could slip off of the guides easily.
Great video tutorial ty!
Great to hear AA. Thanks for watching.
Beautiful work man,,,
Super
Thanks for watching and the support Jose.
Beautiful work I must say. Watching my father create beautiful pieces out of wood, that was the ugly side to getting cuts sometimes you can’t be too careful.
Thanks very much for watching and all of the support. Hopefully I won't need stitches for a while haha.
Well done I say. Good job
That's one finger. Nine to go. Nice job, BTW.
Amazing
Thanks for watching and the support TS!
"Sorry ladies"
ahah
instant subscribe
Haha! Great to hear Antonio. Thanks for watching and the support.
great information and the final product looks great man!
Great to hear Goose and thanks so much for watching. If you liked this one you should check out part 2. Its a side table with a built in Charger. Love it! Thanks for the support and hope you subscribed. ruclips.net/video/s3aDc-ML9Mg/видео.html
Your next project should be how to make a secret room 007 Jame Bond style 😎
Loved it and I just subscribed
I'm looking to epoxy up an L-Shaped desk and wondering what the best way to apply epoxy when you can't frame the piece you're working with? Whether it's just too big or oddly shaped.
Did you put tape or plastic on the mould surface appears to be something on your release of the table. Thanks
nicely done. I'm subscribing
Excellent!
Thanks for watching and the support Luis.
Your hilarious dude. Great job and great video
Can u explain why Paliner cant flaten the wood
If it twisted u can use flat mdf as base then anchor your wood on the top
I've never made product so big? It sure feels great ....
Wow
Hopefully that is a good WOW haha! Thanks for watching Tate.
Nice job!
Leigh S thanks for watching. Glad you enjoyed it.
Nice job.
Simple and v good.
Next time don't forget...sefty 1st. :)
Great work :D
Does the Rubio coat tint the epoxy part?
If its for a desk, can use the same finisher?
Some good info....you go girl!
Thank you?.........Haha. Thanks for watching Mark.
@@BYOTools You know what you are doing! VERY nice job!
Did it get hot when you poured it I poured 1200 grams a few days ago and it was super hot to the touch
I really like your instruction in a magazine i seen one with them and it was really half ass and incomplete. They went up to the point of routing. And thats when it ended . Im thinking if you wet sand the epoxy youll get a really nice glass finish I want to do one using Blue Turquoise , Pearl , and some Clear Color shift Powder . I really think this would come out bad ass ..
ouch! glad the cut wasn't worse. Enjoy the videos, keep em comin!
Got lucky on that one haha! Thanks for watching and the support Donovan.
Once you have a flattened side you can just run it through the thickness planer with the flat side down. You can also use your melamine as a mounting board, hot glue your wood to it and just run it through until you have your flat side.
I love floating shelves, but this is really quite deep for those pins, you’re going to have a lot of cantilever weight on the front edge. You can use rebar or threaded rod if you need larger pins.
Try a clear caulk inside the mold box. a thin bead of the quick dry clear latex will not interfere with the build. I also wipe the interior of my box with wd-40 silicone spray into a clean rag. Makes it "non stick" and easier to reuse my mold for the next project. my walls attached to the base with piano hinges, they just swing away and are ready for the next build. Its a little extra work to build the reusable mold but saves a shitton of time in the future. It adds up, especially if you have a standard size like cutting boards or furniture tops.
Love all of the helpful tips. Thanks so much for sharing and I’ll definitely have to try out you piano hinge idea. Thanks for watching also and hope you enjoyed the video.
Great tutorial (now subscribed) was the 'base expoxy' done in one 'pouring'? Looking forward to more from the otherside of the pond 👍👍
How level is the shelf sitting? Bolts seem pretty short for how deep the shelf is
apply some strip led light at the bottom and it will be more amazing..
great video !!!
question, i often read you have to work with layers of max 1-2 cm because of the chemical reaction of the epoxy getting hot af, but here the epoxy didnt make problems. can you give me some information about it.
thanks
Good question. Yes that is correct and I did have that issue with the epoxy getting too hot but since I since I was able to plane the wood down with my router sled it wasn't an issue. If you use this epoxy or another epoxy that is not specifically used for thick epoxy pours like Ecopoxy then I would suggest pouring in thinner layers. Thanks for watching.
Just asking is it possible to use French oak for the board
Inevitably
4:38 *tests if the screw is holding while it’s still clamped* 😂
Haha! Nice catch but I was actually just checking to make sure there wasn't too much blowout. Got to watch out for that on the ends since particleboard blows out easily even if you pretrial your holes. Thanks for watching. Your definitely paying attention closely if you caught that one haha.
Very very nice 👍 good work
Great to hear Abdul. Thanks for watching.
Good video expect for all the flames
nice
Great to hear Jones. Thanks for watching and hope you subscribed.
Hot glue epoxy dam. Brilliant
Hi,
What is your recommendation for epoxy and tint? Having trouble deciding what to use. Great shelf!!
The color in epoxy is acrylic
White mixture is tinsel powder
actually loved the commentary.. not a woodworker myself (it runs in the family however) but this stuff is inspiring! Curious about the weight it holds as floating desk tho!
Bastafari thanks for your support. Not the strongest floating shelf but can easily hold the shelf plus 40lbs misc items you’d like to showcase.
thanks for the informative video. just curious if the black epoxy migrated to the edges of your river naturally, or did you paint that in? shelf looks beautiful.
@BYOT, how did you get the edges smoky dark??
OMMA- LLAMA good question. It actually happened naturally. Don’t know why but it turned out to be a good mistake haha. Thanks for watching and the support
Where did you buy the aluminum angle iron for the flattening jig? Does it flex/bend over that long of a span?
Metal shops. And that wasn't a long span, as you saw the finish was perfectly level.
Ouch, another battle scar! ⛑
you know after routering the first side, you could have just used your planer since it's not referencing off of a flat side.
Love the video! Can anyone tell me what the name of the product is that was used underneath as a release film? I’d like to search it. Thanks.
Andrew Ryle maybe stretch wrap .
Great job on the video! May I ask what you used for the rails used with the router sled? Thanks.
Great to hear Allen and I just used some simple 1"x1" aluminum L metal. However, If you try and recreate this, try to use steel. That way you can avoid small dips in the router sled when you are moving it across. Thanks for watching.
Use Stonecoat Countertops supercast next time bro. Great job and video!
Thanks for the suggestions Chris. I'll have to check them out. Thanks for watching.
RE the brackets or pins coming out from the wall that go into the back of the shelf. Do they spin on a shaft and are the off center so you can turn them to compensate for the holes not being exactly in the same plane? Not sure if I'm being clear.
I think i know what you are getting at. Holes are in the same plane but when screwing them in they did seam to be slightly adjustable so you can lean them up slightly or down slightly if needed. Is that clear on my end? haha
Ethan Tillis, I think he's adorable and love his voice :)
Thanks for lookin out Coletta. Much appreciated :)
what tool did you cut yourself with?
Hello..what kind of tape can be used with epoxy...love your work
Niha Pradhan I used a very generic clear packing tape. It’s very cheap and it worked perfectly. I should have a link in the description of the video. Thanks for the support.
What type of plastic did you used?
How come when I cut long slabs on my dewalt table saw it's always never straight but has curves and bends? Is the blade sucking or the guide sucking or am I sucking?
That is called a 'banana cut". Common using a normal table saw. If you have a sliding table saw, that would not be a problem.