AP2 Intake Valve Retainer Installation | Honda S2000

HTML-код
- Опубликовано: 10 июл 2024
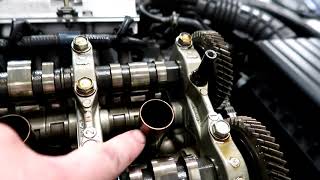
- Hey everyone! Today I’m going to show you how to install AP2 intake valve retainers on an AP1 Honda S2000. As I briefly discussed in a previous video, AP1 intake valve retainers can crack as a result of a mechanical overrev or mishift and can lead to dropped valves and thus a blown motor. The most common way to prevent or fix cracked AP1 intake valve retainers is to upgrade them to AP2 intake valve retainers which are more durable. This job can be quite intimidating to tackle so if you haven’t already I highly suggest you watch my video on inspecting valve retainers and performing a valve adjustment as they will are very relevant. Anyway, let’s get to it.
Difficulty: Medium
Estimated time: 3-5 hours
Tools necessary:
- Valve Spring Compressor Tool (Needs to be slightly modified): amzn.to/2zRR7lB
- Valve Keeper Removal Tool: amzn.to/2B1twxd
- Spark Plug Socket: amzn.to/2yZMgvG
- 3/8 InchTorque Wrench: amzn.to/2B1ukCf
- 5-10 Feet of 1/4 Inch Nylon Rope
- AP2 Intake Valve Retainer Upgrade Kit (8x
14765-PRB-A01 and 16x14781-PCX-004): goo.gl/QqvZEo
- 19mm wrench: amzn.to/2zQPULo
-12mm socket and ratchet
You will also need tools for the valve adjustment:
- 10mm valve adjustment tool: amzn.to/2rR87oj
- Bent feeler gauges: amzn.to/2rxDeVn
You will also need tools for the valve cover removal. Check linked videos for necessary tools.
AP1 Vale Cover Removal: • AP1 Valve Cover Remova...
AP1 Valve Cover Installation: • AP1 Valve Cover Instal...
DBW Valve Cover Removal: • DBW Valve Cover Remova...
DBW Valve Cover Installation: • DBW Valve Cover Instal...
Valve Adjustment: • Valve Adjustment | Hon...
Valve Retainer Inspection: • Valve Retainer Inspect...
Full Step By Step Guide (Script) here (too long for video description unfortunately): docs.google.com/document/d/14...
I know this video was relatively long but I really hope it helps some of you out there tackle this job. If you found it helpful or entertaining give this video a thumbs up and smash that subscribe button if you haven’t already. As always, leave a comment down below for a DIY you’d like to see in the future.  Авто/Мото


I fucked up putting the Intake cam in and had it set a tooth advanced. Car wouldn’t start and I didn’t know what I fucked up. Took a while to figure out the mistake.
I probably should have inserted a note about troubleshooting this in the video. I'll pin your comment for now.
Big D Slap what was it that you did to correct the problem ?
You move the camshaft one tooth clockwise or counter clockwise until you reach perfect TDC.
How did the stock ap1 retainers look ?
Completely fine after 140K
thanks youve convinced me to pay someone to do it lol
After following this video, another one, and various forum research I have a few tips:
- Make absolutely sure EVERY passage is covered. I had a keeper go flying and realized I missed a passage. So I had to drop the oil pan to confirm it didn't fall in there.
- The *bottom* cam shaft caps, for me, were the hardest part of this entire process. They were super hard to get off. Then they were super annoying to get back on. They kept slipping about and the bearings like to drop out, so watch out. I think (double check) that if you use a more "standard" spring compressor tool (not the one in the video) then it may be possible to avoid this step entirely. If that's the case, I wouldn't use the tool we used for the spring compressor.
- Seriously, make sure EVERY passage is covered.
- Leave your spark plugs in, except for the cylinder you're working on. A keeper could fly in to any unplugged hole.
- After you set TDC (1:33) take a picture of your gears, their position, etc. When you put the cams back in you can reference the picture to know for sure you have it setup exactly the same.
I lay newspaper all over a work table, then as I remove parts I set them down in a left to right fashion as I did them and use a magic marker to label them. This small step is super helpful for reassembly, especially if you may not finish in one sitting. Just never knock your table over.
EDIT: Thank you DIYGuys for the video, certainly helped make the job easier!
THANK YOU for these videos. I've watched a ton of them and they're all amazing. This video gave me the confidence/courage to do this job myself. I am definitely not a mechanic and the whole job took me 10 hours, lol. But the car runs great and I didn't screw anything up! Or so it seems...
Anyway, here are a couple tips from someone that had no idea what they were doing:
1. The cam towers can be removed by prying them with a screwdriver, using the head as leverage. Put a rag between the screwdriver/head to avoid damaging it.
2. The F20C has a stroke of 84mm. Put a piece of masking tape on your dipstick 84mm from the end and you will instantly know when a cylinder is at bottom dead center (I used the nylon rope method.)
3. TAKE A PICTURE OF THE CAM TIMING MARKS before you remove the cams. This will make it (almost) impossible to screw up the cam timing.
4. The cam towers are incredibly fussy to re-install. I don't have a good solution, but make sure all the lifters (?) are not binding before you start wailing on the towers with your rubber mallet.
5. When you remove the valve cover, some oil will drip onto the header. When you drive the car, it will smoke... If you don't want to be paranoid about screwing up the valve cover installation (like I was!) spray the header engine de-greaser and rinse it off before starting the car. This will reduce the amount of oil/smoke.
Excellent DIY. Most thorough. Thanks.
Omg, probably the best and most intense S2k video so far haha. I have an AP1 but I would be really nervous to do this job myself.. However, this video might give me enough confidence to do it if necessary.
Thank you so much for all of your videos, keep up the good work.
Peace!
Definitely the most intense video so far. Took me 40 hours total from script writing, to filming, to editing. It is definitely nerve wracking but if you understand the fundamentals of what TDC means and how the pistons move with the crankshaft its not so bad. The only other tricky part is getting the cam timing. But if you just take some time to ensure its parallel to the head it shouldn't be an issue. Worst case scenario you're one tooth off, the car refuses to start, and you know exactly why.
Thanks for the tutorial! Just finished mine up and this helped tremendously.
NOTE: this is not a task for the inexperienced mechanic. Take your time, do not rush. Cover places that you do not want your valve keepers flying off to. I used aluminum foil to help me out.
Thank you! Such a good video. Subscribed! 🤙🏽
You’re welcome
Amazingly helpful
Thanks for the video it helped a lot. I replaced my intake side retainers on the weekend. 5 out of 8 were cracked. From the top there were only 2 sunken.
Wow that’s crazy! Has the engine ever been overreved?
@@DIYGuysvideo I bought it 8 years ago, put around 25.000 very conservative miles in it. Probably the previous owner overreved it. Yesterday eve I cleaned the removed retainers, actually there were 7 out of the 8 cracked not just 5. I feel lucky that it didn't drop a valve yet.
Definitely nerve wrecking but I’m up for the job haha 🤘
Wow this is mad helpful. What a f'n channel!
I highly recommend putting rubber bands around the rocker arms prior to removing them. My VTEC pins almost fell out!
awesome video 👍
Thanks!
nice! im glad i put this off for another month. I will definitely be using this video as a guide. I like the keeper removal tool idea too, i will be buying one. amazon?
+Kyle Gregg Yep, in the description below. Will probably make a follow up video on the tools.
You can also check and replace valve stem seals while your at it
Video convices me to maybe seek a good shop lol
+emilio4256 If you’re not a good wrench it might be best to leave it up to the pros. But if you work your way up through valve adjustments I think you can definitely do it.
emilio4256 this is exactly what I was thinking while watching this video 😀
That’s an awesome tool
I️ did mine with a tool from harbor frieght
Having the right tool for the job can save you a lot of time. Before I had the valve keeper removal tool I was using a socket and a hammer. I lose two valve keepers, which left me without a car for a couple days until I could get replacements. The valve keeper removal tool really makes it impossible to loose the keepers. I'll probably make a separate video just talking about the tools.
Agreed. That keeper removal tool is awesome. I used a socket and had the same issue almost losing keepers .
Thank you!
You're welcome!
That compressor tool looked 100x nicer to use than the one I did !!
Yeah definitely one of those times where it was worth it to get the right tool for the job.
DIYGuys what compressor tool did you use ? Can you send a link or what it’s called ?
Link in the description I believe.
Great tutorial. Thank you for this and your other s2k DIYs.
One question -- when determining TDC for the other 3 pistons (where you can't rely on the timing marks) using a dowel or dipstick, is it OK to turn the crankshaft both clockwise & counter-clockwise to find exact TDC and not just above/below it?
For some reason I thought it was VERY bad to rotate it CCW. Or is that only while camshafts are in place?
I don’t think it matters if you turn the crank clockwise or counter clockwise. At the end you’ll reset the crank pulley to TDC to reinstall the cams.
Great video. I watched it many times and will watch it many more times before i tackle this job on my AP1. I already ordered 8 retainers and 16 keepers from Majestic today. Did u think of doing your valve stem seals while you were in there?
I actually did replace the valve stem seals while I was in there and they made absolutely no difference in my oil consumption. So I can't really recommend it.
@@DIYGuysvideo Ok thanks for that. I already ordered new seals but can't get them delivered to me due to lock-down everywhere.
I would probably rotate engine few times before putting valve cover on, make sure retainers are locked in, timing is ok etc...
When you remove the the nylon rope did you turn the crank counter clockwise?
Thanks a lot.
You gave me the confidence to do it with this awesome tutorial.
Now I'm proud and I have an unbreakable s2000
Awesome video! I am going to do this on my own AP1, and was wondering are you able to use the rope method to replace the exhaust valve retainers too? Or do you need compressed air to do the exhaust retainers? Thanks!
You can use rope to do the exhaust valve retainers too. I ended up changing all my valve stems during this video using rope.
Great video! Any reason you didn't do the exhaust retainers while you were at it?
According to Billman: it is extremely rare for the exhaust side to crack, it lowers the RPM required for piston to valve contact.
great job man i inspected mine and they were fine but parts of me wants to tackle this job still. how many hours did it take you?
+Clive Mckenzie Once I got the right tools I think it would take me 3 hours. It simply takes a long time to get the camshaft caps off. Also feeding in the nylon rope takes a little bit of finessing. But if I didn’t have to film definitely 3 hours.
awesome video. I dont know what your profession is but can you justify whey its 25 ft lbs for the spark plug? 19-20 is honda recommended (for b series, f series, and k series). I always like learning new things. Thanks for the video
I follow Billman’s recommendation (famous S2000 mechanic): www.s2ki.com/forums/s2000-under-hood-22/spark-plug-torque-921403/page3/#post23996215
The revised 21 ft lbs is probably just fine.
This video is awesome. I have Brian Crower Stage 2 cams. The intake lobe on the #1 cylinder scored. I have to inspect the rockers so they're not damaged. This video will aid immensely. Have a video request though. Changing the timing chain and chain guides. Think you'd be up for it?
Hey Emil. Glad the video helped you out. I don’t think I would do a timing chain and guide video since it’s not something I’m likely to do to my car. I understand that our timing chains stretch a little but it’s not that big an issue and the timing might be fixed with ballades timing gear which is a less invasive fix.
Ah. I understand. I actually do have Ballades timing gear which makes the timing line up perfect. The reason for the request is 1) There are no DIYs on how to do this on youtube or s2ki. 2) My TCT failed (since replaced with Billman's Gen X-R holding up fine) and I did have that timing chain rattling noise for a few hundred miles. I have a suspicion the guides and sprocket may have worn excessively and the chain might've stretched prematurely from the more aggressive cams. I have a full Ferrea valve train (beehive) and tuned on AEM Infinity. For peace of mind I planned to replace the timing chain with a Toda heavy duty one, replace the guides, oil pump tensioner and chain, and crankshaft timing gear. I have a rough idea of what needs to be removed. The manual says to take the cylinder head off, however according to Billman it is not necessary but the following need to be removed to do it: valve cover, camshafts, TCT, camwheel, oil pan and timing cover. This is the abridged version, however like many, I am just a shade tree mechanic looking for guidance from someone more qualified. I've owned my S2K for 10 years (AP1 03). It's almost been 10 years since the car has been out of production. There's a plethora of useful videos on the S2000 (and plenty of not so useful ones) and my thoughts are that this is a video that will help out a lot of people given the age of the car. I could try to do a video if I tried to tackle the job but tbh it'll likely be pretty shitty.
A couple hundred miles with a failed TCT isn’t that bad so I wouldn’t worry. I personally drove thousands of miles on a bad TCT and I’m sure others have too.
You made some truly great tutorial S2000 videos. I plan on doing this next month. Since pistons 1 and 4 travel together, I can basically work on them together, right? And then pistons 2 and 3. The same goes for valve adjustment. That way, minimizing the turns on the crankshaft and getting the work done quicker.
Yep.
@@DIYGuysvideo So I am trying your rope method right now and the rope is stuck in piston 3 and 4. Any help in this situation is really appreciated!
Have you rotated the crankshaft back to lower the piston and remove pressure from the rope?
@@DIYGuysvideo We tried that. The end of the rope must be stuck in the valves. I think the issue is trying to do two cylinders at a time using the rope method, which can cause one of the pistons to not fully compress the rope to shut the valve tight due to the rope slack/bunch being not equal. Going to try a couple of different ways to see if that will work.
I can see that happening if you did two adjacent pistons that don’t travel together.
In order to release the nylon rope you would have to turn the crank counter clockwise a bit right? I've read that spinning the motor backwards can cause damage. In your experience is this something to worry about?
That is correct. Haven’t heard of issues rotating the crankshaft backward by hand.
Do you have a link for tool used if the compressed-air method of keeping the valves up is used? Thanks! Keep it up!
In that case you use an air compressor. You might need an adapter to fit the air line into the spark plug hole as well. Are you interested in those?
Right, is it the same adaptor used in a leak down test?
Yep!
Can you do the exhaust side valve retainers and keepers at the same time as the side you were working on? My thought process is if I'm already there I might as well replace the exhaust side as well
You can, but it does not provide any benefit.
Nice work. Did you have any cracked retainers?
+John's S2K None cracked for me on a 130k+ mike motor. Retainers on my old AP1 weren’t cracked either. Never seen it in person to be honest.
DIYGuys Good to hear. I inspected mine during my last valve adjustment, and they appeared to be fine. But I still have some ap2 retainers sitting in my garage from when I first bought the car. Great diy by the way!
+John's S2K Thanks!
Hi, I know this is a bit late, but some people say the retainers are too heavy on the exhaust side. Is this true? If so, is it only better to do the intake side, or replace springs etc...
You are correct, there is little value in upgrading the valve retainers on the exhaust side. Just do the intake side per the video!
I'm curious about the valve keeper removal tool. I have that same tool. Mine is made by Lisle, but I have never used it. My tool came with a keeper/retainer install tool, where you place retainer with keepers in place on top of the spring and hit it with a hammer, is there a reason why you use the valve string compressor and not the Lisle install tool? I am about to start this project and don't want any problems.
Great question. At the time that I had done this I had heard of few people using the Lisle tool for installation. I have now read that you can use the Lisle tool to install the valve keepers but that it is trickier and more error prone with the Lisle tool. Specifically it can be more difficult to use on the exhaust side when using rope or a weak spring compressor. For a beginner the spring compressor is more user friendly in my opinion but if you’re just doing the intakes you should be able to get away with the Lisle tool. Let me know how it goes!
Well the conclusion I reached is you're EXACTLY RIGHT! Remove with the Lisle retainer removal tool, but replace with the valve spring compressor. If you have the upper body strength of Hulk Hogan or can push in dog spikes like thumbtacks, then use the Lisle retainer install tool, I think it would make removing the lower camshaft caps unnecessary. I used it on #1 front exhaust valve before removing the lower camshaft caps by pushing down on the tool by hand, it took a lot of pushing. (I'm not even Hulk Hogan's little finger for strength) I was uncomfortable with the thought of striking it with a hammer since the head of the valve stem is a bit below the hole in the retainer I was afraid of bending the valve stem if I missed. It would have been impossible for me to use it in the more difficult to reach locations. I also have what appears to be the valve spring compression tool you are using, mine had to be modified by grinding out places in the back to accommodate the intake manifold. The end result is I did it exactly as you show in your video, it was the most detailed and useful I found on RUclips. After all that work I didn't find a single crack, but I feel better knowing rather than hoping. Anyone can tackle this project if they closely follow your instructions and take their time.
❤️
im at the point where im putting the new keepers in but my overhead compressor tool is a nightmare to use. im interested in buying the one you have. what modification did you have to make to the tool?
You have to grind down the backside of the tool so that it can fit around the intake manifold runners. If you have an angle grinder or a deemed it should be no problem.
thanks!
If you can wait, they are cheaper on eBay. Around 60$
Hey I just did retainer install and started my car but my valve train is much louder then before, I don't have an engine code and the car starts right up. Is it possible that the timing is off by a tooth, or the valve clearance is that I performed is out of spec?
Most likely the timing is off. Did you re adjust the valves after loosening?
DIYGuys yea I adjusted the valves. I’m going to remove the valve cover later on today and double check on the timing.
DIYGuys hey great news it was not the timing I just messed up on the valve adjustment. I noticed that the feeler lash tool had two stuck together so basically I had the wrong spec the whole time. The car runs better then before!
Thank you again for all your DIY’s
Glad you got it working!
Any tricks on reinstalling the valve train. The rocker arms keep felling all over the place
If you have a lot of zip ties you can get creative and tie the rocker arms up. Good luck
At 8:35 in the video how do you get the rocker arms to stay up like that? Mine keep flopping down causing me to struggle getting the cap base back on.
I was having the same issue. I got my mom to helped me lol. We did one side first and once that side is clear we tackle the other side.
@@Perfectionyx I ended up using rubber bands. I also saw someone use those long magnets.
I have used zip ties before
video of ap1 oil squirter bolt upgrade to ap2 bolts
+Clive Mckenzie Yeah this job seems like it might be just as tricky! It will also include a video about oil pan removal and installation. I’ll add it to the list.
your awesome man keep up the great work
Doing this next week to my AP1, burnt an exhaust valve 5 days after buying it lol 😅. Don’t over rev your AP1 guys
Is the burnt exhaust valve related to the over rev? I'm guessing you could bend a valve which could end up getting burnt.
Where did you order your ap2 intake valve retainers ?
eBay. There is a dealer that sells the retainers and keepers as a set for 60$
Just wondering if you offer any services to people that may be around your area? Lol
I used to offer services but now I just focus on making new videos or helping out close friends. If you're in the bay area feel free to DM me here or on instagram @diyguystv
Hey Soviet! I got as far as removing the AP1 retainers for the first cylinders two intake valves and i installed two new stem seals BUT... I'm struggling to knock the exhaust sides valve retainers off to replace those seals. Hard angle to work with. What do i do?
Hmm. I don’t remember doing anything special for the exhaust side.
@@DIYGuysvideo its just that due to the angle being more extreme I'm finding it hard to get the exhaust side off with a whack or two of the hammer and Lisle tool. I might need to use the compressor tool.
The compressor tool sometimes doesn’t work. You’re RHD right?
@@DIYGuysvideo yeah that's right. Progress update, this morning I managed to knock the exhaust retainers out with the Lisle tool and hammer! Came out fairly easily this time. I replaced the stem seals and am about to reinstall the retainers and keepers now. Had a close call already with the spring jumping out and sending the keepers flying but one got caught in the cage and the other fortunately fell in a shallow bolt hole which i fished out with my magnetic tool. I realize now that the compressor must compress the spring as flush as possible, right?
@@DIYGuysvideo Soviet I conquered the retainer swap! Replaced all stem seals on both sides too. I cannot get the cam caps middle bolts to thread in though. Why? I positioned the rocker assembly (which is a real pain) in place (I managed to keep it from falling apart by just catching it when I saw either side slide out a bit) and knocked it down with a mallet as you said. The holes line up perfectly but now, the middle cam cap bolts do not go in. I'm just turning them for nothing...
What do you mean the spring compressor needs to be modified
I have another video on the tools I used to perform the intake valve replacement. Search for it and you’ll find it 😛
How did the old retainers look ? Miles ?
130k miles. They were completely fine.
Dude where are you located? I don't want to do this by myself lol
Norcal
This work for k series as well?
Not sure but the tool works for k series as well I believe so I don’t see why not.
Is the orientation of the keepers important when reinstalling?
Don’t think so. As long as as they are right side up.
@@DIYGuysvideo That's what I mean - which is the right side up and how do you know when looking at them?
RolanTHUNDER they are larger diameter at the top and smaller diameter at the bottom IIRC
@@DIYGuysvideo Cool thanks. Apparently they have laser etched markings (the AP2 cotters) showing right side up.
I'm going to do my valve stem seals while I'm in there. Car is not smoking. Any tips?
RolanTHUNDER not much. Just get some valve stem seal pullers and it should be pretty easy
Hey guys I have a 2000 ap1. It only has 48k original mileage even proof on carfax. Is this something I should inspect as well just to be on the safe side or I should be fine until 100k mileage?
Got rope stuck in between a valve
Mines also got stuck too. At first I thought it might just be the first cylinder but the second did the exact same thing. I thought it was the rope I was using so I went to Walmart and got a new nylon rope but cylinders 3 and 4 did the same thing. I recommend using compressed air instead of nylon rope.
nice DIY. have considered this but don't plan on over revving my AP1 any time soon.
In my opinion if you don't track your car I don't think it is worth the investment.
haha... i actually track my car regularly. but in my 25 years of driving i have yet to hit the wrong gear. the S2000 gear box is also very precise and confidence inspiring.
reckless! keeping an eye on the motor mounts helps too. good luck with #nomisshifts2018
livin' on the edge, you know. how are the motor mounts related?
When they are busted the motor and trans will move around quite a bit. The shift knob will sway from side to side and make it easier to misshift.
i already fucked up, i ordered new retainers but not the cotters. fuck.
I have 15 cotters sitting around at my house that I can send. Just missing 1 lol.
tight! ill dm you on instagram