I was given a free washer that wasn't working. This video was helpful. It was the bearings that needed to be replaced. When it was out, I also changed out the spider arm because at first it looked solid but then after cleaning a few holes showed up. I dont think I will buy a new appliance anymore, since the last few I bought new ended up neeing me to fix in within 5 years. So why not start with a free one and fix it. Shorly after getting the washer working, I found a matching samsung dryer for free as well. He said it didn't heat but it ran, turned out to be a $25 heating element. These videos you make cover so much it's good thanks.
A few days ago , my washing machine was making lots of vibration when spinning. I called the technician and he told me that the drum was not round , it was oval, i had my doubt, i watch this video because i have a Samsung 2012 almost same model as this one on this video. I did every step from this video , and i found my problem , it was the spider arm that had accumulated so much dirt in its arms, that it was unbalancing my machine. I must say a BIG THANK YOU TO YOU. You saved me a brand new machine. The spider arm cost me 248$ canadians with the 6 bolts. And its working like a brand new machine. So thank you very much.!!!! 👍👍👍👍👍👍👍🇨🇦
The technician had no clue! It could have been shocks or balance rings or spider arms. I started with shocks then balance rings then I found the spider arm like yours. I did not change seal.
Thank you a thousand times for making this video. It was so concise and walked me through the seal and bearing replacement of my Samsung front load washer. You saved me $1,000.00 this past weekend. Thank You!
Hello, I really have seen several videos, but your channel for me is the best, very well explained, camera very well focused, everything step by step. Thanks a lot . you are the best.
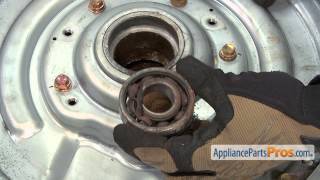
video was a huge help repairing a samsung rear bearing at the same time the flange/spider that had broken...note to others as this is why to run a hot water load that is empty about once a month. To save the spider/flange braket from caking up with dirt and detergent causing it to rust/oxidize and fall apart.
Good tutorial video. My 18 year old Hotpoint top loader is on it,s third replacement water pump and 2 sets of clutch liners, And all done from the underneath of the machine. And that,s all I have ever done to it!
It's not an "easy" job, but it can be done if you go slow, watch the video and go step by step. It takes two people to manage the tub removal. I just finished replacing the seal and both bearings in our Samsung washer. One of the original bearings was bad, the other was better but still not like a new bearing, all due to a bad seal. The bearing/seal kit I ordered from you were exact replacements. Getting the stainless tub out of the bottom tub surround was not easy because of rust that accumulated in the bearings/shaft due to the bad seal. I put the bolt back into the shaft and used a small sledge hammer to finally get the shaft out. Not heavy hits, however. I used 0000 steel wool to clean the shaft before putting it back into the surround tub. Unfortunately, I had to do the job twice because when I put the tub surround back together I failed to put the heating element inside the bracket in the surround tub and the stainless tub rubbed on the heating element, but the job is much easier and faster the second time around. The washer is back in service!
Thank you. First time washer repair, and it took me quite a few hours, but I was able to replace the rear bearing and squeeze some more life out of a washer that was only 2 years old.
Trestin, when you put the inner / outer tub back together, did you find that there was a small gaps between the bolts? Almost like the bolts are tightened too much. I am trying to make sure the darn thing does not leak. Thanks for your help.
ugh, I guess I am replacing my bearings and tub seal. However after 12 years or so of almost daily service, I am keeping this washer and giving it some much needed love.
Very good video. However when I took out the central seal, I took care not to damage the plastic tub in the point of application (holding) of screwdriver, but I scratched the wall of it with it's tip, and almost have to change the tub. You knew how much to insert the screwdriver under the seal not to damage the tub, but please tell the people that the tip of screwdriver may touch the tub and can scratch it under the central seal. It's very easy to scratch!!!
As always a very good and detailed presentation. It is on a new unit though. When I took mine apart the spider arm was all full of dirt. Also getting the unit through the box door was difficult as it is heavy. Some nuts very tight so need a long wrench and long extenders for sure.
Thanks a lot for video. Sir.. When inserting the shaft after bearing replacement, is it okay if i do not apply grease between the bearing and the shaft?
I saw your spider has a steel washer riding on the O-ring. My old one had this, but the new spider didn't come with a steel washer--just an o-ring. Is the washer important? Am I supposed to reuse the steel washer on the new spider, or just install it bare? The washer has razor sharp edges that could easily cut the seal! When you pushed that seal in, did you push it only until the surface was flush, or until it wouldn't go in anymore?
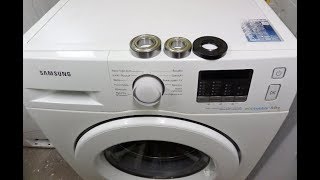
WF405ATPASU/A2 It's a bit a of a PITA, but do yourself a favor and replace the bearings with quality Stainless Steel bearings while you are in there. Rear (Motor Side) - SS6206ZZ - Stainless Steal ID 30mm x OD 62mm x W 16mm Double Shielded. Front (Seal Side) - SS6207ZZ - Stainless Steal ID 35mm x OD 72mm x W 17mm Double Shielded. The cheap bearings used from the factory and sold as replacements wear, which hastens seal failure. The seal failure allows water/detergent to rust the bearings. The rust accelerates bearing wear causing the seal to further degrade.
on samsung wf218anb/xaa 01 washer, how far do you push the oil/water seal into the plastic casing? There is an extra hair-line raise metal edge on the shaft right against the spider. Does the outer-bevelled edge of the oil seal ride on that extra ledge, or does it ride on the straight part even with where the other 2 inner edges of the seal ride on? Just wondering if the extra hairline raised area on the shaft is to catch hair that gets wrapped around shaft, so the hair does not ride or cut into the edge of the seal and get under it.
I went to the hardware store to get a new o ring for the bottom of the 35 mm shaft ,a small angled washer fits on top of the o ring then the water seal on top of that then the bearings.
I replaced the rear rub with a new one and it started leaking from the bottom when I put it on a cycle. I’m sure I tightened all the screws around the front and rear tub assembly but it still leaked. Any idea why this happened? Should I take it apart and redo the screws?
how can I get the rotor for the washing machine front loader coil and complete panel 110 volts the washing machine is 10 kg LG products and again for German machine please can you link me to store
We don't recommend trying to repair control boards. They generally need to be replaced. For more information, you can give us a call at 1-877-477-7278 or you can chat us at our website: www.appliancepartspros.com/. We offer free technical advice and diagnosis.
I changed the two bearings, oil seal and spider. It is much better, but when it rotates, its still unbalanced. Would that be bearing not fit properly? Or spider ? Or tub damaged from previous spins? Does anyone come here anymore?
Might as well buy a new machine. I recently had one of these and given the cost of doing this that's what they opted to do. In this case, we suspected an article of clothing was between in inner and outer drum.
If only the washer was this clean after 8 years of consumer using way too much detergent. 50 minutes start to finish is my average time for this job. Have never done JUST a tub seal.btw.


I was given a free washer that wasn't working. This video was helpful. It was the bearings that needed to be replaced. When it was out, I also changed out the spider arm because at first it looked solid but then after cleaning a few holes showed up. I dont think I will buy a new appliance anymore, since the last few I bought new ended up neeing me to fix in within 5 years. So why not start with a free one and fix it. Shorly after getting the washer working, I found a matching samsung dryer for free as well. He said it didn't heat but it ran, turned out to be a $25 heating element. These videos you make cover so much it's good thanks.
A few days ago , my washing machine was making lots of vibration when spinning. I called the technician and he told me that the drum was not round , it was oval, i had my doubt, i watch this video because i have a Samsung 2012 almost same model as this one on this video.
I did every step from this video , and i found my problem , it was the spider arm that had accumulated so much dirt in its arms, that it was unbalancing my machine. I must say a BIG THANK YOU TO YOU.
You saved me a brand new machine. The spider arm cost me 248$ canadians with the 6 bolts. And its working like a brand new machine.
So thank you very much.!!!! 👍👍👍👍👍👍👍🇨🇦
The technician had no clue! It could have been shocks or balance rings or spider arms. I started with shocks then balance rings then I found the spider arm like yours. I did not change seal.
ive same fault on my lg washer spiders gone
Thank you a thousand times for making this video. It was so concise and walked me through the seal and bearing replacement of my Samsung front load washer. You saved me $1,000.00 this past weekend. Thank You!
Hello, I really have seen several videos, but your channel for me is the best, very well explained, camera very well focused, everything step by step. Thanks a lot . you are the best.
video was a huge help repairing a samsung rear bearing at the same time the flange/spider that had broken...note to others as this is why to run a hot water load that is empty about once a month. To save the spider/flange braket from caking up with dirt and detergent causing it to rust/oxidize and fall apart.
Good tutorial video. My 18 year old Hotpoint top loader is on it,s third replacement water pump and 2 sets of clutch liners, And all done from the underneath of the machine. And that,s all I have ever done to it!
Great step-by-step! Replaced my bearing set and seal. Instructions were well organized and correctly sequenced.
Glad we were able to help you out. If there is anything we can help you with in the future please let us know.
The bearings in mine are loud. It's basically the same job as this, plus a few extra steps. Thanks for making this video.
It's not an "easy" job, but it can be done if you go slow, watch the video and go step by step. It takes two people to manage the tub removal. I just finished replacing the seal and both bearings in our Samsung washer. One of the original bearings was bad, the other was better but still not like a new bearing, all due to a bad seal. The bearing/seal kit I ordered from you were exact replacements. Getting the stainless tub out of the bottom tub surround was not easy because of rust that accumulated in the bearings/shaft due to the bad seal. I put the bolt back into the shaft and used a small sledge hammer to finally get the shaft out. Not heavy hits, however. I used 0000 steel wool to clean the shaft before putting it back into the surround tub. Unfortunately, I had to do the job twice because when I put the tub surround back together I failed to put the heating element inside the bracket in the surround tub and the stainless tub rubbed on the heating element, but the job is much easier and faster the second time around. The washer is back in service!
4 hr Job non experience
You do a great job on these video's. Thank you for the time you spend making these.
very nice video, i did my seal and bearings last weekend , so far everything is working fine, these machines are very easy to work on.
You are welcome! Glad you were able to fix your issue! If there is anything we can help you with in the future please let us know.
Thank you. First time washer repair, and it took me quite a few hours, but I was able to replace the rear bearing and squeeze some more life out of a washer that was only 2 years old.
Trestin, when you put the inner / outer tub back together, did you find that there was a small gaps between the bolts? Almost like the bolts are tightened too much. I am trying to make sure the darn thing does not leak. Thanks for your help.
ugh, I guess I am replacing my bearings and tub seal. However after 12 years or so of almost daily service, I am keeping this washer and giving it some much needed love.
Thanks so much for this - very well done. Washer runs like a top again!
Thank you. Best video for this repair I could find!
Thanks for taking the time to create this.
Very good video. However when I took out the central seal, I took care not to damage the plastic tub in the point of application (holding) of screwdriver, but I scratched the wall of it with it's tip, and almost have to change the tub. You knew how much to insert the screwdriver under the seal not to damage the tub, but please tell the people that the tip of screwdriver may touch the tub and can scratch it under the central seal. It's very easy to scratch!!!
Amazing video!! My bearing replacement went with out a hitch!
Yes. This video is the fix. Not too terrible - if you take your time and have basic mechanical aptitude.
Glad you found the video helpful.
How about just an unbalanced drum?
Is the cause a dirty spider seal?
Is there an adjustment to balance the drum?
Power tools work great!
Thanks so much for this video kind sir! Successful repair...
As always a very good and detailed presentation. It is on a new unit though. When I took mine apart the spider arm was all full of dirt. Also getting the unit through the box door was difficult as it is heavy. Some nuts very tight so need a long wrench and long extenders for sure.
Yeah probably a breeze on a brand new one, it would never go that smooth on a used washer
I'm just gonna get a new washer
Thanks so much, this video is amazing! ¡Saludos desde Mexico!
Your video was a huge help! Thank you!!
You are welcome! If there is anything we can help you with in the future please let us know.
Çok güzel anlattınız teşekkür ederim
Thanks a lot for video.
Sir.. When inserting the shaft after bearing replacement, is it okay if i do not apply grease between the bearing and the shaft?
Is there any video showing how to exchange the bearing? Thank you.
thats what im looking for
So this is what Weird Al Yankovic is doing now, I love this guy. Good video Al.
Thank you, it's verry good instructions 😉
You're welcome. Glad we could help!
Simply Superb Video!. Thanks
You're welcome! Happy we could help.
Thank you excellent video 💪🏻💪🏻
Excellently done video!
I saw your spider has a steel washer riding on the O-ring. My old one had this, but the new spider didn't come with a steel washer--just an o-ring. Is the washer important? Am I supposed to reuse the steel washer on the new spider, or just install it bare? The washer has razor sharp edges that could easily cut the seal!
When you pushed that seal in, did you push it only until the surface was flush, or until it wouldn't go in anymore?
Thank you soooo much!!!! saved me mucho $$$
You are very welcome.
WF405ATPASU/A2
It's a bit a of a PITA, but do yourself a favor and replace the bearings with quality Stainless Steel bearings while you are in there.
Rear (Motor Side) - SS6206ZZ - Stainless Steal ID 30mm x OD 62mm x W 16mm Double Shielded.
Front (Seal Side) - SS6207ZZ - Stainless Steal ID 35mm x OD 72mm x W 17mm Double Shielded.
The cheap bearings used from the factory and sold as replacements wear, which hastens seal failure. The seal failure allows water/detergent to rust the bearings. The rust accelerates bearing wear causing the seal to further degrade.
You don't need a wave washer in this unit?
Good job but would it not been better to change seal and bearings at the same time but well done sir.
on samsung wf218anb/xaa 01 washer, how far do you push the oil/water seal into the plastic casing? There is an extra hair-line raise metal edge on the shaft right against the spider. Does the outer-bevelled edge of the oil seal ride on that extra ledge, or does it ride on the straight part even with where the other 2 inner edges of the seal ride on? Just wondering if the extra hairline raised area on the shaft is to catch hair that gets wrapped around shaft, so the hair does not ride or cut into the edge of the seal and get under it.
What kind of grease does the seal need? The replacement i received didnt have grease inside
You should need any grease for this part.
I went to the hardware store to get a new o ring for the bottom of the 35 mm shaft ,a small angled washer fits on top of the o ring then the water seal on top of that then the bearings.
Glad you were able to fix your appliance. If there is anything we can help you with in the future please let us know.
I replaced the rear rub with a new one and it started leaking from the bottom when I put it on a cycle. I’m sure I tightened all the screws around the front and rear tub assembly but it still leaked. Any idea why this happened? Should I take it apart and redo the screws?
You will need to double check the installation of the part if it was not leaking before replacing it.
@@appliancepartspros thanks. I double checked everything and the leak had stopped.
Very good job sir thank,s
I did everything but for some reason the rotor wont fit back onto the spider arm. Same parts, all i changed were the bearings.
how can I get the rotor for the washing machine front loader coil and complete panel 110 volts the washing machine is 10 kg LG products and again for German machine please can you link me to store
haw many MFD we put.if change
Thank you sir
21:25 rear tub seal
Can these bearings be oiled with lithium grease or something?
Bearings are sealed
@@OOpSjm yep, I found that out....
Dear sir,
How can repair washing machine control panel and automatic switches.
Please consult to me.
We don't recommend trying to repair control boards. They generally need to be replaced. For more information, you can give us a call at 1-877-477-7278 or you can chat us at our website: www.appliancepartspros.com/. We offer free technical advice and diagnosis.
Thanks sir
I changed the two bearings, oil seal and spider. It is much better, but when it rotates, its still unbalanced. Would that be bearing not fit properly? Or spider ? Or tub damaged from previous spins? Does anyone come here anymore?
What did you ever do?
I'm an Electrical technician.
Looks like a brand new washer..
I can't believe I am doing second set of washer bearing replacement... I am so mad at myself why I purchased this samsung washer at first place.
There might be and underlying issue causing the bearings to wear out prematurely. I would check your seals to make sure there aren't in leaks.
Did he say easy????
Might as well buy a new machine. I recently had one of these and given the cost of doing this that's what they opted to do. In this case, we suspected an article of clothing was between in inner and outer drum.
My red is on the left
Did you get to complete your repair? Is there anything we can help you with?
Only a few minutes huh 🤣
Fine...
Easy?
If only the washer was this clean after 8 years of consumer using way too much detergent. 50 minutes start to finish is my average time for this job. Have never done JUST a tub seal.btw.
Very reasuring to see
Plz sir ji Hindi dubbed