Restoring a Berkeley 12JG Jet Boat Pump with a Fresh Paint Job

HTML-код
- Опубликовано: 5 сен 2024
- I wanted to take you through the steps that I took to refresh, and repaint my Berkeley 12JG Jet Drive, getting it looking better than it did new. This 12JG was a spare pump that came with the boat when we purchased it. The boat has had a Dominator 12S pump installed in it for the last 30 years. The Dominator pump has an aluminum impeller and the Berkeley had a stainless impeller already installed.
We had recently removed the mildly build 396 Big Block Chevy from the boat and installed a 625hp 496 BBC. At this HP level we knew that the wise choice would be to swap the pumps, and get the Berkeley in the boat with the stronger stainless impeller.
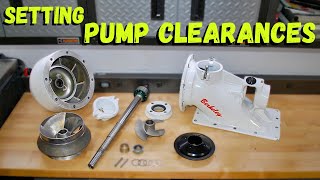
Before we put the Berkeley pump in the boat we sent it off to CP Performance and had them give the pump a full rebuild. The pump was previously used for racing and has already had a lot of detail work done to it. CP was able to get it rebuilt with new bearings, wear ring, and seals. The old shaft was found to be twisted so it was replaced with a new 17-4 shaft. Now CP Performance can take care of your rebuild, but they are not able to repaint or re-powder coat the parts.
Now before I installed the pump back into my 1979 Centurion I wanted to get it looking like new. Since CP Performance was not able to address the cosmetics of the pump I needed to address that on my own. The old powder coating was littered with chips, stains gouges and scratches. It was just beat up from the years. I had considered getting it powder coated, but after much internal debate I decided to repaint it myself.
Now the casting quality of these parts was not great from the factory. So I sanded and smoothed out any blemishes with 80 grit. I then applied an epoxy primer on any area that was exposed bare metal.
I then applied an automotive 4-1 high build primer. This will allow to me fill the big imperfections in the casting and address the chips in the power coating. By applying this primer I will be able to sand it back down and give all the parts a rounder, smoother cast look.
Once I had all the parts sanded down I attempted to apply the orange stenciling paint for the "Berkeley" details. But it did not work to plan. The orange paint was getting on the white single stage paint of the base metal, and when I would remove it it eventually damaged the white. So I repainted the parts and applied one coat of clear coat. I then was able to stencil the orange and not effect the rest of the paint. Once the stenciling was done I applied a few coats of clear to the remaining parts.
Follow me on Instagram: / _autotechnick_
#jetboat #cpperformance #powerboat #speedboating #jetboatperformance #hotboats #flatbottomboat #socaljetboats #hotboat #berkeleyjet #dominatorjet #centurion #riverboat #speedboat #autotechnick


That felt pad on the razor knife was slick.
I think I might have a better method. Aaaaand long story short I will be stripping and repainting the pump again 🫤, so we will get to see if the new idea works better!
~ Nick
Excellent work and video
Thank you!
maaaaan... this is good work and def enjoyed the "primer" choice as i tend to do that often especially on even some composite work etc
love seeing the pump look restored like New!
Thanks 🙏. I appreciate the support. The pump did end up turning out better than I expected!
Turned out awesome. The clear really makes it pop. Great idea with the felt pads as well, I will be using that technique when I do my pump.
Really glad to see this thanks for the video 👍👍👍
You need to get the dominator pump put back in. It's stronger and better then the Berkeley and the SS impeller will fit on the dominator pump. Also machine the intake for a shoe and ride plate while it's out. Maybe even do a setback???
Ken, I agree that the dominator has a superior suction housing. Unfortunately, that pump has an aluminum impeller, and also needs to be rebuilt... On top of all that it also is in need of a new shaft.
The berk has a brand new 17-4 shaft and a stainless impeller. The berk unit is fresh off a rebuild. Its internals are a better match for the 496 that is going into the boat.
An impeller swap is not really in the cards for me. The stainless impeller is machined and set up for the berk pump, not to mention I would want a dominator specific impeller to take advantage of the rear lip that seals into the suction housing. I would be throwing away lots of work and $$$ by swapping the internals to the dominator housing.
At some point, I will rebuild the dominator pump with the internals that I want and it will find its way back into the boat.
~ Nick
Ken... I did have my intake machined for a shoe and rideplate since it was out. Now for the pump setback I am still undecided. It is something that I am considering, since I have everything out... It just may happen though..
~ Nick
@4:06, happy bowl?
😂🤣😂🤣😂
if you dont mind me asking what psi and mixture ratio's are you running through your paint gun?
Tough question, because all those things change depending on many factors. I initially will mix the paint, or primer as per the manufacture specs. I may reduce it down a little extra depending on what I am trying to do with it. If I am spraying build primer and I want a high build I won't reduce it (but may need more PSI to get a good spray pattern). If I want a good layout I might reduce it some. Same goes for the air pressure. Things like the air temperature, product that I am using and what I am trying to achieve will change my gun pressure and % of reduction. It is different every time.