Thanks to a viewers comments. I realized I forgot to install the stock bottom bolt spacer. I went ahead and put it in and wasn't too hard to do it without removing the top bolt mount.
Great video!! Can I ask where you purchase them from? Also, have you tested them by laying the bike gently on a lawn or pads? I'm trying to figure out if they will keep the handle bars from denting the gas tank in a slow drop. Not that I have dropped my bike;)
@@leathaelsdon9438 I got them from Webike in japan. No I have not test laying my bike down. I get that question alot. Maybe I should make a video of it. Thank you.
I just finished installing the crash bar this afternoon and it turned out to be pretty straightforward thanks to this video. Thank you so much for your generosity by filming and sharing.
Thanks so much for your video! The bars literally came without instructions, so i'm glad I found you video. Very simple and well made vidoe. Straight to the point. No annoying music.
Thanks for putting this video together. Because of this and Google Translate I was able to get mine installed tonight. I'd have probably avoided these without the video, so they should be thanking you for the extra sales. Great work!
Thank you so much for this video. I'm always a little nervous about working on stuff like this, especially with my bike only being a couple months old, but I just followed this video step by step and it was way easier than I expected. Got it installed no problem.
After watching this video I also ordered. Aset of ceashbara for my Honda rebel. They seem to be sturdy. But installing them took all my morning, but I'm happy with how they look.
Thanks for the video. It was very helpful. I have a suggestion for your next video though. I feel it would help even more if you were actually talking and explaining what you were doing in each step, instead of just silence. There were times during the video when I wasn’t sure which side of the bike you were working on. Also at the end it would have been helpful to show the bars fully installed. But very helpful nevertheless. Much appreciated!
Hi, Thank you for the kind words and suggestions. That was one of my early videos and I learn from each one. I do recognize some of the mistakes I make. As far as me talking, I've been ask a few times before :) There are a few reasons I don't talk. One is I am not gifted in talking and if I talk, it would require a lot more editing that I would want to do. Also since I dont talk, I tend to put more focus on the video which I think makes better quality videos. Lastly I was inspired to make videos from other DIY videos that hand no music and no talking and honestly I used them to fall asleep as well :)
@@MacrossGarage You are doing great. Doing better than me. I have all the video for easier removal of the Silverado Z-71 oil pan, pick up tube, accessory pulley, and oil pump, but never edited it for posting. Fixes low oil pressure. I should have posted it years ago. I'm picking up a 2023 Rebel DCT today.
@@MacrossGarage love how you show every step of the process and the results! Great Great Great camera angle! Please share it on the Facebook page if you are a member, many people would be grateful!
I just received crash bars through Amazon. The have a name of Baione on them and came with absolutely no instruction. Box says "made in China", my bad but they do look just like the one you installed with spacers and all. I'm still a bit nervous but plan to attempt this install. I would have had no ideal where to start. Glad I found your video
Got it all done yesterday in my 28degree barn. Would not have attempted it without your video. The bars that came from China ha holes that were about 1/16" off. Used a Dremel to slightly elongate.
Hey great video! very easy step to step. I was wondering if you have the PDF instructions? I just needed to see what the long bolt and nut size and length is as mine didn't come with it.
Do the heat shields need to come off? Are they in the way of the install? From the video it's hard to tell.. it doesn't look like they're in the way that much... great job on the video and thank you for this...
Thank you. The left cover give you more room to hang the horn while it is off. The right cover gives you more room on the lower bolt and you risk scratching the cover. You can probably do it without removing the covers.
@@jopierre17 it shouldn’t be that hard. As you can see in my video I used two open and closed wrenches. Sometimes you get unlucky and the loctite they use makes it difficult. If you uncomfortable, seek professional help. Maybe an impact air gun.
Will these actually do anything to protect the bike? I'd love to see someone lay the bike down on the side just to show what all would still get messed up if you went down.
Excellent video. I followed your process exactly, and it worked out perfectly. The Daytona engine guards shipped from Japan, and appear to be a very high quality product. Quality materials craftsmanship and finish. ONE QUESTION: The hardware package included a short bolt (12mm), I presume this bolt is to be used to attach the horn to the left engine guard? The original bolt on the bike works fine, some I'm wondering why the extra bolt was included.
I have a question, my wife is thinking about adding a set of forward controls (CMX1100 DCT Rebel 2022/23 - Kit Original Controls Repositioning (S-0832) - Footrest Footpegs - Hardware Fasteners Included - De Pretto Moto Accessories (DPM Race) - 100% Made in Italy) to her 1100T. Will the Daytona guards work with this set of forward controls?
After looking at the photos, i am going to have to guess it wouldn't work. The left side might be ok but the brake pedal might hit the guard bar and even if they fit, the guard bar will probably get in the way of your feet. Those are nice looking forward controls though, thanks for sharing.
The jack is used to support the engine so it doesn't move out of alignment when the engine bolt mounts are released. If the engine moves it will be hard to put the bolts back on. You can probably do it without a jack and hope it doesn't move, but there is that risk.
Before I go look at my Bike to install, Asking...Any reason Can't install One Frame bolt at a time - L-R Lower first- snug NOT tight/remove upper then Inches away- Push each side upper into place then place and tighten All both lower and upper (or Visa-Versa-Upper first?) Without having to support Engine weight from the Bottom(jack/Blocks etc...)? Or design allows NO Back-Forth swivel play for that?
I suppose you can. Hopefully the exhaust doesn’t get in way. Some have also said you don’t need to support the engine since there are other mounts still holding it. I just wanted to be really safe and didn’t want to deal with an engine moving on me.
Thank You Sir...Simply trying keep things as less complicated as need to be and I ask YOU because done Hands On and many times Easier route not visible until....After already done=hind sight! thinking, Damn, I could've done easier this way, lol🤣@@MacrossGarage
Just got my crash bars, but now I'm apprehensive about install, since I don't have a jack. Some are saying it can be done while on the kickstand, but the engine might sag? That sounds like it would be incredibly difficult to put back in place again with human strength. I wonder if those who are stripping the nuts are the ones trying to do it without a jack (like, the engine weight is putting too much tension on the screw for it to be loosened)? Has anyone actually done this install on the kickstand only, and did they have any problems?
I will be taking the bike to the shop next Monday so they can install the crash bar. I want to make sure that if they remove pieces I get it back. Can you provide me with the list of parts that I need to get back?
Hey Zoltan not sure what you asking with your first question. I am assuming you are asking if it scrapes when I turn? I used a front wheel stand then raised the engine with a jack.
Great video. This is probably a dumb question, but I have never worked on my motorcycle. I'm a newbie. I have a jack to hold the engine, but do I need a stand to hold the bike upright or can I use the kickstand? Thank you.
@@MacrossGarage Yes, it does help thank you. One more question, I'm assuming you're using a 3/8 torque, but I cannot find the amount of torque you're supposed to tighten the engine bolts. I don't want to overtighten or undertighten on my engine.
@@rustyscrib6071 A previous comment asked and I think they found after searching its around 45-55 NM or 35-45 ft-lb. Ask as many questions you like hopefully I have the answer.
@@MacrossGarage thanks for the info. My neighbor has been riding for over a decade is going to help me with it. I went ahead and bought a service stand for the back wheel.
Thanks for useful video. I just ordered mine. But noticed you used a front wheel chock and wondering if this is needed for the install or if one can support the engine with a jack without it as I will need to buy one if that is the case.
Looks good, but it's a poor design being 2 independent pieces. This means any twisting forces will be transmitted directly to the frame which defeats the purpose.
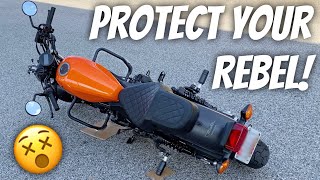
Did you find that the guards were wide enough to provide enough protection for the tank and side of the motorcycle? Or do you wish they were a little larger?
@@hecnotic Yea if there is no plastic it would be easier. That plastic near the brake is the one that covers the horn area and lower nut for the bolt mount?
@@MacrossGarage the rear brake side. No plastic needs to be taken off. On the side of the clutch for me where the horn is. That plastic needs to be taken off. After that. It’s easy. Thanks to your video big props to you for this. Only bad part is my guardian bell was on the bell so I had to take it off and put it back on
Which bolt upper or lower? You are the second comment this week on how hard it is to take out the bolt. Wonder if the newer ones have a stronger torque. Were you able to fix it?


Thanks to a viewers comments. I realized I forgot to install the stock bottom bolt spacer. I went ahead and put it in and wasn't too hard to do it without removing the top bolt mount.
Great video!!
Can I ask where you purchase them from?
Also, have you tested them by laying the bike gently on a lawn or pads? I'm trying to figure out if they will keep the handle bars from denting the gas tank in a slow drop. Not that I have dropped my bike;)
@@leathaelsdon9438 I got them from Webike in japan. No I have not test laying my bike down. I get that question alot. Maybe I should make a video of it. Thank you.
I just finished installing the crash bar this afternoon and it turned out to be pretty straightforward thanks to this video. Thank you so much for your generosity by filming and sharing.
You’re welcome glad it worked out.
Thanks so much for your video! The bars literally came without instructions, so i'm glad I found you video. Very simple and well made vidoe. Straight to the point. No annoying music.
Always good to hear it worked out.
Thanks for putting this video together. Because of this and Google Translate I was able to get mine installed tonight. I'd have probably avoided these without the video, so they should be thanking you for the extra sales. Great work!
Good to hear. It's the reason I make videos. There other videos out there that helped me so just paying it forward.
Thank you so much for this video. I'm always a little nervous about working on stuff like this, especially with my bike only being a couple months old, but I just followed this video step by step and it was way easier than I expected. Got it installed no problem.
You are welcome, glad it worked out. I am alway nervous when I work on my vehicles. I always play it safe.
Thank you. I used your video as step by step instructions. Couldn’t have done it without your help!
Glad it helped. Its the reason I make the videos.
Can confirm this also works on the 2023 crash bars I got as well
Thanks for the info.
Great. I just picked up a 23 1100 and am looking at these crash bars or the, mounted higher up, SW-Motech crash bars.
Or the 2023 1100T?
@@turtle19dad yes that's the one I have the 1100T
I like the fact they can be used like forward pegs. i'm going to order those. Thanks for the video.
I don't travel far enough to need foward pegs but I find that I am using them a lot more.
These work, saved my gas tank from a slow turn. I was working on figure 8, too slow.
Glad you and bike are ok. Was the guard bent or anything?
Great job, on both the installation and the video! Thanks for taking the time to put it all together.
Thank you for the compliments, it was my pleasure making the videos.
After watching this video I also ordered. Aset of ceashbara for my Honda rebel. They seem to be sturdy. But installing them took all my morning, but I'm happy with how they look.
Glad they worked out.
Great video! Been waiting for this for weeks. Thanks a lot, man. Subscribed
Thank you so much, glad you liked it.
Just ordered mine. Great video! This will certainly help with the install. Thanks 👍🤙
It’s the reason I do it, to help others. Good luck and let me know if you have questions.
Just installed my engine guard (Ebay replicas) and thank you so much, your video was very helpfull, you made my day !!!
You’re welcome glad it helped.
Thanks for the video. It was very helpful. I have a suggestion for your next video though. I feel it would help even more if you were actually talking and explaining what you were doing in each step, instead of just silence. There were times during the video when I wasn’t sure which side of the bike you were working on.
Also at the end it would have been helpful to show the bars fully installed.
But very helpful nevertheless. Much appreciated!
Hi, Thank you for the kind words and suggestions. That was one of my early videos and I learn from each one. I do recognize some of the mistakes I make. As far as me talking, I've been ask a few times before :) There are a few reasons I don't talk. One is I am not gifted in talking and if I talk, it would require a lot more editing that I would want to do. Also since I dont talk, I tend to put more focus on the video which I think makes better quality videos. Lastly I was inspired to make videos from other DIY videos that hand no music and no talking and honestly I used them to fall asleep as well :)
@@MacrossGarage You are doing great. Doing better than me. I have all the video for easier removal of the Silverado Z-71 oil pan, pick up tube, accessory pulley, and oil pump, but never edited it for posting. Fixes low oil pressure. I should have posted it years ago. I'm picking up a 2023 Rebel DCT today.
@@TheZX11taking videos is fun but editing not so much.
Thanks for this video. I just finished installing my crashbar!
Nice, glad it helped. Ride safe out there.
Thanks for the video! I just ordered mine and can't wait
Let me know if you need help with the install.
@@MacrossGarage I’ll let you know! Thanks. The your video is fairly thorough.
Who did you order them from??? Daytona website is way to complicated
@@rosalieboring7077 The link is in the description. I got it from there. =]
I used your video and it worked great thanks.
Glad it helped
What about lean angle of the bike?
Doest it reduces it?
I’ve tried to lean them to scrape but have t been able too.
Thank you for making this video! It's great man!
Thank you, glad you like it. Makes time and effort worth it.
@@MacrossGarage love how you show every step of the process and the results! Great Great Great camera angle! Please share it on the Facebook page if you are a member, many people would be grateful!
@@r6bendlova I dont have a FB page but may consider one, thanks.
I just received crash bars through Amazon. The have a name of Baione on them and came with absolutely no instruction. Box says "made in China", my bad but they do look just like the one you installed with spacers and all. I'm still a bit nervous but plan to attempt this install. I would have had no ideal where to start. Glad I found your video
I just looked them up and they do look the same. Good luck hopefully the quality is up to par. Let me know if you have questions.
Got it all done yesterday in my 28degree barn. Would not have attempted it without your video. The bars that came from China ha holes that were about 1/16" off. Used a Dremel to slightly elongate.
@@bartowens55 Glad you got it done. Post a review for others to benefit on Amazon. Thank you.
Hey great video! very easy step to step. I was wondering if you have the PDF instructions? I just needed to see what the long bolt and nut size and length is as mine didn't come with it.
I forget where I put the instruction. I’ll look and let you know. If you contact webike they might email you the manual.
Do the heat shields need to come off? Are they in the way of the install? From the video it's hard to tell.. it doesn't look like they're in the way that much... great job on the video and thank you for this...
Thank you. The left cover give you more room to hang the horn while it is off. The right cover gives you more room on the lower bolt and you risk scratching the cover. You can probably do it without removing the covers.
Is this is an install on a DCT model? The cover on the right side is different on my manual model. Manual cover seems smaller.
So are they comfortable for your legs? What about adding some black grip tape to where your foot goes?
They are comfortable for the legs, although I don’t use them much for that. Grip tape would help.
Would like to get it, but will it fit the Rebel 1100 Manuel version?
I don't see why not. If it didn't Webike would probably mention it. You can always send them a message to be sure.
@@MacrossGarage Hi again, try the link. Nothing came up. No listing of the engine guard.
@@my2wheels I guess they changed the link. I updated it, it should work now.
I tried this today and seems simple but I'm having trouble removing the lower bolt. The bike is on the kickstand.
Is it not turning?
@@MacrossGarage It won't budge. I'm well on my way to stripping it
@@jopierre17 you using an extension or breaker bar?
@@MacrossGarage I've tried both. I'm afraid of breaking it. The only thing I was thinking was the weight or angle but shouldn't affect the nut.
@@jopierre17 it shouldn’t be that hard. As you can see in my video I used two open and closed wrenches. Sometimes you get unlucky and the loctite they use makes it difficult. If you uncomfortable, seek professional help. Maybe an impact air gun.
Looks like the highway bar reduces the lean angle. Any experience or thoughts?
I thought about it when I first installed it. I try to lean it as much as I would normally do and so far I haven’t scraped it.
@@MacrossGarage super. Thanks for the response
@@tomabfall3955 You're Welcome
Will these actually do anything to protect the bike? I'd love to see someone lay the bike down on the side just to show what all would still get messed up if you went down.
I've see a couple videos of people laying the bike down with these. I believe the pegs touch first.
Nicely done, thanks for the lesson . Doing mine tomorrow
No problem, glad to help.
Great "how to", awesome content. Thank you!
Thanks for the kind words.
Just got mine installed, thanks for the help. Did you put back the spacer for the bottom bolt?
I did not put a spacer on the lower bolt.
FYI, You should put that spacer on the bottom bolt. After one more comment talking to another viewer I realized I was mistaken.
Thanks for sharing your knowledge!
You’re welcome
I am trying to figure out which bars offer the most coverage. Thinking about the t-Rex bars.
T Rex probably covers more than the Daytona even though they seem to sit high.
T-Rex for sure, but aesthetically they’re ugly (imo).
Excellent video. I followed your process exactly, and it worked out perfectly. The Daytona engine guards shipped from Japan, and appear to be a very high quality product. Quality materials craftsmanship and finish. ONE QUESTION: The hardware package included a short bolt (12mm), I presume this bolt is to be used to attach the horn to the left engine guard? The original bolt on the bike works fine, some I'm wondering why the extra bolt was included.
I don't remember the bolt setup for the horn. Not sure if it came with it or not.
After looking at the instructions, it is probably for the horn.
Its for the.... horn but the original is better
I have a question, my wife is thinking about adding a set of forward controls (CMX1100 DCT Rebel 2022/23 - Kit Original Controls Repositioning (S-0832) - Footrest Footpegs - Hardware Fasteners Included - De Pretto Moto Accessories (DPM Race) - 100% Made in Italy) to her 1100T. Will the Daytona guards work with this set of forward controls?
After looking at the photos, i am going to have to guess it wouldn't work. The left side might be ok but the brake pedal might hit the guard bar and even if they fit, the guard bar will probably get in the way of your feet. Those are nice looking forward controls though, thanks for sharing.
I just wonder, is jacking the bike up like this needed? I ask because I don’t have a jack and want to install these.
The jack is used to support the engine so it doesn't move out of alignment when the engine bolt mounts are released. If the engine moves it will be hard to put the bolts back on. You can probably do it without a jack and hope it doesn't move, but there is that risk.
Before I go look at my Bike to install, Asking...Any reason Can't install One Frame bolt at a time - L-R Lower first- snug NOT tight/remove upper then Inches away- Push each side upper into place then place and tighten All both lower and upper (or Visa-Versa-Upper first?) Without having to support Engine weight from the Bottom(jack/Blocks etc...)? Or design allows NO Back-Forth swivel play for that?
I suppose you can. Hopefully the exhaust doesn’t get in way. Some have also said you don’t need to support the engine since there are other mounts still holding it. I just wanted to be really safe and didn’t want to deal with an engine moving on me.
Thank You Sir...Simply trying keep things as less complicated as need to be and I ask YOU because done Hands On and many times Easier route not visible until....After already done=hind sight! thinking, Damn, I could've done easier this way, lol🤣@@MacrossGarage
It’s always easier the second time 😅
They say heroes wear capes. I say they wear blue latex gloves. Thanks for this!!
😂😂 you’re welcome
@MacrossGarage I installed mine today. Went very smooth because of your video. Thanks again.
Glad it worked out.
Looks fabulous
Thanks.
Just got my crash bars, but now I'm apprehensive about install, since I don't have a jack. Some are saying it can be done while on the kickstand, but the engine might sag? That sounds like it would be incredibly difficult to put back in place again with human strength. I wonder if those who are stripping the nuts are the ones trying to do it without a jack (like, the engine weight is putting too much tension on the screw for it to be loosened)?
Has anyone actually done this install on the kickstand only, and did they have any problems?
Thats a good point about stripping the bolts and not using a jack. I personally wouldn't take any chances.
Do you have to have the front forks on a jack like that or can you do this on a kickstand?
You technically don’t have to have it straight
I will be taking the bike to the shop next Monday so they can install the crash bar. I want to make sure that if they remove pieces I get it back. Can you provide me with the list of parts that I need to get back?
I'll look tomorrow to see what I had left over.
@@MacrossGarage thank you!
@@hbarrero05 It looks like I have one long mounting bolt which is the top one if I remember correctly and two spacers.
Hi Macross. One question. Can't reach the road in a bend? And one more question, where do you raise your motorcycle? Thanks for the answer.
Hey Zoltan not sure what you asking with your first question. I am assuming you are asking if it scrapes when I turn? I used a front wheel stand then raised the engine with a jack.
So i try to asking. 🤣Does the crash bar not reach the road when cornering?
@@zoltannyari9571 No, i've never once scraped them.
Bro, quedarían en una rebel 500 o la estructura es distinta ya que las encontre en Amazon y me gustaría saber si son compatibles o solo con la 1100.😊
I not sure but I don’t they they are the same.
Does it decrease the inclination…?meaning scrape easier on curves due to less leaning angle.?
I’ve tired to scrape it and haven’t yet.
@@MacrossGarage thanks bro ….just got a rebel 1100 in Taiwan… $20.000 USD …. . U guys a lucky….
Worth every penny 😉
はじめまして。 私もこのエンジンガード付けてました。でも、すぐ外しました。なぜなら、バンク角が浅くなるからです。傾けずに乗るライダーならいいでしょうが、一般的な走行でもすぐ接地します。 おすすめのエンジンガードは、プロスマンですね。強度とバンク角共に優れてます。
Interesting, I haven’t scraped mine and I lean me pretty good.
Great video. This is probably a dumb question, but I have never worked on my motorcycle. I'm a newbie. I have a jack to hold the engine, but do I need a stand to hold the bike upright or can I use the kickstand? Thank you.
The side stand should be ok but the tilt might make it awkward. I've never tried this with the side stand though. Hope that helps.
@@MacrossGarage Yes, it does help thank you. One more question, I'm assuming you're using a 3/8 torque, but I cannot find the amount of torque you're supposed to tighten the engine bolts. I don't want to overtighten or undertighten on my engine.
@@rustyscrib6071 A previous comment asked and I think they found after searching its around 45-55 NM or 35-45 ft-lb. Ask as many questions you like hopefully I have the answer.
@@MacrossGarage thanks for the info. My neighbor has been riding for over a decade is going to help me with it. I went ahead and bought a service stand for the back wheel.
@@rustyscrib6071 The stand will be worth it in the long run.
Thanks for useful video. I just ordered mine. But noticed you used a front wheel chock and wondering if this is needed for the install or if one can support the engine with a jack without it as I will need to buy one if that is the case.
I suppose you don't need one and just rely on the kick stand. You just have to work on it with an angle and make sure you support the engine.
Are you saying that you need to use the jack/lift to support the engine from underneath when removing engine mount bolts?
Yes, to avoid the engine moving or sagging.
@@MacrossGarage Thank you! And just one more question....does the engine bolt not need a specific torque when tightening?
@@lisabradley6466 I didn't torque mine but after some research it probably around 45 ft lb. Ask as many questions as you'd like.
@@MacrossGarage Thank you so very much!
Awesome rebel. I really want one.
You won’t regret it.
I was trying but i had nothing to support engine up
I think some people installed it without using a support. I like to play it safe and support the engine.
Looks good, but it's a poor design being 2 independent pieces. This means any twisting forces will be transmitted directly to the frame which defeats the purpose.
Yea I got to admit most of the reason was the looks and great for resting the feet on.
Wrong because Santa clause is coming to town.
i bought the same chock you have, but for some reason no matter how hard i try it just wont go on, how’d you get yours to work?
Make sure the chick doesn’t move. Try having someone stand on it.
Do u need the jack to replace the crash bar, or can u do it without rising the bike?
You can i suppose. As long as you dont mind working on it at an angle.
Oh and also, remember part of the engine is not supported when you removed the bolts.
Did you find that the guards were wide enough to provide enough protection for the tank and side of the motorcycle? Or do you wish they were a little larger?
From what I can see the the engine is well covered. The engine doesn't really stick out that much.
Great video. Where did you buy the motorcycle stand?
Cycle Gear.
Great video! Thanks for sharing.
No Problem, glad you liked it.
Can u rest ur feet in the crash bars for long highway cruises?
Yes you can. I tried to show my feet at the end of the video. I am 5’8”
The hardest part is trying to line up the top bolt to get it back on the left side
Yea that does get difficult. For me was placing the spacer for the same mount.
Is screw lock glue not needed when installing or putting the bolts back on?
I don't remember the factory bolts having any. It probably doesn't hurt to put some on.
for stuff like that you always want ot use loctite just in case......
Can anybody explaun why im having so much trouble taking the bottom nut off its not spinning and nuts are getting stripped
Are you holding it on the other end? The bolt is long and needs to be held on the other side with a wrench.
Yes
Does it look rusted or anything?
Don't you scratch when cornering?
No I haven’t. I’ve tried leaning hard and still hasn’t hit.
where did you get the headlight guard?
These are engine guards. Unless you are referring to another video.
Thank you for the video. No loctite on those motor mount threads?
There wasn't any from what I can see. I didn't put any when I put them back. I will be checking the bolts from each ride.
I was thinking of fettering these but I’m afraid it limits the leaning angle?
I don’t think it limits it. I’ve seen a video awhile back that leans the bike all the way down and the pegs hit first.
Thanks for this!
You are welcome
Does that reduce your lean angle?
I've tried to scrape them while leaning and haven't been able to.
Hey Macross what is the torque setting you used to tighten the bolts to fix the crash guard?
I couldn't find the toque specs so please don't follow mine if you are particular about it. From my experience I think 20lb is plenty.
@@MacrossGarage thank you
@@binoyvaliyaparambath5759 No problem, you can also check on them every once in a while.
@@MacrossGarage cool 👍
@ Binoy Valiya looks like the top tightening torque is 44N.m and bottom is 54 N.m as per instructions in Japanese
I am getting those this Wednesday. I live in Agoura Hills. Can you help with the install? I pay $200 for help…
I would help you and wouldn't charge you anything you are pretty far away.
I just ordered mine
Nice.
This is for the DCT. I’m trying to follow but the manual looks different
Interesting, I didn't know it was different. What part is different? Are you not able to install them?
@@MacrossGarage I’m working on it now but the side of the brake. I believe there’s no plastic to take off
It was easier if you think about it one less step to deal with. Clutch kind of got in the way adding the plastic back in back not horrible
@@hecnotic Yea if there is no plastic it would be easier. That plastic near the brake is the one that covers the horn area and lower nut for the bolt mount?
@@MacrossGarage the rear brake side. No plastic needs to be taken off. On the side of the clutch for me where the horn is. That plastic needs to be taken off. After that. It’s easy. Thanks to your video big props to you for this. Only bad part is my guardian bell was on the bell so I had to take it off and put it back on
What front wheel stand is that?
I picked it up at a local Cycle gear called Trackside Roll On Wheel Chock
very cool. give us your opinion in everyday, please. practical, you can put tour feet in motion. curves, etc.
I will once i use it more. At the end of the video I show myself riding with my foot on them.
would this fit on honda rebel 500?
Not sure but highly unlikely.
DZIĘKI !! Polska pozdrawia !
You’re welcome
Plus bas la cloche, plus bas!
🤷
Where can I order them??
Webike, link is in the dercription
No locktite ? good luck.
I will probably go back in and apply it in the near future.
Torque wrench should be used.
What's the torque spec?
Engine bolt did not come out that easy.the entire bolt turned an eighth then the nut stripped out on me.not as easy as it looks in video in my opinion
Which bolt upper or lower? You are the second comment this week on how hard it is to take out the bolt. Wonder if the newer ones have a stronger torque. Were you able to fix it?
This guy talks to much
:)
No - thanks
It’s not for everyone
Very good information vedio....😊😊😊
👍
감사합니다 따라 장착해볼께요
You’re welcome