Brick Fire Pit

HTML-код
- Опубликовано: 16 окт 2020
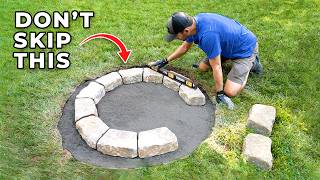
- In this video, I will be making a beautiful brick fire pit. This firepit will end up being 4 feet wide and a foot and a half high. This is a big project probably more complicated than the typical DIY video you will see on RUclips, however, this fire pit is made very well and will last for many years! the end result is comparable to a professionally built fire pit.
I have plans to build an outdoor entertaining area including a patio surrounding the fire pit, two porch swings, a firewood rack, and nice landscaping. If you want to see more let me know in the comment section below this video and stay tuned for future videos.
Support my Channel on Patreon at - www.patreon.com/user?u=32924378
And get access to Shoutout, Giveaways, and much more.
For Simon Says DIY merchandise go to - www.amazon.com/s?k=Simon+Says...
Please Like, Comment, and Subscribe!
Follow me on Instagram and Facebook for more content.
Instagram: Simon_Says_DIY
Facebook: Simon Says DIY
#SimonSaysDIY #Brickfirepit #Firepit  Хобби
Хобби


![DIY Smokeless Fire Pit [with a sealing strategy others missed!]](http://i.ytimg.com/vi/l15BEL4CjgU/mqdefault.jpg)


You can use a 50/50 mix of the muriatic acid and water to clean the extra mortar off your bricks if you want a cleaner look.
Thanks!!!
Muriatic acid even at a 50/50 mix over time eats away at the concrete its just a lower less potent form of
"hydrochloric acid" why brick layers stop using it its been found to decay away concrete over time , muriatic acid is an aluminum cleaner for frigerated trucks and aluminum surfaces.
I used this video and design (+ a few tweaks) to build a fire pit behind our house. It turned out fantastic, and I couldn’t be happier with the final product. Took a little longer than this video, but it looks great and will last for years. Thanks so much for the video and tutorial! I learned a ton building this and so happy I did!
That is so awesome!! Thanks for letting me know! :)
GRE8 JOB BROTHER 😊
I can't wait to have my own pit!
Good Luck!
When I seen the Milwaukee I knew. I can trust this guy!
haha Thanks! 😀
Awesome job. Really love the look and function. Only thing I’d change would be to have less mortar spilling over and covering the nice red of the brick on the top of the bricks. At that point though, perhaps you just stop caring because you’re exhausted. 😂
Thanks! good luck with yours :)
You did a amazing job I like it! Thank you for letting us watch.
Thanks so much! I appreciate it!
I wish I found this video before I started my project. This is awesome!
Thanks!! :)
Thank you for the video I am going to try this idea
You’re welcome 😊 good luck with yours!
This is awesome, Thank you for the step by step method
I’m glad you liked it! Thank you!
Great, informative video! I will definitely be using this design for the fire pit I'm about to build!
Glad it was helpful! good luck with yours! one thing I would maybe change, one of my viewers recommended filling the gap between the metal ring and the bricks with sand instead of concrete. this would better insulate the concrete and brick wall from the heat of the fire and last longer.
Wow! I love this. I must show my wife this.....
Thanks! I’m happy to hear it.
It’s amazing the only thing I will do right after it will be to grind a bit all around.
That way the brick and the cement will have a nice finish and not so rough.
But this video is by far 10/10
Bravo.
I must say man I think you did a fine job!!!
I love the building inspection ♥️ hehe
Haha Thanks! 😂
Great vid. When I do mine I think I'll add some iron pipe with an elbow connector to build the drain/air intakes right into the concrete pad
Thanks! :)
Definitely going to be watching this during my fire pit project this weekend
Awesome! Good luck with your project and I hope this video is helpful! :)
Excellent video thank you for sharing. 👍
Your very welcome!
I'm glad the video could be helpful :)
Congrats! Maybe you could grinding with wire brush to remove the cement of the bricks. I'm pretty sure that you and your family's been enjoying amazing moments at the fire.
😂 job inspectors came out
Great job!! Thank you 😊
Haha yeah, thanks! :)
Thank you for posting. My wifenis wanting me to build one. I will use your tips.
Awesome! thanks!!
Η pvc σωλήνες που έβαλες θα λιώσουν από την θερμοκρασία. Όλα τα άλλα ήταν πολύ ωραία δουλειά. Μπράβο σου φίλε
Thanks!! 😊
Looks really great! I don't understand how try remove the PVC pipes. Thank you for sharing!!!
I guess you said the PXC pipes just melt as they were just used to form the vents.
@@ritareilly8548 Hit them with a hammer from the inside a bit, they should losen up and then pull out.
@@blades3o Thank you!!!
@BigMW26 Thanks! That is exactly right.
good acheivement. personally one thing ide have done to make the top layer cleaner (no cemet stains) is to have filled your mortor 3/4 way up, then made a dry pointing mix and then you wouldnt have had the overspill of mortor
Was inspirin to watch.
Thanks! I appreciate the recommendations!
Great video! It would be super helpful if you could create a list of materials and measurements for everything. In particular, how many bricks did you wind up using?
I used 98 bricks but a few extra wouldn't be bad just incase.
3 - 80lb bags of mortar
11 - 60lb bags of concrete
@@squidsix-nine4868 how so?
I don't see squids reply ... probably removed;although, I'd rather read all comments to make my own conclusions
@@SimonSaysDIY
One OPTION that can be added to this fire pit is to make a CONDUIT very similar to the PVC pipe ... but perhaps use a metal conduit instead .. for a PROPANE tank hose .. so that if there is ever a FIRE BAN in place by a municipality / local laws .. due to potential forest fire issuance .. then one can STILL use this fire pit DURING a campfire ban / open flame ban timeframe. This makes this fire pit EVEN more versatile ... Jus Sayin. (oh ... and the propane tank can be place several meters away with a longer hose attachment ...and this tank can even be made to be inset into the ground by building a mini- concrete silo to protect the tank, . .and then a lid put on this silo. Smart, eh ..?
I would fill the space between the ring and bricks with stones and just top 6" with concrete
Yes, that is a better idea! Thanks for sharing. That would give room for expansion when the fire pit is hot.
Thanks for sharing!!!
Pretty cool thx...I think I may use same technique but go deeper with less above ground height...because I will be mostly sitting in a chair
Yeah, that would give you a lot more radiated heat from the pit as well. Thanks and good luck with your project! :)
Love it!!
Thanks!
Did you consider using like a tan color curved landscape stones for the top layer? I think the contrast of color and a different stone for the top would be cool.
That would look really nice!
And easier!
Loved watching this! I have a similar plan, but am concerned and uninformed, not sure how to find out.
I've been told that some masonry/concrete cement mix would warp or crack with heat. What did you use? I'm rewatching now to see if I can spot a bag. Is this a concern I should have? Excited to plant one in my own backyard! Thank you for sharing.
Mortar...Altho make sure you create more ventilation than this video!
Amazing work 👍👍👍👍
Thanks! 😁
Thanks for sharing this wonderful video. Great backyard fireplace sir.
Thank you! And thanks for watching!
Well done brother really nice I will do exactly the same thank you
Awesome! Glad to hear it!
So after having the fire pit for a while have you had any issues with the mortar or bricks cracking or falling apart from the heat? Anything you would do different?
Thanks
Concrete is stronger than brick and mortar so I wouldn’t have put concrete In between. Just me
Great work!!! Does the pvc pipe melts from the heat?
nice. ran into some glitches. I'll be in touch. Quality work!
Thank you! Sounds good.
Great work and great video!
Thanks so much!! 😀
For sure, you did a good job but, IMHO it's definitely overbuilt and shows more concrete than bricks. That's why most DIY fire pits use adhesive between the layers so it doesn't show. Nonetheless you get an "A" for brick laying and neatness.
Thanks! I have seen it done with using the adhesive but i'm not a big fan of it but it does seem like a great option to consider. :) Thanks for watching!
I've tried both Fuze-It and Locktite max lock whatever (supposedly the strongest bond). Both become flexible over time, and particularly in hot weather, don't hold worth a crap. Now trying Gorilla Glue Clear Max with landscaping blocks on the outer, and will do a layer of red clay bricks with refractory mortar on the inner layer. We'll see how it goes.
Beautiful work, I will be definitely making this. How many bricks did you use, cement etc..
Thanks! I'm glad my video could help. I don't know the number of bricks off the top of my head but i will count them when i get home tonight and let you know.
Great job bro
Thanks! I appreciate it!
I hope you never have to move it :)
Nice job. Did you use refractory cement between the brick and fire ring? Wondering if regular concrete will crack with heat/cool cycle?
Yes. It will break apart. Could be wrong, but I give it a couple of months. I did something similar using fire brick on the inside instead of a metal ring. I also used refractory cement. Filling the center (11:00) with concrete ensures heat transfer. This transfer will lead to the eventual failure due to the heat/cool cycle. Instead, leave this area OPEN and suspend your top circle of bricks (block it up during construction) with an air gap to allow for heat to escape. You should get a good 8 - 10 years before you need to repoint anything. Hope that helps.
Very beautiful. Does the heat radiate through the bricks, or does it just stay at the top and go up?
Thanks! It would take awhile for the heat to make it through the concrete and bricks so it mostly just radiates from the top.
Great project! Why do you use the inner metal fire pit ? Are there any risks of cracks ?
Or rusting
Awesome job. I see you built this on concrete and didn’t use any fire brick at bottom or paver sand, pebble rocks, etc. so will this eventually crack the concrete?
It may slowly crumble over time but if your concerned you can leave sand in the bottom to insulate the concrete from the heat. Personally I’ll just leave a layer of ashes in the bottom to keep the heat from getting to the concrete. I have used it quite a few time and it has no noticeable damage yet.
@@SimonSaysDIY from my understanding sand is not enough to keep the concrete from cracking. I’ve searched all over and you’re 1 of the first I’ve come across to build directly on regular concrete (not stamped) every article I’ve read said it’s highly discouraged to build fire pit on regular concrete.
@@GainsMarathon I haven't had any issues yet but you could definitely get the same end product if you just pour a ring around the outside to lay the bricks on and leave the bottom open to avoid direct contact with concrete.
Thanks!!
@@SimonSaysDIY Yeah, even if the concrete slab cracks in the middle, continues to crack, spalls, and eventually pulverizes into dust, it would basically only be similar to having a fire on dirt at that point. It's doubtful it would ever cause the brick wall to fail prematurely. My only concern is the stories I read of exploding concrete. Still not sure how common/likely that is. Any fire balls w/ concrete shrapnel in the last 2 years?
very cool build , any considerations for the cement to withstand the heat ?
After a few years and many really hot bomb fires a few cracks have formed. It's still holding up really well but I would recommend filling the gap between the metal and the brick wall with sand. this would let the metal expand when hot and isolate the concrete from the heat. Thanks! 😄
I like the way this looks. It looks a bit rustic and that's what I want. I have old bricks and prefer the way they look to new. My question is, can I do this without the ring? What is the value of using the ring? When I was a child no one used a ring. Many just used rocks they dug out of their yard. If there's a specific reason to use it, I'll consider it. But it's a extra money and I'm trying to save.
Really nice! Btw, you forgot to remove the PVC from the bottom holes..
Thanks! I forgot to take it out for the end of the video but with a bit of tapping with a hammer the PVC came right out :)
What trowels were used for the project?
I'm looking at doing this exact firepit in the spring.
I'd personally use a diamond
i have silly quesitons (newbie).do you have to have the logs sit upright or can it be laid down? can twigs and branches be used? i have string lights, how high does the string lights have to be so it won't cause a fire? thanks in advance.
Gut video. Would like to build mine exactly like this. Question 1.how many bricks did you use. Think the rest I, ll mage, Thx alot. 👍👍👍
Thanks! I don’t recall the number of bricks used. I believe I replied to a few comments with that number your looking for.
So I'm curious why did you put the concrete base instead of just using dirt. It seems that would not necessitate cleaning or draining. Nice job.
Thanks! I was worried about the tree roots busting up the fire pit and wanted a good base to build off of. But you could always just put concrete around the sides and leave the middle dirt.
what company did you use for your mortar and sand? and what were the ratios? great video btw
Can you give a ballpark estimate of how many brinks we used for this? Trying to figure out how many I should look to buy.
Sorry I didn't get back to you sooner! I used 98 bricks but a few extra wouldn't be bad just incase.
Love it! Where did you buy the metal circle?
Thanks! I got it from Tractor Suppy,
Is it necessary to use high-heat mortar? That stuff is expensive. Great video. Thanks!
I'd like to know this also. $66/bag at Menards for refractory mortar, but I stood there in the isle reading about exploding concrete so ultimately decided to buy the stuff.
Way to go! I love it! What are the bricks measurements? Are all the bricks the same? Thanks
thats the best fire pit yeat
Thanks! I appreciate it!!!
Cool stuff man! Did you use a special "fire bricks" and cement or was it just regular?
Thanks!! I had some fire bricks left over from another project so I used them to build this. However, the concrete I used was just the normal bag mix you can get at a store. I don’t think much heat should make it to the bricks on the outside so I don’t think firebricks should be needed. The metal ring and cement should shield most of the heat.
@@SimonSaysDIY It's too tall and you should use fire brick as the interior lining. That metal will eventually corrode. The air vents are a good idea.
@@danatcanyonlake583 Thanks Dan! I appreciate the advice!
At 10:07 he literally jumps straight up into the air and then at 10:08 he lands and teleports to the right side of the frame.
WHAT MANNER OF WITCHCRAFT IS THIS?!
haha! nice :)
I’m curious: did the foundation or the ring burst? Once me and some friends had a fire on an exposed-aggregate concrete slab and it literally exploded 😅 nice work! Looks pretty good 👍
Probably an air pocket in there that you heated up
Thanks!!!👍🏻
Very welcome! 😄
I'm considering doing this, how long will it take, how much will it cost and do I need the metal ring and surrounding concrete
Thanks! This took me a full Saturday and then a few more evenings through out the week. You could skip the metal ring as well as the surrounding concrete but it will not be as strong. If I did it again I would build the outside ring of bricks and then drop the ring in and pour sand in to fill the gap. I had the bricks left over from another project but i'm guessing it would take $150-200 or so depending on the type of bricks you choose.
@@SimonSaysDIY thanks, how much will it cost with just the bricks (estamate)
Can you update how this fire pit has held up over the past few years?
That sucker will last until the concrete explodes from intense heat!!! People be careful, when it blows it will go off like a cannon.
i was thinking the same it happened with us before very dangerous
After the explosion I cleaned it out and repaired the concrete bottom. I love the fire pit so I invested in outside firebricks and it did it again, just not as bad this time. So, I cleaned it out again but this time filled in the damage smooth with pool sand. Also, welded a circular steel rebar grate together to provide a 3 inch airspace for the coals to cool to ash. Now, it works great….just wished I thought of the rebar grate before ever firing it up the first time. I’m very lucky….
When you do your jointing you should take a soft brush
Can you put stone over this or the heat and other reasons won’t allow it? Thanks
Only problem when u use cement or mortar on a fire pit is ,it gets hot and it will crack ,u would have to use fire brick ,but it would still prob crack
Thanks!! I haven't had any issues yet but i'm sure over time the concrete will crumble and fall apart. But it may take awhile.
I know this is very late on the thread but I'm building this fire pit and my bricks as I'm stacking them and starting on the second layer The gap between each is wide at a v shape and the bricks aren't lining up to look round It's more jagged. I'm not sure where to go from here. I thought as I made the circle it would be round like yours but it is coming out as a very jagged circle. Any thoughts? If you get this soon I'd appreciate any comment or help.
Sounds like the circle was too small
Should there be a grill on top of the pit to keep meat or whatever from falling inside?
That would be a great addition! 😁
Thanks
👍🏻😁
Next time right at the end take a wet sponge and clean off the mess on all the bricks... would look alot better.
Uum how do you replace the water trough you used as the inside liner when it wears out?
doesnt the plastic pipes melt after start the fire??
I removed it shortly after finishing the video. I wanted to make sure the concrete had cured fulling before hammering them out. I used a block of wood and hammer to lightly tap on the pipe and it came right out.
You are probably correct though the plastic would probably melt and burn.
Any special concrete? I thought fires can explode concrete?
you left the PVC pipe in ! lol
should have left the open space between brick and ring and put the holes at the top of the metal ring. make sure the ring is NOT galvanized.
Thanks for the tips!
Hello,I have a question.I went to Home depot to buy the concret to build my firepit but the guy over there told I must not use concret for the bottom because can explote!😳 So,I'm really confuse because I saw a lot of videos and you almost always use concret at the bottom. So,what should I do?🤔 Thank you in advance if you can answer me.
concrete can retain moisture in it and at high temps it can cause a grenade explosion that can be a serious problem, my suggestion would to make sure the concretec is dried thoroughly or don't concrete the center where the ring is going to be and use just gravel.
@@Exessive-Gaming thank you so much! I'll do only with gravel yes.
@@cubanalibreenmichigan2890 Your Welcome,
another good example without a concrete pad is by the "bros build" just scale it down and take out bricks at the bottom ring for airflow.
ruclips.net/video/gIxzP8TnMeM/видео.html
@@Exessive-Gaming that sounds good,I think I'm going to do that one. Thank you again for taking the time and answer me. You have a new subscriber over here.🙏❤🙋
@@cubanalibreenmichigan2890 TY and YW!
what was your shopping list w quantity?
Dude, nice job!👍 As I started watching, I thought someone *FINALLY* had the perfect smokeless fire pit build on YT!
You considered what it seems most EVERYONE fails to address: air intake at the bottom - which is what fire craves! (And also doubles as cleanout & drainage!)
1st question tho: how badly did the outside crack from thermal expansion?
It had nowhere to go...
Here's how I would adjust the design to make it the perfect smokeless fire pit:
#1. Drill the top perimeter of the ring with 1/2" dia holes spaced at about 2" centers, just below the top rib of the ring. (A quality step bit works well for this.)
#2. *DON'T* fill the space between the ring and the brick with *ANYTHING* - this becomes a hot air chamber which will provide "secondary combustion" at the top of the fire...
#3. As you did, provide the air intake to the interior & cover the pipes with morter - OR, just use pieces of steel pipe, and morter the gaps where they pass thru the bricks & ring, and leave in place permanently.
#4. On a 60° offset, provide 3 more air inlets at the bottom that only go thru the bricks - providing air to the chamber between the ring & the bricks.
#5. Adjust the size such that this air gap between the bricks & the ring is only 1-1/2" to 2" wide - this is plenty for expansion, but tight enough to get the proper hot air draft when in use.
#6. This is mostly esthetic, but I would either lay the top bricks on their side, touching at the inside dia, and with a slight overhang over the ring - thus enhancing airflow at the top... Or better yet - just use the trapezoid cap stones made for the top!
#7. After the inital burn (and the galvanized coating burns off the ring) clean & spray paint with high temp black - and marvel at the beauty of it!😁
P.S. Another awesome improvement would be to set the primary air intake (galvanized steel) pipes partially IN the concrete base - and/or allowing them to extend far enough inside to be able to top with an old BBQ cooking grate to keep the fire up & drafting PERFECTLY throughout the burn.
I'm working on a similar build based on patio blocks & trapezoid retaining wall block, and wasn't planning on mortering the block - but I think you've INSPIRED ME!👍👍
stock ring is what's it's called but don't forget to drill the holes at the top of the ring if you want less smoke.
Thanks! I appreciate it!
This looks like my grandma's Waterwheel
how many bricks total?
So fire and pvc probably not the best idea as it produces toxic gases I get that you say you can knock it out but you are clearly having a fire with it still in place and kinda suspect it would not come out easily.
I actually did remove it. I wanted to make sure the concrete had fully hardened before i removed them. It was a little stuck at first however with a block of wood and a soft taps with a hammer it slid right out. sorry i didn't cover that is the video, I needed to get the video edited pretty quickly.
Thanks for the comment. I appreciate it!
You need to wet the bricks. Some of the bricks had moss on them. I'd clean that off.
Yeah they were very old bricks. I tried to scrape off the moss but must time I’ll try wetting them as well. Thanks! :)
How many bricks do you need
A good OPTION to add to this fire pit is to make a CONDUIT very similar to the PVC pipe ... but perhaps use a metal conduit instead .. for a PROPANE tank hose .. so that if there is ever a FIRE BAN in place by a municipality / local laws .. due to potential forest fire issuance .. then one can STILL use this fire pit DURING a campfire ban / open flame ban timeframe. This makes this fire pit EVEN more versatile ... Jus Sayin. (oh ... and the propane tank can be place several meters away with a longer hose attachment ...and this tank can even be made to be inset into the ground by building a mini- concrete silo to protect the tank, . .and then a lid put on this silo. Smart, eh ..?
Thanks for the tips!
💪😎🇺🇲
Looking nice, done cool, though.. there is no chance to water flow away after rain or snow storm.. There is no drainage.
Thanks! There is actually three holes on the bottom for the water to drain out. The three holes are for air flow as well. :)
How many bricks?
I used 98 bricks but a few extra wouldn't be bad just incase.
Has the heat of the fire done anything to the concrete?
I’ve had only 3 or 4 fires in it so car and it had no damage so far! Thanks :)
Concrete exploded!
You're supposed to strike your head joints before your bed joints, you are doing the opposite. Also that concrete you are putting around it is way way too wet! Just trying help
drill some holes around, near the top of the metal cylinder for a smokeless why don't ya
Thanks for the tip! :)
Why didn't you make it a smokeless pit?
I wasn't too worried about the smoke. It might be nostalgic but I kinda like having some smoke, it reminds me of camping out with my dad and brothers as a kid.
omg he filled a smokless pitt cement, not the smartest lol
You need fire brick your pit will crack if you don’t line the inner with fire brick.. wish I knew before watching this video
I did it the better way, just bricks. Drains naturally into earth.
Love it! I believe there is always room to improve and modify to make it your own. Thanks for sharing!
The cement all over the bricks looks a mess
It's build to high , the wall does not provide heat for your whole lower body when sitting next to it , you would have been better off installing a hobo barrel at least the barrel is thin and will get you warm but your pit only burns ones face .. no hate just saying from exp sitting next to one
Very true, I have noticed that. It has to me a large fire to get much heat from it at all.
How much do you think this cost?
Probably around $150-200