15" inch MacBook Pro A1398 Mid 2015 Battery Replacement Repair

HTML-код
- Опубликовано: 6 окт 2021
- If my videos helped you save money, please consider helping me continue to make these videos by sending me a little appreciation, even $1 would be greatly appreciated. Thanks! :)
Venmo:
"@BinhVu" Last 4 Digits if it Asks Are 6734
Zelle or PayPal (friends and family from a bank account so they don't charge any fees):
itsbinhrepaired@gmail.com
Patreon:
/ binhrepaired
Feel free to mail me your old electronics or parts you replaced during an upgrade.
Mail:
It's Binh Repaired
1288 N Hillview Dr.
Milpitas, CA 95035
Tesla referral link: www.tesla.com/referral/binh58522  Хобби
Хобби


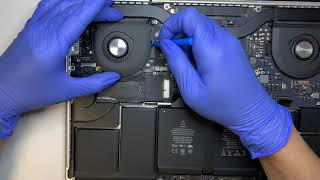
![15" MacBook Pro Battery Replacement Tutorial [Mid 2015, A1398] #ifixit](http://i.ytimg.com/vi/rHlvwRQlLfM/mqdefault.jpg)


Dang what happened to your hands?
This ruclips.net/video/aDKOo7agETg/видео.html lol
@@ItsBinhRepaired dang that was bad.
Also thanks for making the MacBook video lol
@@JoeyMendoza1 haha yeah, no problem
Man I was worried you cut them up on the MacBook using floss or something, Unicycle doesn't look like a fun way to do it either. Thanks for the vid.
Hahaha yeah
I don’t understand why people are worried about your hands🙏🏽just want you to know you are greatly appreciated for this video. It helped me ! 💯 thanks ! Perfect instructions and details and not making it sound over complicated.
Thanks! I think some people just have a tough time with gore. Maybe makes them queasy. Some are more sensitive than others. Must be tough on Halloween
I always appreciate when someone uses a good hand model to do these kinds of tutorials
Lol thanks
Your repair video was perfect! I followed your guidance and did the battery replacement on my wife's mid 2015 MacBook Pro in about an hour and a half. You anticipated lots of places where I would have messed up! I also borrowed an idea from another repair video that made the job even easier: I used a syringe to put a small amount of isopropyl alcohol in the spaces around the battery cells to soften the adhesive before using the flat metal blade tool. FYI, my old battery was swollen far more than the one in your video, but it remained completely intact during the prying and removal. I'm really grateful for the expertise you generously shared!
Awesome, glad it helped. I usually don't use isopropyl alcohol at the start because it makes a goopy mess. I usually do it after peeling the remaining adhesive. If you haven't already, please like and subscribe so others can find my videos and possibly consider watching a few others to get the algorithm to recommend my channel. Thanks!
That was AWESOME, thank you so much! I don't think I would have had the nerve to do this on my own, without a clear, step-by-step guide like this. Worked like a charm; thanks again! 🙂
Glad it helped. If you haven't already, please like and subscribe so others can find my videos. Thanks!
You sir are a lifesaver! I am not good with hardware electronics, but I followed your steps 1 by 1 and successfully replaced my 8yr old battery. Never thought I could do it. Thank you for this video!
Glad it worked out. If you haven't already, please like and subscribe so others can find my videos. Thanks!
Just finished mine! Thank you so much, a relatively easy fix made even easier with your instruction. You’re definitely helping others with your content, keep it up!
Glad it helped. If you haven't already, please like and subscribe so others can find my videos and possibly consider watching a few others to get the algorithm to recommend my channel. Thanks!
Great video. Just swapped out the battery on my 2015 MacBook Pro. Been sitting on my shelf for ages and finally got round to doing it. Excellent instructions. Thank you.
Awesome, glad it helped. If you haven't already, please like and subscribe so others can find my videos. Thanks!
Fantastic! This video shows the whole operation and zooms in on the details you need to know. I watched it once while waiting for battery delivery, then had it cued up and played it along while I did the repair. Success! I did it slightly differently. My MBP didn't seem to have the latch for the trackpad connector, so I just bent the connector back/up and just avoided it while working. My tool was smaller and had a shorter blade, so getting under the speakers was hard. Instead, I used a cotton swap and dabbed tiny amounts of 99% Isopropyl Alcohol in there to loosen the foam tape and went in from the corner. Once I got the end segments free the rest went quickly. Everything else was just like the video. I used an old credit card to scrap the debris after the old battery was out. The tool was in a $8 pack of tools that I found while searching for cheaper alternatives to the ifixit tool sets, which were probably better but I liked the price and variety in my alternate pick. Just take your time with the blunt scraper tool and this repair isn't so hard, just tedious! I would have gladly paid someone to do it, but everyone wanted me to leave the laptop for days, and apple needed to ship it out, for up to two weeks! I'm glad I did it so I could get back to work right away.
Yep, all the other places take a long time. I usually do same day turnaround once parts are on hand. Glad you were able to figure it out!
I just installed a fresh battery in my MacBook Pro 15” 2015. Thanks a lot! Super detailed instructions, everything was easy to follow 💯
Glad it helped. If you haven't already, please like and subscribe so others can find my videos. Thanks!
First thing you did when computer is opened.. Clean out the Dust.. Well done, you are the first one I've seen to do that important step.
You also covered Power Management reset and battery calibration. Everything was Spot On ... a very concise well thought out instruction video.
Thanks! Yeah, I don't know why some people work on computers and don't clean them. Lol
Hello. This is Mario Lazoski, notebook technician from Rio de Janeiro in Brazil. Excellent video. The only one I watched where the technician took extra care to remove the double-sided adhesive residue. You are very didactic. Got another like and another subscriber.
Thanks! :)
Incredible job on this video and breaking down each step and noting how important it is to be careful in certain areas. If I did not watch your video and did this on my own I probably would of damaged my machine. Was nice to final find a solution to the "boot loop". - Thanks
Glad you saw the value in the video. A lot of people just fast forward through. Lol If you haven't already, please like and subscribe so others can find my videos. Thanks!
I confirm it worked for me. Much simpler than the ifixit post.
Thank you very much. I was waiting for this video since so long.
Some photos from the ifixit post helped me zoom in the image of the track pad unplugging.
Glad it helped. If you haven't already, please like and subscribe so others can find my videos. Thanks!
This is excellent! Changed the battery in about as long as it too the video to play on an iPad next to me. Thank you for this.
Awesome, glad you were able to follow along and the repair went well. If you haven't already, please like and subscribe so others can find my videos. :)
Second time now fixing my own laptop, thanks to you and your clear explanations! Thanks so much, Binh!
Awesome, thanks for the support!
Great video. I could see every step, including the tricky attachment of the trackpad cable to the trackpad. I used a little acetone applied with a small syringe to loosen the adhesive, and an old credit card to work the battery free. Sent $10 to Binh. Thank you.
Glad the video helped. As long as you're careful with that acetone, it'll be ok, but I don't use it, because a tiny bit can cause a lot of problems if it gets into the wrong place. Lol Thanks for the support!
I used a 8" x 1.5: tapers wooden wedge used to install doors and windows as a scraper-less puncture damage. I used my hands mostly to pull up the battery. With the trackpad so close I was afraid to use any tools. I got it. I only unconnected the battery and the wire connector next to it covered by the metal plate. Thanks for this video.
Sounds good!
Thanks. I almost started following the ifixit tutorial which would have had me strip the entire laptop. I reckon I would still be in there rather than now watching my laptop charge happily :)
nice work, hope your hands healed well!
Awesome, glad the video helped. Thanks for the support! My hands have healed pretty well. :)
Thank you for posting this SUPER INFORMATIVE video! I'm job hunting and not having a computer is detrimental to my process of looking for work and I can't afford to have someone replace the battery. I did look at other videos, but yours doesn’t skip any steps and you're great at explaining everything you're doing and why. It took me a while to get it done because I stopped the video at every single step! 😂 This video is a lifesaver! Thanks again!🎉🎉
Awesome, glad it helped. If you haven't already, please like and subscribe so others can find my videos and possibly consider watching a few others and commenting to get the algorithm to recommend my channel. Thanks!
Thanks again! It worked like a charm. I used some alcohol to help dissolver the adhesive too. Your method is really simple and your video goes right to the point.
Awesome!
Hi, is it really necessary to remove every little bit of the old adhesive tape? Is it for optical reasons only or is ist necessary to for technical issues, like sticking dust, etc? So can I just take the thicker bits of, leave the sticky residue (no alcohol, etc) and put the new battery on top? Thank you.
I didn't follow any instructions other than this video, maybe not the smartest to not cross reference but i did read comments to see general sentiment. Informative and descriptive while being concise. Made the process simple for me who knows nothing about these parts, but I can follow direction LOL. Right on brother! Feels amazing to not have my mac die every 15 minutes, bein forced to stay at a plug!!
Awesome, glad it worked out! Haha Yeah, my videos are designed so that as long as you can follow directions, the repair should go well. If you haven't already, please like and subscribe so others can find my videos. Thanks!
Followed along while changing my battery and enjoyed the ride. Thank you!
Awesome haha if you haven't already, please like and subscribe so others can find my videos and so you can enjoy the ride in the future, hopefully. Lol Thanks!
Such an excellent video! I followed every step carefully (but skimped a bit on removing the remaining tape). Everything works as it should now thank to you. Greetings from Sweden! :-) 😊❤
Awesome, glad it worked. If you haven't already, please like and subscribe so others can find my videos. Thanks!
I can not thank you enough!!! Followed step by step. You’re a life saver!!!
Awesome, glad it worked out. It doesn't take much to thank me. A like, subscribe, and a watching a few other videos to get the algorithm to share my channel is plenty and will help others with their computer issues. Small contributions to the channel are also greatly appreciated. :)
I followed this video exactly and it worked great! Thanks for the detailed shots of everything that you did! For those in the market, I believe the "pry tool" is quite similar to a frosting knife.
Glad it helped. Thanks for the support! A frosting spatula knife will definitely work, but make sure the tip is very thin. If it's too thick, it'll dig into the battery. I bought some to try before. It's a bit less flexible, but if you grinding down the tip so it can get under the battery, it works really well.
The one I use was for a pharmacy. It's thin to scoop up pills. I got it as a replacement for the giant frosting knife I used to use.
I have a gig Saturday so I will surely be doing this next week! Plus i have to order the stuff lol. Seems easy to follow thanks for this!
Awesome, sounds good!
Thank you! I used this video to help me change the battery my first time. Helped a lot!
Glad it helped. If you haven't already, please like and subscribe so others can find my videos. Thanks!
Thanks.... I followed your instructions step by step and successfully changed my battery.
Awesome, glad it helped! If you haven't already, don't forget to like and subscribe so others can find my videos. Thanks!
Your approach worked nicely for me and the video was great. I used the flexible gift-card technique to free most of the batteries and then a piece of flexible stainless steel to finish the job. I got tired of using rubbing alcohol (70%) to worry the adhesive residue free, and used some grain alcohol (190 proof 95% alcohol). The residue was gone in seconds - much easier and quicker. If you use grain alcohol wear a nitrile glove, as grain alcohol will dehydrate your skin.
Sounds good!
Many thanks. I replaced the battery successfully after following your video step by step. 👍👍👍
Awesome, glad the repair went well.
Hello , as i am writing this comment to your channel ,the new battery for my MBP mid 2014 is just inserted and callibrating . Great video . Best Refards from Belgium
Glad it helped! If you haven't already, please like and subscribe so others can find my videos. Thanks!
I've done quite a bit of research on this because the instructions that came with the battery involve removing every component inside the case before removing the battery and I was afraid I was likely to cause more potential problems doing all of that than if I just carefully removed the battery. There are lots of videos about this process - some useful, some not so useful - but I liked this one the best for its common sense, professional approach. The job requires some patience, but the instructions are well illustrated and easy to follow. My computer is up and running and will actually sit flat on a surface again. Meanwhile, I hope Mr. Binh Repaired has recovered from the thrashing his knuckles took while fighting with a large rock. Thanks for the great video!
Hahaha! My hands are healing well. Will hopefully eventually have a stop motion/time lapse video of the healing process.
Your video is helpful!!! The zoom in part is really ncce!!! I replaced my MBP battery successfully!!! Thank you!!!
Awesome, glad it helped! If you haven't already, please like and subscribe so others can find my videos. Thanks!
Thanks man, very time consuming but got my machine battery replaced before it did further damage and tbh it was easier than expected. I did not have to remove the speakers. Luckily my adhesive was pretty easy to get off.
Awesome, glad it worked out. If you haven't already, please like and subscribe so others can find my videos. Thanks!
Thank you so much for sharing your knowledge with the masses. Your guidance worked perfectly and I could never have done this by following the instructions that came with the battery. You, sir, are a Rockstar! Greetings from Scotland.
Awesome, glad it helped. If you haven't already, please like and subscribe so others can find my videos and possibly consider watching a few others to get the algorithm to recommend my channel. Thanks!
@@ItsBinhRepaired I liked, but I forgot to subscribe! So, here I am now. A new subscriber.
@@tartanrambo haha thanks!
Thank you so much for this guide! Thought I had flickering once it turned on at the end, but it seems to be fine. Again, thank you!
Glad it helped. If you haven't already, please like and subscribe so others can find my videos. Thanks!
@@ItsBinhRepaired Done!
@@Caenei Awesome! :)
Watched several videos and this one is the most concise thus far!!! Mahalo nui loa!!!
Hope the repair goes well. If you haven't already, please like and subscribe so others can find my videos and possibly consider watching a few others to get the algorithm to recommend my channel. Thanks!
Wow. Great video. Very helpful. You make it look so easy. Thank you for sharing.
Glad you found it helpful. :) If you haven't already, please like and subscribe so others can find my videos.
Thank you for your guidance. It was really easy to replace it. Now my MacBook have second life to live, thanks!
Awesome, glad it helped. If you haven't already, please like and subscribe so others can find my videos and possibly consider watching a few others to get the algorithm to recommend my channel. Thanks!
This is the absolute best I have ever seen. Thank you!
Thanks!
I just finished this ordeal. First time doing this. It took me 3 hours as I punctured the corner battery right from the get go. I got cold feet. It smoked 3 times but then I used the credit cards that come with the iFix kit instead of the butter knife shown above. I had to be really patient with pushing through the adhesive but made it through. Did the reboot options as shown. New battery is now charging. All seems well so far. Thank you for such an amazing video.
Awesome, glad it helped! Yeah, the tool I'm using is not a butter knife, it's a very flexible and really thin pharmacy spatula.
@@ItsBinhRepaired did you file the edges of the spatula to make the smooth?
No, it was already smooth
Thank-you for an awesome instructional video on how to replace the battery.
No problem, glad it helped.
Thanks mate, cracking and in-depth video. Super helpful 🎉
Glad it helped. If you haven't already, please like and subscribe so others can find my videos. Thanks!
Thanks very much! Your video was super helpful and very clear. Successfully changed the battery in my MBPro after I had random shutdowns running on battery power, even though the battery had >60% power left on reboot. Turns out the battery was pretty bloated after all and definitely in need of replacement. A local Authorized Repair Center asked $500 to do this! (Really! They obviously just didn't want to bother.)
Following your instructions and replacement battery leaflet, the most time-consuming parts of the task were blowing out all the dust, and OCD-fueled cleaning of remnant adhesive with 70% isopropyl. 99% would have worked MUCH better I think. I used scotch tape to keep removed screws in correct position/order so they were easy to put back in. Slow and steady did it. Thanks again!
Awesome, glad it helped and the repair went well. If you haven't already, please like and subscribe so others can find my videos and possibly consider watching a few others to get the algorithm to recommend my channel. Thanks!
Your video helped along more than IFixIt's! Thank you and I hope your hand is healing well.
Glad it helped! My hands are doing well. If you haven't already, please like and subscribe so others can find my videos. Thanks!
your step by step video is very clear. 🙂Thanks a lot!
Glad it helped. If you haven't already, please like and subscribe so others can find my videos. Thanks!
Thanks for the video! I bought the ifixit kit (great kit btw!) but needed a little info on how to get that battery out. Mainly the right way to get the adhesive to release. Didnt want to damage the battery getting it out. Great instructions!
Glad it helped. The residue can be easier cleaned by using a syringe to drip the isopropyl alcohol directly on it and letting it sit until it turns milky color. If you haven't already, please like and subscribe so others can find my videos and possibly consider watching a few others to get the algorithm to recommend my channel. Thanks!
@@ItsBinhRepaired yea the kit came with adhesive remover. which i’m pretty sure was just IPA. took it off easily!
@@SWBCrawler Yup!
Awesome video! Your scabby hands were quite a distraction, though, but I feel your pain, because I watched your crash video. You have some pair on you for even taking that ride, but you handled it like a champ, and you saved me a bundle with this step-by-step video. The last dude who replaced my battery ef'd it up, and so far, so good with this one. Donation is on the way. Thank you!
Awesome! Glad it helped. Thanks so much for the donation. Work has been super slow recently. It really helps me out. Haha it's pretty fun to ride that thing.
@@ItsBinhRepaired You make house calls to Encinitas, CA? ;) Hang in there. We're in for more bumpy rides, and hopefully you won't be riding that e-Uni when it hits the fan. Stay alert, my friend.
@@reelmensch9987 as long as you cover the travel fee, sure. Lol
@@ItsBinhRepaired For that e-Unicycle? Sure. :)
@@reelmensch9987 lol
Thanks bro for the video! You saves me alot of money and time! 🎉
Awesome, glad it helped. If you haven't already, please like and subscribe so others can find my videos and possibly consider watching a few others to get the algorithm to recommend my channel. Thanks!
Thank you! Your instructions were very helpful.
Glad they helped. If you haven't already, please like and subscribe so others can find my videos. Thanks!
A very meticulous, instructive video. Thank You!
No problem. If you haven't already, please like and subscribe so others can find my videos and possibly consider watching a few others to get the algorithm to recommend my channel. Thanks!
Great video, thanks. Glad to see that we have the same brand of replacement battery. I wasn't sure which one to choose and now I have more confidence in it
No problem. Hope the repair went well.
@@ItsBinhRepaired Great! I'm planning to do mine tomorrow. It's severely swollen so I'm going to do it in the garage and potentially behind plexiglass with a respirator mask just in case!
Haha I don't think you need all that, but I guess better safe than sorry.
@@ThatTalkingDogGuy don’t forget to Earth ur left leg 🦵 as well!
Could you share me the link to the battery @It's Binh (Been) Repaired & Reviewed is using in this repair?
Thanks a million for this. Worked great!
Glad it helped. If you haven't already don't forget to like and subscribe so others can find my videos. Thanks!
Thanks a lot! Took my son 45 minutes to do this. Initially it did not work but turns out we did not completely "click" the battery connector. Now my MBP is thin again.
Awesome, glad it helped! If you haven't already, please like and subscribe so others can find my videos. Thanks!
Fantastic man !! I could repair it in an hour ! Thank you !!
Awesome, glad it helped. If you haven't already, please like and subscribe so others can find my videos and possibly consider watching a few others and commenting to get the algorithm to recommend my channel. Thanks!
Worked like a charm. Thank you!
Glad it worked. If you haven't already, don't forget to like and subscribe so others can find my videos. Thanks!
Thanks for the video!! I used a Heat Gun which made it easier. Thanks again because I wasn't sure which screws to remove.
Glad it helped. I don't trust heating batteries. That can be dangerous. If you haven't already, please like and subscribe so others can find my videos and possibly consider watching a few others to get the algorithm to recommend my channel. Thanks!
I don’t actually heat the battery. I heat the other side of the computer on either side of the trackpad. I definitely give you a like and I will subscribe as well. The MacBook will not boot up now without the battery. Do you think I have to purchase another battery? I was trying to use it without the battery.
@@phillipwoodward6816 yeah, Apple is a butt when it comes to stuff like that. I'd worry about melting the keyboard keys. I've seen people do it even with just a hair dryer trying to get water out of their computer.
You save me so much money!! Great video. So easy!!!
Glad it helped. If you haven't already, please like and subscribe so others can find my videos. Thanks!
great video! ... I did not understand why the apple store assistance had told me that I should also replace the keyboard with the battery because it is a single block!
Because they don't know how to separate the battery from the palmrest.
Excellent video, thanks! One comment - I found using lighter fuel better for cleaning off the adhesive residue than alcohol. Thanks again.
I don't trust that stuff being inhaled or making contact with my skin. I found using a dripper bottle and letting it sit a few seconds works well.
well done, good video recording and instructions
Thanks! If you haven't already, please like and subscribe so others can find my videos and possibly consider watching a few others to get the algorithm to recommend my channel.
Brilliant video. Thank you so much.
Glad it helped. If you haven't already, don't forget to like and subscribe so others can find my videos. Thanks!
Good vid. So I'm currently working on getting an old bulging battery out of my 2015 MacBook, and I ended up using the floss technique plus my library membership card to ease out the batteries. The trick I would suggest to people is instead of applying the alcohol underneath the battery is to dip the entire floss in the alcohol. The alcohol along with the friction will be enough to weaken the adhesive.
Alcohol just takes time to dissolve the adhesive.
@@ItsBinhRepaired Indeed, but it's faster with friction.
@@rommix0 yeah, it removes the dissolved layers faster.
Just did it. Works fine everything is good thank you so much
Awesome, glad it worked out. If you haven't already, please like and subscribe so others can find my videos and possibly consider watching a few others and commenting to get the algorithm to recommend my channel. Thanks!
@@ItsBinhRepaired sure did my g
@@AkhilaBeatstv thanks again!
Thank you so much , this was helpful.
Glad it helped. If you haven't already, please like and subscribe so others can find my videos. Thanks!
Thanks for the great tutorial. Just finished successfully replacing the battery on my 2015 macbook pro. Unfortunately, some of the keys on the keyboard are not working and the NVRAM reset did not work at all for me.
Oh no :( did they stop working after the replacement? Might have damaged the keyboard cable. :(
Thank you- this was a huge help.
Glad it helped. If you haven't already, please like and subscribe so others can find my videos and possibly consider watching a few others to get the algorithm to recommend my channel. Thanks!
i watched the one where your hands get injured, haha@@ItsBinhRepaired
Lol :)
Hi, thank you very much for this video, I followed it step by step but I’m having an issue turning the Mac on it’s just not responding. This is the reason why I changed my battery in the first place but the problem still hasn’t been resolved by me changing the battery.
Sounds like a motherboard issue sadly
Very nice and easy-to-follow video. Well done! Will this also work for the late 2013 model?
About the same, but this ruclips.net/video/ZWHx65hEt34/видео.html
Awesome thanks! I used a hard plastic kitchen spatula. :) 10 minutes!
Awesome, glad it worked out. If you haven't already, please like and subscribe so others can find my videos. Thanks!
Thank you for this wonderful video! I recently bought a 2015 MacBook Pro 15” off of someone from Craigslist, much newer than my mid 2011 iMac 27”, and after playing around with it discovered the battery needs servicing warning. I’m very glad I found your video amongst all the others. Though at the end I was confused when I saw your MagSafe connector with an L connector instead of the T which I know is standard for MagSafe 2. Was this a mod cause the end of your MagSafe 2 died, or what? Please advise. And off topic, if you or any other followers care to give a recco for which 2tb ssds is best for this MacBook in terms of longevity, low heat, and reliability, I’d be grateful, as I’m spending too much time without figuring it out. WD 550s are nice and appear solid, but $$ and hard to find. Samsungs seem to run hot. And Sabrents are fast, but seem to have problems in Macs. Answering the MagSafe Q is all I expect, but thought to find out what folx are doing on the other.
Magsafe is an 85W magsafe charger with a magsafe 2 adapter on it. The SSD you'll need an adapter to convert m.2 pcie nvme SSDs. amzn.to/3oXCrNW sometimes it'll have issues going to sleep though. amzn.to/3NomUA4 I like crucial.
Awesome guide thank you
Glad you liked it!
Thank you for share this video. Greetings from Cuba
Glad it helped!
Great video. Helped a lot
Glad it helped. If you haven't already, please like and subscribe so others can find my videos and possibly consider watching a few others and commenting to get the algorithm to recommend my channel. Thanks!
@@ItsBinhRepaired Sure. Your video helped exactly on the part where you had to bend the connector before plugging it in... great 🙏
Awesome :)
I can say from experience please be super gentle with the battery during removal. I had one catch fire while working it out. It doesn't take much!
Yeah, don't puncture lol
Great video, got a couple more years out of my MacBook Pro.
Awesome, glad it helped. If you haven't already, please like and subscribe so others can find my videos. Thanks!
Thanks for the video. A little advice. Use Ronsonol Lighter Fuel on a paper towel and it will remove the leftover adhesive without damaging plastic.
I used a dripper bottle with isopropyl alcohol now. It works well
@@ItsBinhRepaired I use the alcohol too but after using the lighter fuel. The light fuel is my go to for removing adhesive for years. They literally melt any adhesive without damaging plastic.
@@chrismiralles2781 nice
Great Video. Followed it and all worked great. I used a thin spactler that has 45 degree angle used for windows. Same Result. The repair was really quick. Apple engineers need a lesson on serviceability. I guess they design systems that are disposable. thanks for your video.
Yeah, they design them to be just repairable enough to deny it and to make people bring it to them for high profits.
If you haven't already, please like and subscribe so others can find my videos and possibly consider watching a few others to get the algorithm to recommend my channel. Thanks!
awesome, thanks. it was great. everything works great
Awesome!
Thank You!
Glad it helped. If you haven't already, please like and subscribe so others can find my videos and possibly consider watching a few others to get the algorithm to recommend my channel. Thanks!
great job thanks
Glad you enjoyed it. If you haven't already, don't forget to like and subscribe so others can find my videos. Thanks!
Thank you !!
Glad it helped. Thank you so much for your support!
Very nice teardown. It does look like you crashed a motorcycle a few days before you made the video. Scab-R-Us. 👍
Close! This is what happened. Lol ruclips.net/user/liveaDKOo7agETg?feature=share
Great Video, just wondering have you thought of heating the front with hair dryer? or it doesn't work well
No, don't
Thanks bro, a thorough and very helpful tutorial! Your knuckle roasties are another story- bike, skateboard or backhand?
Glad it helped! This is what happened ruclips.net/video/aDKOo7agETg/видео.html haha caught on live stream.
@@ItsBinhRepaired Ouch!
@@grantwood9302 that was nothing compared to the slow speed crash that broke my right clavicle lol
Great instructional video. Tomorrow I am supposed to receive my new battery I ordered on Amazon. I unfortunately I don't have the manual dexterity to do this installation on my MacBook. I am in So. CA., I live in San Jacinto, Riverside County and sometimes in Calabasas, LA County. You wouldn't happen to know anyone in the vicinity of either of these cities, who can replace the battery with the same care and precision that you did and won't charge a fortune like Apple? (Apple won't do labor only either.)
No idea. You could ship it to me. Lol
Very helpful!
Glad it helped. If you haven't already, please like and subscribe so others can find my videos. Thanks!
Super, thanks!!!!
Glad it helped. If you haven't already, please like and subscribe so others can find my videos and possibly consider watching a few others to get the algorithm to recommend my channel. Thanks!
Thanks!
No problem. Thanks for the support!
Hello, great video thanks. I just changed mine but my mac is slow now, fan is running the highest.
Any advise? I am about to mount the old battery because i need it to work 😢
Double check the battery connection and the trackpad. If you damaged the trackpad, then the old battery won't fix the issue.
@@ItsBinhRepaired thanks for answering, still same problem with the old battery. I got this code after running the system diagnosis PFM006.
I was very careful when changing the battery i can’t believe i just broke it 🥲
:(
Nice Video, will it able to power on even the battery is disconnected?
Nope, because Apple is a butt
Thank you for the video, it helped me a lot. I successfully replaced the battery on my MacBook and did the SMC. It booted up after that and went in the account, I shut it down and did the PRAM reset. After that it keeps restarting at 30% loading logo. When in boot options is not restarting, so it's a boot problem. Did I crashed the boot with the reset? Help will be much appreciated.
Sounds like bad replacement battery
Not sure
@@ItsBinhRepaired Nevermind, it was my fault. I didn't pressed all the way down the battery plug into the mainboard socket, that was dumb of me, maybe I was afraid of breaking something. Now it purrs like cat. Thanks for the input.
@@Cyb3rvision haha sounds good
Thank you so much for this! Battery install worked but now my touchpad doesn’t work. Any idea what to try?
You might have damaged the trackpad cable or the trackpad itself
@@ItsBinhRepaired anything i can look for to narrow down the issue?
@@ItsBinhRepaired keyboard doesn’t work either but lights come on and power button works? what the.
Double check both ends of the touchpad cable. If that doesn't work, you'll likely have to replace the touchpad cable.
For some my mouse pad is not working and the fan is running high after changing the battery and following your instructions.
Can you please give some advise?
Sounds like you damaged the touchpad
Fantastic tutorial - very clear and specific. My only question/concern is that now my keyboard and trackpad are not responding despite correctly reconnecting the strip. Is this most likely because I somehow damaged the connector strip? Gratefully-Dan
If both aren't working, it's most likely the touchpad cable
Thanks for your response. I replaced the trackpad cable and the keyboard/trackpad still don’t work. It does work with an external keyboard/mouse. Should I try to replace the trackpad as well?
@@Danegger1same issue. did you find a fix?
Yeah
Yes; despite being very careful about the battery removal I must have somehow damaged the trackpad and/or cable. Once I replaced them it worked. Thanks again for your excellent tutorial and responses!
Hi Quick urgent question, After doing all this, my laptop is way slower, even if the battery replacement worked properly, could you help me out quickly ? Thank you very much for this tutorial.
Is the touchpad working?
So I followed your tutorial trackpad and keyboard did not function just ordered new flex cable batteries were really swollen you think this might be issue ?
@@brettlewis5157 trackpad cable most likely
Thank you so much, I just replaced the battery on my MBP late 2015 Retina, all seems to be ok but the keyboard stopped working. Do you know what could happen? Maybe I did not plug it correctly?
If the power button works, you likely damaged the trackpad or trackpad cable.
@@ItsBinhRepaired thank you, yes the power button is the only thing that still works. I guess I need to buy a replacement for the trackpad and cable.
I pull the cable upwards instead of towards the back of the laptop. The trackpad is still working,(move the cursor and clickable) do you think it could be just that I am not connecting well the cable? I thought about just replacing the cable. not the trackpad and cable.
@@JavierRigoniKobayashi possibly. Hopefully that's the only issue.
Thanks. Just not sure what keys you held for the last test? Ctrl+alt+R? What is for?
Ctrl option P R
Thanks for the support! I hope it continues to run well for a long time.