Bbones are great, but not so great if you're planning to export the armature to a engine. The way I do it, and it generally takes 90% of the weight painting job away is using a mix of support bones (similar to what you did, but with no Bbones), and pre automatic weights planned bone placement. For the hips I just move the leg bone to about the end of the pelvis. Then I skin it, and then move up the bone back to its regular position. If you understand a bit at how the bone position affect its envelope weight it really speeds up the process.
@@channelname8623 “not so great if you're planning to export the armature to a engine” I was thinking exactly the same question. If you rig like this then you can only animate it in Blendre, or re-invent bbone in other software like UE. This is why they make so many support bones in their standard skeleton rig.
I’m completely new to game engines, but can you make all the character animations in blender and use the animations on the game engine without a need of the bones? Will there be problems like changing from an animation to another? Because I remember watching some tutorials where they could animate the bottom part of the model with a running anim and the top part was aiming and shooting but idk (and don’t remember) if they were using rigs in the game engines or just imported animations
@@haramberinokripperino7770 Yes bones are essencial in games. Characters use bones to record animations instead of vertices, because most of the character animations a procedural, not pre-baked sequences. And animations can be re-used only on similiar skeletons, or you will need to do alot of extra work to retarget them.
@@Nevetsieg so its pointless to make rigs and animation in blender if you want to make a game? Just make the model in blender then make the anims in unreal engine?
Thank you so much! I've been watching your tutorials for years and they've really helped me learn Blender and character creation, so it's really cool to get a comment from you :)
Can confirm it also works amazingly with quadrupeds, even with very little geometry definition between the limbs and the body. You can even get fancy and add a second set of these to the shoulder. Might have to weight paint a little, but it's nothing compared to what you'd have to do otherwise Can't believe my months of struggle are finally over 😅
This is why I see that there's the "Hip Layer" and the "Waist Layer" in any model. *_Dang, the sheer time and effort to actually fix the most complicated joints in the human body is the reason why the rigging is smooth._*
Super high quality, thank you. Most blender tutorials on RUclips are like fast food quality in other words, they’re too basic. Not all of them of course.
If this works, you're a godsend! I'm continually feeling like I'm failing at all this stuff, and trying to take on the hips was an extra huge blow to morale. Glad to know it's not just me. If anybody else is struggling, I'm still bad at getting stuff done, but I've learned the essentials on many fronts in the first eight months of having my first computer, by just trying to listen to every bit of info out there and skipping to a different thing the second I completely don't understand. Don't confuse that with laziness, it's just the practicality of knowing you'll understand everything better if you ease in and generalize until the dogmas click, and that you aren't built to work like a machine at one thing for a long time, most likely. I myself am going to try to give up the prospect of finished animation for a while until I go back to basics and use the isolation to learn all the tips, tricks, nooks and crannies. If anybody else has thoughts to share about sane productivity, maybe we can siphon data off each other. Anyway, stay strong, people 💪
Thank you so much for the comment! The best thing I can recommend is to do loads of mini projects each that focuses on a new technique each time. Then over time you're abilities build up and you start to be able to combine the skills into bigger projects. That's the way I did it! Another thing I'd recommend with characters is you don't need to make an entire production ready perfectly weight painted character if you're only going to use it once for a few shots. Do the very basics quickly, animate the scene and then if there are any deformations that look off on the poses, add and keyframe a shape key and sculpt it so it looks right from the camera view. I spent loads of time when I started trying to get perfect deformations for poses that the character was never going to be in, and now I save so much time! Finally, also be aware that you don't have to make every single thing in the scene, it's good to get an understanding of how everything works but definitely have the goal of building up an asset library of textures and assets so in the future you can have more fun building the scenes rather than spending ages trying to model and texture everything! :)
@@lewisanimation yeah, right now I'm just going to take a step back and read through a lot of the documentation until I understand everything I can, cause it seems like there's always more to it. I'm probably a bit too much of a perfectionist to use other people's assets but having my own ones organized would definitely be cool. Maybe one day I'll turn into one of those freaks who can make a perfect model in 3 minutes
The most amazing thing is that I’ve been suffering from similar problems for two days now, I didn’t google anything, but I got this video in RUclips suggestions, thanks for this lesson and an interesting solution to this problem
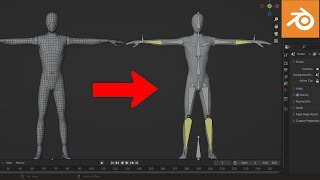
Wow! Thank you for sharing this, and for including the side-by-side demonstrations of the character with and without the hip improvements. And to be able to just tack it onto any rig without interrupting the motion capture animation is so helpful!
thank you bro, your overall existence makes me believe there's a solution for any problem, you just need to take your time, sip your cup of coffe, sit and work then after a lot of struggles, have a great night of sleep and with a fresh mind try again until it works, lol. mad crazy talented skills you have. I love you! and thank you again!
Okay, so, this is incredible. I'm going to work on blender again pretty soon since I have a "real" PC now and started learning UE5. And since it has been years I first tried it out, I forgot how to rig etc. Stumbling upon this video is a blessing, cause I remember the deformations in my models were a pain in the arse to deal with lmao. I feel like it's a cheatcode and your video is only 9mn, straight to the point and really understandable. A novice like myself can totally understand and make what seems like a miracle in no time. Really, words cannot express my gratitude, thanks for your work mate!
@@VISDE Heyo! Well that's a good question but since I'm still working on blender atm, I can't say immediately. I guess unreal takes body weight into consideration already, so why not bones? Whenever I fiddled on unreal I saw models with different bones count so my first guess is that it would work, but it's just a guess... I'll post an answer whenever I go back to unreal, which will be in a few months so yeah, sorry for not being able to provide a clear answer just yet :x
Dear Sir, I want to express my HUGE gratitude for sharing such a powerful technology. The thought that it would take a long time to learn how to draw a weight discouraged me from learning 3D modeling. Thanks again
Had a similar idea a while back and tried it on an old model with kinda bad topology. Worked like a charm. We're basically doing poor man's muscle sim using extra bones. Only caveat with this is you can't export bendy bones to game engines iirc. In my setup I used about four bones with Stretch To around the hip and a few helper bones around the pelvis to control the auto weights better.
"Only caveat with this is you can't export bendy bones to game engines iirc." Did you find any ways to adopt it, all or part? Or some other method that's like this?
Have you found a way to add this hip setup to a rigify rig? I'm attempting it as I type, and not having much luck so far. Putting this hip setup in the metarig before Generating doesn't create the proper deformation bones, but they DO stay in the metarig copy. So I think I need to Generate a rig, then Join the Bendy Hips to that rig before I parent with Auto weights
@@jdamagedgoods because we live in a polarized energetic system where Truth = Positive and the opposite of Truth = Negative, and Truth cannot exist without it's counterpart. Every facet of our reality is a dualistic system at the core. Even the planet we live on is a polarized energy field (that's how "gravity" works, also how a compass works). By the OP signaling that they would not lie, they are attempting to communicate Truth and, by doing so, they are broadcasting positivity.
I actually loved doing weight painting in maya back in school, after loosing the licence and switching to blender it has been a struggle, thank you for this tut!
Fantastic man! Such an amazing trick that will relieve a lot of time and frustrations for both new and advanced riggers. Thanks for sharing your knowledge!
I've spent the last 2 and half hours screwing around with weight painting the hips and it was going nowhere. This fixed my problem and I am relieved from my day-long suffering
Seeing the video length, I came in expecting it to be filled with babbling barely related to the topic. But no, every second of this video turned out to be relevant and attention catching. Great job and thank you!
God-sent advice. I've been beating myself up over the little imperfections in hip weight painting that I was only thinking to solve out with mathematical geometry designed around range of motion and musculoskeletal anatomy. This takes that foundation to the next level. Thank you!
I just began to learn animation in Blender, watching this video is like stepping into the future of understanding animation. It's where I want to be....hopefully soon.
This randomly popped up, I don't do any rigging these days but the hips were always a pain back in the day. Good to see there's a handy solution should I ever have to go back to it!
Wow, you’re really great. This was a joy and so professionally done also such a positive sounding voice. Thank you. Look forward to more of your tips and techniques.
this is the first video i saw from You and i never use blender, but at the half of the video i already pressed the sub and like! love it! very great video and technic!
Adding a centre crotch bone was a huge help! But for older versions of blender that armature modifier not being available, the solution is to create separate bones for each leg! For each leg i create a pendulum bone (it points down just off centre, so its easier to mirror) and has a small nub bone at the crotch mesh point that will be skinned. It copies the rotation of its corresponding leg at 25% strength- just make sure to add a limit rotation so they can't cross over each other when the legs are crossed!. To stop the thigh mesh at the top/side crease point from moving too far inside the torso when bent, i created bones above the thigh joint, level with the expected mesh crease point that full copies the thigh leg rotation so the mesh swings out at a higher pivot point! Mixing the weights with these added bones have got me close to the above results, with a little bit of smooth correction modifier too. Shoulder joints are my last bugbear to fix- i like making simple models so i can't rely on things ironing out over sub-d's.
Not as quick as your lazy being would think it was, but it is actually quicker than manual weight painting pain... Incredible results. Thank you very much my guy.
Can you achieve something similar for game characters aswell, where stretching functionality can't be exported? Or do you have any nice tricks or solutions for game characters aswell that will be exported for engines like Unity or Unreal Engine?
I tried this setup without using bendy bones. I can confirm that with some additional manual weight painting it does work. You can then bake the animation onto the game rig and export it for use in a game engine.
The best part of the tutorial is that you show how useful and versatile is. 🌟 I always have the doubt of using a feature in a different character/scene/etc.
rigging the hips has made me kinda give up on modeling actual characters, because I can never make it look right and I couldn't find any practical solutions in the past, but thanks to you I might start doing it again... also... that constraint at 5:21??? when tf was that added? that's amazing, so much of my stuff needs that constraint.
You sir are beautiful, my characters hips not deform right is what burned me out because I couldn't get the weight paint just right this is what I needed
wow. that was incredible! I've been struggling with this for a while, thinking that the only solution was just to get better at weight painting.. You've shown me some new constraint ideas that I've never thought of before
I love Blender's default weight deformation, most Characters come out very clean. I hardly weight painted any of my characters. Your tips are awesome, will try them for sure on my next iteration !
I don't know what kinds of characters you animate, but the realistically proportioned ones I've used auto weights on have all suffered from this issue with hips and a similar issue with shoulders. It's a convenient tool for sure, but it's never been good enough for me out of the box.
I tried this on the shoulders and while it works pretty much as good as it does for the pelvis! It isn't 100% perfect but it's pretty dang good. Thank you so much for this video!
This is brilliant. I have been looking for so long for something like this. I tried so many different ways to achieve this and nothing has worked as good as this.
if i had to guess at why this works so well i'd imagine it's because it's replicating the dynamics of actual muscle better? i wonder if there could be some more generalized nugget of information somewhere in here that could be applied to every joint
I also can't be bothered with weight painting. I've been using helper bones but never bendy bones. Also your tips for transferring setups between rigs are great ! Subscribed.
Wow, this is exactly what I've been looking for. The RUclips algorithm might be better than RUclips search :) This should also work for my setup. I'll soon try it.
can you do something on proper arm deformation, too? Especially armpit muscle effect is so hard to achieve and most animations look pretty awful as a result. Thx master of rigging 👍😎
I haven't worked out anything special for arm rigging yet but will certainly share if I do! :) The best I can recommend is looking into shape keys so you can sculpt in the correct deformations for the different poses. You can even use shape keys while animating that if there's a specific pose that doesn't look right you can add a new shape key and sculpt adjustments just for that specific shot
This is a VERY informative rigging video. Even with weight painting, I've had a hard time getting the deformation on the legs correctly, but with this, I've managed to actually improve the deformations very well. I didn't use B-Bones for the reason that, as a few other people have commented, an armature with B-bones cannot be imported into game engines, so I did everything you suggested here without making the Middle hip bone into a B-bone and instead subdivided it, giving me a similar result. It works out nicely when I rotate my character's legs in (Blender's) local Z-axis, but when I rotate the legs forward (local X-axis), the character looks... Off. DO you have any suggestions for this?
high quality lesson. i'm sure many people will be grateful, if not worship you for this insight. (here i am making procedural rooms and objects because i'm not dealing with animation weights.... i suppose my objects can have people now.)
Amazing! I'm really glad this helps and I do hope it encourages you to add characters to your scenes! It adds a lot of life to it. Best of luck with your work! :)


I just started modeling in Blender, and I feel like I just stumbled upon some forbidden knowledge. This is fantastic.
Awesome! Thank you so much :)
it is forbidden. i was forboden. But now i have the knowledge... I... HAVE, THE POWER!
Bbones are great, but not so great if you're planning to export the armature to a engine. The way I do it, and it generally takes 90% of the weight painting job away is using a mix of support bones (similar to what you did, but with no Bbones), and pre automatic weights planned bone placement. For the hips I just move the leg bone to about the end of the pelvis. Then I skin it, and then move up the bone back to its regular position. If you understand a bit at how the bone position affect its envelope weight it really speeds up the process.
Why are b bones not so great for exporting to an engine?
@@channelname8623 “not so great if you're planning to export the armature to a engine” I was thinking exactly the same question. If you rig like this then you can only animate it in Blendre, or re-invent bbone in other software like UE. This is why they make so many support bones in their standard skeleton rig.
I’m completely new to game engines, but can you make all the character animations in blender and use the animations on the game engine without a need of the bones? Will there be problems like changing from an animation to another? Because I remember watching some tutorials where they could animate the bottom part of the model with a running anim and the top part was aiming and shooting but idk (and don’t remember) if they were using rigs in the game engines or just imported animations
@@haramberinokripperino7770 Yes bones are essencial in games. Characters use bones to record animations instead of vertices, because most of the character animations a procedural, not pre-baked sequences. And animations can be re-used only on similiar skeletons, or you will need to do alot of extra work to retarget them.
@@Nevetsieg so its pointless to make rigs and animation in blender if you want to make a game? Just make the model in blender then make the anims in unreal engine?
Perfect tutorial! Great pacing and just enough info to make it all understandable.
Thank you so much! I've been watching your tutorials for years and they've really helped me learn Blender and character creation, so it's really cool to get a comment from you :)
Great
Hey Dikko
Oh dikko huge fan
this video is very good Helped me a lot
Can confirm it also works amazingly with quadrupeds, even with very little geometry definition between the limbs and the body. You can even get fancy and add a second set of these to the shoulder. Might have to weight paint a little, but it's nothing compared to what you'd have to do otherwise
Can't believe my months of struggle are finally over 😅
Awesome! Thank you so much for sharing this :)
I think no one on earth despite weight painting as much as I do. This tutorial is a GEM, thank you so, So much man 🤝❤️
I understand your pain, I'm very glad I could help :)
over a year old and you never fixed your typo
@@IveNeverStoodUp😂😂😂
This is why I see that there's the "Hip Layer" and the "Waist Layer" in any model.
*_Dang, the sheer time and effort to actually fix the most complicated joints in the human body is the reason why the rigging is smooth._*
Super high quality, thank you.
Most blender tutorials on RUclips are like fast food quality in other words, they’re too basic. Not all of them of course.
Thank you! Glad you found it helpful :)
3:29 just beautiful mouse cursor movements
Glad you think so! :)
If this works, you're a godsend! I'm continually feeling like I'm failing at all this stuff, and trying to take on the hips was an extra huge blow to morale. Glad to know it's not just me. If anybody else is struggling, I'm still bad at getting stuff done, but I've learned the essentials on many fronts in the first eight months of having my first computer, by just trying to listen to every bit of info out there and skipping to a different thing the second I completely don't understand. Don't confuse that with laziness, it's just the practicality of knowing you'll understand everything better if you ease in and generalize until the dogmas click, and that you aren't built to work like a machine at one thing for a long time, most likely. I myself am going to try to give up the prospect of finished animation for a while until I go back to basics and use the isolation to learn all the tips, tricks, nooks and crannies. If anybody else has thoughts to share about sane productivity, maybe we can siphon data off each other. Anyway, stay strong, people 💪
Thank you so much for the comment! The best thing I can recommend is to do loads of mini projects each that focuses on a new technique each time. Then over time you're abilities build up and you start to be able to combine the skills into bigger projects. That's the way I did it! Another thing I'd recommend with characters is you don't need to make an entire production ready perfectly weight painted character if you're only going to use it once for a few shots. Do the very basics quickly, animate the scene and then if there are any deformations that look off on the poses, add and keyframe a shape key and sculpt it so it looks right from the camera view. I spent loads of time when I started trying to get perfect deformations for poses that the character was never going to be in, and now I save so much time! Finally, also be aware that you don't have to make every single thing in the scene, it's good to get an understanding of how everything works but definitely have the goal of building up an asset library of textures and assets so in the future you can have more fun building the scenes rather than spending ages trying to model and texture everything! :)
@@lewisanimation yeah, right now I'm just going to take a step back and read through a lot of the documentation until I understand everything I can, cause it seems like there's always more to it. I'm probably a bit too much of a perfectionist to use other people's assets but having my own ones organized would definitely be cool. Maybe one day I'll turn into one of those freaks who can make a perfect model in 3 minutes
I love it, please make more videos about using this method in others bodies parts 🤩
Thank you so much!!
The most amazing thing is that I’ve been suffering from similar problems for two days now, I didn’t google anything, but I got this video in RUclips suggestions, thanks for this lesson and an interesting solution to this problem
Amazing! Happy to help :)
Wow! Thank you for sharing this, and for including the side-by-side demonstrations of the character with and without the hip improvements. And to be able to just tack it onto any rig without interrupting the motion capture animation is so helpful!
Glad it was helpful! :)
thank you bro, your overall existence makes me believe there's a solution for any problem, you just need to take your time, sip your cup of coffe, sit and work then after a lot of struggles, have a great night of sleep and with a fresh mind try again until it works, lol. mad crazy talented skills you have. I love you! and thank you again!
Okay, so, this is incredible. I'm going to work on blender again pretty soon since I have a "real" PC now and started learning UE5. And since it has been years I first tried it out, I forgot how to rig etc. Stumbling upon this video is a blessing, cause I remember the deformations in my models were a pain in the arse to deal with lmao. I feel like it's a cheatcode and your video is only 9mn, straight to the point and really understandable. A novice like myself can totally understand and make what seems like a miracle in no time. Really, words cannot express my gratitude, thanks for your work mate!
Hey man, have you tried exporting your rig to Unreal? I'm not sure if Unreal supports this kind of rig, Please let me know if it works.
@@VISDE Heyo! Well that's a good question but since I'm still working on blender atm, I can't say immediately. I guess unreal takes body weight into consideration already, so why not bones? Whenever I fiddled on unreal I saw models with different bones count so my first guess is that it would work, but it's just a guess... I'll post an answer whenever I go back to unreal, which will be in a few months so yeah, sorry for not being able to provide a clear answer just yet :x
Great! Very clear and detail description. Thank you!
Thank you so much! I really appreciate it, glad I could help :)
:)
Dear Sir, I want to express my HUGE gratitude for sharing such a powerful technology. The thought that it would take a long time to learn how to draw a weight discouraged me from learning 3D modeling. Thanks again
You are very welcome! Really glad the video helps :)
Had a similar idea a while back and tried it on an old model with kinda bad topology. Worked like a charm. We're basically doing poor man's muscle sim using extra bones. Only caveat with this is you can't export bendy bones to game engines iirc. In my setup I used about four bones with Stretch To around the hip and a few helper bones around the pelvis to control the auto weights better.
"Only caveat with this is you can't export bendy bones to game engines iirc."
Did you find any ways to adopt it, all or part? Or some other method that's like this?
Maybe use the keys and this metod together? Bones for correct bending, keys for maintaining geometry and subsequent transfer to another system?
Or use real subdivision for bones, not virtual? Create more real bones for geometry.
Not gonna lie, rigify should use this method by default.
Have you found a way to add this hip setup to a rigify rig? I'm attempting it as I type, and not having much luck so far.
Putting this hip setup in the metarig before Generating doesn't create the proper deformation bones, but they DO stay in the metarig copy. So I think I need to Generate a rig, then Join the Bendy Hips to that rig before I parent with Auto weights
@@SortOfEggishdid u try after generating rig? I hvnt tried though.. But i think base adding to the base guide bones wd be useless
Why is lying even an option?
Use the proper rig types
@@jdamagedgoods because we live in a polarized energetic system where Truth = Positive and the opposite of Truth = Negative, and Truth cannot exist without it's counterpart. Every facet of our reality is a dualistic system at the core. Even the planet we live on is a polarized energy field (that's how "gravity" works, also how a compass works).
By the OP signaling that they would not lie, they are attempting to communicate Truth and, by doing so, they are broadcasting positivity.
I actually loved doing weight painting in maya back in school, after loosing the licence and switching to blender it has been a struggle, thank you for this tut!
Glad it was helpful! :)
I believe this is one of the most usefull rig tutorial I've ever seen for blender!
Thank you! Glad you think so :)
Fantastic man! Such an amazing trick that will relieve a lot of time and frustrations for both new and advanced riggers. Thanks for sharing your knowledge!
No problem! Glad you enjoyed, has definitely saved me a lot of time so thought I'd share :)
It's not like I need this right now - But one of the best tutorials I've seen.
Thank you so much! Glad you enjoyed :)
I've spent the last 2 and half hours screwing around with weight painting the hips and it was going nowhere. This fixed my problem and I am relieved from my day-long suffering
Glad I could help! :)
Learning blender atm and frustration with weight painting brought me here. Wow this technique looks perfect
I hope it helps! And good luck on your new Blender journey :)
This wins the Best Blender Tutorial of the Year
Glad you like it! :)
Seeing the video length, I came in expecting it to be filled with babbling barely related to the topic. But no, every second of this video turned out to be relevant and attention catching. Great job and thank you!
You're very welcome! Really glad you enjoyed and found it helpful :)
God-sent advice. I've been beating myself up over the little imperfections in hip weight painting that I was only thinking to solve out with mathematical geometry designed around range of motion and musculoskeletal anatomy. This takes that foundation to the next level. Thank you!
Thank you so much! I'm really glad I could help :)
I just began to learn animation in Blender, watching this video is like stepping into the future of understanding animation. It's where I want to be....hopefully soon.
I've been waiting patienly for your next video...And it's finally here! Thanks :)
No problem! Hope you enjoy :)
Can you also make a tutorial for the arms and shoulders?
i made the same thing in C4D and it works wonderfully, thank you so much, you saved me hours of work
Awesome! Happy to help :)
This randomly popped up, I don't do any rigging these days but the hips were always a pain back in the day. Good to see there's a handy solution should I ever have to go back to it!
A simple yet genius solution towards animation. Well done. 💜
Happy to help! :)
Wow, you’re really great. This was a joy and so professionally done also such a positive sounding voice. Thank you. Look forward to more of your tips and techniques.
Thank you so much I really appreciate it :) Plenty more content and tutorials on the way!
Dang! I love this technique. It's much more easier than adding weight painting.
This is revolutionary! This better blow up and hope you get the subscribers you deserve.
Thank you so much! Glad you like it :)
this is the first video i saw from You and i never use blender, but at the half of the video i already pressed the sub and like!
love it! very great video and technic!
Thank you so much! glad you enjoyed and welcome to the channel! :)
Adding a centre crotch bone was a huge help! But for older versions of blender that armature modifier not being available, the solution is to create separate bones for each leg! For each leg i create a pendulum bone (it points down just off centre, so its easier to mirror) and has a small nub bone at the crotch mesh point that will be skinned. It copies the rotation of its corresponding leg at 25% strength- just make sure to add a limit rotation so they can't cross over each other when the legs are crossed!. To stop the thigh mesh at the top/side crease point from moving too far inside the torso when bent, i created bones above the thigh joint, level with the expected mesh crease point that full copies the thigh leg rotation so the mesh swings out at a higher pivot point! Mixing the weights with these added bones have got me close to the above results, with a little bit of smooth correction modifier too. Shoulder joints are my last bugbear to fix- i like making simple models so i can't rely on things ironing out over sub-d's.
Thank you very much for sharing this! This'll be helpful to a lot of people :)
Not as quick as your lazy being would think it was, but it is actually quicker than manual weight painting pain... Incredible results. Thank you very much my guy.
Glad I could help! :)
Can you achieve something similar for game characters aswell, where stretching functionality can't be exported? Or do you have any nice tricks or solutions for game characters aswell that will be exported for engines like Unity or Unreal Engine?
I don't work with any game engines unfortunately so I don't know what would work best
I tried this setup without using bendy bones. I can confirm that with some additional manual weight painting it does work. You can then bake the animation onto the game rig and export it for use in a game engine.
@@danielryb6210 Amazing! This will be helpful to a lot of people
Dude, this is black magic. Thank you so much.
Happy to help!
I've been doing something simillar for some times, but this seems like a much more involved solution, thank you for sharing.
Fantastic
Happy to help! :)
amazingly elegant. This deserves a exclusive add-on or even a app.
Thank you!
Really great work regarding pacing, information, etc. I wish all tutorials were this well done.
👏
Thank you! Glad you found it helpful :)
I learned more about rigging on this video than in months around tutorial and courses. Thank you for all this value!
No problem! Really happy to hear it helps :)
You changed my mind about rigs. Sensational tutorial. Congratulations on the job.
Happy to help! :)
The best part of the tutorial is that you show how useful and versatile is. 🌟
I always have the doubt of using a feature in a different character/scene/etc.
Glad it was helpful! :)
This tutorial made me follow you. This is how tutorials should be. Useful, clear and concise. I’m trying this soon, for sure.
Thank you so much! Glad you enjoyed and welcome to the channel :)
@@lewisanimation Worked like a charm! Thank you so much!
Thanks for sharing this cool trick. I hate weight painting so even if this is tedious, its reusable across multiple rigs, totally worth the effort.
Glad I could help!
rigging the hips has made me kinda give up on modeling actual characters, because I can never make it look right and I couldn't find any practical solutions in the past, but thanks to you I might start doing it again... also... that constraint at 5:21??? when tf was that added? that's amazing, so much of my stuff needs that constraint.
Really glad I could help :)
You sir are beautiful, my characters hips not deform right is what burned me out because I couldn't get the weight paint just right this is what I needed
Amazing! This is exactly why I made this as I had exactly the same problems when I was learning. Good luck with your new characters! :)
This is such a useful tool to have under any 3d animators belt!
Has definitely saved me many hours :)
Very elegant solution to rigging hips.
Now I can finally make animated remakes of all my favorite Jean Claude van Damme movies.
This trick it's mind blowing!!
Has definitely saved me many hours! :)
This Is what we need from blender tutorials. Subscribed
Glad you liked it! Welcome to the channel :)
This is an underrated gem of a rigging tutorial *clap* *clap* *clap* what an amazing tutorial!
Thank you so much! Glad you enjoyed :)
Such a great flow of concise information and everything I needed for a project I'm working on, thank you! :D
OMG, thank you so much! I was suffering with weight painting but no more!
You're very welcome! :)
wow. that was incredible! I've been struggling with this for a while, thinking that the only solution was just to get better at weight painting.. You've shown me some new constraint ideas that I've never thought of before
Really glad I could help! :)
thankyou so much, i am now waiting patiently for the hands and head! if not i will just keep watching your content anyways! good job bravo sir!
Happy to help! Thank you for watching my videos :)
I love Blender's default weight deformation, most Characters come out very clean. I hardly weight painted any of my characters. Your tips are awesome, will try them for sure on my next iteration !
Thank you so much! :)
I don't know what kinds of characters you animate, but the realistically proportioned ones I've used auto weights on have all suffered from this issue with hips and a similar issue with shoulders.
It's a convenient tool for sure, but it's never been good enough for me out of the box.
I tried this on the shoulders and while it works pretty much as good as it does for the pelvis! It isn't 100% perfect but it's pretty dang good. Thank you so much for this video!
Amazing! Happy to help :)
Thank you much for making this video. Im going to share this to my friends when I'm finish making my model
Thank you so much! Glad I could help :)
This is brilliant. I have been looking for so long for something like this. I tried so many different ways to achieve this and nothing has worked as good as this.
Amazing! Really glad I could help :)
What a genius method! I finally know the importance of bendy bones
Thank you! Glad I could help :)
My head is spinning, this is genius 😵💫
Glad you liked it! :)
if i had to guess at why this works so well i'd imagine it's because it's replicating the dynamics of actual muscle better? i wonder if there could be some more generalized nugget of information somewhere in here that could be applied to every joint
Never thought that this can be solved by this way, amazing!!
Thank you!
I also can't be bothered with weight painting. I've been using helper bones but never bendy bones. Also your tips for transferring setups between rigs are great ! Subscribed.
Glad it was helpful! Welcome to the channel :)
Wow, this is exactly what I've been looking for. The RUclips algorithm might be better than RUclips search :)
This should also work for my setup. I'll soon try it.
So I tried it, it's still far from perfect, but I think it's much better than before.
Love how simple the video is
That thing just blows my mind🤯
Glad it helps! :)
You are a wizard, Lewis!
First time I've been called that but thank you! :D
This is awesome, you are going to te CGI heaven
Thank you very much :)
What a class, Mr Lewis! Thank you so much!
You are very welcome! :)
What an amazing tip! Thanks for sharing!
You are very welcome! :)
Holy!!! dude this method on a free tutorial with such quality on video, ty man realy tyvm.
Happy to help :) Glad you enjoyed!
this is amazing, what a genius, very clever, love it
Thank you! Glad you like it :)
Perfect Tutorial For Every Blender Rigging Artist Thanks For Your Effort Bro... Keep Going...
Glad it's helpful! :)
can you do something on proper arm deformation, too? Especially armpit muscle effect is so hard to achieve and most animations look pretty awful as a result. Thx master of rigging 👍😎
I haven't worked out anything special for arm rigging yet but will certainly share if I do! :) The best I can recommend is looking into shape keys so you can sculpt in the correct deformations for the different poses.
You can even use shape keys while animating that if there's a specific pose that doesn't look right you can add a new shape key and sculpt adjustments just for that specific shot
Great tip! I wonder if it would work on shoulders ...
I haven't tried on the shoulders yet but it might work!
This is a VERY informative rigging video. Even with weight painting, I've had a hard time getting the deformation on the legs correctly, but with this, I've managed to actually improve the deformations very well. I didn't use B-Bones for the reason that, as a few other people have commented, an armature with B-bones cannot be imported into game engines, so I did everything you suggested here without making the Middle hip bone into a B-bone and instead subdivided it, giving me a similar result. It works out nicely when I rotate my character's legs in (Blender's) local Z-axis, but when I rotate the legs forward (local X-axis), the character looks... Off.
DO you have any suggestions for this?
Wow, this is incredible, I will have to try this!
The question why it wasn't spreaded before. Amazing cleaar explanation, thank you very much!
Glad it was helpful! :)
Yes it is heplful, exciting, inspirig...🖖@@lewisanimation
Cant wait to try it ! Thank so much. I often stuck at this step in many days ^ ^
Happy to help! Good luck with your characters :)
Cool solution, man! Great video. Easy to follow and perfect pacing! Thank you!
Lifesaver, thank you! Subscribed 🎉
Welcome to the channel! :)
I'm not in front of my computer right now but I can't wait to try this out! Thanks so much for this!
Also: I subbed!
This Tutorial is golden Thank you for this
Glad it helps! :)
high quality lesson. i'm sure many people will be grateful, if not worship you for this insight.
(here i am making procedural rooms and objects because i'm not dealing with animation weights.... i suppose my objects can have people now.)
Amazing! I'm really glad this helps and I do hope it encourages you to add characters to your scenes! It adds a lot of life to it. Best of luck with your work! :)
Amazing rig technique, that "preserve volume" is just *chef's kiss*
At 5:25 I can't set the target bones in the constraint. When using the eyedropper to select the armature, a warning pops out "failed to set value"
Youre in object constraints. Bone constraints are lower and icon looks lika a meat ona bone.
Great tutorial! Your voice gave me flashbacks of admiral Zex, which was awesome.
This could be very useful to me for a character i have in mind when i get into 3D Modelling
Glad I could help! Good luck with your character :)
Tha was a really nice solution mate. Specially the center bone. Congrats!
Thank you! Glad I could help :)
Thanks for this! I will be using this for my rigs now.
Amazing! Happy to help :)
New subscriber. Just what I needed learning in blender. Thank you!
Amazing! Welcome to the channel :)
Incredible! Thank you so much for this!
You're very welcome! :)
This is absolutely genius! Well done.
Thank you! :)
Ok fine, I'll subscribe. Keep these gems coming!
Welcome to the channel :) More on the way!