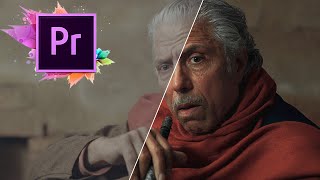
De-Noise Your Footage WITHOUT Losing Sharpness | Premiere Pro Tutorial

Поделиться
HTML-код
  • Опубликовано: 27 апр 2021
  • WATCH PART 1 ON DENOISING HERE: • How to Fix Noisy/Grain...
    MY LUTS AND PRESETS: connorgilks.gumroad.com
    SUBSCRIBE: / @connorgilks
    FOLLOW ME: / connorgilks
    ------------------------------------------------
    THE GEAR I USE:
    **ALL of the gear I use: kit.co/connorgilks/ **
    MY CAMERA: amzn.to/3NlExx3
    My FAVORITE Lens: amzn.to/3y1VVRN
    My GO-TO Pocket RGB Light: amzn.to/3ypjohh
    Main Key Light: amzn.to/3IbX4eB
    Favorite Gimbal: amzn.to/3QVZgKT
    External Monitor: amzn.to/3ynCUL1
    Shotgun Microphone: amzn.to/3A9szUr
    6K RAW Capable SSD: amzn.to/3buxaWX
    Camera Cage: amzn.to/3xTDejk
    Camera Cage Top Handle: amzn.to/3xXIwu3
    Best Budget Motorized Slider: amzn.to/3QVZgKT
    ------------------------------------------------
    Full disclosure, these are affiliate links, meaning if you buy anything from these links I get a small percentage of the profits at no extra cost to you.

Комментарии • 170

  • @progrockrules
    @progrockrules 5 месяцев назад

    Excellent - love your style - no nonsense - straight to the point. Helped me a lot.

  • @R3DB3EARD
    @R3DB3EARD 2 года назад +14

    so useful! spent too much time trying to find a simpel answer to this. The part 1 and 2 really sets someone up for success now and into the future! Whether you are just starting out or have experience, this part 1 and 2 were incredibly useful

    • @ConnorGilks
      @ConnorGilks  2 года назад

      So glad it was helpful! Thanks for the kind words, Gavin.

  • @ftlbaby
    @ftlbaby 2 года назад +2

    BRILLIANT. Just what I needed! Subscribed.

  • @SonicElysium
    @SonicElysium Год назад +10

    Awesome tutorial and a very bright explanation right on the spot with no blah-blah talking. Thank you!

  • @SakisPallas
    @SakisPallas Год назад +1

    that is by far the best denoise tutorial i ve seen online.
    I use almost only this method now with VR-Denoise (thats uses both gpu/cpu) and saves a ton of time for me at least.
    many thanks , you saved me hours looking at loading bar.
    subscribed

    • @ConnorGilks
      @ConnorGilks  Год назад

      Thanks so much Sakis! So glad it was helpful.

  • @VeganLinked
    @VeganLinked 7 месяцев назад

    Nice, this was a very interesting take and trick on this!

  • @jojispoon3619
    @jojispoon3619 Месяц назад

    Man, thank you so much. You literally saved my time with this

  • @ZeallousMusic
    @ZeallousMusic Год назад

    I mentioned this on part 1 but, the second of two best tuts for live music videos! This vid changed the overall look for the better.

    • @ConnorGilks
      @ConnorGilks  Год назад

      Thanks again man! So glad I could help!

  • @walterbinns6992
    @walterbinns6992 2 года назад +1

    Awesome Video tutorial. I needed this badly. I appreciate it. Great work!

  • @chandrant
    @chandrant 2 года назад +1

    excellent tutorials. Thanks a lot🤝

  • @fenwayleo7218
    @fenwayleo7218 2 года назад +1

    Thank you Conner for this very useful technique!

  • @rcsalbumshorts
    @rcsalbumshorts Год назад

    I Found that helpful and Subscribed at once and for all

  • @2kphotography
    @2kphotography 2 года назад +2

    What an excellent tutorial! Very useful.
    Subscribed!

  • @deephorizon457
    @deephorizon457 2 года назад +1

    Very good. You are innovative 💡

  • @IvanMonteck
    @IvanMonteck Год назад +1

    Thanks a lot for this Connor! you save the footage of my first weeding job :) I really appreciate it

    • @ConnorGilks
      @ConnorGilks  Год назад

      That's great news Ivan! So happy I could help.

  • @Kozitaju
    @Kozitaju Год назад +2

    Simple and so efficient ! Thanks so much !!!

  • @ValentinKovshikMusic
    @ValentinKovshikMusic 5 месяцев назад

    This is a brilliant tutorial! Exactly what I need. Thanks!

  • @GrowingUpWithoutBorders
    @GrowingUpWithoutBorders Год назад

    This is great! Thanks for sharing

  • @AdamVenturesTravel
    @AdamVenturesTravel Год назад

    Excellent video, thank you so much for this!

  • @Eduardo-zh5eb
    @Eduardo-zh5eb 2 года назад

    Great tutorial! Helped a lot! Thank you.

  • @mojoemurphy
    @mojoemurphy 9 месяцев назад +2

    I video myself in bands and it's almost always on a dark stage so noise is a pain. I really appreciate this!

  • @sunrisemonk
    @sunrisemonk Год назад

    Subscribed, great methodology, thanks for the tips on denoising

  • @raquellewallace
    @raquellewallace 2 года назад +1

    This is brilliant, thank you so much!!

  • @HeySight
    @HeySight Год назад +6

    i never really comment on videos but i just have to show love where its due; amazing video. Of course the content of the video was good and useful, but the actual presentation and education style of the video was very very well done. Very clear and concise; especially coming from the previous de-noise video. Roses for you

    • @ConnorGilks
      @ConnorGilks  Год назад +3

      Thanks so much! Glad you found it helpful.

    • @MiniTheVinx
      @MiniTheVinx 5 месяцев назад

      Totally agree. You often get people who haven't worked out what they were gonna say before hand so there's loads of pauses and half sentences. This was a bit more like watching the BBC {other than the accent, obviously.} Their motto is inform, educate and entertain and this video certainly did the first two.

  • @DE-signYourLife
    @DE-signYourLife Год назад +1

    Thank you, i will try this method with luminosity mask and sharpen

  • @LittleBiiig
    @LittleBiiig 2 года назад +1

    The luma key trick is golden, thank you!

    • @ConnorGilks
      @ConnorGilks  2 года назад

      Right?! It's so handy. Glad I could help!

  • @oneworldvideo
    @oneworldvideo Год назад

    Fantastic video! Subscribed!

  • @BrettHoustonTube
    @BrettHoustonTube Год назад

    Great tip, thanks Connor!

  • @pinkcloud758
    @pinkcloud758 2 года назад +1

    thank you! This Was really helpful !!

  • @krispatmo
    @krispatmo 11 месяцев назад

    This is really great, thanks!

  • @iamroofa
    @iamroofa 3 года назад +20

    If you reading this, have a good day and be safe. God bless you 🙏🏻❤️

    • @aclark210
      @aclark210 9 месяцев назад

      God bless you to bro!🙏🏾❤️‍🔥

  • @teodoroassunik1376
    @teodoroassunik1376 3 года назад +2

    Nice trick man, tks for share! Like

  • @pedrinhosari
    @pedrinhosari Год назад

    wow! so great!

  • @shotbyarian
    @shotbyarian 8 месяцев назад +1

    such a great tutorial!

  • @elfegeletitulaire
    @elfegeletitulaire Год назад

    Thansk alot !

  • @hrishikeshpatil7002
    @hrishikeshpatil7002 3 года назад

    Nice trick man! Smart!

  • @FidelTshivhasa
    @FidelTshivhasa Год назад

    thanks bro, useful tips

  • @alifashrareza
    @alifashrareza 2 года назад

    My guy thanks for the tutorial!

  • @polyglotcat
    @polyglotcat Год назад

    Thanks a bunch! I`m your follower!

    • @ConnorGilks
      @ConnorGilks  Год назад

      Thanks Gregory! Much appreciated!

  • @elenacarrillo1309
    @elenacarrillo1309 8 месяцев назад

    You saved my day, thank you so much!!!!

  • @maxmaxmaxgoon5602
    @maxmaxmaxgoon5602 2 года назад +1

    Its lovely

  • @Horneciu
    @Horneciu Год назад +1

    Amazing PROTIP! First time in my life I just hit all the bottoms (Like and Subscribe) in the same time, when you said to do it. Very clever method, a creative one. I will experiment with this especially with my drone footage (It's a little drone with little sensor, so it can be noisy especially in shadows). Thank for your work, man!

    • @ConnorGilks
      @ConnorGilks  Год назад +1

      Thanks so much! Glad I could help!

    • @MiniTheVinx
      @MiniTheVinx 5 месяцев назад

      Ditto. First time I ever hit like. How does subscribe work? If it only means you get notifications in the bell icon, I'll do it.
      But everyone's video ends with them asking you to like and subscribe. Can someone explain to me that this helps the video creators in simple English, please?

  • @ironicanimations
    @ironicanimations 5 месяцев назад

    👏 using a luma key to take out the shadows separately and keep the sharpness on the character on picture, is GENIUS

    • @ConnorGilks
      @ConnorGilks  5 месяцев назад +1

      Thanks so much! So glad you like it.

  • @namco751
    @namco751 2 года назад

    You are great!!! thank you!!!

  • @norkin4life
    @norkin4life Год назад

    Great video

  • @currenluna
    @currenluna Год назад

    The luma mask is smart. Thanks, Connor.

  • @seanmarkbaxter
    @seanmarkbaxter Год назад

    Very very nice. Thank you.

  • @rewind2play
    @rewind2play 2 года назад

    Great info, thanks....

  • @rustedknight189
    @rustedknight189 2 года назад

    Annnnd you denoised that hair since last week :D

  • @tancotanco6662
    @tancotanco6662 Год назад

    Thank you so much bro.........

  • @theboatgoat
    @theboatgoat Год назад

    do you have a link to tehsoftware yu used to denoise it originally?

  • @bazzarcreation4557
    @bazzarcreation4557 2 года назад

    Yo thank you so much!!

  • @DroneStories
    @DroneStories 3 года назад

    Amazing trick.

  • @dadabmedia
    @dadabmedia Год назад

    Thank you

  • @tarunverma7015
    @tarunverma7015 3 года назад

    100th like
    thanks mate 🔥

  • @S.T.VisualStories
    @S.T.VisualStories 3 года назад

    Very interesting 👌

  • @pewburrito
    @pewburrito Год назад

    @Connor Gilks thanks for the cool tip! Any idea how I can apply this in 3-parts optimized for each range of the visual spectrum: do 3 different NR masks.. one for the brights, least amount of NR; one of the mids, medium amount of NR; and one for the lows, most amount of NR? I'm trying to set it up, but something seems wrong, perhaps I've got something not set right. How would you go about it?

    • @ConnorGilks
      @ConnorGilks  Год назад +1

      Honestly, you're getting such diminishing returns at this point I would strongly recommend against it. That's a LOT of extra processing power and rendering time you're going to be adding for what is going to be a negligible difference.

    • @pewburrito
      @pewburrito Год назад

      @@ConnorGilks well, here's whats happening: in bright daylight scenes, there's almost 0% noise processing. In darker scenes (dungeons, interiors, outside at night) there's like 70% of the scene processed for noise. Also, women w/ blonde hair = virtually no noise processing, men w/ darker brown hair = almost 100% noise processing. In all due respect brother., does that seem like a good workable solution? When I capture from VHS and laserdisc, there's noise in every frame, irrespective of light/dark (though its probably strongest in the darkest spots of the frame, and lightest in the brightest). Hence, I'd like to do the least amount of NR on the brightest parts, and the most on the darkest.. hence your luma trick. But as it stands, its configured to only affect the darkest spots. What am I missing? :)

  • @NuovoSolePrd
    @NuovoSolePrd Год назад +1

    Hi, I will try this as soon as I've finished the editing, as you suggested. 👍🏻 I also have another problem, the noise in some scenes has "grains of other colors", like green dots on a face, the colors are not homogeneous (I don't how you call this technically, but I'm sure you understand what I mean).
    it is caused by low resolution and often dark images (in photos there is a function in Lightroom that helps fix it). Is there a way to solve this problem on Premiere? I have an old version (Cs4,) and Neat Video. Any tips? Thanks, Elena

    • @ConnorGilks
      @ConnorGilks  Год назад +1

      There are two types of noise, luminance noise, and color noise. What you're seeing is color noise, and a denoiser should typically take care of both types for you.

  • @MiroAcronymity
    @MiroAcronymity Год назад

    Very nice technique. I will definitely try this out. I have found that when applying Neat Video after color correction/grading, the performance drops a lot. I am talking hours instead of minutes during export. I suggest that at least users of Neat Video first apply the denoiser and then color correction.

    • @ConnorGilks
      @ConnorGilks  Год назад

      Interesting, there shouldn't be any difference. The render time goes up purely because it has more to process on export, similar to when you add sharpening for example. Although noise reduction should generally be done before color correction anyways, from what I understand. Are you saying that the order of effects changes render time for you?

    • @MiroAcronymity
      @MiroAcronymity Год назад +1

      @@ConnorGilks At least that was my impression when rendering the clip in Premiere's timeline and also when I exported it with Media Encoder, but I only started using Neat Video today. I'll test this more thoroughly tomorrow and get back to you.

    • @MiroAcronymity
      @MiroAcronymity Год назад +1

      I tested it again and can confirm that at least on a Mac Studio and in combination with Premiere (latest versions), Neat Video slows everything down almost to a stop when it is applied after Lumetri. Rendering a 22 second clip (h264 140mbit/s 10 Bit source material, Sony) took almost 23 minutes! For rendering, only about 20% CPU was used and about 60% GPU. Worse, this effect combination also made working with the clip in Premiere impossible. Preparing and building to get the clip into Neat Video took 1-2 minutes and whenever I selected it to display the effect configuration or cut it, the 'thinking' circle appeared and it took 2-3 minutes until Premiere was responsive again and I could do anything. This was repeatable.
      Applying Neat Video first and then Lumetri was completely different. In Premiere, there is a short processing pause when selecting the clip and building and preparing it went as expected (seconds). I can also edit it as usual. Rendering in Media Encoder took about 1.5 minutes and about 40% CPU and 85% GPU were used. Leftover noise in the resulting video files ist almost identical. I'll send this report to Neat Video and ask their opinion on this.
      Edit: While searching for their contact info, I found that this is a known issue in Premiere: www.neatvideo.com/support/known-issues/premiere-sr

    • @ConnorGilks
      @ConnorGilks  Год назад

      Thanks for doing the research on this! Very interesting. I always denoise first in my chain so perhaps that's why I never encountered this particular issue. Thanks for sharing your findings!

  • @KarlGutowski
    @KarlGutowski Год назад

    Great techniques! However, layering and masking does not work with darker skin tones, or in my current specific case, brown skin on an overcast beach, at sunset. The noise is in the facial details and clothing while the sky and water are way in the highlights.

    • @ConnorGilks
      @ConnorGilks  Год назад

      Absolutely. It will work with darker skin tones but it will depend entirely on what else is in the scene and how else everything is exposed.
      In which case, you may find better success using a Color Key, or a combination of the Color Key and Luma Key together to select the areas that work best for you.

  • @designdotd
    @designdotd Год назад

    What was the second layer? It was some plugin?

    • @ConnorGilks
      @ConnorGilks  Год назад

      Bottom layer has VR Denoise, top layer has Luma Key

  • @Inguzutube
    @Inguzutube 9 месяцев назад

    Hi great trick! I am having an issue with the blending of the layers... somehow the blending makes the whole look brighter... Each layer on its own is fine, but as soon as I add the luma key, the shot is brighter... 😕

    • @ConnorGilks
      @ConnorGilks  9 месяцев назад

      That's strange. It could be a number of things, so without more info I can't say for sure. Check the opacity mode on both of them and make sure the blending mode isn't set to something other than "Normal". If it's set to something like Screen it will make things brighter.

  • @mitarbeitermatch
    @mitarbeitermatch Год назад

    thx

  • @DJIncendration
    @DJIncendration Год назад

    Hi,
    How would I do this with GoldWave? I'm only interested in audio, because I am blind and can't see anything.

    • @ConnorGilks
      @ConnorGilks  Год назад

      Hi! Unfortunately, I'm not familiar with GoldWave so I can't help you with that. Best of luck though!

  • @ConnorGilks
    @ConnorGilks  3 года назад +19

    This trick works extremely well, I just had to share it with you guys! Hope it helps you on your next project!
    PART 1 ON DENOISING (USING A FREE TOOL BUILT INTO PREMIERE): ruclips.net/video/hr7qFhh6Y5g/видео.html

    • @r.l.r.4139
      @r.l.r.4139 3 года назад

      Great! How about a video of how to reduce noise but in audio? You know, the annoying hiss that is always there... Is there any way?

    • @MrAcapela
      @MrAcapela Год назад

      Thanks 👍👍

  • @MiniTheVinx
    @MiniTheVinx 5 месяцев назад

    Cheers, mate. A Yank speaking intelligently and coherently - who'da thunk it? As we just do documentaries now, I know nothing about colour grading etc. But I've got to try to get some stills for a funeral from some video we shot on mini-DV tapes in the late '90s. Just old skool SD. {Thankfully, we bought an old 2nd hand camcorder for fifty quid during lockdown and using an old MBP with a firewire port, had an external thunderbolt boot drive with FCP7 and the last OS that supported it from almost a decade ago as I couldn't use Pre to capture tapes.}
    Got 300 tapes captured, but this video I need to get stills from was when we'd just got a camcorder to play with before we knew what we were doing in the slightest. And the footage we need to get the stills from was shot at night in London and is grainy as fuck.
    Will see how it goes.
    Btw, one article I read mentioned plugins you can get. One had a free version and a paid for pro version. Another had a trial version, and as this will be the only time I use it in all probability, it doesn't matter if I only had it for a week or a month or whatever.
    Is there a free PP plug in for this you'd recommend?
    I don't really get RUclips or understand how clicking like helps you, but as you asked, I did it. How does subscribe help? If it means I only get notifications in the bell icon at the top as opposed to loads of spam or whatever, I can do that. Never done it before so am a bit wary.
    Anyway, thanks again and all the best.

    • @ConnorGilks
      @ConnorGilks  5 месяцев назад

      Hey Vinx. I personally recommend the plugin Neat Video. It has a demo but I'm not sure what the restrictions are on the demo like a watermark or a limit on the length or resolution of the clip you're denoising, if there are any. Either way, that's my plugin of choice. Alternatively, you can use one built into premiere called VR Denoise if you prefer.
      RUclips will be more likely to recommend my channel/videos to others if it sees that users are enjoying the content enough to engage with it through likes, comments, and subscribing, so I really appreciate you doing all three! Thanks so much.

  • @cxssetteman182
    @cxssetteman182 Год назад

    Does this increase the size of the Export?
    I'm new to the software, so I'm not very aware.

    • @ConnorGilks
      @ConnorGilks  Год назад

      It doesn't not increase the size of the final output file. It will, however, take longer to render the exported file.

  • @cmoneytheman
    @cmoneytheman Год назад

    How can I do this with neat i upscale 480p tv shows like jeannie and Brady bunch

    • @ConnorGilks
      @ConnorGilks  Год назад

      Same exact process. Just used Neat Video on the bottom clip.

    • @cmoneytheman
      @cmoneytheman Год назад

      @@ConnorGilks but with shows its mutiple scenes im using DaVinci do you know how to do it there

    • @ConnorGilks
      @ConnorGilks  Год назад

      Sorry, I don’t know DaVInci very well.

  • @LizNeptune
    @LizNeptune 9 месяцев назад

    you just saved my ass lmfao

    • @ConnorGilks
      @ConnorGilks  9 месяцев назад +1

      Haha happy I could help Liz!

  • @chicagowebsiteservice8482
    @chicagowebsiteservice8482 3 года назад

    Will this work with a nested multicam track?

    • @ConnorGilks
      @ConnorGilks  3 года назад +1

      I haven’t tried that, but I’d recommend doing it on a per-clip basis. Your noise pattern/levels will be different depending on the settings used among other variables, so it’s best to treat each clip individually.

    • @chicagowebsiteservice8482
      @chicagowebsiteservice8482 3 года назад

      @@ConnorGilks Thanks! I tried it on a nested sequence and I just cut the parts that I wanted to use it on. In the future, I will add it to the whole clip of the footage that needs it before nesting. Thanks for the tip!

    • @ConnorGilks
      @ConnorGilks  3 года назад

      No problem!

  • @leecloud4349
    @leecloud4349 Год назад

    now umm how do u make it one video...one clip so its easy to move around in timeline

    • @ConnorGilks
      @ConnorGilks  Год назад

      Select the two clips, right-click them, and then click on "Nest". If you need to edit them separately again later, just double-click on the Nested sequence again.

  • @simplysurfing
    @simplysurfing Год назад

    But this only for this niche situation / footage, this wont work for all types of scenes. Only when u have this kind of high key image with darks vs brights.

    • @ConnorGilks
      @ConnorGilks  Год назад

      Well, not really. No matter what your scene is, noise is most noticeable in the darkest areas. Scenes that are more high key with the same amount of noise will generally be “less noticeable.”
      The other component is that you can still denoise that top layer if you need to (although obviously we shouldn’t be creating this issue in the first place and should be capturing our footage properly in camera), you could denoise both layers but less so on the top layer to preserve detail while still using a heavier effect on the darkest areas.

    • @simplysurfing
      @simplysurfing Год назад

      @@ConnorGilks Ahhhh thats where i beg to differ. Ive seen noise in daylight on certain colors alone. Like magenta plain walls. Brown walls and Rust yellow plain walls. I dont know if u get what i mean. But still the method you mention is useful and worth using in many cases. With my godox lights and shooting in a medical lab ive seen noise on plain walls. Maybe im pixel peeping. LOL.

    • @ConnorGilks
      @ConnorGilks  Год назад +1

      It's not really a matter of opinion, it's just the science of color and vision. There absolutely can be noise elsewhere in the image, I havne't said otherwise. In fact, the same amount will be present across the entire frame, but it's most NOTICEABLE in shadow areas because it has nothing to mask it, shadows don't contain the same amount of detail and color information that would otherwise obscure the effects of that noise like your midtones do.
      Noise overlayed on a flat black area is going to be more noticeable and visible compared to the ame amount of noise in your midtones where there is texture, color, etc. to break up the image more. The same can even be said for different types of content in your midtones: a more complex area in your midtones like a textured plaid shirt or a pile of gravel will hide noise better than a flat red wall, for example. You can even see in the video how noise is less noticeable in the subject's hair than in the pitch black area behind him, for this exact reason.
      In short: more detail and variance in color/brightness = less prominent noise. Not less noise, simply less noticeable.
      That being said, if you have noise that's that bad in your midtones like you've explained, then no denoising strategy will help you much. You can't fix an image that was simply captured improperly, what you need is to shoot with more light so that you don't have to raise your ISO so high, which results in the noise you're dealing with. Using more lighting on set is the ideal solution, with a faster lens being another option as well.

  • @AlojitDas
    @AlojitDas Год назад

    Exporting time is very long after the effect..

    • @ConnorGilks
      @ConnorGilks  Год назад

      Yes, as I mentioned it will take longer to export because it's a very CPU intensive process you're asking for. Same thing occurs with other effects too like Unsharp Mask, Rolling Shutter Repair, Warp Stabilize, etc. That's why I say this is best done at the end of your editing so it doesn't also slow down your playback and therefore your editing process too. There's no way around that, sadly.

  • @faisalag4729
    @faisalag4729 Год назад

    I used it and it looked like the video is lagging

    • @ConnorGilks
      @ConnorGilks  Год назад

      That’s likely because your computer can’t handle processing all of that in real time. That’s why I recommend saving denouncing for the very end of your editing process, or playback will be slow unless you have an extremely fast computer.

  • @sampeterson8274
    @sampeterson8274 Год назад

    I tried to apply but I couldnt do it. Am I stupid ?

    • @ConnorGilks
      @ConnorGilks  Год назад

      Where did you get stuck in the process? I’ll do my best to help!

    • @sampeterson8274
      @sampeterson8274 Год назад

      @@ConnorGilks I think I will buy Neat Video. That would be easier .

    • @sampeterson8274
      @sampeterson8274 Год назад

      @@ConnorGilks I have watched your video for the 10th time . I think tint tool has nothing to do in the de-noise process, it is just for our eyes to see the difference. Am I right ???

    • @ConnorGilks
      @ConnorGilks  Год назад

      That’s correct! Otherwise it’s very hard to tell which parts of your scene are the denoised layer and which aren’t.

  • @kennguyen222
    @kennguyen222 10 месяцев назад

    *only work with black bro*

    • @ConnorGilks
      @ConnorGilks  9 месяцев назад +1

      Of course, because we're focused on the shadows and you're using a Luma Key. Luma = luminance. If you want to isolate a color - which I generally don't recommend - you can do this same process, but use a Color Key instead of the Luma Key.

  • @steviegbcool
    @steviegbcool Год назад

    only really works when you have a dark background

    • @ConnorGilks
      @ConnorGilks  Год назад

      This same approach will work in any scene, it just depends how you adjust your settings. However, keep in mind that noise is most evident in the shadows so that’s why we’re focused on that. If you’re image is so noisy that you have prominent noise in your mid tones, then you should really be looking at reshooting if at all possible.

  • @TonyLovell
    @TonyLovell 6 месяцев назад

    3:30 -- I see no difference.

    • @ConnorGilks
      @ConnorGilks  6 месяцев назад +1

      Try viewing on a larger display, make sure you're watching at full resolution. His skin (especially the forehead) without this technique is noticeably smoother, as if someone applied a "smooth skin" filter onto it. Another good spot to notice it is the hair on the side of his head, where it connects to his beard. On the left it's just all blended together, whereas on the right you can see more detail and more of the individual hairs.

  • @wikitheonlyone
    @wikitheonlyone 9 месяцев назад

    How to denoise video ----- "I already denoised it" ..... hm :-D LOL :D time wasting video....

    • @ConnorGilks
      @ConnorGilks  9 месяцев назад

      I'm guessing you skipped 0:20 - 0:32, and the first link in the description. ;)

  • @themartinandersson
    @themartinandersson 2 года назад

    You should seriously change the title. You used an "already de-noised" clip and this video does not show how to de-noise. Only some kind of after-effect-hack applied to a clip to improve said undisclosed effect.

    • @ConnorGilks
      @ConnorGilks  2 года назад +2

      Sounds like you didn't watch my other video on how to denoise your footage. Or listen to what I said at 0:25. Or the link in the title card. Or in the description.
      Regardless, the two components are separate - you can use Neat Video like I did on the clip in this video, or you can use the built-in Adobe tool like I show in my other tutorial preceeding this one, you can even just crush your shadows into oblivion if you like and not denoise at all, it doesn't matter. All of these are completely compatible with the technique I show in this video at reducing noise in your image.
      If you want to learn how to denoise, you can watch my other video where I covered it already, which is what I said within the first 30 seconds of this video.

    • @themartinandersson
      @themartinandersson 2 года назад

      @@ConnorGilks However much I cherish your valuable and thoughtful reply, it does sound like you didn't actually read my comment lol. I understand completely that you have already in another video shown how to denoise video. And I am going to watch it! Obviously you have some mad skills and there are loads of people you help immensely, including me after I have watched that other video.
      But THIS video does not show how to denoise. So the title shouldn't start with "De-Noise Your Footage WITHOUT...". At least I find it misleading and since I - and I am sure I am likely not the only one - have no idea how to denoise and I found this video through a search, I came here thinking that's exactly what I will learn, and was waiting for lol. But no, it does not show at all how to denoise.
      What title would I use? I have no idea. I am not a video editing guru lol, and I didn't obviously finish watching this video. Because I am still at step 1! Trying to denoise lol. BUT, since you refer to a "part 1" in the description, putting a "part 2" in the title of this one may be a good indication that one should watch the other video first.
      Again thank you so much for your reply. Really good to see enthusiastic community-engaged people like yourself =)

  • @JarosRC
    @JarosRC 9 месяцев назад

    Great De-noise tutorial, except you didn't tell me how to de noise

    • @ConnorGilks
      @ConnorGilks  9 месяцев назад +1

      I'm guessing you skipped 0:25 - 0:32, and the first link in the description. ;)