BREAKING NEWS: Screw Modifier: I recorded this tutorial using the Blender 2.83 build from 2020-03-16 cuz I knew everything worked and I wanted to avoid surprises during recording. Now I download last night's build (2020-03-29) and the screw modifier allows 1 Step which makes this workflow even more awesome! (thx to @deadpin for the hint!)
Hi Chris, I am still running 2.80 due to the removal of some of the shading nodes I lean on in 2.82. I really liked your demo of this non-destructive workflow. I figured I would see if there was a way to get rid of that center cut from the screw modifier. I could be wrong here, but it looks like doing a planer decimate (1 iteration) modifier works to do the trick. Always more than one way to accomplish something in Blender. Thanks again for sharing and keep em coming! *Update* The decimate only works for the first few steps, and then it kinda falls apart.
@@lawrencedoliveiro9104 There was a change in the voronoi noise generator (forget the mode, but there is one that makes cracks that are perfect for terrain), and 2.79 to 2.80 removed the npr shaders so I am still using 2.79 for toon shading projects.
blender has always been armed with a great assortment of modifiers but no real explanation on how to use them thank you for filling that void & showing how powerful they are.
Nice tutorial (as always)! Two comments: 1) You can create a cylinder procedurally out of a single vertex by stacking Skin, Subdivision, and Cast (the latter set to "cylinder") 2) By setting the "Offset" option of the Solidify modifier to zero, you get a symmetric extrusion on both sides of the face.
This is so powerful. I had no idea this was even possible with the screw modifier, and then they way you stack the modifiers is pro. Thank you for sharing your workflow. Something people should also keep in mind is Solidify can also use vertex groups with weights, so you can also vary your solidify width per vertex non destructively!
13:40 I think this is the best method to teach modeling. Instead of doing step by step tutorials that only teach you how to copy, it's much better to teach how to creatively use different tools in cooperation with each other. Great video!
This sort of non destructive workflow makes for a lot of saved time when you have to edit stuff. Here's hoping Blender continues the trend towards parametric modeling tools.
you should combine this with animation nodes, see how far you can go with animating this procedural modelling! pretty sure you'll come up with dope stuff!
Bravo, You used Blender like CAD software, i think therefore thad CAD capabilities of Blender have enormous potential, developpers could push it forward, Thank you smart young man.
I could be mistaken, but you'll get a cleaner result at 27:33 if you move the Boolean to before the Solidify so the curve of the Skin doesn't make the edges concave. I love these parametric modeling tips; good stuff!
a few more ideas: 1.use bevel modifier on a cube to have a "procedural cylinder" 2.use hook modifier to control a "cutter" mesh "from outside", from object mode e.g. using an "empty"
14:09 One thing I have done in some projects is put all the cutter objects into a separate “Cutters” object collection, which is excluded from the final render. Then I can hide/show them all at once.
So extruding a single edge objects is possible!!! 🤯🤯🤯 Thank you, thank you! I looked for this ever since transferring from Max! Already gave up... It will make generating hard-surface objects so, so much easier.
For 2.82 and versions below you could use a decimate modifier with the mode set to planar to work around the 2 steps limit :) Won't work in every situation but for the first shape it would work :)
This method, which I learned mainly from watching your lenses non-destructive videos, really changed the game for me. Up until then I followed a few tutorials successfully and attempted to make a few models with references but I had so many mesh issues that I ran into difficulties I just couldn't solve. Now, since December last year, I've been able to create models and looking at them, I think, wow, did I do that? It's early days yet as I've only been at it for a year, so I hope things keep improving as I slowly add new knowledge on top of the basics you taught me. Essentially, I've been learning how to manage the issues related to destructive modeling while using non-destructive in areas where it is a viable method. Can't wait to watch this and learn more.
These techniques are incredible and I've learned a ton by watching this! It sounds like the nightly build lets you resolve your screw modifier issue; another way to do so would be to add a Decimate modifier, but change it to Planar and use 0.1 degree for the angle limit.
That's amazing how many "aha moments" this man forces me to experience^)) His level tone of voice makes me go to sleep however the rich flow of "aha moments" keep me not only awake but also very excited:))
I come from 3D Studio Max and I miss this kind of modelling so much... Great Video! I wonder if there will ever be a Edit-Mesh Modifier for this workflow :) But I think not...
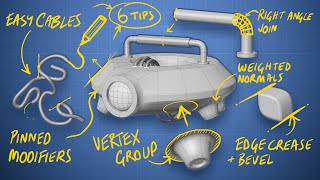
Weighted Normal modifier tip, check Keep Sharp and Face Influence, and in the Bevel Modifier set the Face Strength Mode to Affected. That should really help!
very nice tutorials , I learnt a lot from you , so thanks You can solve problem of extra edges created by screw modifier by using Decimate modifier with planar option active
awww latest blender crashes when i try to Spin two vertices connected by an edge into a cylinder! But these are FANTASTIC tips and I love it. I hope one day blender allows you to have a page of "parameters" you can enter for your model, or variables to use in various fields so that your X dimension of a particular mesh can be say 2 times the Y dimension, or whatever.
This is interesting. I have never used Blender for this sort of stuff. I use FreeCAD at home and AutoCAD when I go to posh places. Thanks I'll have a play.
Great stuff, Chris - clear explanations, good pace. I've worked with the great Hard Ops plugin for a month but this video feels like "Hard Ops: The Missing Documentation. Part 1." ;) Thank you!
for old version don`t 11:40 you can get rid of it with decimate planar. Also there is align operation in blender. Also BoolTool will help with booleans. And you can use Wondermesh for procedural primitives Also you can use mirror+bisect to get rid of half of shape and decimate planar will wash out seam. 26:44 inner blender keycasters can`t catch modal actions, because modal operation «locks operation inside» So I suggest external keylogger, such as Crealesson or QiPress p.s. anyway like, because you remind me to use screw as extrude
Really interesting stuff, helps to understand from a different perspective and eventually, come up with new creative ways to do things. Will be on the look out for the next one :)
1:42 OK, you got me to do an “AHA!” at this point ;). I’ve been wondering for a long time why the Solidify modifier won’t work on bare 1D edges, you need a 2D plane to start with. Here’s an answer!
1:09 Going back to your previous claim, that two verts and an edge are the minimum you need to do anything, I got it down to one vert and no edges, and two screw modifiers + a solidify modifier, and I now have a cuboid!
Really cool way of going about using the modifiers! Not sure if mentioned already but if you want to bool 2 of those verts-only-screw/solidified objects you have to set the "mode" in the solidify modifier from simple to complex in both objects or else it doesn't work for me (2.83A using 1 Step in the screw modifier).
If your ARRAY MODIFIER is making the duplicates smaller as they go, your scale needs to be applied on both the empty and the object. Select > CTRL A > Apply Scale
such a nice tutorial - its by far my most favourite blender tutorial i have ever seen! it matches perfect my workflow in 3dsmax which is very modifier based and non destructive! keep on this good work! i even can see this type of workflow in tracing dwg files for architecture use. in 3dsmax i always use splines together with extrude and shell modifiers to model buildings!
Hello, You could use Decimate modifier right after Screw with Planar option to git rid of that middle of Screw modifier or any other extra lines on planar surfaces that are not needed in a procedural way.
Great tutorials and the screw extrude trick is nice, but we really need an improved solidify/extrude modifier here. I have a plane that needs to be deformed and then solidify + bevel, etc. The problem is: - Solidify messes up as it follows normals, not axis and makes the solidify distorted. - Screw follows axis (good) but extrudes ONLY for edges, so it breaks the faces of my plane. - Array makes a beautiful copy of my deformed plane, but does not connect the two planes with faces that can be beveled. So the only 2 solutions so far are to solidify my flat plane first and then use Hooks or other transformations on vertex groups of my plane after solidify. Alternatively I need to Inset my whole plane to have undistorted normals along the edge... All of this would be not an issue if Solidify could work along a specific axis or pointing to an object like "Normal Edit" modifier which BTW does not help in my case.
This is the most helpful tutorial I have seen ín a while! I have a lot of CAD nostalgie after switching to blender. I mostly avoid booleans in blender because of the shading nightmare it usually causes. Your use of the screw modifier is simply brilliant. Im curious how much clean up work will be required to turn this final into a mesh in order to UV unwrap it. I know blender has some really nice remesh tools now. Do you know anything about weight painting, like for cloth sims and such? This is a topic I would love to see a video from you on. I bet you have lots of cool ideas I have never considered, like in every other video of yours that I have seen so far. Good work!
@Chris P, hello, just thought about your middle edge issue. You can remove it by using the decimate modifier with the planar method right after your screw ;)
1:39 Aaaand first eureka moment! I am using Blender for so long and never really messed with that modifier and I did got in that problem where I needed "Extrude modifier". It just seemed not possible yet.
If they added grouping of modifiers it would help because I have a relatively low resolution screen so all I see are the first letters of each modifier in the stack


BREAKING NEWS: Screw Modifier: I recorded this tutorial using the Blender 2.83 build from 2020-03-16 cuz I knew everything worked and I wanted to avoid surprises during recording. Now I download last night's build (2020-03-29) and the screw modifier allows 1 Step which makes this workflow even more awesome! (thx to @deadpin for the hint!)
Hi Chris, I am still running 2.80 due to the removal of some of the shading nodes I lean on in 2.82. I really liked your demo of this non-destructive workflow. I figured I would see if there was a way to get rid of that center cut from the screw modifier. I could be wrong here, but it looks like doing a planer decimate (1 iteration) modifier works to do the trick. Always more than one way to accomplish something in Blender. Thanks again for sharing and keep em coming! *Update* The decimate only works for the first few steps, and then it kinda falls apart.
@@SJ98296 What shading nodes were removed in 2.82?
@@lawrencedoliveiro9104 There was a change in the voronoi noise generator (forget the mode, but there is one that makes cracks that are perfect for terrain), and 2.79 to 2.80 removed the npr shaders so I am still using 2.79 for toon shading projects.
non destructive modeling is incredibly interesting. keep it up Chris.
@@SJ98296 I still see a Toon BSDF in 2.82 - is that what you meant? As for terrain, Musgrave seems more suited for that.
Should have called the video "101 ILLEGAL MODELLING TECHNIQUES IN BLENDER" and it wouldn't even be clickbaiting
Setting steps to 1 is now possible. Use a new nightly build of 2.83 :)
Ohhhh! I kept the older version for recording the tutorial to avoid surprises... Will check this out!
blender has always been armed with a great assortment of modifiers but no real explanation on how to use them thank you for filling that void & showing how powerful they are.
Nice tutorial (as always)! Two comments:
1) You can create a cylinder procedurally out of a single vertex by stacking Skin, Subdivision, and Cast (the latter set to "cylinder")
2) By setting the "Offset" option of the Solidify modifier to zero, you get a symmetric extrusion on both sides of the face.
I'm a 20 years old gamer and I enjoy creative Blender videos like that more than most gaming content. Man, sometimes I feel like nerd and I love it
Pro-E in Blender! Excellent work!
This is so powerful. I had no idea this was even possible with the screw modifier, and then they way you stack the modifiers is pro. Thank you for sharing your workflow. Something people should also keep in mind is Solidify can also use vertex groups with weights, so you can also vary your solidify width per vertex non destructively!
13:40 I think this is the best method to teach modeling. Instead of doing step by step tutorials that only teach you how to copy, it's much better to teach how to creatively use different tools in cooperation with each other. Great video!
THX!
please share, tweet, .... :)))
11:30 PRO TIP : Use a Decimate set to Planar of 0degrees to get rid of both that line down the center and also the "edge bevel"
I was shocked when you just casually deleted that haha. I was admiring it.
:))
:)))
This sort of non destructive workflow makes for a lot of saved time when you have to edit stuff. Here's hoping Blender continues the trend towards parametric modeling tools.
More non destructive modeling (beginner's) please!
It’s like an engineer taking a peek at the creative world. Wunderbar Chris, you’re an amazing instructor!
Edge Slide and pressing C to extend...wonderful!
Man, 1st 10 minutes into this and I am already amazed!! Thanks
I can’t express how useful this is
you should combine this with animation nodes, see how far you can go with animating this procedural modelling! pretty sure you'll come up with dope stuff!
🤓
Please keep making nondesctructive tutorials! It´s awesome!
kinda not sure what else to do....
Bravo, You used Blender like CAD software, i think therefore thad CAD capabilities of Blender have enormous potential, developpers could push it forward, Thank you smart young man.
Hi Chris, this is great tutorial. THank you for the knowledge shared! Big like.
I don't think you were talking too much Chris! Every bit was GOLD:))
I can see why these are popular, keep them coming :)
...check out the other 3 videos (see links in video description)
14:42 And don’t forget, you can use nondestructive modelling to create your cutter object as well!
I could be mistaken, but you'll get a cleaner result at 27:33 if you move the Boolean to before the Solidify so the curve of the Skin doesn't make the edges concave.
I love these parametric modeling tips; good stuff!
a few more ideas:
1.use bevel modifier on a cube to have a "procedural cylinder"
2.use hook modifier to control a "cutter" mesh "from outside", from object mode e.g. using an "empty"
This video is Gold.
THX 🤓
That "calculate order" 7:13 would have consumed 2 hours of my time... Thanks for the great tip.
ahaha the screw modifier doing the extruding job just killed me. That's some awesome modifier magic you do there!
14:09 One thing I have done in some projects is put all the cutter objects into a separate “Cutters” object collection, which is excluded from the final render. Then I can hide/show them all at once.
Very practical and creative, thanks for uploading!
So extruding a single edge objects is possible!!! 🤯🤯🤯 Thank you, thank you! I looked for this ever since transferring from Max! Already gave up... It will make generating hard-surface objects so, so much easier.
I'm fighting through this with a simple SVG I imported. I can extrude with the screw but I can't make the bevel work.
i really like the way creating cube & cylinder with 2 vertices
Very interesting indeed! The more i learn, the more i realize i know little, but always enjoy learning from skilled people! =) Thanks for sharing.
For 2.82 and versions below you could use a decimate modifier with the mode set to planar to work around the 2 steps limit :) Won't work in every situation but for the first shape it would work :)
note: check my pinned comment here on RUclips ... things are improving rapidly ;)
This is nothing short of pure magic, i need to try these, so cool
NEVER will I ever create a cylinder EVER again in blender. Thanks so much for this video!
😁
This method, which I learned mainly from watching your lenses non-destructive videos, really changed the game for me. Up until then I followed a few tutorials successfully and attempted to make a few models with references but I had so many mesh issues that I ran into difficulties I just couldn't solve. Now, since December last year, I've been able to create models and looking at them, I think, wow, did I do that? It's early days yet as I've only been at it for a year, so I hope things keep improving as I slowly add new knowledge on top of the basics you taught me. Essentially, I've been learning how to manage the issues related to destructive modeling while using non-destructive in areas where it is a viable method. Can't wait to watch this and learn more.
Just killin' it with these tutorials Great stuff, thanks!
Thx!
These techniques are incredible and I've learned a ton by watching this! It sounds like the nightly build lets you resolve your screw modifier issue; another way to do so would be to add a Decimate modifier, but change it to Planar and use 0.1 degree for the angle limit.
I've never subbed to a channel this quickly.
😁👍🏻
This is brilliant. I used to abuse the deformers in Maya in similar ways. 😄
A lot to learn here! Thanks
The cylinders you used to cut the metal bracket could be cubes with subdivision modifiers
You could even use a lattice to work with the deformation and arrays to place the holes
or cylinders made out of 2 (or even just 1!) vert - like in the 2nd part of this video ;)
@@chrisprenn exactly!
That's amazing how many "aha moments" this man forces me to experience^)) His level tone of voice makes me go to sleep however the rich flow of "aha moments" keep me not only awake but also very excited:))
😁👍🏻
Best overview on non destructive modelling out there! Keep on going!
Taking note of nondestructive modeling, thank you Chris!
Brilliant, clear, creative, and fun to watch. Thanks!
I come from 3D Studio Max and I miss this kind of modelling so much...
Great Video!
I wonder if there will ever be a Edit-Mesh Modifier for this workflow :)
But I think not...
Thanks once again Chris .. I'm getting insights into new workflows that will surely be useful in real projects.
Weighted Normal modifier tip, check Keep Sharp and Face Influence, and in the Bevel Modifier set the Face Strength Mode to Affected. That should really help!
very nice tutorials , I learnt a lot from you , so thanks
You can solve problem of extra edges created by screw modifier by using Decimate modifier with planar option active
Sweet jesus. I'm on minute 20 and I've already filled my brain with new things. Enough for today.
it just blew my mind watching this. thank you, man
THANKS! can't believe I learned so much in 35 minutes.
Genius! It's something I've been so missing. Kind of extrude modifier to mix withe solidify later. Thanks
Awesome tutorial, thank you very much!
Stumbled upon this channel and this is the best sub I have made this year! Thanks Chris
THX!
We really need an actual extrude modifier. That's a really neat hack to use the Screw modifier though, I wish I knew that for a project a month ago!
awww latest blender crashes when i try to Spin two vertices connected by an edge into a cylinder! But these are FANTASTIC tips and I love it. I hope one day blender allows you to have a page of "parameters" you can enter for your model, or variables to use in various fields so that your X dimension of a particular mesh can be say 2 times the Y dimension, or whatever.
fantastic
Thank you Chris.
great video. Thanks!
Very, very useful for modeling whatever. Thanks, Chris.
I think you and Midge Sinnaeve would get along really well
Great video as normal Chris. Keep up the good work - I never fail to learn something new every time!
This is interesting. I have never used Blender for this sort of stuff. I use FreeCAD at home and AutoCAD when I go to posh places. Thanks I'll have a play.
Awesome! Thank you!
I would like to see in blender out of box such tools as in mesh machine (L_Select, Weld nearest vertices with range adjusting, offset cut)
Really nice use of modifiers. I learned a lot. Cheers!
Thanks. Nice tutorial for beginners.
THX :)
Great stuff, Chris - clear explanations, good pace.
I've worked with the great Hard Ops plugin for a month but this video feels like "Hard Ops: The Missing Documentation. Part 1." ;)
Thank you!
thx!
for old version don`t 11:40 you can get rid of it with decimate planar.
Also there is align operation in blender.
Also BoolTool will help with booleans. And you can use Wondermesh for procedural primitives
Also you can use mirror+bisect to get rid of half of shape and decimate planar will wash out seam.
26:44 inner blender keycasters can`t catch modal actions, because modal operation «locks operation inside» So I suggest external keylogger, such as Crealesson or QiPress
p.s. anyway like, because you remind me to use screw as extrude
so simple and so cool, thank you, sir!
Chris P has gained 1 additional Subscriber...
Absolutely brilliant. Thank you Chris.
SAVED MY MODELING LIFE!
Really interesting stuff, helps to understand from a different perspective and eventually, come up with new creative ways to do things. Will be on the look out for the next one :)
Great video. Smashed that like button as instructed.
thnx!
24:15 You are actually changing the “Radius X” and “Radius Y” values. These are displayed in the Item tab in the properties toolshelf.
1:42 OK, you got me to do an “AHA!” at this point ;). I’ve been wondering for a long time why the Solidify modifier won’t work on bare 1D edges, you need a 2D plane to start with. Here’s an answer!
1:09 Going back to your previous claim, that two verts and an edge are the minimum you need to do anything, I got it down to one vert and no edges, and two screw modifiers + a solidify modifier, and I now have a cuboid!
Really cool way of going about using the modifiers! Not sure if mentioned already but if you want to bool 2 of those verts-only-screw/solidified objects you have to set the "mode" in the solidify modifier from simple to complex in both objects or else it doesn't work for me (2.83A using 1 Step in the screw modifier).
If your ARRAY MODIFIER is making the duplicates smaller as they go, your scale needs to be applied on both the empty and the object. Select > CTRL A > Apply Scale
i knew about the screw Combo but didn't realize i could make a Planar out of it LUL
Thanks for this it was awesome!
It's an enormous help to me. Thanks!
One of the best video of Blender
THX ♥️
such a nice tutorial - its by far my most favourite blender tutorial i have ever seen! it matches perfect my workflow in 3dsmax which is very modifier based and non destructive! keep on this good work! i even can see this type of workflow in tracing dwg files for architecture use. in 3dsmax i always use splines together with extrude and shell modifiers to model buildings!
Hello, You could use Decimate modifier right after Screw with Planar option to git rid of that middle of Screw modifier or any other extra lines on planar surfaces that are not needed in a procedural way.
Check out my TL;DR video on the topic which is a bit updated 😉
Great tutorials and the screw extrude trick is nice, but we really need an improved solidify/extrude modifier here. I have a plane that needs to be deformed and then solidify + bevel, etc. The problem is:
- Solidify messes up as it follows normals, not axis and makes the solidify distorted.
- Screw follows axis (good) but extrudes ONLY for edges, so it breaks the faces of my plane.
- Array makes a beautiful copy of my deformed plane, but does not connect the two planes with faces that can be beveled.
So the only 2 solutions so far are to solidify my flat plane first and then use Hooks or other transformations on vertex groups of my plane after solidify. Alternatively I need to Inset my whole plane to have undistorted normals along the edge... All of this would be not an issue if Solidify could work along a specific axis or pointing to an object like "Normal Edit" modifier which BTW does not help in my case.
Another amazing tutorial. I love it!!! Thanks a lot!!!
Wow this is excellent Chris, thanks so much :)
Glad you liked it!
Something like magic.
This is the most helpful tutorial I have seen ín a while! I have a lot of CAD nostalgie after switching to blender. I mostly avoid booleans in blender because of the shading nightmare it usually causes. Your use of the screw modifier is simply brilliant. Im curious how much clean up work will be required to turn this final into a mesh in order to UV unwrap it. I know blender has some really nice remesh tools now. Do you know anything about weight painting, like for cloth sims and such? This is a topic I would love to see a video from you on. I bet you have lots of cool ideas I have never considered, like in every other video of yours that I have seen so far. Good work!
THX ♥️
Thanks Chrish, perfectly explained
Very Nice And Thank You.
THX
@Chris P, hello, just thought about your middle edge issue. You can remove it by using the decimate modifier with the planar method right after your screw ;)
1:39 Aaaand first eureka moment! I am using Blender for so long and never really messed with that modifier and I did got in that problem where I needed "Extrude modifier". It just seemed not possible yet.
Great Video
If they added grouping of modifiers it would help because I have a relatively low resolution screen so all I see are the first letters of each modifier in the stack
the modifier stack is indeed not very easy to read - no matter what size/resolution ;)
Aha! Thanks Chris😁
😁