How to Replace a Control Arms & Ball Joints - Honda Ridgeline - Front Right & Left (Complete Guide)

HTML-код
- Опубликовано: 1 авг 2024
- Find out how to replace your control arm on a Honda Ridgeline 1st Generation.
The Tools:
• MOOG RK621545 Control Arm and Ball Joint Assembly - FRONT RIGHT - amzn.to/3CrFXlu
• MOOG RK621546 Control Arm and Ball Joint Assembly - FRONT LEFT - amzn.to/3g1qf7h
• Pickle Fork set - amzn.to/2X94HyQ
• Floor Jack (3 Ton) - amzn.to/2R7G96H
• Jackstand (3 Ton)- amzn.to/3f3ABC5
• Pilers - amzn.to/3lEU6WF
• Gloves - amzn.to/3bbfEnu
• Safety Glasses - amzn.to/3ux25GO
• Shop Towels - amzn.to/2SC8D93
• Ratchet - amzn.to/3xWjE5g
• 19mm, 22mm Socket - Basic Socket Set - amzn.to/3fjRoBd
• 19mm Wrench - Basic Set - amzn.to/3jzlMcJ
• 1/2in Impact Drill (Rigid) - amzn.to/3vVDUBZ
• Torque Stick - amzn.to/33wFTR2
• Impact Sockets (Metric) -amzn.to/3etXiQU
• Torque Wrench - amzn.to/3fEIrDi
• Flat Head Screwdriver - amzn.to/2RAjTlU
• Long Flathead Screwdriver - amzn.to/3CCDCED
• Hammer - amzn.to/2VBhF7V
• Rummer Mallet - amzn.to/3jDa5le
• Sledge Hammer - amzn.to/3ywEurD
00:00 - Start of Video
00:07 - The Problem
00:25 - The Tools
02:24 - Jacking up the Truck
05:12 - Front Left (Driver) Ball Joint & Control Arm
28:48 - Front Right (Passenger) Ball Joint & Control Arm
44:16 - Putting the Truck back down
44:45 - Closing of Video
This video works on many makes and models. .
Check out my website at mcfixit.us
Disclaimer:
Due to factors beyond the control of MC FIX IT, I cannot guarantee against improper use or unauthorized modifications of this information in the video, post, blog, or social media. MC FIX IT assumes no liability for property damage or injury incurred as a result of any of the information contained in this video. Use this information at your own risk. If you feel uncomfortable at any time. Stop and go to a professional. MC FIX IT recommends safe practices when working on vehicles, your house, or any other project and or with tools seen or implied in this video. Due to factors beyond the control of MC FIX IT, no information contained in this video shall create any expressed or implied warranty or guarantee of any particular result. Any injury, damage, or loss that may result from improper use of these tools, equipment, or from the information contained in this video is the sole responsibility of the user and not MC FIX IT.
#mcfixit #autorepair #cellphonemountfix
--
Supplies used to record this video:
* GoPro Hero 7 Black - amzn.to/3f3ALtb
* 256GB Flash Drive - amzn.to/33pAueG
* Vlogging Frame - amzn.to/33tajE0
* GoPro Pro 3.5mm Mic Adapter - amzn.to/2RCURCu
* Youmic Lavalier Lapel Mic - amzn.to/2R55sWX
* Boom Stand (tripod) - amzn.to/3bdkQaw
* 5/8” to 1/4” adapter (boom to blogging frame- amzn.to/3txrVsM
* Portable Battery Powerbank- amzn.to/3vJQc0q
* 6ft USB to USB-C (powerbank to GoPro)- amzn.to/3uAS5MH  Авто/Мото


![How to Replace Rear Struts on a Honda Ridgeline [Complete Guide]](/img/1.gif)
The Tools:
• MOOG RK621545 Control Arm and Ball Joint Assembly - FRONT RIGHT - amzn.to/3CrFXlu
• MOOG RK621546 Control Arm and Ball Joint Assembly - FRONT LEFT - amzn.to/3g1qf7h
• Pickle Fork set - amzn.to/2X94HyQ
• Floor Jack (3 Ton) - amzn.to/2R7G96H
• Jackstand (3 Ton)- amzn.to/3f3ABC5
• Pilers - amzn.to/3lEU6WF
• Gloves - amzn.to/3bbfEnu
• Safety Glasses - amzn.to/3ux25GO
• Shop Towels - amzn.to/2SC8D93
• Ratchet - amzn.to/3xWjE5g
• 19mm, 22mm Socket - Basic Socket Set - amzn.to/3fjRoBd
• 19mm Wrench - Basic Set - amzn.to/3jzlMcJ
• 1/2in Impact Drill (Rigid) - amzn.to/3vVDUBZ
• Torque Stick - amzn.to/33wFTR2
• Impact Sockets (Metric) -amzn.to/3etXiQU
• Torque Wrench - amzn.to/3fEIrDi
• Flat Head Screwdriver - amzn.to/2RAjTlU
• Long Flathead Screwdriver - amzn.to/3CCDCED
• Hammer - amzn.to/2VBhF7V
• Rummer Mallet - amzn.to/3jDa5le
• Sledge Hammer - amzn.to/3ywEurD
00:00 - Start of Video
00:07 - The Problem
00:25 - The Tools
02:24 - Jacking up the Truck
05:12 - Front Left (Driver) Ball Joint & Control Arm
28:48 - Front Right (Passenger) Ball Joint & Control Arm
44:16 - Putting the Truck back down
44:45 - Closing of Video
This video works on many makes and models. .
Check out my website at mcfixit.us
Disclaimer:
Due to factors beyond the control of MC FIX IT, I cannot guarantee against improper use or unauthorized modifications of this information in the video, post, blog, or social media. MC FIX IT assumes no liability for property damage or injury incurred as a result of any of the information contained in this video. Use this information at your own risk. If you feel uncomfortable at any time. Stop and go to a professional. MC FIX IT recommends safe practices when working on vehicles, your house, or any other project and or with tools seen or implied in this video. Due to factors beyond the control of MC FIX IT, no information contained in this video shall create any expressed or implied warranty or guarantee of any particular result. Any injury, damage, or loss that may result from improper use of these tools, equipment, or from the information contained in this video is the sole responsibility of the user and not MC FIX IT.
#mcfixit #autorepair #cellphonemountfix
--
Supplies used to record this video:
* GoPro Hero 7 Black - amzn.to/3f3ALtb
* 256GB Flash Drive - amzn.to/33pAueG
* Vlogging Frame - amzn.to/33tajE0
* GoPro Pro 3.5mm Mic Adapter - amzn.to/2RCURCu
* Youmic Lavalier Lapel Mic - amzn.to/2R55sWX
* Boom Stand (tripod) - amzn.to/3bdkQaw
* 5/8” to 1/4” adapter (boom to blogging frame- amzn.to/3txrVsM
* Portable Battery Powerbank- amzn.to/3vJQc0q
* 6ft USB to USB-C (powerbank to GoPro)- amzn.to/3uAS5MH
My ball joint is shot. Thanks for showing how to do this and including all of the needed tools. You make great content on Ridgeline. Thanks for taking the time to do this for us all!
Glad it was helpful! Good luck on your project!
I’m undergoing the whole kit in a few weeks. Thank you. Your saving me hours already
Best of luck on your project. Thanks for watching and commenting!
@@MCFIXIT your the only RUclipsr that shows the details on how to do everything on the ridge line . Keep it up.
Thanks! I’ve got a lot of videos on my Ridgeline. I just got an Odyssey so you’ll be seeing a lot of videos on it coming soon. Not sure if that’s helpful but they are very similar in many ways.
I like that you’re showing us the tools AFTER the job is done so it’s a complete list, instead of half way into the video “oh and you’ll need this and this”
Thanks so much! Hope you are able to fix your issue!
Thank you for adding the specs! This really helps set your videos above other ones! Great job!
You are welcome. Glad it has helpful
Good job on the video and very informative. I have an 08 Ridgeline and was replacing the struts, lower control arms and outer tie rod ends, and multiple shops quoted me anywhere from 9-11 hours labor and upwards of 1300$. I really felt that I could do it myself given a few extra tools and a nice piece of ground to do it on. I'm glad I was right.
Yes. That’s why I did mine instead of a shop. The cost of labor is very expensive for auto repairs. Make sure to have everything tighten to specks and get an alignment when finished.
Thanks for motivating me to do this! Over the 2 previous days I replaced both control arms, both front struts, both outer tie-rod ends, both front sway bar links and bushings. While working on the ground for this "slightly" over-weight 66 year old was tough on the body, it was so worth it, knowing I saved probably $1000 in labor but also having the satisfaction that I got by doing it myself.
Well done!!!! Congratulations!!! You saved way more $1000 if you did all of that work. More like $3000 or more unless you have a friend who’s doing it. Thanks for watching and commenting!
Keep putting out those videos and I'll keep refurbing my 2006 RTL w/ 209,000 on the clock!@@MCFIXIT
I hope to have more videos to come. Mines over 250k and still going! Hoping to get this to 300k
Ratcheting wrenches make things a lot smoother
Yes they do
Great explanation on how to remove and install. Thank you for showing both sides too!
You are welcome! Good luck on your project
Great idea using the impact gun. It really helps speed up the video time. Overall awesome video. This is going to assist me so much in doing this project myself today.
Yes! It does make the project quicker and less strain on your joints
Get a set of Gearwrenches. I got the swivel set that has SAE and metric for $59.95 from Tractor Supply Company and it made the lower ball joint castle nut a breeze. Your video made my axle swap a morning project that was flawless. Thank you!
Thanks! Got a link to exactly what you are talking about? I’m always interested in getting tools that help get the job done more efficiently! Thanks again!
Is this similar to what you are talking about: GEARWRENCH 15 Piece 3/8inch Drive 6 Point Universal Impact Socket Set, Metric - 84918N a.co/d/43G6JKz
Very nice, excellent detail, great filming, very complete. Thanks, this will be my next project on the 2007 Ridgeline.
Glad it was helpful!
Great video. You explain things so well!
Thanks Jennifer! I appreciate your comment!
Man you really have some great content for the ridgeline. Appreciate your videos!
Thanks! I’ve got a number of other ones coming out hopefully soon. It takes me a lot longer to edit than do the projects so I’ve got a backlog of videos that need to be edited
Thanks for the help dude
You are welcome
Thank you
You are welcome, thanks for watching!
Great video. It looks like your rack and pinion may need to be changed out due to the amount of grease you can see on it.
Yes, that’s a future project! They are leaking a little bit it’s also some from the cv axel
Great disc golf dyes and car repairs. I wonder how close this would be to my Pilot. My LCA is going to need replaced soon.
Thanks! Yeah, I love working on vehicles. It should be very similar if not the same
I was hoping that you did a video on the Honda Ridgeline heated seats and how to fix the heated seats thank you
I haven’t had that issue, but if I do I’ll make a video of it!
When are you going to post your video on the drive shaft? We need to change that out too. You mentioned it in your video. Thanks in advance!
It just posted today! I hope you find it helpful too!
Great video. What symptoms were you having that made you replace both control arms?
Badly cranked boots. Also, I was changing out a number of worn parts with the suspension. So I did them all at once. Thanks for watching and commenting!
Thank you MC! Q: i have read that it is better to do the final tighten /torque after the truck is on the ground to take into account for the tension on the bolts when you lower it. Why did you not do that? Q: Did you notice any difference in the handling of the truck after replacing the control arms/ball joints? Great video!
That’s def an option on how to do it. It helps to make sure it doesn’t move. I’ve been doing it this way for many years and never had any bolt come lose. If I was doing it by hand, I’d put it on the ground but with an impact tool, I don’t think it matters.
Yes, it’s much better. If they are worn they should be fixed. Better tread wear on tires and also you don’t risk the possibility of breaking when driving which can be deadly at high speeds.
Too bad that ball joint tool you bought didn't work. I have one of those and I'm hoping it fits on my truck's ball joint. I hate using the pickle forks because they take forever to separate the ball joint.
Yes, I was a little upset bc it would have made it easier. It seems like it might for one of my other vehicles though. I think it was made for a car not a Ridgeline
Could you leave the ball joint in the lower control arm or is it a case where you have to seperate it before taking the control arm off?
I like it bolted on to remove the ball joint easier with the separator. That’s the only way I’ve done it on this vehicle. But it should work taking off the other bolts first.
Great video!
My control arm bushings (especially the flat ones) are shot. I will need to change mine out but also need to replace leaking trans seals and half shafts.
What differences did you notice from before to after the swapping of the control arms?
Thanks!
Thanks!
I did all my suspension stuff at once and it drove like new after an alignment! Struts, cv axels, control arms, tie rods, and recently did the sway bar links (when I made these videos). Not sure if that helps answer your question though.
@@MCFIXIT It does, thank you!
Perhaps you might know... I have been fighting an issue on my 07 RL since I bought a year ago. It will steer/pull to the right (mostly) but left as well. This probably has to do with the crown on road at any particular time but is much more pronounced than on any other vehicle I drive on the same roads with.
I have tried multiple alignments and ensuring that the rest of the steering and suspension components are not too far worn but it still pulls. I have also made sure that the brakes are not sticking.
I am hoping that replacing the control arms and the half shafts will fix this issue.
Any thoughts?
It might help after you get an alignment replacing the shafts & control arms. Have you also changed out the tie rod ends? That's what I did to get the biggest change. My tie rods were not totally ruined but bad enough that there was some noticable play in the steering.
I'd make sure to get a print out of the alignment before and after they do it. This helps show you where things were and where they are now. I hope that helps!
@@MCFIXIT They seem pretty tight but I think I will replace those too. Thanks!
The new ball joint end will just pop back in with no pressure?
Yes when replacing the control arm it just goes back into place. You might need a floor jack on some makes and models to get it lined up and lifted into place.
Can you take off the sway bar links to make this easier?
Yes, but not sure that’s totally necessary. If you are doing the drive shaft / cv axel that’s a good way to get more room and move things around easier
I don't understand why the tool for separating ball joints didn't work?
Mine did not open up enough. It would have been very helpful if it worked though
How are the Moog LCA’s holding up?
Very well. I've got almost 5k miles on them already and no issues at all. They ride smooth and handle turns well.
PS Do you have to change out both? Or can you just do one?
You can just do one if you need. Both of mine were bad.
How can I diagnose if the ball joint is bad? I took the control arm off yesterday to replace the compliance bushings only but want to make sure I replace the ball joint if needed while it’s off.
Torn boot, excessive wear by mileage, any weird noises coming from there. I like to change it all out and then get it aligned. With as many miles as I put on vehicles, it’s just a safe bet it will need to be changed out sooner rather than later.
@@MCFIXIT what about how loose it is when moving it around, is that an indicator of needing to be replaced?
@@BradleyCox It shouldn't have a lot of play in it. It's hard to say without seeing and even hearing it. Any leaks? any grinding sounds?
Can i ask what symptoms led you to change these out? I have an annoying knocking sound when going over bumps im trying to isolate
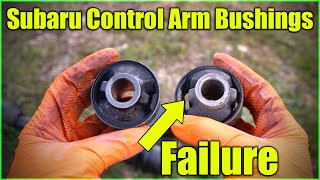
My wear and tear was on the bushing. I didn't notice any sounds. Look at your bushings and see if they are cracked badly. That's what mine had done due to about 220k miles on it. Best of luck w/ your project!
@@MCFIXIT yes they have cracks all over
Mine had a annoying knock sound going over bumps and found that sway bar rubber bushings and links were worn.
Why do these fail so easily on this vehicle? My rubber part looks the same.
Not sure. Mine is quiet old at 227k. It doesn’t seem like they rot easily though
Would this be similar on a 2nd generation Ridgeline?
It might but I highly doubt it! The G2 was a total redesign. I know the lead engineer and he fixed a lot the suspension issues in the first generation. In fact, he used my NART loaded down with mulch as images for their research on what needs adjusted.
Why didn't you use anti-seize on the threads?
That’s an option. They were not rusted and I really don’t want any of those bolts coming out easily. I torqued them to spec and hope to never have to redo this project. But yes, you can. I’d go light on it though. These bolts are super important to stay exactly where they are at during driving. Thanks for commenting!
Are their upper control arms on this vehicle?
There are no on my Ridgeline (its a first generation).
Did you need to preload the suspension.
These come as a complete struts. So they are preloaded which is safer and easier. They are ready to bolt on and go (after alignment).
This comment might be a little late, but yes you need to preload the suspension before the bolts to the control arm and ball joint are torque down. If you don't and torque down first what happens is when you lower down the vehicle the bushings to the control arm will tend to twist with that extra force from the vehicle's weight on the ground. You don't want that to happen.
Can you just replace the ball joint and not the whole control arm?
You should be able to do so. I couldn’t find a link though. Let me know if you find one!
Yes
Does Honda sell a replacement ball joint? I can’t find it
A 1.5T floor jack works on the ridge? Thing is 4500lbs.
Yes, you were not jacking the entire car up from one spot. You were simply lifting it up and putting floor jacks underneath it. I always try to make sure I have at least four points of contact… Example 2 tires and two floor jacks.
Can’t get the balljoint under the knuckle.
I had to use a grinder because cheap control arm from Amazon had extra metal where it hit the back of rotor.
12:51 below and to the left of the cv axle above where you are removing from frame....... it looks like its leaning forward. what is that?!? TIA
Are you talking about the transmission mount bracket?
@@MCFIXIT yes, now I know. Lol thanks.
Why don't change just the boll joint instead change. Change everything?
You definitely could if you have the tools to press it in correctly. The Control Arms were rotted as well and it comes all reassembled and easy to install with just three bolts.
You should know what you're doing before making how-to videos.
Not sure what you mean. This has been working great on my truck for over 20 thousand miles.
@@MCFIXIT You don't even know where to position jackstands properly lol