How to Build a Wood Fence

HTML-код
- Опубликовано: 23 июл 2024
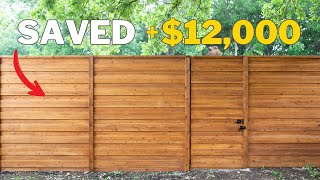
- In this video you will get the idea how to build wood privacy fence simple and easy way.
Material used - all pressure treated lumber:
- Lumber posts: 6x6 inch, 10 feet long,
- Horizontal stringers top and bottom: 2x6 inch, 10 feet long,
- Horizontal middle stringer: 2x4 inch, 10 ft long.
- Vertical planks: 1x6 inch, 6 ft long.
- Plank covers: 1x6 inch, 10 ft long.
- Screws: 3,5 inch for stringers and 1,5 for planks coated deck screws.
- Quickrete cement premix: yellow bag, 3 bags per post.
Tools used:
- Drill,
- Rafter square,
- Circular saw or Mitre saw,
- Tape measure,
- Level.
#fence #homerenovation #deck
Disclaimer:
Videos produced by this channel The Handy Neighbor are provided for informational, educational, & entertainment purposes only. Some of these projects, materials, and techniques may not be appropriate for all ages or skill levels. The Handy Neighbor does not make any claims of the safety of the projects, techniques, or resources listed on this site and will not take responsibility of what you do with the information provided by this site. Viewers must be aware by doing DIY projects on their homes they are doing it at their own risk and The Handy Neighbor, this channel and content creators here, cannot be held liable if they cause any damage to their homes. The Handy Neighbor cannot claim liability with all applicable laws, rules, codes and regulations for a project. By clicking and/or viewing this video you accept these conditions.


Video very clear! Step by step easy to understand wood fence look very nice .👍
Thank you! Very useful for me!
Great video! Thanks for not complicating things or over explaining the process.👍
Very nicely done. Thanks bud!
Really nice and simple video honestly.
Great vid! Thanks
Great video and thanks for including a parts list.
Thank you for the feedback!
One of the best step by step videos I've ever seen 👏🏾👏🏾👏🏾
Thanks
Oh, thanks a lot. I have a video how to set these posts as well.
Please like and subscribe! Thanks for the feedback!
Solid job and tutorial
Please like and subscribe!
Thanks
Great Video!
Thanks for informative explanation how to build a fence 👍
Please like and subscribe! Thanks!
easy simple but looks awesome! this is exactly what I was looking for! Thanks!
Thanks! Please like and subscribe!
Very helpful! I also live in Edmonton and about to do the fence DIY. Your video is exactly what i was looking for!
Great! I am glad it could help. Comment here if you need some more info. I have a video how to set a fence post as well!
Please like and subscribe!
Good luck!
Great video Thank you!!
Thank you for the feedback! Please like and subscribe!
Great video !
Thank you for your feedback 👍
This is great! So much easier than installing sections, and stronger too, especially since you're using screws. Nails don't last.
Thanks for the feedback. Please like amd subscribe!
Great video! I'm looking forward to using this one to build mine this spring
Great! Please like and subscribe! Let me know if you have any questions!
Very helpful and nice job thanks..
Thank you! Please like and subscribe!
Very good video my friend. I build them pretty much the same, but i also put metal brackets on the stringers for added wind protection. Fence looks great
Thanks for the feedback! Please like and subacribe!
very good video. easy to understand. great job
Thanks a lot! Please like and subscribe to the channel!
Excellent! Very easy to understand and require minimum labor. Great job 👍
Thank you for your feedback. I am very glad to hear that!
Wait until you build it. You'll feel the labor lolz.
Most people un my area want the fence to step. Not follow the grade. Almost all the videos ive seen from the US follow grade. Good video
Thank you for the feedback. Yes you can both ways, it is up to you. If you want it on the same level you can take the laser level once you install the posts and make the mark on laser line.
Please like and subscribe!
Brother, it was a fine install. The excess post above needs to be cut flush to make it truly spectacular. I'm sure you will do it ✌🏽
Thank you for the feedback! 100% I have to cut it this spring, as soon as it gets warm outside.
Great video! Love the look of the fence! I live in a very windy region and am looking to build a strong fence, would you say that this is one of the better designs for durability? Thanks so much!
I think it is. Use 6*6 posts. It will hold for many years. I live in Alberta where we get -40 in the winter.
@@TheHandyNeighbor Thank you!
I love the over lapped boards, curious if add a 1x4 top cap running vertically would be advised to keep water out?
Not bad idea, it one of the ways to do it. Good luck. Please like and subscribe. Thanks
Did you level the planks?
What did you level?
Great video
Great video, Any video's on a gate for this style of fence?
Yes I have a video for this exact gate on my channel. Take a look. Please like and subscribe.
Thanks for your video! I’m wondering how long between your fence posts ? 8 to 10 ft?
8 feet but some builder do 10 nowdays, I is up to you.
Please like and SUBSCRIBE!
GREAT VIDEO! I'm building a 'double-sided' fence that needs to look the same on both sides (neighbor is paying for half so he's getting a 'new' fence on his side.) I can't have the stringers showing on 'neighbor's side. The cost for the slats would DOUBLE so the slats have to interlap as you did but look the same on both sides. Considering using stainless steel staples to tie the slats together but not sure how to secure them together WITHOUT three 1-1/2" stringer width between the 2 sides. The fence pickets have to be flush to each other. I've seen ZERO videos showing this technique. Any info on solving this riddle would be much appreciated. THANKS IN ADVANCE!
Can you use Simpson Strong Tie
www.homedepot.com/p/Simpson-Strong-Tie-FB-ZMAX-Galvanized-Fence-Rail-Bracket-for-2x4-Nominal-Lumber-FB24Z/100375311
Place it closer to the end of the post and use and overlap planks only on one side. That way you will get the stringers right in between the posts if you know what I mean. Like here:
www.makingmanzanita.com/how-to-build-a-wood-fence/
Please like and subscribe! Thanks!
@@TheHandyNeighbor THANKS handy neighbor but it's not about attaching horizontal rails to the 4x4 posts. I can do that. It's about attaching the 'fence slats' WITHOUT using any rails - other than the top cap (2x4) and a bottom 2x4 rail laid horizontal between the post. Where might you pin 'stainless steel staples' so the slats overlap each other? Besides IN TO EACH OTHER AT THE OVERLAP EDGES, I'm assuming you would use 1x1's pieces at top, sides and bottom that are attached to the vertical posts and top & bottom 2x4's - with the distance of 1-1/2" between them so as to fit the overlapping slats into that 1-1/2" space (each slat is 3/4" thick.). Would that make sense?
@@ricktorreano266 just put the rails on your side. Like everyone else on the planet. No big deal
You could have made a shadowbox fence with the same materials. Unless, of course, you want complete privacy.
Is your house the yellow with the dirt yard or the blue house with the grass yard?
This was the exact kind of video I was looking for. Well done.
Great! Take a look how to make a gate, I have that as well. Mine is yellow!
Please like and subscribe!
@@TheHandyNeighbor just watched the gate video!!!
@@TheHandyNeighborWhat does the other side of the fence look like? The blue house side. Can you show us?
Would that be possible? Can you post a picture on your IG or FB or on here? Thanks!!!
I posted it this morning on my FB. Go take a look!
what is distance between your fence posts in this particular video?
Mostly 8 feet.
@@TheHandyNeighbor ok thanks
Did you cover the top after?
I did not but you defenetly can, it is optional.
Please like and subscribe! Thanks!
What does the back of the fence look like ?
Can not upload photo here, very similar. It looks nice as well.
Hi, what is the distance between posts ?
Standard is 8 or 10, it is up to you. From center of the post to the center of the post.
Please like and subscribe! Thanks!
Good video! It would be nice if you listed the materials and tools used to complete the project.
Thank you for the feedback! All material and tools now listed in description. I hope I was able to help.
Are you serious? I'm sorry, but if it's not completely obvious, you better find someone else to build the fence.
What was the cost?
Can’t remmember sorry.
G is silent, just like K in knife.
Why not use a bracket for the railing??
You could but I just think this is better as ties the posts better with installing stringers directly on the posts.
Please like and subscribe!
@@TheHandyNeighbor sounds good, thats what I thought too. I am not sure why most contractors use a U bracket, maybe for the looks? I am building my fence at 8 feet and follow your process.
You didn't treat your cut ends.
I did after the video. Thanks. Please like and subscribe!
Why not drame the 2x6 and 2x4 inside the 6x6 posts .
Because this way I get much better support on the posts. I mount them directly on the post. Inside you have to use brackets or screw the stringers from the top side and bottom what is not ideal way to position the crews.
Please like and subscribe, thanks!
Piece of cake. Piece of crumb cake.
I wouldn't want that big of a gap at the bottom tho. Have to shorten that up.
Thank you for the feedback. Please like and subscribe! Thanks!
Awesome
The first big win is going to rip that down. That Qi’s absolutely the worst way to build a fence but the best way to have a nightmare
Of couse it will not. It will hold for the next 50 years. I live in Northern Alberta, Canada with high winds and -40 C degrees during the long windy winter times and it holds great. Most of our fences in the city are built the same way.