LIGHT Up Your Images with PHOTOSHOP Latest Tool!

HTML-код
- Опубликовано: 14 июл 2024
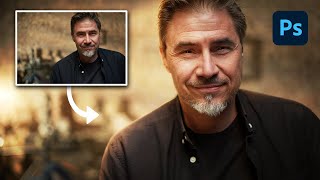
- Download Actions and PSD files free: photoshopdesire.com/ In recent Photoshop updates, Adobe introduced an exciting new feature that can add captivating lighting effects to your photos. In this tutorial, I'll guide you through the steps to achieve stunning results using this exclusive feature, available in the latest Photoshop version.
Step 1: Darken the Image
To get started, open your image in Photoshop and head to the adjustment layers. Select "Exposure" and lower the exposure slider to darken the image.
Step 2: Create the Spotlight Effect
Now, let's add a spotlight effect. Select the layer mask and set your foreground color to black. Using the gradient tool, choose the "Foreground to Background" radial gradient option. Drag the tool to brighten your image, but here's the fun part: you can adjust the light's direction by dragging the small dot in the center.
Step 3: Customize the Light
To further fine-tune the effect, manipulate the light's falloff by adjusting the midpoint. This gives you precise control over the light spread. Click off the mask to preview the lighting effect separately and admire the transformation.
Step 4: Enhance Texture
Now, let's enhance the texture in specific areas. Head to the Channels panel and focus on the red channel. Ctrl+click (Cmd+click on Mac) on the red channel's thumbnail to create a selection based on its information.
Step 5: Copy and Apply Texture
Return to the Layers panel, select the background layer, and press Ctrl+J (Cmd+J on Mac) to duplicate the selected pixels onto a new layer. Change the blending mode of the duplicated layer to "Overlay." It might look unusual, but we're not done. Go to "Filter" - "Other" - "High Pass" to enhance the texture further.
Step 6: Final Touches
Compare the image before and after applying the High Pass filter to see how the texture pops in the selected areas, creating a captivating effect.
In summary, we've successfully created a powerful lighting effect and enhanced the texture of our image in just a few steps.
That's it for this tutorial! If you found it helpful, please leave a comment and share what you've learned. If you're new here, consider subscribing to stay updated with future tutorials. Until next time, happy editing!
►SUBSCRIBE: goo.gl/d31fld
►Become Channel Member:
/ @psdesireyt
Follow US - LET'S BE FRIENDS!
------------------------------------------
►Official Website: www.photoshopdesire.com
►FACEBOOK : / photoshopdesire
►GOOGLE+ : plus.google.com/+photoshopdes...
►Twitter : / psdesire
►Instagram: / photoshopdesire
#photoshop #lighteffect #photoeffects  Хобби
Хобби


The G.O.A.T has just spoken!😊
Thank you! Have a happy day!💞👍
Thank you so much for the nice informative video ... God bless you ...
I love these short and sweet lessons!
That’s an excellent technique!
Nice Lesson of Photoshop
How to add oval shape gradient in photoshop, In my case only add circle shape.
Wow amazing
You always amazing man.. Thanks alot ❤
Could have done this with radial gradient. That’s basically what this is.
You can achieve the same or rather very similar results by using camera raw or Lr…with better results by excluding the subject layer.
Can you explain why you are choosing the Red channel as opposed to the other channels?
Good morning
excellent video, providing a plus for the photo.
can you tell me if with Photoshop we can create the effect of the Harcourt studio in Paris
thank you for sharing
Yes you can!
why?
Dear Eshwar, whenever I use the gradient tool for a radiant gradient, I don't see the white outline around the gradient circle the way it shows when you use it. Could you please guide me how to fix that. Thank you.
Is this really a new feature, or we could do this with gradient filter before?
Good old days when we used lighting effects from render menu😢
How is it new feature ?????
It’s an old techniques that you can achieve in photoshop 5. Maybe even 4?
The only annoying thing is if one accidentally clicks outside of the gradient and drags, even a tiny bit, the first gradient disappears. Even if you get the gradient back by Control/CMD + Z, you can get the gradient back, but you can't modify it anymore. Also, it's a shame that you can't edit it later on (let's say after saving the PSD and opening it again).