HOW TO BUILD A DECK : START TO FINISH (Part 1 of 2)

HTML-код
- Опубликовано: 22 июн 2019
- This home improvement DIY project will show you how to build a deck from start to finish. Part 1 will take you through the process of demolition of an old deck, to excavation, drilling/pouring footings, and full explanation of deck framework. Click www.amazon.com/shop/byotools to HELP support the channel. Deep dive into what it truly takes to frame a deck from start to finish. This is a large scale project which will involves a lot of hard work and sweet, but this project will transform your backyard to another world. There's plenty of handwork involved on this project but its all worth it in the end. Plenty of deck ideas and composite decking along the way with Bring Your Own Tools (BYOTools #49).
Do you link the videos and want to treat Brent to a cup of coffee? ko-fi.com/byotools
BYOT News Letter (Automatically Entered into Yearly Giveaways) byotools.me
Follow me / byotools
BYOTee Shits Available NOW! teespring.com/byotools
Material List:
-2"x10" Pressure Treated Lumber
-4"x10" Pressure Treated Lumber
-Concrete
-CDX Plywood
-Metal Flashing
-Hurricane Ties amzn.to/2LafoJt
-Joist Hangers. amzn.to/2xbtWjM
-Adjustable Post Base amzn.to/2Ftf6JT
-Strong Tie Plate amzn.to/2LakyVH
-12" Diam. Concrete Tube Form amzn.to/2FmZIij
-Galvanized J Bots amzn.to/2xbZExs
-Galvanized Flashing Roll amzn.to/2XpqaCd
-G-Tape. amzn.to/2Y78rfV
-12" Waterproof Membrane amzn.to/2L8OhOQ
-6" Waterproof Membrane. amzn.to/2Y6NFNq
-1.5" Galvanized Nails amzn.to/2FmYKCH
-3" Galvanized Nails amzn.to/2L9mJsF
-Ledgerlock Screws amzn.to/31RZiKv
-Structural Connection Screws amzn.to/2Fv41YK
-Weed Block amzn.to/31N08rK
Tool List:
-Atlas 46 Chest Rig amzn.to/2WiQGdX
-Sledge Hammer amzn.to/2xgAZHL
-Reciprocating Saw amzn.to/2ICiq7p
-Framing Hammer amzn.to/2XmNErF
-Circular Saw goo.gl/itL8ST
-Palm Nailer amzn.to/2RvgW1A
-Air Compressor amzn.to/2IzBeEo
-Framing Nailer amzn.to/2VYLLQx
-Table Saw goo.gl/vGIx5s
-Feather Board: goo.gl/olhURX
-Tape Measure goo.gl/nguoOO
-Circular Saw goo.gl/itL8ST
-Chalk Line amzn.to/2IzSZ6x
-Speed Square amzn.to/2FrIuQK
-6' Level amzn.to/2J301Qo
-2' Level amzn.to/2RuPUHF
#byot #diy #howto  Хобби
Хобби


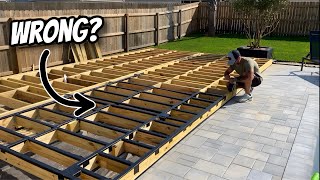


As the owner of a deck company, and someone who's built 30 to 40 decks a year for the past ten years, not bad. Technically sound. The overkill is too much overkill. And wrapping the beams in tin may actually be detrimental. Two dissimilar metals, copper and tin. The chemical used to make the brown pressure treated wood is called copper azole. We've had instances where we can not have metal touching wood. Not sure I buy it myself, but you may want to check into it before wrapping a beam in tin again. On to part II
I don't have a lot of construction, but the amount of joist seem pretty excessive to me. For home owners who are trying to stretch their dollar, how many joists would you say is acceptable for a deck that size? He said he used over 40.
Also, are the stiffeners he puts in between the joists necessary? When you fasten the deck top to the deck frame, wouldn't that prevent the joists flexing in that direction?
Interested in hearing what you think.
@@rugbyrocks123321 : 16" oc is the standard spacing, I think he said he went 12" for "overkill" which he seems to like. Most guys Ive worked for like to double the rim at the house and on the exterior, some guys even the sides, and stiffeners are quite helpful in a span that wide so stretching your dollar gets kind of tough when you are talking decks since theres only so many corners you can cut. Never seen anyone wrap PT lumber in metal flashing, that part kinda had me shaking my head. As long as your PT lumber is rated for ground contact youre good to go.
I’ve been going over and over again on how to prevent my frame from rotting, but heck it’s only a 9x9 deck. If I got to rip it out in 5 years, I’ll install pavers instead. I like change 🙈🤪 my deck will be mostly ornamental anyway.
Hey, I thought BYOT did a great job, but was curious about wrapping the beam. I am going to be building a ground level deck this month, and your saying as long as it is pressure treated ground contact wood, I am fine to not wrap it with anything? the top of the beam will be at ground level. Thanks!
We bought from the builder that chose to live in the home during the financial crisis in 2007. The deck he had built has no flashing, no underlayment against the house which explains why the walk out basements were leaking water when there was a weird hurricane in NJ a few yrs ago. It’s a 2nd floor but I want it redone and do not trust “builders” to come out, they will cut corners. I want it redone but not sure I can find someone to do all of what you are doing. Great video I will get my towns code info and attempt it because I am ocd with projects I have done.
Fabulous, tightly organized, efficiently presented
Bravo.👏
Super planning,tutoring and execution. 👍
Nice deck bro! My wife’s boyfriend loves it! 👍
Hey thanks for mentioning 811 utility locates before digging! First video I've seen mention it tonight while on my binge. From your local gas line locator, thanks!
Great to hear Zach and glad I included it for my views. Always got to make sure your not digging up something your aren't supposed to haha. Thanks for watching and hope you subscribed.
I'm getting a Milwaukee M12 12-Volt Lithium-Ion Cordless Palm Nailer after watching your video because I already have a charger and 2 batteries. Superb work!
Great to hear and thanks so much for watching. Gotta love a palm nailer. Hope you subscribed.
Great video, with list of supplies is a nice touch, I need a palm nailer.
PN a must haha! Great to hear Brian and thanks for watching. Hope you subscribed.
Your videos are an incredible Resource, Thank You
Great to hear Jackson. I put a lot of time and energy into my videos so glad to hear it shows. Thanks for watching and hope you subscribed.
your editing is as excellent as your decking. this is the go to video for anyone who is building one from ground up.
Great to hear Alan. I do all of the editing myself and I take pride in providing a detailed account of what it really takes to build a deck like this. Thanks for watching and your support.
@@BYOTools i send it to my trainer and we were watching in class room with dozen mates xDDD
Awesome video! Thank you for sharing, since I plan on building a 15x15 ground level deck soon.
Great to hear JJ. Thanks for watching and hope you subscribed.
How'd it go?
I like your regular voice instead of your "radio voice". Nice job and think it's so cool you stretched before working!
Haha great to hear you enjoy my normal voice and the stretching. Always important! Thanks for watching and all the support.
Really good video. I always learn something new, thanks!
Great to hear and thanks for the support DB.
Man phenomenal video! Very detailed and professional.
You done a excellent job don’t see people doing work like that any more pride is gone so sad
Thank you man I’m learning so much with your videos
Turned out great man! Very informative!
A quick squeeze clamp on that square would help to make those vertical circle saw cuts a bit more manageable by freeing up your other hand 👍🏽
Great to hear Donovan. That is a great suggestion on the speed share when doing the vertical cuts. I'll remember that one. Thanks for watching.
Awesome! Can't wait for part 2
It will be sooooo Dubjiiiii!
Like a good book cannot wait for Part 2
Couldn't say it better myself :)
Great job, a very, well built deck.
Definitely well built haha! Thanks for watching!
i ve build decks for 8 years for a living and still time to time accept deck jobs.You sir are a PRO.I've learned from your video thank you.
Silvio I LOVE hearing comments like this. Makes me feel like I'm doing something right haha. I take great pride in producing high quality videos that help others learn how to built. Thanks so much for watching and sharing. Hope you subscribed.
Agreed. I also build decks I have also learned a couple things. It’s nice to see people taking pride in their work as I do the same. I’m getting a palm nailer ASAP. I use screws and have for years but the palm nailer is legit! Great job!
Can I have ideas
Yes stretching is important and should be a part of the risk assessment.
Haha! Well stated. Thanks for watching!
my suggestion to anyone who is building this same type of deck or similar. When you install your rim joist AND the 2 outer-side joists, double them up. A: It gives way more strength B: they act as a sacrificial board, without damaging the actual rim joist (staggering where the ends of the boards are, for strength and water intrusion) and C: when you go to install whatever type of railing system, the support is already there, just screw/ nail/ anchor to it. and as and extra, your last strip of decking will have lots to screw to.
Thanks for the suggestion Jenny. Greatly appreciate your input. Thanks for watching.
DIY professional project! This is good work not for the weekend warrior.
Great to hear Rob and thanks for watching.
Very nice great presentation 👍
Great to hear Yuri! Thanks for watching and the support.
Hahahaha, love it!! The stretching is killing me lol (might be because I'm into a few bottles of wine during quarantine) I swear I saw a hard hat in there. Great Video!!! Fun to watch and pretty informative...btw the "radio voice" is great. I'm a "surgeon" at this, lol. I was sucked in to see what was next. Great solid advice. Awesome video!! On to part 2
LOL! Yes James! You nailed some great parts of this video and glad you enjoyed it. Let me know what you think of Part 2 and thanks so much for watching. Hope you subscribe.
Great build!
Great to hear Andrew and thanks for watching. Hope you subscribed.
오..좋아요.아주 좋습니다.
Very good
시청 해 주셔서 감사합니다
An amazing project. Inspiration!!!
Great to hear Daniel. Thanks for watching and supporting the channel.
Rim & Deck joke... You sir just earned yourself a sub.
Henry!!!!! I don't know if you are the first one to get that joke but your the first to actually leave a comment about it LOL!!! FINALLY!!! Thank you so much for watching and for subscribing. Its greatly appreciated.
@@BYOTools LMAO, it's refreshing to know there are others out there that share the same sense of stupid humor. Great work though man, keep it up!
Grear vid, thank's! I guess one can do it much simpler?
Thanks for watching. If your talking about a simpler SMALLER deck then yes you can for sure make it much simpler on yourself haha!
Wow, you are a pro!!! Nice details I have never thought about!
Great to hear Griffin. Thanks so much for watching and all your support.
Bro, as a mason I would recommend for you to try using mason-line little wooden blocks instead of tying line. That way you can move them side to side on the horizontal level plank of batter boards while you dig for sonotubes or something. Just make pencil-line on the sides also as on top with your speed square, since blocks cover the line visible from above.
Thanks for the helpful tips Sergey. I'll have to keep that in mind on the next project. Thanks for watching and the support.
Can you refer any contractors in the Philadelphia area ?
Great job 👍👍👍👍👍
Great to hear Nien. Thanks for watching and hope you subscribed.
Always so entertaining. Great job so far, I'm enjoying the process! And just so we're clear...we should get a palm nailer, right? 😀
LOL! Yes get a palm nailer STAT haha! Ya I probably went a little too hard on pushing the PN but it came in handy so many times that I had to bring it up a few times. Thanks for the support Don.
From my knowledge you do a deck a bit out of level, downwards from the house, so water can run away from the house. Laying the decking boards pointing away from the house, would also help.
Thanks for the comment Didi and yes you are correct that is standard but personally I prefer things as level as can be and as long as you have the proper flashing attached to your house their shouldn't be any issues with moisture effecting the house. Thanks for watching and you input.
You'd have to run the joists the other direction to run the boards away from the home, that deck is just a little long for that..
This was the same question i had- aren’t you supposed to have a 1/4 inch to a foot fall towards the outside for drainage off the deck. But you answered it. I still think the deck will last longer with fall.
very hardworking naman ni kuya keep it up po stay safe & godbless
Thanks so much for watching and the kind words Akosi.
very nice construction
Great to hear LLok. Thanks for watching and hope you subscribed.
Home tour !!! :)
thank you .
Great to hear Min. Thanks for watching and hope you subscribed.
Being a retired contractor I can tell you from experience, there is no part of this deck build that could be called a DIY project. This was done by a professional contractor and it wasn't his first deck. The structural engineering aspect of this project alone would take months to learn.
Richard, I take great pride in producing high quality how to / DIY videos and reading a comment like yours makes me feel like I’m doing something right :) You are correct, this is not my first deck but hopefully I'm helping others out there with their deck projects. Thank you so much for your comment.
@@BYOTools You're welcome, that was a first class build.
I wish could learn how to do a quality build. Where and how do you learn this?
@@bartsoo5102
I went to carpenters school in Virginia and spent the next 25 or so years remodeling bathrooms. Buy a GOOD book on construction techniques and learn the basics of foundations and load bearing support systems. Then build a mini mock up so you can practice the actual techniques involved. After you feel confident enough to try a real deck you will need to purchase about $3000 of PROFESSIONAL quality tools and you are ready to go. If it isn't yellow don't buy it. There is a reason the vast majority of professional construction workers buy DeWalt tools . By the way, they are yellow.
@@BYOTools dear friend, I am VERY happy you make money by your videos, but don't say you do it to help others. you do it to make money.
In the South, Dun-Lumber is reusing wood you already “done” used! 😂😂
That front beam might not be contacted with dirt but moisture rising from ground is trapped inside all that tape and sheating so it more likely will fail faster.
Based on my research and the tape spec sheet that shouldn't be an issue but only time will tell. Thanks for watching though Mr. WizeGUY.
Lol I saw an episode of This Old House and a lot of this reminds me of it 😂
HAHA! I Definitely now which TOH video you are talking about because I watched it myself. Hope you still enjoyed my video compared to the real professionals. Thanks for watching.
Americus diamonds 💎
Nice vid
Great to hear Leroy and thanks so much for watching. Hope you subscribe.
thanks
No Problem. Thanks for watching Walter.
Nice video
Great to here SS. Thanks for watching.
Great video thanks! Quick question could you also put the G tape on the bottom of the joists?
This guy is amazing. I have seen any builder i have hired to do this level of care and detail !! No one has used foam pads, they just pour cement in. And the level of care he took for water proofing - unbelievable. Even the cut wood preserver!!
Palm nailers are invaluable, worth the $50.
AGREED! as you can tell by how many times I said palm nailer in the video haha. Thanks for watching Rob.
I like that small concrete maker (mixer) 7:18
Some of the best money I've ever spent haha. Thanks for watching and hope you subscribed.
They call it a rim board because it's the outer rim of the deck. You have your rim's which encase the field, which ties into the ledger.
Thanks for the reply Jordan and for watching. Hope you enjoyed the video.
Great video. Dude for future projects that involves concrete please use a vibrator, rent it with the mixer. greetings from Colombia
Great to hear and thanks for the tip Luis. Glad I have viewers in Colombia. Thanks so much for watching and hope you subscribed.
Impressing job! I noticed you cut your flashing with a grinding tool of sorts, but something tells me it will rust in a week if it's not cut properly. At least here in Norway. 👍
Good catch but I don't have to worry about that since the metal flashing is galvanized so its meant for exterior use. Thanks for watching and GREAT to hear I have views in Norway!
Using a grinder heats the metal. You lose galvanizing properties with heat because the zinc coating can burn off causing premature rust. Use snips...
Nice video BTW!
Lumber guy came in hot!
Cool
Thanks for watching PS.
this was amazing. This was the best video I've seen on this topic. How did you learn all of this?
Great to hear MW. Learned from a few construction books I have, installing one on my own house, and of course RUclips. However, the ones on RUclips aren't quite detailed enough from start to finish for my liking so I felt this would be a good project to take on. Glad to hear you enjoyed it and thanks for the support.
BYOT i’ve been following your channel for a while. I made the street number plaque from your instructions. Didn’t have any walnut on hand so I made it with pine and did a faux walnut finish with stain. Your videos are the most practical for diyers. Other channels are for semi professionals.
Great to hear MW. I put a lot of effort into making sure my projects are manageable for any level of DIYers. You should take a picture of your street numbers and tag me on instagram or email it to me. Always love seeing how projects turn out from people that follow my videos. Thanks again for the support and nice work on your channel as well. Looks like a growing channel for sure.
@@BYOTools just sent you a message on instagram.
You guys should meet up and do a project together- then toss each others salads
Nice job mate, just cannot get the wooden house thing. Bricks n mortar over in Ireland. Too many rainy days :)
Great to hear Brown. As for the wooden house thing you must not have to think about many earthquakes in Ireland haha. We don't get too many but we do get some and wood structures seam to fair better in earthquakes then brick. I love the look of a brick home though. Thanks for watching and hope you subscribed.
Amazing job , Thank you
Great to hear Zaby. Thanks for watching.
Think rim of a glass, the outer edge. The rim joist is the outer edge of a deck.
A lot of people have explained what the rim joist is but Todd I think you had the best description of all of them. Thanks so much and hope you enjoyed the video
@@BYOTools I did. Good to see another true craftsman at work. There are many that make the claim, but few that actually deserve the title.
They make a strap gun that shoots collated 1 1/2” nails for hurricane straps. It’s way better than a palm nailer
Probably but how much does that one cost? Is it worth getting if you don't do decks very often? Thanks for watching and hope you enjoyed the video Shawn.
Pretty sure the first 'Beam' was in your 'Dingo' accent, which I'm gonna score you on because I'm Aussie and we do that... I'd say you get a six. More gusto and a little bit more mick-take and you'll have it! Great deck build, cheers cobba.
Haha! Great to hear i have fans across the world Simon and thanks for the tip on the accent. I'll make sure to keep that in mind next time. Hope your staying safe over there due to the fires. My thoughts and prayers are with Australia right now.
Simon Pollock I’m fr9m Australia too :)
From* sorry I accidentally clicked the wrong key
Question...what if you have concrete structures on three sides of the deck instead of just on one side? Would you fasten "ledger boards" to the concrete on all three sides, and then have a couple of piers on the open side?
Another question...you have the siding that protrudes out and fortunately can overlap the top of the ledger board, which is great, but in my case I have the concrete foundation to fasten the ledger board to, with brick above it instead of siding. What waterproofing measures should I take with the ledger board in that case?
Rim joist as it goes at the perimeter of field joists
Thanks for the clarification Jim. Hope you enjoyed the video. Thanks for watching.
No problem.great video, keepup the good work.
Our “rim joists” are called “boundary joists” and are generally doubled.
Nice deck job, but I’ve never seen a deck built with any waterproofing added.
👌
omg maaakeee surrrrrre is now ringing in my head.
Hahaha sorry about that but thanks for watching BYS.
@@BYOTools dont get me wrong its a great video overall :D
Great video bro thanks. Hey QQ, why do you use nails versus screws?
Great job man! That deck must have cost as much as the house. Haha
Haha! It definitely wasn't a cheap deck but Its not going anywhere thats for sure haha. Thanks for watching Blake and greatly appreciate that you subscribed.
@@BYOTools I'm sure, and yeah, that bad boy will last forever. Thanks for the vids, and knowledge for us diyers.
Pressure treated no joke
Awesome looking deck, very inspirational video! I'm currently building my first deck and I can't find any website that can ship G-Tape to Iceland! Are there any alternative names for these tapes that I could potentially find in a local store? Thanks!
Great to hear and good question. Yes there are other types of tape you can use. Also called joist tape or you can just use some type of flashing tape and cut it down like the one here: amzn.to/2V2T4Wn Thanks for watching and good luck on your project. Hope you subscribed.
Hi! I hope I get a reply for this question i have. We are planning to replace a door from where our window then a deck outside. Which one is best to start? Making door first or finish the deck first? Or it doesn't matter which one shoyld be first?
Great deck build - love your videos, finished product always look nice. Just curious though -do you worry about water pooling under this deck since the ground beneath it is a low point? What are your thoughts about putting in french drains prior to deck install? Or is that overkill? Thanks brother , keep em coming!
Seeing all this "water proofing" makes me glad I live in a part of California where it only rains Jan-May sometimes! Lol
Would it be better to do the portrait framing first all around then adding in the filler boards?
or just use treated lumber
In Finland where rains quite a lot, we do not use any of these water proofing things...We just use treated wood!
So well water proofed you didnt even need pressure treated lol
LOL! Right?! Thanks for watching Jay and hope you enjoyed the video.
Its called the rim joist because first of all its a joist then placed on the rim of your deck.
Thanks for the clarification Matt and hope you enjoyed the video.
nice job, i have a question why didn't u used sand mix with concrete, because i think flat concrete makes a big hole in wallet also nice deck and i will watch second part.
Great to hear and thanks so much for watching. I've never tried mixing sand and concrete together but it sounds like it might weaken the concrete and when your thinking of the overall cost of this deck the concrete what the lease of my worries haha. Thanks for the support.
Nice job, man. Ground level decks are hard to do. Where do you get your lumber? All the treated crap I get is warped, crowned and bowed.
Great to hear Cameron and thanks for watching. I got all of my PT lumber from a place called Dunn Lumber. Very nice outfit and great product. Hope that helps and thanks for all of the support.
I miss my carefree salada days.....TKS for remember me that...
LOL! Any time Fred. Thanks for watching and hope you subscribed.
In the framing of a deck or floor system, a rim joist is attached perpendicular to the joists, and provides lateral support for the ends of the joists while capping off the end of the floor or deck system. ... It is also confusingly called a header (header also refers to other framing components) or rim board. Liked subbed
Well explained LSM. Thanks for the helpful and knowledgable note. Greatly appreciate the support.
because it is the rim of the deck like the rim of a bucket
Thanks for the reply Jeff. I did receive the answer before but much appreciate you answering my question. Hope you enjoyed the video.
How do you attach the center support bracing?
Rim Board - because it runs at the rim/perimeter of the structure.
Thanks Jas. Appreciate the support and hope you enjoyed the video.
@22:50 when I did my deck (also during this summer) and pretty much the same dimensions as yours, instead of doubling up the joists at those intersections (I did the same design 16 ft decking with vertical decking separating each section) I ran blockers vertically for the deck board divider to rest on, and then adding a joist in between each joist cavity making it 6 inches cavity (my deck was 12'' on center). So the end of my deck boards are floating a bit without support for about 3 inches. I dont think it makes a difference and because there is no joist right underneath at so many openings, water falls right through it and dirt does not collect there either. And also the hidden screws I used are not at the ends of the deck boards which usually tends to split the ends if done too close.
Thanks for all the input Salvador. Much appreciate the support.
12:20 How do you make sure the line is leveled ??
Silly question perhaps, but the tool you used to take out the ground and to drill the holes... what's it called exactly? I understood it was a "Dengo" or something?
There is a link Pieter. Thanks for watching: www.toro.com/en/professional-contractor/compact-utility-attachments
Exactly what i looked for, when i wanted to understand how do i build a good deck in League of Runeterra, thx Google i guess....
QUESTION: Why use expensive G-Tape instead of just painting the top of the josts?
You did a fine job until you got to the beam being nested in the ground, it will collect water that takes away all your attempt to keep ground contact. should be draining that trench to a low spot or your beam will rot fast. Thanks
Juan you would be correct if the beam is going to be submerged in water of in contact with soil. That is not the case and will never be the case since I properly wrapped the beam and its a couple of inches off the ground, which means it will never be submerged in ground water. Thanks for watching though and hope you enjoyed the majority of the video :)
much better if you put extra beam on the center of the deck
Is the Seattle frost depth 12 inches? I'm having issues finding the right info here, a lot of places say "Washington average 24 inches"
2 questions
1: shouldn’t the deck slope away from the house??
2: is drainage under the deck a problem u have an open hole next to ur house??
1.) This is something that is suggested and I've done it both ways. I don't find it actually does anything since no mater what the water is going to be hitting the ground within the same area.
2.) I don't know what hole you are referring to next to the house but make sure the ground is sloped away from the house if possible. Especially if that is what it was like before excavation.
Thanks for watching and hope you enjoyed the video.
BYOT ty for the response I'm about to do a deck and have to dig out under it was worried it would what to pool up and get in the crawl space
make sure you check that there's no inground services where you are digging. Don't want to chew up a phone cable or the gas line
Couldn't agree more. That why I added that note at min 2. Thanks for the reminder Lucius and hope you enjoyed the video.
Cool. So in the end this deck build cost about what 40-50 thousand dollars?
Did you need a permit for this? i'm building a 20' x 14' ground level deck, away from my house, and wanted to know if i need one - Charlotte, NC.
For this size deck you should get a permit, but if you don't just make sure you build it to code. Permit is less of a big deal since it is a ground level deck but is still required. Thanks for watching.
Круто🔥
Remember: "Make shuuure" :D
god it was annoying, i almost muted the video
what is your hammer called?
10:04 "im using dumb lumber because of local good quality yada yada" (truck preceeds to drop/slam it on the ground 😂) there goes the quality........
I think they know what they are doing Ronald. If your worried about your lumber being damaged due to a small drop like this then you need to find yourself better lumber haha. Thanks for watching though and hope you enjoyed the video.
@@BYOTools true..... looks like it did withstand it. That's a sign of quality 👍
Whats up with the "Make Shuuuuure"???? XD Nice job tho
Maaaaaak......haha JK. Thanks for watching Bruno. Glad you liked the project.
Hi, what sort of nailer do you use?
They only nailer i used on this project was this one. Thanks for asking and watching the video Evgeny. -Framing Nailer amzn.to/2VYLLQx