@aaronnace I'm thankful to you! You are one of the only RUclipsrs who have not turned to the Darkside of being a brand ambassador, and have continued to teach rather than push the gear! You are a true #MasterTeacher
Hello. I opened my camera raw filter, but a lot of the tools are missing and they are not alligned horizontally, instead they are fit vertically. Can you help me with this issue? Thank you. :)
Thanks for making better sense of a complicated subject. In your "Color Spaces Explained" video a few years ago you highly recommended using the ProPhoto color space. Why the switch back to RGB 1998?
Super glad I discovered this series! The more and more I am learning about Photoshop I am more and more convinced for using Photoshop for my edits and becoming the best I can be using this program vs Lightroom. Huge thanks Aaron!
Thank you, this is the part of the program I think is best for editing a photo. Not to see the result immediately, but because you can see what the edits do with the histogram. Very nice!!
First, I need to give thanks to you. Yet, in this episode I can't follow because lot of issues. First I don't have camera raw, so I installed the plugins. Another issues I have is it seems I can't find any toolbar that needed. I can't find lens correction, tone curves, detail, hsl adjustment etc. Including, graduated filter and adjustment brush's tools bar. If anyone can help, I much appreciated
Loving the 30 days of Photoshop classes. Adobe has great products. Kind of frustrating that they are constantly moving the tools and shortcuts around. Camera Raw 14.5 looks nothing like the version in this video and if you don't know the key shortcuts you can't even see the masking and gradiant tools.
Very detailed video. I'm curious about why when working with raw files it's recommended to convert to smart object. However, in most of your other tutorials the starting point is a regular image. Photographers usually work with raw files, which is why I'm curious about this. Thanks and keep the awesome tutorials coming!
As I understand, Smart Objects allows for non-destructive editing because the image will retain its raster and vector data. This gives you the ability to go back and make corrections because these are not baked in. Conversely by NOT converting to Smart Object, it permanently bakes in any edit into your image. However, one of the things I've read/learned when using Smart Objects is that it can really tax the computer's processor even if the end user has the latest and greatest fastest machine.
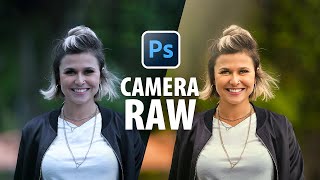
This is really helpful-- what a dramatic difference in before/after! I'm curious about best practices and workflow. Since Photoshop gives us so many tools-- masking, layers, blend modes, etc,-- does it make sense to just do the minimum in Camera RAW, and save the "heavy lifting" for Photoshop? Thanks again for the great videos!
@@kaiworleyphotography Not an expert but from what I've gathered it's a good idea to make changes to colour/ overall exposure in Camera RAW whilst the image is still in RAW format. Moving into PS, when your file becomes TIF you would then take advantage of the powerful tools (mentioned above) that allow for local adjustments (that LR/Camera RAW do not have).
Great video with useful tips. I appreciate the brush and radial tips at the end. What about noise, though? That's my biggest problem with RAW is how to reduce all the dang grain without losing detail.
Why are exported images which were first edited in LR Classic and then finished off in PS (e.g. noise reduction with Nik Define) (without upscaling or increasing canvas size), much larger in size (Mb) than if the same image was exported from LR? Fantastic series - thanks for all the work you've put into it
do you get the same quality if i do it differently? like importing the image without doing anything on the first window than convert it to smart object and then apply the camera raw filter? do color correction there and add the other effects on different layers like the lights and all that ? is there any kind of lose quality if i do it that way? if i do a few copies im still working on the raw file right?
I'm having an issue. Whenever I open Adobe Camera Raw the options for lens corrections is not present. I've looked online for a solution but am yet to find one. If anyone can tell me how to access that toolbar it'd be greatly appreciated.
Hi Aaron, this is a great set of videos! Do you have advice on minimising the size of edited files. My RAW files are about 30MB and if I edit in PS and add any layers, they end up at 300MB or more. I have tried TIFF as it is possible to use compression, and although smaller than PSD, the files are still huge.
Thanks for video.... Sir plz help help.sir. I am from gujarat. Sir .i am use nikon z7. and only tiles and marble photography so how can largh marble image into 10 feet-8feet and so photo can click into raw file or tiff file pls teach me that is my confusion answer me can u make tutorile on this confusion pls solve my confusion
How do I access camera raw without using the example? I can’t find it under filters. I have it because it opens with I use the example photo. Other than that I can’t find it.
Okay Aaron, I give up! You're waaay ahead of me. I shoot a Nikon D600 in camera raw. It creates an NEF file which I open in Adobe Bridge. I tell Bridge to open the file in Camera Raw and it complies. However, the Adobe Camera that Bridge opens is only vaguely similar to the Camera Raw in your tutorial and it's missing many of the bells and whistles. My Adobe programs are all up to date. So being as I'm physically incapable of doing anything incorrectly, let me ask you - What the heck are you doing wrong?
Great tutorial, but PHLEARN you can’t retouch a smart object with frequency separation I mean you can’t do apply image. You encourage one to always convert their images to a smart object. When you know there’s a limit to what you can do to a smart object. It’s been a fun tutorial so far. Thank you
Hey Aaron, thanks for this Course! I really enjoy it and I've never learned anything that fast!!! I've got a little Problem and I hope you, or someone who's reading this might help me. When you change the Size or the Hardness from a Brush with CTRL+ ALT and the Mouse Cursor there is a red color where you can see the changes... I opened PS today and this is gone. Does anyone knows where I can acitvate this again?? THX
So, I work an image in Lightroom, then run it up to Photoshop to do some other stuff; is there a quick way to get into ACR without going to the top menus?
Is it just me or were all of the settings already adjusted in the RAW file to what Aaron wanted them to be? Every time I clicked on something to adjust like he was doing, it was already at the final value he chose. Even the radial filter and stuff.
I have to say your work and knowledge of PS mesmerising which leads me to assume you are Mr PS or you write the programs. Otherwise how do you know all this . Mick G. UK.
@@josephallen7448 I found a fix, change your settings from gpu acceleration to software and switch between the two. the image does display but its because it has gpu acceleration on its too dark to see
Thank you @phlearn i recommend your channel for anyone looking to take their editing game to the next level, I have learnt so much from your channel since I subscribed and it has helped my photography amazingly... more importantly the application of skills from your 30days of photoshop awesomeness so far has transformed how I approach video editing especially with my recent series on youtube... you can check my channel out and let me know what you think thanks and bless you


Please make 20 days in After Effect, please. Because you do things completely differently than others!
@aaronnace I'm thankful to you! You are one of the only RUclipsrs who have not turned to the Darkside of being a brand ambassador, and have continued to teach rather than push the gear! You are a true #MasterTeacher
Addicted! Learning so much! Thank you
Amazing tutorial, Aaron! I'm enjoying the series so much
Thanks Aaron, I'm loving the 30 Days of PhotoShop!
Thank you very much for sharing the knowledge
That was a great tutorial, thank you so much!
Hello. I opened my camera raw filter, but a lot of the tools are missing and they are not alligned horizontally, instead they are fit vertically. Can you help me with this issue? Thank you. :)
Thanks for making better sense of a complicated subject. In your "Color Spaces Explained" video a few years ago you highly recommended using the ProPhoto color space. Why the switch back to RGB 1998?
Super glad I discovered this series! The more and more I am learning about Photoshop I am more and more convinced for using Photoshop for my edits and becoming the best I can be using this program vs Lightroom. Huge thanks Aaron!
after 19 meetings we become well known freinds !!!
Please make, Lightroom tuts also.
10days Lightroom.
Unreal. So many good tips in Camera Raw. I had NO idea how to get back!
Thank you Aaron for another great video.
Good lesson for me. Liked it very much. Thank you.
Thank You So much, Sir.
Thank you, this is the part of the program I think is best for editing a photo. Not to see the result immediately, but because you can see what the edits do with the histogram. Very nice!!
I'm going to miss this series when it's over. So much fun and I'm learning a lot. I'll Phlearn ya' later!
This is my favorite thing of doing thing in RAW.
First, I need to give thanks to you. Yet, in this episode I can't follow because lot of issues. First I don't have camera raw, so I installed the plugins. Another issues I have is it seems I can't find any toolbar that needed. I can't find lens correction, tone curves, detail, hsl adjustment etc. Including, graduated filter and adjustment brush's tools bar. If anyone can help, I much appreciated
Loving the 30 days of Photoshop classes. Adobe has great products. Kind of frustrating that they are constantly moving the tools and shortcuts around. Camera Raw 14.5 looks nothing like the version in this video and if you don't know the key shortcuts you can't even see the masking and gradiant tools.
Very detailed video. I'm curious about why when working with raw files it's recommended to convert to smart object. However, in most of your other tutorials the starting point is a regular image. Photographers usually work with raw files, which is why I'm curious about this. Thanks and keep the awesome tutorials coming!
As I understand, Smart Objects allows for non-destructive editing because the image will retain its raster and vector data. This gives you the ability to go back and make corrections because these are not baked in. Conversely by NOT converting to Smart Object, it permanently bakes in any edit into your image. However, one of the things I've read/learned when using Smart Objects is that it can really tax the computer's processor even if the end user has the latest and greatest fastest machine.
@@WeeklyWhiskers Very illustrative comment, thank you.
I'd love to see at the end a workflow of things to do when you take a picture straight out of your camera.
This is what you do next after taking your photos.
Richard's World Traveler no this is a camera raw overview. It’s not the workflow of editing a picture from beginning to end.
Thanks so much for your excellent photoshop tutorials!
They moved all buttons to the right panel, don't get frustrated just try to find them.
Learned a lot again today. Thanks.
Wow best episode for me so far in the series
دائما تتحفنا بكل جديد ..جزيل الشكر والامتنان ..Thank you
I have Photoshop 2019. Graduated filter option is not here inside camera raw filter
Thank you, i am definitely learning alot.
I wish all teachers are this good
I enjoyed every bit of your content. Thank you. 🙏
Muchas gracias.
Cool tutorial
This is really helpful-- what a dramatic difference in before/after! I'm curious about best practices and workflow. Since Photoshop gives us so many tools-- masking, layers, blend modes, etc,-- does it make sense to just do the minimum in Camera RAW, and save the "heavy lifting" for Photoshop? Thanks again for the great videos!
Would love an answer to this question if anyone can help!
@@kaiworleyphotography Not an expert but from what I've gathered it's a good idea to make changes to colour/ overall exposure in Camera RAW whilst the image is still in RAW format. Moving into PS, when your file becomes TIF you would then take advantage of the powerful tools (mentioned above) that allow for local adjustments (that LR/Camera RAW do not have).
Great video with useful tips. I appreciate the brush and radial tips at the end. What about noise, though? That's my biggest problem with RAW is how to reduce all the dang grain without losing detail.
That was amazing. I knew how to edit RAW, but this tut gave me more insight. Like the Smart Object option.
Why are exported images which were first edited in LR Classic and then finished off in PS (e.g. noise reduction with Nik Define) (without upscaling or increasing canvas size), much larger in size (Mb) than if the same image was exported from LR?
Fantastic series - thanks for all the work you've put into it
Thank you so much
do you get the same quality if i do it differently? like importing the image without doing anything on the first window than convert it to smart object and then apply the camera raw filter? do color correction there and add the other effects on different layers like the lights and all that ? is there any kind of lose quality if i do it that way? if i do a few copies im still working on the raw file right?
I'm having an issue. Whenever I open Adobe Camera Raw the options for lens corrections is not present. I've looked online for a solution but am yet to find one.
If anyone can tell me how to access that toolbar it'd be greatly appreciated.
It's in the optics tab called Use profile corrections
are RAW images supposed to be pixelated when i import them to a pc??
Thank you Aaron
Soooooo helpful thank you
!!! Thanks a lot ...☺️☺️
Hi Aaron, this is a great set of videos! Do you have advice on minimising the size of edited files. My RAW files are about 30MB and if I edit in PS and add any layers, they end up at 300MB or more. I have tried TIFF as it is possible to use compression, and although smaller than PSD, the files are still huge.
Thanks for video....
Sir plz help help.sir.
I am from gujarat.
Sir .i am use nikon z7. and only tiles and marble photography
so how can largh marble image into 10 feet-8feet and so photo can click into raw file or tiff file pls teach me that is my confusion answer me can u make tutorile on this confusion pls solve my confusion
Never used those mask in camera raw, nice work
Nothing is happening to the image?! am i opening the DNG file to work on or the JPG file to follow along with edit.
Can u please make same like tutorials for Adobe Lightroom?
Why tone curve and other stuff is missing in my camera raw ... how I find it ?
Superb
cool ..thanks
How do I access camera raw without using the example? I can’t find it under filters. I have it because it opens with I use the example photo. Other than that I can’t find it.
Okay Aaron, I give up! You're waaay ahead of me. I shoot a Nikon D600 in camera raw. It creates an NEF file which I open in Adobe Bridge. I tell Bridge to open the file in Camera Raw and it complies. However, the Adobe Camera that Bridge opens is only vaguely similar to the Camera Raw in your tutorial and it's missing many of the bells and whistles. My Adobe programs are all up to date.
So being as I'm physically incapable of doing anything incorrectly, let me ask you - What the heck are you doing wrong?
Aaron, help please.........
hello! can I open the RAW files with same settings? I meen is enyvhere option to save settings for open all raw file with same settings? thanks ;)
Plz do 30 days illustrator tutorial
Many thank's!!!
Excellent
i can't find the radial filter tool? It looks different on my end? is anyone available to help?
Right click on the masking icon.
Great tutorial, but PHLEARN you can’t retouch a smart object with frequency separation I mean you can’t do apply image. You encourage one to always convert their images to a smart object. When you know there’s a limit to what you can do to a smart object. It’s been a fun tutorial so far. Thank you
Cảm ơn Thầy nhiều nha.
Love this
Camera raw vs Lightroom?
Hey Aaron, thanks for this Course! I really enjoy it and I've never learned anything that fast!!! I've got a little Problem and I hope you, or someone who's reading this might help me. When you change the Size or the Hardness from a Brush with CTRL+ ALT and the Mouse Cursor there is a red color where you can see the changes... I opened PS today and this is gone. Does anyone knows where I can acitvate this again?? THX
Make sure Use Graphics Processor is enabled. It won't show if that's unchecked. Or try updating photoshop to the latest version.
Can you edit a RAW photo with layers?
So, I work an image in Lightroom, then run it up to Photoshop to do some other stuff; is there a quick way to get into ACR without going to the top menus?
ctrl + shift + a
@@mindofdami Sweet! Thx!
Yeah hit cmd+shift+a
@Anibal Villafañe Yah I know...read my question which is already answered. ;0)
I haven't found lense corrections ??? Help
My screen doesn't look like yours - no tool bar on top. I'm lost!
Lens correction is now in Optics/Profile and tick the box "Profile Corrections"
It seems easier in Lightroom.
Unfortunately my gui for Camera Raw on Photoshop 2020 is totally diffrent for some reason so I can't follow along the video.
Is it just me or were all of the settings already adjusted in the RAW file to what Aaron wanted them to be? Every time I clicked on something to adjust like he was doing, it was already at the final value he chose. Even the radial filter and stuff.
Yes I noticed that too
Awesome content!!! So thankful for ur tuts!!! Keep it up!! Like and Sub!
How did you get the image to open in camera raw? I had to open it through adobe Bridge
Modify things in Preferences...
u are best
I have to say your work and knowledge of PS mesmerising which leads me to assume you are Mr PS or you write the programs. Otherwise how do you know all this . Mick G. UK.
Wow
my image only opening in the film strip (bottom or top left corner) and not on the main window...how to fix?
need help with this having the same problem
@@josephallen7448 I found a fix, change your settings from gpu acceleration to software and switch between the two. the image does display but its because it has gpu acceleration on its too dark to see
why use lightroom when wehave camra raw , is lightroom adanvce
I'm early every time
I Like Ure Videos Thx So Much
Thank you @phlearn i recommend your channel for anyone looking to take their editing game to the next level, I have learnt so much from your channel since I subscribed and it has helped my photography amazingly... more importantly the application of skills from your 30days of photoshop awesomeness so far has transformed how I approach video editing especially with my recent series on youtube... you can check my channel out and let me know what you think thanks and bless you
FriendzwithYOU yes I agree bro
FriendzwithYOU thanks aaaron @phlearn it has helped my team greatly too, now we make better images
FriendzwithYOU great actually, this is another great tutorial... I wish there is a way to fastrack to 30, amazing content thank you @phlearn
Amazing tots
A whole new dimension to editing pictures in photoshop camera raw amazing share
7:55 I never understood how to find/ enable those square brackets on the keyboard :/
you can enable it by just tabing them
I just don't get why u have to edit through raw and not photoshop directly...
Photo shop 2022 does not look anything like what day 19looks like No tools
Sorry, but you will need to make it 100 days of Photoshop 😃