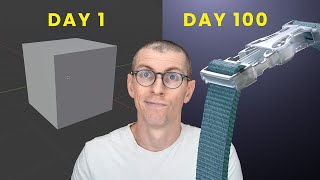
Product Design in Blender: Headphones [Full Process]

HTML-код
- Опубликовано: 29 июн 2024
- The first 1,000 people to use the link or my code derekelliott will get a 1 month free trial of Skillshare: skl.sh/derekelliott06221
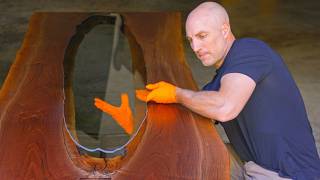
In this full-process video we'll be modeling, adding materials, lighting, and animating a pair of headphones in Blender 3D. There are tons of tips and tricks in here during all parts of the process including intermediate topology, subsurface workflows, cloth simulation, bump mapping, texturing, procedural textures, product lighting, product presentation, and more.
This video is aimed at people who are not totally new to 3D software but with patience and dedication can be completed by people at the beginner level. If you are interested in product animation, product design, industrial design, etc then this video is for YOU!
Have fun and share your results with me!
CHECK OUT MY NEW COURSES ON SKILLSHARE!!
www.skillshare.com/en/r/user/...
Find me online at DERRK.COM
Patreon [tutorial files]
/ derekelliott
Instagram [more regular updates + extra content]
/ derekjelliott
Behance [more work]
www.behance.net/derekelliott
00:00 - Introduction
00:34 - Getting Started
04:18 - Skillshare
05:58 - Joint Detail
13:30 - Ear Cushion [Cloth Simulation]
19:19 - Mirroring the Earpiece
22:54 - Making the Headband
27:43 - Making the Head Cushion [More Cloth Sim]
33:56 - Model Wrap-up
36:54 - Lighting Setup
44:40 - Base Material
46:26 - Leather Material
54:32 - Mesh Earcup Material
59:51 - Creating 'L/R' Texture in Blender
1:00:53 - Applying 'L/R' Texture to Mesh
1:06:29 - Adding Logos
1:14:58 - Animation
1:18:19 - Glassy 'Fog' Effect
1:20:17 - End


I recently landed my first professional job out of University (where I also studied ID!) by using Blender for modelling and motion graphics - I cant thank you enough for all your tutorials and the skills you have helped me develop - forever grateful 🙏🏻
@@abraham_e thank you fella!
@@jekboi you're more than welcome, and the best of luck with the upcoming project. 🙌🏾
That is fantastic and makes me very happy to hear congrats on your new role
@@DerekElliott so dope to hear back from you! Thank you dude, appreciate it 🤙
Congratulations!
Your approach to modelling made me start attempting modelling any object I see, you removed the fear in me.
I still have it, gonna try...
@@Eclipse240 keep pushing ey
Thank you for the amazing tutorials Derek! Just like you I have been learning blender off RUclips tutorials and your style is truly amazing. The little humor here and there along with the places to do our own variations on designs really makes the videos engaging and keeps me working. Keep doing what you are doing, love it!
I've been playing around with Blender for around 4 months now and this was exactly the tutorial I was looking for, really happy with the result! Nicely explained use of the cloth simulations and general concepts used for modelling. A really good all-round tutorial from start to finish (modelling, lighting, shading, decals & simulations). Made a few minor tweaks for my own personal touch and ended up with a really convincing super realistic render. Thanks!
Ive been teaching myself blender over the past few weeks watching all the tutorials I could find. And this is without a doubt the best for modelling that really explains, in a simple and easy to understand way, how to get organic and rounded shapes out. Thank you so much!
Man, you’re the one behind my blender skills. Love your tuts
step-by-step instructions to if your bevel doesn't show:
Start by selecting the mesh that you want to bevel.
Press "Tab" to go into Edit mode.
Press "A" to select all vertices in the mesh.
In the "Mesh" menu at the top of the screen, select "Merge by Distance". This will eliminate any duplicate vertices in your mesh.
If that doesn't solve the problem, it might be an issue with the normals. To fix this, still in Edit mode, select the mesh and go to "Mesh" > "Normals" > "Recalculate Outside".
This should ensure that all the faces are facing in the correct direction.
After following these steps, try using the bevel tool again and see if it works.
THANK YOU FOR THIS
Love this, you really save me
Bro you are a blessing, thank you!
Thank you, I got stuck on this ❤
thanks brother
I can't even describe, how freaking hard I love Your content. I love Your style, Your voice, the flow of Your tutorials, humor. I'm adicted to it XD
Been loving your content, brotha! It's been tough going from solidworks back to blender, and your stuff has made the move a lot smoother
Really amazing tutorial! Im finishing my last year of uni for product design and yet to be even shown Blender. These have helped me understand so much, and see the value in Blender and getting out of my Keyshot comfort zone! Thanks!
Excellent guide! Many thanks for the thorough and detailed instructions, along with the comprehensive explanations of all the intricacies!
It's so pleasing. The setuping and mastering softs amazing.
i love how you can explain so many things and at the same time keep a nice and calm voice
God bless you for every waking second you've spent to create this for us Derek. For real. This kinda tutorial is not only helpful but this can be one masterclass if we stop over and over again to understand the tools. Thanks you so much !
Wow, finalmente achei alguém que faz tutoriais realmente profissionais, já estou seguindo e tentando fazer todos!
I’m waiting for the second part! (Advanced animation)
Fanstastic tutorial as usual 🔥
This tutorial taught me a lot of things I didn't know before! Thank you!!! It will make Blender even more fun!
such a banger tut never got bored , ur commentry is soo on point doesnt get us bored all together i rate this tutorial 100/100
Very clean and understandable tutorial. It is really hard to find such high quality tutorial. Thank you so much for contributing your time! Blender RULES!!!
Amazing tutorial Derek. Thank you so much for spreading knowlegde.
Derek is so underrated. I have been following these tutorials for very long now and it's just super fun and very informative. Thank you so much, Derek!
less goo, was waiting for a new good detailed tutorial
Really easy to follow along, thanks for sharing, Derek
I have been working and using Blender professionally for years, I wish I had this kind of tutorials back on time, really well explained and so effficient workflow. Thank you. Only one recommendation, I work sometimes for fashion industry and they are really picky about the cloth simulation/realism, I think for this specific project is great how you do it but if you ned something more realistic and accurate simulations, I recomment to scale the object up like 10 times so the simulation is more accurate and realistic, specially when you want to have an animation
Same mesh, bigger scale?
@@imiy yes
nice tip
What a great tutorial. I learned so much. Thanks Derek!
You can transfer modifiers as you link material (CTRL+L) or individually using the apply button in the modifier field, using copy to selected option.
This series was so inspiring to see a blank canvas become something so realistic! When I get back home next week I am inspired to try this out :D
Amazing!! 😳👌Just amazing. Well done!
I had enormous fear of blender well who doesn't as a newbie but you have made me have confident to want to learn. Thank you so much for the amazing tutorials.
Love your product renders/animations!
Amazing tutorial! You're a great teacher.
Hi Derek awesome video! after about a year, as hobbyist coming to this video made me realize how much i had picked up hotkeys and how your tutorial reinforced my learnings! happy to say i completed it in 2 days.
nice!!!
thank you for the detailed guide, it helped me install this soft
Love the procees & time you make in these videos, keep it up brother.
This man is my saviour! I was about to give up blender... This saved me god bless my man😌.... The techniques are very understandable
I swear to god, you are so funny! while I was following along I couldnt help but giggle every once in a while. Thankyou so much
Man, I love how the sewing/pressure work and the cushion material. Turn out so well for me.
1 million subscribers for this channel!!! Premium content everytime!
The best soft soft tutorial ever!
I really like what you said about the entire process of product modeling and rendering
Really love your tutorials
You make some of the best blender tutorials in this site! You´ve helped me some much in learning this program a few months ago i couldn´t make a donut and now i feel like i might be able to do something worth spending my time on.
wow! can't believe such a detailed and amazing tutorial is available free on RUclips...you are doing an amazing work..SIR
Watched the whole video non-stop. Really well explained and inspiring tutorial. Might start a new model of my Omen headphones by using this vid. Thank you!
UPD: just finished my model. The explanation was so clear that I didn't even have to rewatch this tutorial the second time. I'm really happy with what turned out from my work, thank you again!
You're the Bob Ross of 3d-modeling! Thanks for this tutorial :)
Amazing Tutorial! Thank you!
Simple but effective, great job!!!
Derek thank you soooooo much for this video
This is incredible!!!
Thank you Derek, im really improving , you make this really easy.
again an awesome tutorial with great tips. thank you so much for sharing your knowledge with the community in such an understandable way. i love it.
enjoyed the tutorial , thanks derek
Thank you so much! I can not wait to start setuping. I want to create original soft for comrcials and shows alongside my many other
You make lighting look easy.
Thanks for this Tutorial. Nice One
Brilliant tutorial. Quick point for anyone modelling to real world scale I found that the pressure setting during the ear pad cloth simulation has to be ramped up to about 500.
Good point. I was not working in a real scale here
So I went into soft soft and tried to intuitively grasp the basic fundantals. And now listening back I feel like I'm one step ahead of Nice tutorialm.
I learn from ur tutorials, helped me a lot in learning blender. Dope headset by the way👌
Great video as usual Derek, very valuable tips and tricks!
thanks man, I loved it!
You're super cool. Thank you for sharing!
this is a fantastic walkthrough for intermediate Blender users 🙂
Sorry but don't know why I can use magic texture as alpha input, I am using 4.1 Need Help
awsome tutorial thank you so much
So good!
YES! I LOVE YOU!
I love soft soft so so so so much!
Edge slide, never knew about that. good to know, thanks.
Wow that's so osm 🥳 thank you for teaching ❤
The difference of transmission roughness vs roughness is the former is roughness of the "volume" and affects the refraction, roughness is just the surface. You can have frosted glass inside but polished on the surface or vice versa.
Good points that makes sense. I suppose transmission roughness is more visible on thick objects
great video man
For me, you are perhaps the best Blender instructor on RUclips...
You became my main source of Blender knowledge! Great tutorial as always dude :D
The caramel camel blew me away! 😁 Pleas make an two hour tutorial of that! Awesome vid, thanks!
I definitely need to make a fluids tutorial eventually. I use the flip fluids addon
a lot of value here
Another excellent piece of work for the little guys ... Great stuff Derek as usual
Awesome!
Nice tutorial Michael,
Learned so many new Tecnics :)
Looks good.
I like your tutorials, I wish you had some tutorials for architecture also . thank you
21:01. Select all objects first, and the one with the Mirror modifier at last. Toggle down the menu and select "Copy to selected". Handy when working with a lot of objects.
By the way, I believe the killer spike at the ear piece that you get is because you need to apply the subdivision modifier :)
thank you very much!! your videos are super! at my university, the teacher does not give in pairs, but tasks must be passed :,) and thanks to you, I have a credit 😭💓
You are the best!!
SUPER. SAG OL Derek!
I find it strange how advanced some people are but don't know stuff like ctrl L copy modifiers, this is such an entertaining video I enjoyed so much of it
its not strange. blender being so hot key driven you have to know the keys to access things easily...thats a blessing and a curse at the same time.
Como agradecerte por tanto! El conocimiento que compartes es invaluable! Te admiro bro!
Man love your work and tutorials. Thanks 👍 😊
TNice tutorials is absolutly the best video of the world you expaining skills are good and it was a honor to see tNice tutorials vid well done
Mmmm Derkk Asmr on a sunday... Nice.
Dude you are awesome thx for doing this, and also you sound like Matthew Mcconaughey a lot
thank you so much 😍😍
A very useful lesson for all aspiring softians
professional!
coz you did great work on the video, thank u for your help o7
Thank you!
Keep up the Great Work. Love you😍😍😍😍😍😍😍🥰😘
I'm going with all the comments below, you are truly a pleasure to watch, listen to and learn from. Great tuts, thank you sooo much 😎
you have about the software. I personally enjoy learning so it was a little bit easier to do it over ti. But you’ll get there brother