Refrigeration - Soldering Steel to Copper

HTML-код
- Опубликовано: 29 июн 2023
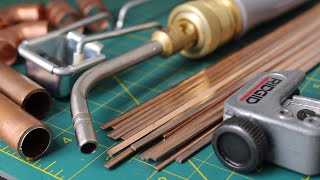
- First, we're gonna begin by cleaning both the steel and the copper. This process doesn't need to be done in any particular order. I just grabbed the steel first. I'm going to fast-forward the two sections of sanding in this video, but that doesn't mean they're not important. When it comes to sanding, clean is king, if you find a portion of the metal that appears not to be sanded enough, it's always safe to assume that is not and go back and re-sand it. Here in this section, I'm using 120-grit sandpaper, which is probably the most common type of sandpaper to use. You don't wanna be using such fine sandpaper that you find it's actually difficult to sand the material clean. With the copper, you can see a very distinct difference between the sanded and non-sanded areas. With the steel back in the vice, we're gonna begin the pre-tinning process. And for heat, we're simply using camping gas. This could be picked up at Walmart, Kmart, or any camping store for usually around 25 to $30 for the gas and the torch head. Here you're gonna see me take the torch to the tinning flux. We're just using Oatey No. 95. You get it, home Depot or Lowe's - usually for under $10 for this size container. And the whole purpose is just to soften it so it works in the brush a little bit easier.
Pre-tinning means that we're going to add a very thin layer of solder to the steel tinning. Flux has powdered solder in it, so when we apply heat and then we apply the flux, the solder comes out of the tin solution and adheres to the steel. This process can be done to multiple different types of metal. However, in refrigeration, we're typically dealing with steel, copper, and sometimes aluminum. And just a side note, if you are dealing with aluminum, aluminum requires an aluminum flux. You should note that I'm adding heat first and then applying the tinning flux, which is the appropriate way to use a tinning flux. When the tending process is complete, you should see a nice chrome finish to the material and any excessive flux should be wiped off. Next, so we can get the steel inside of the copper tubing, which is going to be 1/4" copper tubing.
We're gonna be using this T 10 torque bit. This process can be a little bit difficult, but by pushing into the copper and twisting at the same time, you will slightly expand the copper, allowing it to fit over the three sixteens inch steel line. Also, the little tap on the copper you saw there was me knocking out any debris that may have been pushed inside the tubing. So here I'm sliding the copper over the steel and I'm roughly inserting the steel inside the copper about 3/4". Now that we have the copper and steel together, we're gonna go ahead and tin the area in which we'll be making our joint. Once again, we will apply heat and then apply the inning flux. A little pro tip for you, the flame should never touch your brush. If the flame touches the brush, it will melt.
The bristles and oil can be released causing a contamination in your joint and the solder not to bond. Another tip is to use the torch appropriately. Excessive flame causes excessive heating and will build up a layer of oxide, usually indicated by a black film on the steel and or copper. If this film develops, the solder cannot bond to the material, it must be res, sanded, and then go back through the tinning process. Once the materials are up to temperature, only a tiny dab of solder is needed to set the joint. One of the biggest mistakes we can make as technicians is using an excessive amount of solder, which will flow inside the lines and cause a restriction. It's a little bit difficult for the camera to pick up on, but here you can see the solder has made it all the way around the joint.
PS, if you're wondering, it's Oatey silver-bearing solder that we're using in this video. Any silver-bearing solder should do as long as it falls between 3% to 6% silver. To prove to you how strong this joint actually is, I'm going to try and break it. So I've gotten out my Robinair pipe benders, and I'm gonna make some handles to twist if you've never used these before, the flat side goes to the left, the round side goes to the right and the tubing is inserted into the appropriate slot. I first bent the steel, which was 3/16, and now I'm doing the copper, which we can see being inserted into the 1/4" slot. There's also a number on the outside of the pipe bender indicating what angle you are bending. And as you can see here, I've done two 90-degree bends.
www.fredsacademy.com


Great video, fixing an old R-12 system, low to medium temp! Thanks!
you're welcome, jean!
As a blacksmith artist I create unusual flowers, and have a project which will involve copper pipe (made into flowers) inserted into necked down steel pipe. I don't want to epoxy the copper to the steel, and this video showed me a better way to do it. I'd have forgotten to flux! Thank you.
That's awesome! Very welcome Bryson and we hope the art came out great.
"Tinning" Flux though!!
Use Tinning Flux though.
👍
@@joepol711 We did. Oatey #95 tinning flux.
Thank you for the videos. My family had been watching. My 15yr daughter and I have been doing HVAC for about a year now.
Recently our Hisense Fridge went out in our RV. We have ordered a new compressor and dryer, and it uses 2oz of R600A.
High side is only 122 max psi.
These units are SO different than the stuff we have been working on, and it's just amazing to me that the residential stuff is so different.
Good stuff!!
Great video
Thanks much!
very good
II tried to replace the compressor. I have benzomatic, Stay-Brite 8, and Stay Clean. Copper to Copper was very good. But copper to metal does not want to be soldered. The drops just rolled off and that’s it.
What do I need to buy for copper to metal soldering?
Use exactly what you see on screen and you will not have a problem. ;)
😮perfect
Oatey 95/5 solder, is it good for soldering aircon piping?
www.oatey.com/products/oatey-955-lead-free-plumbing-wire-solder--1659545085
A link to their website. Looks to be a green light.
What is welding rod?
Why call it camping gas? It's propane. People need to look for propane
it's called camping gas. ;) www.amazon.com/s?k=camping+gas&crid=9ELD1RHDTJN6&sprefix=camping+gas%2Caps%2C93&ref=nb_sb_noss_1
Is it a paste flux or borax?
Oatey No. 95 tinning flux.
Is this work with aluminum to aluminum or copper to aluminum and what about aluminum capillary tube
This will not work for aluminum. A specific flux must be used. However, the heat needed to solder them often will melt the thin aluminum. It is recommended to use Lokring fitting for aluminum lines.
So why did you sand all of the copper pipe you did and you didn't clean the inside of the copper pipe also the standard practice is when joining dissimilar metals you use a brazing Flux and a solder with silver in it but If you don't clean the inside of the pipe it's pointless also doing the pre Flux thing and the heat is a good way to contaminat your joint I've been working on HVAC for 25 years now and have done over 30000 solder joints and the most important thing to do is do it right the 1st time and then you are good you don't want to do it a 2nd time it sucks definitely no fun the preparation and setup is the most important thing you can do.
Hello there Travis. Thank you for your comments. For starters this is residential refrigeration and not HVAC, We do not clean the inside of the line and for good reason. The capillary tubes we deal with are tiny and any debris inside of the line can migrate to them and create a restriction unlike the larger cap tubes and or expansion valves you would be dealing with. Next, you DO NOT use "brazing flux" when soldering. It is called brazing flux for a reason as it is to be used when brazing and not soldering. When it comes to the "pre flux" it's called pre tinning and the whole purpose is to draw the solder out of the tinning flux onto the steel. Solder loves to bond with solder and this technique creates a superior bond with the steel and copper join when Soldering. After pre tinning the joint is wiped clean so no contamination can occur. Please understand that there are differences between brazing and soldering. Though similar, the two should not be confused.
@@fredsapplianceacademy I'm sorry but HVAC and small refrigeration is the same thing still has refrigerant and pressure and I did forget about more thing if you are worried about keeping the inside of the pipe clean you definitely need to use a purge gas.