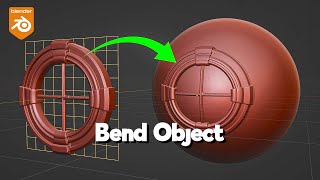
Blender Secrets - Add Seamless Details without Booleans using Shrinkwrap and Snapping

HTML-код
- Опубликовано: 9 сен 2024
- Adding details to a surface makes a hard surface object looks more interesting. But it’s often a lot of work to integrate objects that are added using boolean techniques with retopology. What if you could skip all that work and still have it look seamless?
⇨ Free Blender Secrets e-book: www.BlenderSec...
⇨ Full e-book on Gumroad: blendersecrets...
⇨ Full e-book on Blender Market: blendermarket....
⇨ Full e-book on Flipped Normals: flippednormals...
Recommended by Blender Secrets (affiliates):
⇨ Cinematic Lighting: gumroad.com/a/...
⇨ Blender Launch Pad: www.cgboost.co...
⇨ Master 3D Sculpting in Blender: www.cgboost.co...
⇨ Master 3D Environments in Blender: www.cgboost.co...
⇨ Blender Animation course: www.p2design-a...
⇨ Rokoko Smartsuit: rokoko.co/3O7UZBz
⇨ Poliigon textures: www.poliigon.c...
⇨ Realtime Materials: blendermarket....
⇨ Photogrammetry course: gumroad.com/a/...
⇨ Soul Stirring Digital Color Mastery (e-book): gumroad.com/a/...


Well you don't need to select every edge loop and set weight,you can just select the outer edge assign weight 1,then in weight paint mode (f3->smooth weight paint)
Oooh, thanks that's an awesome trick! I didn't know that 😍
@@BlenderSecrets you should buy his book
@@BlenderSecrets Now do a video update on that!
what does this mean? "then in weight paint mode (f3->smooth weight paint)"
@@UnchartedWorlds press F3 type smooth weight paint
Also, data transfer modifier (normals) helps with reducing that visible edge between two meshes
I know, the next video will be about that
I didn't consider that thanks stranger
@@BlenderSecrets For us watching this years later, it would be nice to have a link to that video instead of having to search it tho.
@@SaranjivacSRB it's the next video in the playlist
Yeah, Shrinkwrap is more useful than it is generally supposed to be. 😁
Yep
Thank you so much, i've been googling "how to merge mesh while keeping separate." So far this has been perfect
a revelation for my aircraft modelling. Fairings, nacelles... all the stuff never looking really good, it`s past, thx so much
Never would have thought that it could be done. But separately, all these tools have been used more than once. Some kind of tin. Thank you. Very powerful.
I fucking LOVE this channel. Every time a video pops up in my recommended and I check one out, I learn some groundbreaking trick that solves a headache I've had at one point. And that fact they're so professionally done, in super short vids, with concise and clear explanation. I have DROWNED hours watching videos cover aspects of blender and they take AGES to explain something that should be relatively simple.
This is pure genius! thanks for sharing!
Wow that's awesome
Using modifiers correctly is really useful
...Non destructive booleans. Amazing 🤘
Thanks a lot !
Holy moly, took me a few different searches, but finally found something that will allow me to make progress on a project. Much love, man. I really need to get a better grasp on vertex groups.
so cool
Very creative this way of weighting the snapping
Holy Moly, that is a key solution to a ton of stuff. Thank you random stranger :D
How did i never think of this ! Thank you very much this is really useful !
This is such a cool tip (plus the one from Irfan)! Awesome!
(the other tip incase it get's deleted at some point: Well you don't need to select every edge loop and set weight,you can just select the outer edge assign weight 1,then in weight paint mode (f3->smooth weight paint))
This is going to prove incredibly helpful in complex shape models. Thank you!!
it's even better than boolean cuz it gives you the feel of it being welded down 👍 👍
that thumbnail looks like shoulder armor of Cloud Strife from FF7 :D
Thank you, this is concise and to the point, unlike most video tutorials.
Whoa that’s a really genius technique
When I select a loop, a single vertex, any part of the geometry, and assign a vertex groups weight, it also changes all the other vertices weight. I can't see to be able to assign different weights within the same geometry. Do you have any idea of what I may doing wrong please ?
The shortest explanation of this method in the Web. Thanks! : - )
thank you, help a lot
Awesome technique! Thanks!
That's a really nifty trick.. very nice!! 👍👍👍
Great tutorial in a short time
That just blew my mind. For that, good sir, you've just earned yourself a subscriber. Well done. :)
your RUclips Channel is so useful, you deserve more subscribers, views and Likes
Very cool trick ,i will use this in my workflow.
Another magic trick! Thanks :)
Elegant!
One of my faves!
This is very helpful, thanks!
you can refine this method by using data transfer - custom normals
The next video will cover that ;-)
cook me meth haizenburger
thanks for the tips
Excellent!
You are amazing
Very nice!
Legend thanks a lot !!
Very good! Thx.
Lovely!
thank you so much
Solid!
I had to delete the bottom face to get it to bevel correctly. Which extrude type did you use?
I bought the book because of this.
Thank you for your support!
what if in Blender 4.2 there is no "Project Individual Elements" in the snapping options?
wooooow you are the best thank u so much
Very good
Now I'm more in awe of how KitOps does it... his snap to surface looks cleaner. Love your stuff anyways 😋
Max Puliero he released this kind of modeling 5 years ago, and it was not even indicated)
How do i know my weights are applied? I cant seem to tell
how too..or is there a workflow to bring that to game engine or make it game engine ready or is it ready. .can this be baked....
Normals can certainly be baked into the mesh! That should totally carry over... but do test it with one, before doing a lot of work. You would just have to apply the shrinkwrap modifier.
I sculpt for 3d printing. Booleans don't work so this got my attention. This doesn't merge geometry and remove the hidden polys below the added details. It still might work if the details added are manifold though. Thanks
No, I don't think this technique will help you for 3D printing. Booleans should be fine, but whenever I prepare something for printing I will ALWAYS retopo with an automated remeshing algorithm, and reproject the detail onto that to get a perfect watertight mesh. Like this: ruclips.net/video/KowEPRIfM-w/видео.html
@@BlenderSecrets boolean generates bad geometry. More trouble than it's worth
You are the bast 🤝
Thnx for the tut its great! :) .. One question tho - this is lets say non destructive approach. But when u need to texture objects afterwards you do connect the together via ctrl+J, than do some sort of clean up? Or what do you have to do in order to clean up for texturing?
No boolean cleanup?? Thats so much useful
Your video script is shorter than the thank you letter I was about to type.
Great!!!
If you're wondering why your object is inside the target and not outside, it's probably just upside down. Just figured it out after an hour haha.
adamın dibisin
Holy crap this is some advance stuff
Wow!
Nice
и где это видео было раньше
Спасибо!!!!
Magic
Gold one
NICE! Quick and to the point. Who downvoted this?
Don't worry about it, for the algorithm it's all the same! 😁 Maybe they won't see my videos recommended anymore, I guess.
In my case, I'm dealing with a very irregular shape (changing the character's body parts) and I'm getting bad results, I don't know how to glue it so that it fits perfectly (face snapping is too imprecise), and i made things you sad in data transfer video still effect is not smooth enough
On shrinkwrap, *Nearest Surface Point* doesn't make a perfect curvature in mine, so I tried the others, and *Tangent Normal Project* instead fixes it.
One moment is unclear.We asign four loops as vertex group. Then select outer loop and asign weight of 1, then we select second loop and asign 0.8. Does it really remembers the weight for each loop, cause when i select the loop that i asign weight 1, it still shows weight 0.4-the last one i asigned. PS: Seems like it works just fine. It's weird Blender doesn't show loop weight dynamically on selection. Feels this part of Blender lacks a lot.
That's odd. You can see it in Weight Paint mode, the color goes from weight 1 to weight 0.
@@BlenderSecrets Ahh....i see now. Though it would be more convenient to see weight value on selection or in vertex group window.
@@maxstepaniuk4355 Ah, now I understand what you mean. It only works the other way around, you can select everything based on a value. You’re right, that would be convenient. Maybe suggest it to the Blender devs?
@@BlenderSecrets Just did it on Right click select. Don't know any other places to suggest.
@@BlenderSecrets This was the issue I was having. I was looking for numerical feedback of assigned values.
Does this work to make holes?
Hello, this is very good ( thumbs up) and I have recreated this effect - but when I went on to render the image ( using default rendering settings), objects are no longer seamless in the rendered image. Is there a setting that needs changing for the render?
never mind, got it :)😂
Do tell, what was the issue?
❤️
Is there a way to do same trick, but inside of the mesh? If you want like holes
Great question! I will try and see if I can make a video about it.
Tried it but no, it's not possible - at least not with snapping enabled.
@@BlenderSecrets thanks for trying. would be easy floaters i guess. there is so much work with floaters on curved area, especially if you trying to run some pipes in these holes. then you have to mix AO in photoshop... that's a bit annoying
I guess using this method wouldn't work well with textures?
How to get one smooth uv when i use this?
What do you mean with a "smooth uv"?
Vertices in the same group don't seem to retain individual weights.
If they don't, something is wrong. Individual weights is the whole point of vertex groups and weight painting ;-)
@@BlenderSecrets Something's wrong then. Every time I change the weight of a single vertex in the group, they all change to that weight. I've selected them by loop as well as individually.
Nvm, I thought the Vertex Group panel would show the assigned weight of a vertex or loop when reselected. So apparently the 'heat map' in Texture Paint mode is the only way to 'know' the value of an assigned weight.
thank u thank u thank u very nice very handsome
Sorcery!
If you're not going to have closeups, there's a way to achieve something similar with a shader trick too
You're probably talking about Data Transfer of Normals, I'll show how to do that tomorrow.
Nope it's a shader trick that involves lightpath transparency and blackface. If I remember how to achieve it (or found the tutorial) I can share
Hey Jan, I finally found the video explaining the awesome trick! ... ruclips.net/video/hNrTOCTUCj4/видео.html
@@lsscpp merci
@@lsscpp have you remembered tho
shoot me now!!! nice
So in my Blender freshman new born baby brain, this is like stretching a balloon around a door knob? 😂 if that makes sense.
what the hell it was that simple all along??
This is straight away cheating! :D Thanks!
Now find a way to align UV map too
You mean like blend the texture between the different objects where they meet?
@@BlenderSecrets That would actually be better than what I meant, which is a UV that would be generated as if you just extruded that part from the base mesh (which means heavy stretching without UV seams) 🤔I think it could be done with Python relatively easily: iterating over all vertices with weight 1 check on which faces of main mesh they land, convert that to UV coordinates and set that as UV coordinates of loops with those vertices. Now just pin those points and UV unwrap. Perhaps the blending solution would simply use 2 UV maps: this new one, the original one, and a material that blends color between them?
Is there any catch? No way it's that easy lmao
This video has one of the highest like/dislike ratio I've ever seen and it's well deserved.
And if you want to animate this the problem is solved with parents???
Is there a way to separate the detail object from the main object and keep the new mesh as part of it?
It's very useful, thank you!
Lovely!