Tutorial - Overcast Landscapes Don't Have to Be Boring

HTML-код
- Опубликовано: 31 мар 2020
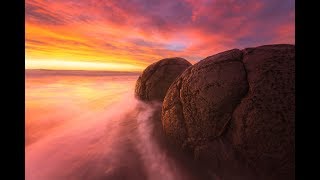
- In my newest Challenge Jimmy video, I show you how to exposure blend and process an overcast landscape. This video is for Photoshop users, Raya Pro users, and also photographers who do not use Raya Pro.
Challenge Jimmy Email Address: ChallengeJimmyMc@gmail.com
Download Raya Pro here: www.shutterevolve.com/raya-pro...
Download My Art of Photography here: www.shutterevolve.com/art-pho...
Download the Free Easy Panel here: www.throughstrangelenses.com/e...


You are the Bob Ross of Photoshop, great flow and efficiency, I had to get your courses and software.
Thank you Jimmy. Very clear tutorial as always. Thank you for showing the "without" raya pro method as well. Though i'm already a raya pro 4 user, this is useful to those who can't afford it "yet". You're the only one in youtube (as far as i know) that doesn't advertise much about your awesome panel. Instead you show how it's done without your panel. You're very kind.
Thanks a lot. Stay safe and stay healthy.
I really appreciate that. Thank you!
Hi Jimmy , great episode and great to have you back , thanks.
Fantastic Jimmy. Extremely useful tutorial. Thank you.
Thanks Jimmy that was a great tutorial. I've purchased all your panels and video tutorials but these short RUclips tutorials work for me as a refresher so please keep producing them!
Nice trick in the end. Love that way of sharpening.
cheers Jimmy reminded me of things I had forgotten and taught me some more too! much appreciated.
I just got raya pro, I'll have to watch more tutorials
Thanks mate. Watching your tutorials have really helped me a ton. And I really love the way you show us both methods with and with out raya pro. I haven't got it yet. Hopefully one day I can purchase it. Honestly thanks very much. Be safe 🙏
So glad you are doing some more Challenge Jimmy Tutorials. I enjoy these so much and learn new things every time. I have missed them. Hope you,your family and friends are doing well in these challenging times. I liked his version but yours seems a little more natural. He did do an excellent job though. I appreciate him sending in such a lovely photo for you to practice on and teach us with.
Very good complete process which is perfect to remind me what I have forgotten. Thanks Jimmy ;)
Jimmy is back ❤️ thanks as usual!
Well done Jimmy. Clean and to the point. Thx for the elucidation, it helps. Keep well everyone.
Great tutorial Jimmy, thanks.
Nice edit and explanations as usual. I've been using a lot that detail enhancer technique since before I bough Raya Pro, with the Easy Panel.
Just fantastic. So clear and concise and great that you show the routes without Raya Pro (even though I bought it yesterday!). Would love to see more of these vids
Thanks. Check out all my Challenge Jimmy videos. There's plenty to watch!
Cheers Jimmy, some great tips there, lots I can use here.
Excellent work!!!
Really excellent Jimmy, excellent :-) Take care or you and yours.
Thanks again for such a great totorial!
Good to see you back Jimmy. This is a much needed inspiration.
Cheers bro.. we miss you
Thanks!!! I hope to make more of these as often as possible, which is why I'm hoping for more people to send me their images :)
@@JimmyMcIntyre would you accept hand held, high ISO shot? Took one 8 years ago in Shanghai, but still is one of my favorite photos, probably due to extraordinary clean sky at the time.
wonderful thank you!
Gr8 as always. enjoyable in this gloomy days
Amazing edit Jimmy..Be safe..
Hi Jimmy,
From the video we can see in addition to use curve layers with mask to customize our vignettes, you also use simply add a new layer with blending mode soft light then use brush to apply (for the mountain highlight area).
Would you please shed some light on how you define the needs of which method to be applied while creating vignettes?
Thanks.
Nice
Hey Jimmy, so glad you're back doing these tutorials, they're really helpful for saving some of my more difficult exposures. I'm just wondering why you didn't use Auto Align Layers vs. manually aligning with Difference. Cheers!
Hi Adam, You can't auto-align smart objects, unfortunately.
@@JimmyMcIntyre Ah! Good to know, thanks!
Hi Jimmy woo! U the man!
I hope you liked today's intro ;)
Jimmy McIntyre haha yes happy to hear it! Nice to see you back Jimmy!
Is there a special reason you d&b in a destructiv way? Nice tutorial as usual.
No particular reason, apart from the fact that I prefer the D&B tools ahead of 50% grey layer and all the rest. Just personal preference, really.
Any plans for the Raya Pro Affinity Photo version?
Affinity doesn't accept panels like these, sadly.
@@JimmyMcIntyre Aha, OK, yeah.. sadly. Thanks