Let me add something here since this is so cool as Expected if anyone wants to generate a wave effect or a reaction to their object on touching the water just make the ocean cube a canvas and the object a brush stroke which i believe is in physics tab then the water will react to the object naturally almost like in real life. But as usual another master tutorial thnx man ur the best
Damn dude, you updated right when I was looking for a tutorial in the new version, thanks a lot, I really like the tutorials that you bring and the way you do the them, keep going!
Sadly I think lightpath not working for AMD card and specifically for 5700XT and maybe every card under 6000 series. If i use is CameraRay it totally switch to 2nd input means =1 for factor, If I use the is SHadowRay or is DiffuseRay its switch all to input 1 means its 0 for fac.. It doest not separate rays its not using raytracing at all. The render is Transparent or Glass not in between. Im with the newest drivers from September. Someone can confirm is this work for AMD and what cards are you using? EDIT in fact its the volume absorption and volume at all that is making something wrong. I cant achieve what you do in tutorial.
Nice but if you want realistic water stick to white color in Glass BSDF Color, otherwise the water will be tinted as you can see in shallow waters or close to the walls of your structure
This Is for Blender 4, 4.1, make sure to use cycles, maybe the diferencie Is the assets I used, the lighting etc, but the shader works in 4.1, I always use it.
Огромное спасибо тебе! Действительно полезное пособие. Удачи в развитии канала! Thank you very much! Really useful guide. Good luck in developing the channel!
Nice tutorial, thank you. And I've noticed that you often add mixing or adding nodes with Shift+A. Note, that in Node Wrangler there are commands 'Lazy mix' (Ctrl+Shift+RMBdrag between nodes (in older versions Alt+RMBdrag)), and also a bunch of mixing commands, with an automatic one among them (select two nodes, then Ctrl+Numpad0). Those commands are much faster, they even reconnect the old output.
Good morning, Thank you for this remarkably interesting video. I have a little problem when rendering because the water present in the 3D view disappears when rendering. I checked my settings, and they seem to be correct. Do you know this problem? Thank you in advance for your response.
So many projects break with some blender updates. I have a folder full of blender demo files that don't work after blender 3.0. It seems to me that if blender wants to be an industry standard they need not to break their files with every update.
@@chuckcg The lack of backward compatibility really ruins the usefulness of Blender in a professional environment. It also screwed up my textures on mirrored and applied objects in one project. Newer versions have a repeating clapboard look to the wood panels. Ugh.
Sure that's anoying. But always make your backups, this is the basic reflex. Also, you can have different executables of Blender on your computer. So you can open older projects in older version of Blender. Just use the portable version for this.
@@vladartiomav2473 even the backups don't work on current versions of Blender. I don't like the fact that with each update, older projects are broken. I used to keep a few versions of Blender, but I found that each one takes up several GB of space in the users/documents and settings folders as all extensions are duplicated for each Blender environment. Too much overhead. Nowadays I just keep one version on my PC.
Awesome tutorial. I was creating a floating water orb for a spell effect. I like how you explained things here and the effect looks nice BUT it flipped everything upside down whereas using the metallic property on the principle bsdf does not. Definitely following for more tips.
Good morning, Thank you for taking the time to respond to my request. After some research I found the source of the problem. In my scene I created a channel and I used the Bolean function and to render it you must first uncheck the eye but especially the camera. The result is that everything is in order now. Thanks again for your help.
Just a Quick tip if you Hold CTRL and SHIFT then RightClick and Drag between two different Shaders, Textures, Etc.. it will Add a mix Node between them and hook it up into the existing out up. :)
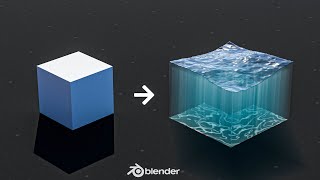
This tutorial is about the Water Material, the ocean modifier is a plane, we need something with depth to get the result, if you use a plane this won't work, but you are free to try it.


Let me add something here since this is so cool as Expected if anyone wants to generate a wave effect or a reaction to their object on touching the water just make the ocean cube a canvas and the object a brush stroke which i believe is in physics tab then the water will react to the object naturally almost like in real life. But as usual another master tutorial thnx man ur the best
Thanks! nice tip, I have to try it
how do you make the object itself a brush stroke?
lol i got the email about the 4.0 issue from you.lmao
Damn dude, you updated right when I was looking for a tutorial in the new version, thanks a lot, I really like the tutorials that you bring and the way you do the them, keep going!
Sadly I think lightpath not working for AMD card and specifically for 5700XT and maybe every card under 6000 series. If i use is CameraRay it totally switch to 2nd input means =1 for factor, If I use the is SHadowRay or is DiffuseRay its switch all to input 1 means its 0 for fac.. It doest not separate rays its not using raytracing at all. The render is Transparent or Glass not in between. Im with the newest drivers from September. Someone can confirm is this work for AMD and what cards are you using?
EDIT in fact its the volume absorption and volume at all that is making something wrong. I cant achieve what you do in tutorial.
Beautiful results!
To add mix shader 1 tip. CTRL+SHIFT R-mouse hold and drag from 1st to 2nd and it will automatically add mix shader and connect the 2 inputs.
Very nice. You explain everything very well.
Nice but if you want realistic water stick to white color in Glass BSDF Color, otherwise the water will be tinted as you can see in shallow waters or close to the walls of your structure
It makes sense, maybe I changed the color just to show it, but in my render I used a white color, Thanks for let us know.
Thank you for the update
estoy seguro de que hablas español, excelente tutorial hermano🤩
Si claro, este tutorial también está en mi canal en español
Pls do this tutorial on blender 4.1 bcs the result is different
This Is for Blender 4, 4.1, make sure to use cycles, maybe the diferencie Is the assets I used, the lighting etc, but the shader works in 4.1, I always use it.
I had to play around with material settings to get any transparancy
sometimes this happen to me, could be blender 4? try with 3.6, I think for this material blender 3.6 works better
No wonder the water looks janky in blender 4.0 Thanks for the updated tips
You're welcome, glad it was helpful!
Looks good but I can't see transparency at all. How do I make it more transparent?
are you using cycles render? also check your normals, you can also play with IOR in the glass shader
@@chuckcg yeah the face normals are blue on the outside, I am on cycles and my IOR on the glass BSDF is .750
I figured it out! I didn't have blend alpha setting turned on haha
Огромное спасибо тебе! Действительно полезное пособие. Удачи в развитии канала!
Thank you very much! Really useful guide. Good luck in developing the channel!
Nice tutorial, thank you. And I've noticed that you often add mixing or adding nodes with Shift+A. Note, that in Node Wrangler there are commands 'Lazy mix' (Ctrl+Shift+RMBdrag between nodes (in older versions Alt+RMBdrag)), and also a bunch of mixing commands, with an automatic one among them (select two nodes, then Ctrl+Numpad0). Those commands are much faster, they even reconnect the old output.
Thanks, because these are tutorials I try to show everything, but you right I have to try it
Good morning,
Thank you for this remarkably interesting video. I have a little problem when rendering because the water present in the 3D view disappears when rendering.
I checked my settings, and they seem to be correct.
Do you know this problem?
Thank you in advance for your response.
Did you check the normals? maybe they are flipped.
So many projects break with some blender updates. I have a folder full of blender demo files that don't work after blender 3.0. It seems to me that if blender wants to be an industry standard they need not to break their files with every update.
This happened to me only with some geometry nodes projects, but now when I open any blend file saved with an older version, blender 4.0 breaks it
@@chuckcg The lack of backward compatibility really ruins the usefulness of Blender in a professional environment.
It also screwed up my textures on mirrored and applied objects in one project. Newer versions have a repeating clapboard look to the wood panels. Ugh.
Thats why they have LTS versions for studios so they dont need to update every few months :)
Sure that's anoying. But always make your backups, this is the basic reflex.
Also, you can have different executables of Blender on your computer. So you can open older projects in older version of Blender. Just use the portable version for this.
@@vladartiomav2473 even the backups don't work on current versions of Blender. I don't like the fact that with each update, older projects are broken. I used to keep a few versions of Blender, but I found that each one takes up several GB of space in the users/documents and settings folders as all extensions are duplicated for each Blender environment. Too much overhead. Nowadays I just keep one version on my PC.
Awesome tutorial. I was creating a floating water orb for a spell effect. I like how you explained things here and the effect looks nice BUT it flipped everything upside down whereas using the metallic property on the principle bsdf does not. Definitely following for more tips.
I have still a problem.
Whatever I try it still reflects the background
No video has helped me to make it transparent. Any help?
No transparency? make sure to use cycles and check your normals, if not try to use blender 3.6 to see if it works
Good morning,
Thank you for taking the time to respond to my request.
After some research I found the source of the problem. In my scene I created a channel and I used the Bolean function and to render it you must first uncheck the eye but especially the camera. The result is that everything is in order now. Thanks again for your help.
Hey I really love your videos and I hope you never stop making them!! Can we request videos? ❤️❤️
is there a way to make the water actually move?
Just a Quick tip if you Hold CTRL and SHIFT then RightClick and Drag between two different Shaders, Textures, Etc.. it will Add a mix Node between them and hook it up into the existing out up. :)
Thanks!
The submerged part is not showing. I guess 4.1.1 couldn't pull it. Otherwise, the top portion looks beautiful.
Отличный туториал. Без воды, всё по делу :)
I think the best water I ever seen!😍
why not just use ocean modifier?
This tutorial is about the Water Material, the ocean modifier is a plane, we need something with depth to get the result, if you use a plane this won't work, but you are free to try it.
ah i see,,thanks
@@chuckcg
Thank you for your work! Perfect stuff
for me the connection line between both glass and mix and transparent and mix turn red and the material just turns pink...
Red line?, make sure both shaders are connected with a Mix Shader and not mix color
@@chuckcg oooh ty haha i put it in a regular mix...
Amazing tutorial, super simple to understand. If I wanted to animated this water, how would I go about doing that?
One way to do that would be key framing the texture coordinates of the noise texture.
great tutorial thank you
is there any way you know of to animate this water or do i need to just mess with it until i find a way?
animate the noise texture, change it to 4D and animate the W value
@@chuckcg Ah that's way easier than i was thinking, thanks
Thank you so much!!
Very nice result!
А теперь можно тоже самое, но в 40 тысяч раз медленнее😊
?
i cant see through my water
nvm its because i was using evee it sucks it doesnt work on evee :( im trying to make liminal spaces but i dont want it to take forever to render
@@2dquix ruclips.net/video/VEdd9CynwQU/видео.html
@@2dquix have you tried watching blender guru’s video about ways to make cycles render faster
@@2dquixtry taking a look at render time hacks on here, I’ve seen a few videos mentioned taking a 30 min render to 2 mins.
Omg
Perfecto!!!
❤❤❤
muy bueno Carlos
Gracias Guillermo, que bueno que te sirvio
Thank you!
You're welcome!
perfecto gracias!
Con gusto
Thank you!
You're welcome!
THANKS
You're welcome!