$24 Wagon Vise - 365

HTML-код
- Опубликовано: 2 окт 2024
- 📙 Article/plans for this build: jayscustomcrea...
📝 IN THIS VIDEO | disclosure - affiliate links below:
→ Wagon / Tail Vise Kit lddy.no/vd0i
→ Thread Locker lddy.no/vldu
→ OverDrive Drill Bits lddy.no/vldv
→ Multi-Length Extensions lddy.no/vldw
→ Brass Bench Dogs lddy.no/vlkb
----------
💰 Coupons to save you money 💰
💲 - Router bits (use code JAYBATES for 10% off - bitsbits.com/
🌪️ - EF5 dust collector (use code JAY5 for 5% off) - jayscustomcrea...
💲 - Save 10% on CMT saw blades at Taylor Toolworks with code CMT10 - lddy.no/qi2r
----------
Sign up for my email newsletter: jayscustomcrea...
Mailing Address:
PO Box 33
Mathiston, MS 39752
Social links:
Lbry - lbry.tv/@jayba...
Odysee - odysee.com/@ja...
Twitter / jaybates86
Facebook / jayscustomcreations
Instagram= / jaybates86


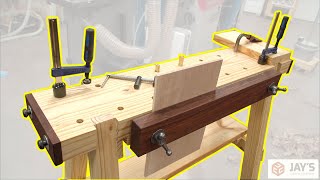


📙 Article/plans for this build: jayscustomcreations.com/2021/03/24-wagon-vise/
📝 IN THIS VIDEO | disclosure - affiliate links below:
→ Wagon / Tail Vise Kit lddy.no/vd0i
→ Thread Locker lddy.no/vldu
→ OverDrive Drill Bits lddy.no/vldv
→ Multi-Length Extensions lddy.no/vldw
→ Brass Bench Dogs lddy.no/vlkb
----------
💰 Coupons to save you money 💰
💲 - Router bits (use code JAYBATES15 for 15% off - bitsbits.com/
🌪️ - EF5 dust collector (use code JAY5 for 5% off) - bit.ly/2NlQ9ov
💲 - Save 10% on CMT saw blades at Taylor Toolworks with code CMT10 - lddy.no/qi2r
Ive been working on mine on and off forever. Lots of binding and slop and modifications and wood splitting and rocking and finally wood clamping that pops right out.
The original block split when I was cutting in the dado slot for the plastic rail I installed to limit the rocking and twisting.
Maybe i just have unreasonable expectations for clamping. I swear to christ i wish i never got it in my head to build this thing lol.
Came here for some tips but ive done most of the stuff you did. So frustrating.
UPDATE: after I wrote this I went back into the garage and tried one last time and BOOM it worked. Thank the gods.
Thank your perseverance instead.
Great outcome for the workbench. I wonder if you could get a left hand threaded rod for this so you can maintain traditional righty tighty lefty loosey operation of the vise.
I'm sure they could be sourced but a reverse thread rod and square nut would increase the cost a bit. No need for that in my opinion.
Glad you saw that as well.
@@JayBates Actually, a left-handed acme lead screw from McMaster-Carr is cheaper than the comparable right-handed version.
huh? it looks left handed to me. UNLESS the video is reversed? @8'20" Jay's motion is turning left to tighten
@@leeackerson2579 but these are not Acme. Acme are much more expensive than standard threads
LH thread would be great for this style so you turn the handle clockwise to advence the wagen.
Piling on - Dental Work - Laughing out loud, Jay - you made my day, thanks.
Hahaha, “traditional dental work”! Got me laughing out loud on that one Jay! 👍
That was painful.
Very unlike Taylor to send you the wrong screw but it looks like you got a left handed thread. That's why you have to turn the crank counter clockwise to tighten the vise - backwards. Nice build nonetheless.
This isn't the wrong screw. It was the one offered at the time of me building it.
do they have a reverse thread so you can screw handle right to tighten?
I wonder if the sliding block won't start to lean back after some usage, since there's only one nut in the middle that works as a pivot point. 2 bushings on the sliding block might be needed after a while.
Hmm, would probably be even better if I trim off that corner of the end so that the end block is flush with the end of the bench.
Cool addition to the workbench Jay and I enjoyed your video. You continue to impress me with the quality of your videos, your work and your honesty as you build. By the way, good to see a guy from Livonia doing so well in the warmer climate .... Go “D” teams!
I'm thinking that the gap for the vice could be left open during the building of the bench top so you don't have to cut it out later.
Very cool design and add to ur workbench. Keep up the great craftsmanship and hard work Jay. Keep Making. God Bless.
Nice kit and nice addition to the bench.
Great REAL WORLD project here, Jay. I like what you did and how you did it, to the point and no glitzy showy stuff. I use a very similar wing nut (speed handle, some call it) for my carving set ups. I'm almost certain those are made by Peerless (mine are). Jergens and Gibraltar make similar two pronged handles that do the exact same thing but I prefer the Peerless models. If you do any 'clean work' around them (any model) make sure to wipe them down really good and give them a sealer coat of something tough like a flooring poly. They're all cast and the dark zinc/iron surface is never baked in properly, left un-coated that powdery residue will get on your hands and transfer nasty smudge marks onto anything you touch after handling them - clothing, your face, veneers, anything you really really really don't want messed up in any way, it's inevitable. I think they're made with the intention of their being used in machine shops where such cleanliness is thought of as like LOL, RIGHT, SURE, BUDDY, WE'LL GET RIGHT ON THAT by default.
Is there any reason why you didn't cut a recess so the end could be flush? I might have to try this.
Extra work for no benefit.
Awesome! Thanks
Thanks for sharing that!
"Now the part that resembles traditional dental work." 😆
there is one issue with this, you can not clamp a piece of wood against the leg of your table, because your thread is in the way
I ordered the kit as well as a hand wheel and one if those 1" wood owl drill bits. I'll get a whole set if I like it, which I Imagine I will. I noticed today that Harbor Freight has these now (the bits, that is), whatever you think of the Freight co... It is what it is. Always wanted one of these wagon vises, this video really sold me! Thanks man!!
Excellent addition to the bench. One question, if you reversed the threaded rod, would a clockwise rotation of the "adjustment dial" move the block toward the center of the table? The existing counterclockwise rotation seems backward to me. Perhaps it's just me. Thanks
Reversing the threaded rod does not reverse the thread pitch. One needs a left-hand threaded rod to do this (standard threading is right-handed). A better kit for a non-travelling-rod wagon vise would include a LH-threaded rod and nut with Acme threads for faster vise travel. I'm using the term "non-traveling rod" for this type of design where the block with the threaded nut travels along the threaded rod which rotates in a fixed position in relation to the bench top. The other design type has the rod terminate in the travelling block and has the nut captured into the end cap. In this design, the rod and hand wheel extends out further from the end of the bench as the block is retracted to open the vise.
How important is it that the vice gap be 2.5 in wide? Is it fine to go wider, like 3in? That way you can just leave a gap of 2 boards in the glueup
How can you tolerate having your shop so tidy? Doesn't keeping it tidy eat more of your shop time than actual work does?
Nah. And it definitely gets messed up often. If everything has a home then it's easy to keep it clean.
@@JayBates ...but why would you do it? Keep it clean, I mean? How can you keep track of where everything is if it isn't spread all over every horizontal surface?
I don't clean until I really have to. That way it costs me very little total time and I know exactly where everything is.
Nice build Jay very useful and powerful.
Uaa as I was going to buy this from Tay Tools until I was the direction of the threads. That’s a no go for me.
Nice addition to a workbench. You'll wonder why you didn't include it on original build, but you will find it very useful now
please excuse a newbie question but is it off center for a reason?
Hey Jay man. This wagon vise u made look like a very easy install. i HAVE SOME OF THOSE PARTS ALREADY SITTING OUT IN MY SHOP. i8'M KEEPING THEM ASIE UNTIL i FINALLY GET ROUND TO BUILDING A WORKBENCH LIKE THE ONE U HAVE.
Great job man. Love the easy of the project. Well u made it look easy I should say..
Just so I know, what is the benefit of using this as opposed to just mounting a regular bench vise on the end of the bench that has a little pop-up dog. Won’t that still allow you to pin the work down to the bench to do face work?
Love the quick and easy install, however Personally if have made the end plate flush with the end of the bench. That’s probably just my OCD
Put some wax on that plane lol, looks like you are working a little too hard to push it
Glad I ran across this vid, Jay. Will use the Taytools kit and accessories. They're a great outfit.
Why is the screw not centered on the sliding block?
Why did you not just add a tail vice with a dog hole in the face block?
Glad to see that hat. ;)
Great video and simple, affordable solution, Jay!
Great vid! Welcome back... we missed you. LOL
I really like that idea Jay. Very clever idea. George S.
Does it spin freely like a Benchcrafted wagon vise? I just installed the Chris Schwarz book/wagon vise and your version seems like a much simpler install.
Yes. I'll do a follow up video on my blog channel this week.
I'm still waiting to see the wagon!
I had one once, but the wheel fell off. Needed one of these to fix it.
really nice job
Quick Q: What's the difference between a Wagon Vice & a Tail Vice?
I appreciate your video and detailed plans. I'm really looking forward to having a reasonable price televise
Great Idea!
I really like it
Greets from Austria!
Wonderful video! Is it possible to do this without having to add an end block and just install the wagon handle flush with the end of the workbench? I ask because I'm designing my new workbench and would like to incorporate this from the beginning.
Wow, a Sunday morning Jay Bates video - just like the good old days! :)
That's pretty cool, Jay. I'll have to do this.
I didn't see a Lions, Tigers, or Red Wings banner, who made this video?
cool, add more knowledge, greetings from Indonesia ... good luck with your channel
Thanks I am definitely adding one to my bench.
Nice 2A hat
Take that Lee Valley.
Hey Jay, what are your thoughts on the Taytool Hand Planes?
Nice 😊
You really love the Redwings huh? Nice work there.
I’ve often wondered if the vice jaw binds in the track, with seasonal movement? My shop is not air conditioned, so thinking a tail vice might be a better option?
Chévere amigo
Really missed your wood working vids! Great to see you back!!
Taylor Tools might be a good sight if it was not for the annoying promotional piece that takes up half of the page. Yes I am an old man who does not like being forced to sign up for something.
Really enjoyed this installation. I have a small shed, filled with my wife's garden stuff, so I watch with envy. P
Jay, drill press or band saw first?
Thanks.
Which grade of LOCTITE would you recommend for double prong cast knob?
Good stuff Jay. Thabks for the post.
Just looking over your plans. You list 3/4 screws in the material list for installing drawer slides. Did I miss something or are you just checking to see if people pay attention? lol
Hahaha. I used a template. Might have missed a line to delete. I'll check.
Fixed. Thanks!
I think you need a new dentist lol
Shrinking and swelling, wood shrinks and swells. Dimensions change due to moisture content, not temperature. It’s not just you. There’s been about 3 people in the world that I’ve heard say shrink and swell. Maybe I shouldn’t care. ...I care.
Thanks for posting
I'd take the screw out and turn it around so that when you rotate it to the right it would advance the block. The way it is now the rotation is backwards. Well to me it is. Righty tighty lefty loosy.
Thanks for the tip!
Imagine a threaded rod with a nut on it. If you unscrew the rod from the nut and turn it around, it's still a right hand thread, so the direction doesn't change. If you want to have the block move away from you when you turn the screw it has to be a left hand thread.
Yes. My reply was sarcasm. As I thought the original comment was :)
Awsome brother!!!!!
Having a little trouble with Jay's new method of over-enunciating throughout his commentary. Still, another great video from the man.
Nice work, and great result. Its refreshing that you admit where you made a flub and how you corrected it. That happens to everyone, but some would just edit that out. Credibility is more important than perfection.
I built my bench from your plans but I added a a wagon vise during construction.
Great video. I paused to see what that plane you were using is. Taytools 5½? Is there going to be a review video on that bad boy? It's pretty. I'd like to know how you like it.
We missed you man!
Great option for a vise. I think you may have mixed up the grain direction vise block.
Very cool Jay
cool, thanks
Nice! Pretty cool and inexpensive solution! Thanks for sharing this! I'm planning on building a new bench sometime here soon and this looks like something I would really like to add to it.
Great to see a simple kit available at last. A few months too late for my workbench build, I made a mini one from a PoS wood work vice.
Why is the vise screw left-hand threaded?
I had the same question
What type of hand plane do you use?
مبدع
Is the threaded rod left hand?
Nope.
Great bench upgrade. I have forgotten what life was like before having a decent tail vice in my own bench 🤣👍
On a side note...what hand plane is that?
Taylor tools 5-1/2 lddy.no/vozq
There is supply chain issues with stock right now.
@@JayBates I noticed, even with Lei Neilson, Veritas, and Woodcraft. All out of stock
Jay gotta be one of the only woodworkers to say "Height" the proper way, and not "heighth"
Ciao Jay, sei un grande hai fatto un ottimo lavoro, un salutone dall'Italia .-
probably I should just make my block wider than my drill. I got a drill, maybe long enough to just reach out to the end, so I can mark it, but probably I'll just measure it and go with that, it will align fine, I think
I like your hat
Thanks Jay, great to see video for people who don't have infinite resources for making tools. An alternative if you have some metal working skills is to buy acme screws and flange nuts from McMaster-Carr(www.mcmaster.com/98935A741/?SrchEntryWebPart_InpBox=acme+screw). The finished look with a 1" or 1 1/4" diameter lead screw is closer to a commercial product.
Thanks for the plans and guide. Fortunately I'm building the bench from scratch and don't have to go through the steps of cutting out the old bench top. I ripped 2x6 stock in half and used the flat edges at the top side. My moving block and gap is 4.5" wide (3 thicknesses of 2x stock) and I have 2 dog holes in the moving block. Doing the construction on a new bench is MUCH easier since I can drill all the holes at the drill press. I made square dog holes in the bench by cutting 3/4" x 3/4" dados in the 2 outer boards taped and clamped together. That gave me 3" between holes. This section of my bench is about 10" wide, so it will go through my thickness planer. I'll be making another half of the bench top with a twin-screw side vise and will have a 1.5: gap between the 2sections to allow for clamps to go through the center - like a Robou bench.
Great video. Taylor Toolworks RULES!
Thanks!
I’ve have been wanting to install a tail vise for a while. I watched a few videos and yours was the most comprehensive. Thank you. Your video was tremendously helpful.
Looks like the end product was "lefty tighty, righty loosey." Can that be solved by just flipping the threaded rod, or is a wagon vise designed that way for a reason?
(definitely not criticism. nothing but respect for your work!)
Thanks Jay. This is something I’m planning for my next workbench build. A wagon vise just seems to be really useful in a lot of situations.
Really nice! I have been thinking about a wagon vice for my Moravian workbench, this might be it.
I have a wagon vice from a veneer press screw that This would be an improvement on Thanks Jay
Great Job!!! Well Done!!! Thank You Jay!!! 👍😎😃✌
Very good video. I am impressed with your narration and instructional points of any of the projects you do. Keep it up .