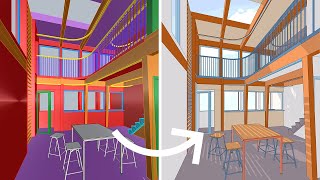
Cutaway Architectural Drawings - Rhino 7

HTML-код
- Опубликовано: 11 июл 2024
- This video tutorial goes through the steps to create a cutaway drawing in Rhino 7. The key steps in this video can be found below:
00:00 - Introduction
01:20 - Using the 'Split' command to split apart the 3D model
04:00 - Using 'Cap' to close any holes created from the Split command
04:25 - Equally spacing the cross sections
05:13 - Selecting a view for the drawing and saving as Named View
06:08 - Creating small cutaways within the geometry
08:45 - Making a 2d drawing using 'Make2D' command
10:25 - Exporting the drawing as an illustrator file
11:35 - Formatting the drawing in Illustrator
12:15 - Editing the line weights
13:58 - Adding in a thicker section line
16:03 - Adding a white fill to allow the drawings to be layered
17:52 - Layering up and aligning the final drawing
19:30 - Adding annotation
20:46 - Adding in colour using the 'Live Paint' tool
22:48 - Exporting as a Jpeg
23:27 - Rendering out shadows from the Rhino model
25:22 - Combining the shadows and linework in Photoshop


Thank you so much!, this is the first time I see a full tutorial like this, keep going ✨
I really love your visual language. Thanks, keep it up sir!
thank you so much Tom!
That was really helpful
Thank you
awesome video, thank you!
Amazing thanks🤙🏻
Great Tom¡
Awesome! thaks
😇Thank you for this video.
Thanks, glad it was useful!
Ure awesome
Tom you are the goat
Thanks!
I have a question. Why did you make those Clipping Plane Intersection Layers in the layers panel coz I saw the 'Clipping Plane Intersections' toggle checked in the Make2d window coz mine's not checked when I'm doing it. Why's that and should I do that? Does that help in anyway?