going to try this this week. Great job. I especially like the idea of hiding a mistake, in your case a chamfer. Smart...very smart....design by camouflage!
Just a tip to make the video more real. Right now, when you're talking to viewers, you're looking at your camera/phone screen. And it seems to the viewer that you are not talking to him, but to someone there on the side behind the camera. So it will be very realistic if you mostly look directly into the lens, and occasionally glance at the screen for a second, just to correct your movements, be in the frame and show what you are doing in the center of the screen. Speech and dialogue conduct looking only into the lens. Good luck to you!🌹
Very nice router bit. Thank you for sharing your awesome box with us today. Sometimes we just need to change the plan. Stay safe, happy and healthy. From Henrico County Virginia
I like that you are exploring successfully tools I don't have and have not seen in use. The birdsmouth bit and the Kerfemaker, for example. The finished products are simple but well done and attractive, and the video editing is above average.
Very interesting router bit. I’ll have to check one out. I’ve been making a similar joint by ripping the stock on my table saw. if you are careful. It comes out nice.
That turned out beautiful! 👌 I have used that bit a number of times and it makes a very strong joint like you said! Thank you for sharing your awesome work!
Wood craftsmen do not make mistakes; they accommodate the nature of the wood. I make picture frames out of wood, not plastic -- knots, cracks, nail holes, old tool marks, and any other mark of life I can find.
Great job! Your videos have really been a help to me since I started watching a few weeks ago. I am going to click and order the birds-mouth router bit and I'm going to make one of those sanding jigs. Very smart.
Great video ! I am going to have to try make some boxes like this . I just ordered this set of router bits from amazon . I have lots of small pieces of maple and walnut also. Thanks for sharing your videos I am already learning some new tips from watching.
That is a very lovely box. I think the walnut on the top of the handle works best, because you can see it's contrast well and it repeats the order of the woods of the top. I appreciate learning about the bird's mouth bit, too. May I suggest one thing? Smile more. You come across as very serious, but it's more fun to watch if it looks like you're having fun! (BTW, I'm the same way -- I naturally hold a neutral expression, not a smile. But I'm not a RUclips star like you!)
I do like the bird’s mouth router bit it makes a beautiful corner. Have you ever done flocking on the inside of your boxes just for something different
I am really liking your channel. Your projects and explanations are very accessible. Your willingness to not be perfect feels like it takes pressure off the rest of us, too. One comment on the lid: I think chamfering the insert portion slightly might make putting the lid in place easier. Well, two comments...! Making the insert portion half the thickness might make the lid look lighter visually when it's off, as well as give a little more space in the box.
Hi DavZell, thank you for your kind comment. The lid goes on easy ofter sanded a bit. I totally agree with you on the thickness of the insert. Truth is, I realized was a bit thick but I just got a new dust processor and I didnt set up the ducts yet so, so far I only have one hose that I have to keep moving from machine to machine :) Was too lazy to change it so I can run my board through the planer. Also for a box so small I would use half inch material but I already had the bit set up for 3/4 from making a waste basket earlier in the day and didnt want to set it up for 1/2 in since it takes a while to set up properly
2:00 Gloves will greatly reduce the nuisance of the sander's vibration. A search for "anti vibration gloves" will return the usual tsunami of citations. I use ordinary heavy leather gloves. They cushion the snap of the pop rivet tool, too.
Hey, this is super! So, I did cave in and gave Hyezmar's Woodworking Bible a good look. It's pretty simple to work on any of his projects, try on go'ogle while his still sharing it as a rough draft.
@@woodworkingwithSkyler - Ah! Okay! And thank you for telling me! 😀 You do sound a lot like the Polish partner I once had but definitely even moreso like the Romanian violin teacher my Son had had ten years ago, as well as someone else whose YT channel I've been following. Those two women even have the same name: Alina 😀 Greetings from New Zealand! 😊
What an absolutely ignorant and unnecessary comment to add to a woodworking video. Making THIS political? Good grief. So according to you, Democrats are dumb? And I guess by extension, only Republicans are smart? Can you cite these (yes, according to you, MULTIPLE studies) that come to this conclusion? Of course not because they don't exist. And for your information, it should be "how-to" videos, not "how to videos" as you stated. So I guess even non-Democrats are stupid, eh? Leave your political BS out of things like this. Quit showing your ignorance and divisiveness. It may look good to your Dear Leader but it's unnecessary in real life. Get one.
Yes you can. Used same bit today with 3/8 in wood. The reason I used 3/4 is because I already had the bit setup from a different project and didn’t feel like changing the setup


going to try this this week. Great job. I especially like the idea of hiding a mistake, in your case a chamfer. Smart...very smart....design by camouflage!
Seu trabalho ficou realmente bom!!! Muito bem!!!
I had forgotten I own one of those bits. Thank you for showing a new use for it- had bought to make turned boxes.
Beautiful work! Thanks!
A beautiful creation made by a beautiful creator
GREAT project. Even the end grain of the top and bottom maple gives an additional look! !! !!!
Thank you
They look very firm, they're holding up nice!
That box looks cool. The different colour woods makes it look original
I am so glad you like it @alid8646
Very nice. I like how you keep things basic. You don't overly complicate your projects. Cheers
Glad you like it. Thank you. I really appreciate your kind comment
Excellent job!!!
Bravo, just bravo!
Thank you very much
Beautiful. Absolutely beautiful.
Thank you very much!
Beautiful!
Thank you!
Great project and thanks for introducing me to birdsmouth router bits. Another bit of shiny kit to buy...
:) Thank you. Happy shopping!
The contrasting wood colors look beautiful together especially with the finish you chose. Nice job as always
Thank you so much Vince
Gorgeous Skyler. I’m definitely getting that bit.
Thank you @Griffinwoodworks. It’s a bit hard to set it up but it’s so worth it
Love the look of that box. I've got to get those router bits.
I think you will really like it
Beautiful work enjoy your videos
Thank you so much Rick
Turned out great even with the tiny mistake that I definitely didn't even notice.........The oscillating sander sure looks handy.
Thank you! Yes very handy and affordable. Can’t believe I didn’t buy one sooner
Very nice work. I've never seen the Birdsmouth bit, used before, it does an excellent job.
Thank you very much!
That’s a great box. It’s a beautiful design. Thanks so much for sharing this. It’s great for a gift.
Thank you Bob
That’s genius and I’ve never seen this method before. Thanks!
You are so welcome Phil
i have got to get me a birdmouth bit,,,this is the first time i have ever seen them used,,,great looking box,,i think you really do good work
Thank you
I love that you challenge your woodworking skills on the projects that you do.
Thank you very much
Thanks for the video and the links.
My pleasere
Just a tip to make the video more real. Right now, when you're talking to viewers, you're looking at your camera/phone screen. And it seems to the viewer that you are not talking to him, but to someone there on the side behind the camera.
So it will be very realistic if you mostly look directly into the lens, and occasionally glance at the screen for a second, just to correct your movements, be in the frame and show what you are doing in the center of the screen. Speech and dialogue conduct looking only into the lens.
Good luck to you!🌹
Subscribed btw.
Nice project. The router bits are perfect. The shape and colors are great! Thank you for sharing.
Hi Jim. Thank you. So glad you like it
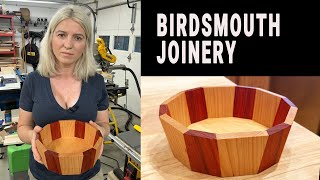
Gorgeous box and it's the first time I seen birds mouth router bits in use! Thanks :)
You’re welcome 😊 I will soon use the 12 sided bit to create a bowl. I think you will like that one
@@woodworkingwithSkyler Looking forward to that. Thank you :)
Great job'
Love the chamfer to hide mistake. Brilliant thinking.
.
.
Thanks Peter! I was pretty nervous doing that chamfer but glad it worked out ok
Very nice router bit. Thank you for sharing your awesome box with us today. Sometimes we just need to change the plan. Stay safe, happy and healthy. From Henrico County Virginia
Hi Norm! Thank you
I like that you are exploring successfully tools I don't have and have not seen in use. The birdsmouth bit and the Kerfemaker, for example. The finished products are simple but well done and attractive, and the video editing is above average.
Glad you like them! Thank you
Box is beautiful thank you
Un abraso de Sur Tejas
My pleasure 😊
Again, very nicely done! Keep up the good work.
Thanks again!
Great looking box. Nice work shop as well.
Thank you kindly
Thanks for good ideas you give us really I appreciate let me try to look for that bit in our store
You are so welcome
Skyler ,great video,I learn something every time I watch. Really like your honesty towards miss haps. 👍😇🇺🇸
Thank you Rigus208
That is a beautiful box and loved your chamfer idea 👌. Love your videos. Merry Christmas all !!!
That's a fantastic box Skyler, I'm gonna have to get a birds mouth but.. excellent content
Thanks for watching!
Very interesting router bit. I’ll have to check one out. I’ve been making a similar joint by ripping the stock on my table saw. if you are careful. It comes out nice.
That sounds good. I don’t know how to create similar joint on table saw
Beautiful box! Great video!
Thank you!! 😊
Excellent work Skyler! I could happily watch you for hours :)
Wow, thanks!
Beautiful
Thank you
That turned out beautiful! 👌 I have used that bit a number of times and it makes a very strong joint like you said! Thank you for sharing your awesome work!
Awesome! Thank you!
Awesome 😮
Thanks 🤗
Nice
Another very nice, simple, direct & informative video. I appreciate & enjoy your approach (& your sense of humor). Thanx for sharing.
Glad you enjoyed it!
Wood craftsmen do not make mistakes; they accommodate the nature of the wood.
I make picture frames out of wood, not plastic -- knots, cracks, nail holes, old tool marks, and any other mark of life I can find.
You do some awesome work. Great video!
Thank you very much!
Very nice.
Thank you
Very nice video as usual. Why dont you get a CNC. Also vectric aspire makes double side machining very easy. 😊
Great job! Your videos have really been a help to me since I started watching a few weeks ago. I am going to click and order the birds-mouth router bit and I'm going to make one of those sanding jigs. Very smart.
Awesome! Thank you!
This is a beautiful box and not that hard for an "advanced beginner" woodworker. I wish the 1/4 x 6 1/2 x 15 inch boards were less expensive.
Great video ! I am going to have to try make some boxes like this . I just ordered this set of router bits from amazon . I have lots of small pieces of maple and walnut also. Thanks for sharing your videos I am already learning some new tips from watching.
Have fun! Thank you
That is a very lovely box. I think the walnut on the top of the handle works best, because you can see it's contrast well and it repeats the order of the woods of the top. I appreciate learning about the bird's mouth bit, too. May I suggest one thing? Smile more. You come across as very serious, but it's more fun to watch if it looks like you're having fun! (BTW, I'm the same way -- I naturally hold a neutral expression, not a smile. But I'm not a RUclips star like you!)
Thank you very much @RYwoodview. :) ha ha ha! “RUclips star”!
Boy, i sure wish i could afford the Tools you have....
I do like the bird’s mouth router bit it makes a beautiful corner. Have you ever done flocking on the inside of your boxes just for something different
I didn’t but have it on my to do list
I am really liking your channel. Your projects and explanations are very accessible. Your willingness to not be perfect feels like it takes pressure off the rest of us, too.
One comment on the lid: I think chamfering the insert portion slightly might make putting the lid in place easier. Well, two comments...! Making the insert portion half the thickness might make the lid look lighter visually when it's off, as well as give a little more space in the box.
Hi DavZell, thank you for your kind comment. The lid goes on easy ofter sanded a bit. I totally agree with you on the thickness of the insert. Truth is, I realized was a bit thick but I just got a new dust processor and I didnt set up the ducts yet so, so far I only have one hose that I have to keep moving from machine to machine :) Was too lazy to change it so I can run my board through the planer. Also for a box so small I would use half inch material but I already had the bit set up for 3/4 from making a waste basket earlier in the day and didnt want to set it up for 1/2 in since it takes a while to set up properly
I really like your presentation, mistakes and all. Well done, keep it up.
Thank you very much!
I really appreciate your kind comment
The box is beautiful. So are you, Skyler.
Thank you @erickovach
Do you have a viedo on a leather lined box
Skyler, what do you use to wipe the finish on?
3m white cleaning pad
2:00 Gloves will greatly reduce the nuisance of the sander's vibration. A search for "anti vibration gloves" will return the usual tsunami of citations. I use ordinary heavy leather gloves. They cushion the snap of the pop rivet tool, too.
Awesome. Thanks. I will order some
P R O M O S M
Hey, this is super! So, I did cave in and gave Hyezmar's Woodworking Bible a good look. It's pretty simple to work on any of his projects, try on go'ogle while his still sharing it as a rough draft.
Marketing 101 rule 1. Cleavage sells. You got that one down.
What accent is that, please? Polish? 🙂
Romanian
@@woodworkingwithSkyler - Ah! Okay! And thank you for telling me! 😀 You do sound a lot like the Polish partner I once had but definitely even moreso like the Romanian violin teacher my Son had had ten years ago, as well as someone else whose YT channel I've been following. Those two women even have the same name: Alina 😀 Greetings from New Zealand! 😊
These videos make me so glad that I'm not a democrat. I have read studies that found only 2.7% of democrats watch " how to videos " like this.
:)
What an absolutely ignorant and unnecessary comment to add to a woodworking video. Making THIS political? Good grief. So according to you, Democrats are dumb? And I guess by extension, only Republicans are smart? Can you cite these (yes, according to you, MULTIPLE studies) that come to this conclusion? Of course not because they don't exist. And for your information, it should be "how-to" videos, not "how to videos" as you stated. So I guess even non-Democrats are stupid, eh? Leave your political BS out of things like this. Quit showing your ignorance and divisiveness. It may look good to your Dear Leader but it's unnecessary in real life. Get one.
So you can not use those bits with thinner boards? Don't like boxes with those fat sides 😖😖🤦♂🤦♂, that's just me (by the way : nice work)
Yes you can. Used same bit today with 3/8 in wood. The reason I used 3/4 is because I already had the bit setup from a different project and didn’t feel like changing the setup
Very nice.
Thank you