Shop all my router templates here: (US) www.diymontreal.com/product-category/router-templates/ (Canada & Int'l) www.etsy.com/ca/shop/diymontreal?section_id=44184041 For links to the products used in the video, click on "...more" to expand the text below the video, just under the title.
One of the things I love about your channel…you say “I’ve been doing it wrong” ….. long ago I gave up on “experts” saying “you’ve been doing ir wrong” . Keep up the great content and thanks for keeping it real
Thanks for making a "simplified" version for those of us without a bandsaw and/or a router table. Very nice to see how easy the adaptions are to create the same lovely trays.
Learning new things is Fun at 59 yrs . Most woodworking tools I haven't touched in 45 plus years since school . Many times I've turned to RUclips to learn how to fix or make something. Thanks for Sharing. From Indiana U S A
I love your oversized router base. Here's a way to make your router even more stable... save those outside scraps 1:44 and loosely tape them back together and place them outside of the tray on your table top. 4:06 Now your tray is twice the size and your router is twice as stable. Sending lots of love💖 from sunny 🌞 Arizona 🌵. Take care of yourselves 😷.
I almost did not watch this video, thinking that this would be a CNC "build," of which I do not have. Then I saw you with simple tools and CELEBRATED !!!!!! Thank you so much for making these beautiful projects with tools that us poor folk use! Keep 'em com'in!
It is a real pleasure to find a lady that can compete with any man when it comes to working with wood and making a video. I like the way you teach and it is so far above many of the videos about woodworking made by man or woman. I definitely hit the subscribe button.
My routers are my favorite tool in my shop. I just picked up a cordless Milwaukee for portable sign making and so far the battery life and power are better than I expected. My next batch of things are going to be some of these trays.
Two hundred years ago they would have used a bit called a center bit in a hand held brace to achieve what you did with the forstner bits. I have a set and they still work great if you're into hand woodworking. Love your channel. Keep it up.
I bought one of your templates about a year ago and just got around to using it. Used the acrylic sheet and the tape you suggested (best tape ever BTW) and got great results. Just ordered those sanding attachments. Thanks, again.
You could use the waste for raised garden beds or poultry bedding. I've been using jigs for thirty-plus years and you've taught me a great deal. God bless.
@DIYMontreal thanks for the lesson! I just got a free king router and free bits (about 30)...yes free! From a gentleman on fb marketplace...it looks like he only used 1-2 bits...he admitted he didn't understand it. Trying to start my own woodworking business repurposing items to keep them out of the landfill... I just discovered you today. Love the fact you are a competent woman and Canadian! I'm in Nova Scotia...most videos are guys from other countries...definitely subscribed.
Nice work! I make a lot of wooden cases for my tools, using a technique my father showed me some time ago, eh-hem, I'll just say the pedestal drill that he used, and we still use today is over 60 years old! All the recesses are made entirely by using a series of holes saws in the pedestal drill. There is on occasion the need of a chisel to do some things, but I generally form the tray to the tool, so there is sometimes extra complexity. Round-overs and edge features are done by old school hand planes, that I really enjoy using. But after watching this I may consider increasing the number of router bits I have on hand. :)
Nice work! It bears mentioning that certain woods are prone to tear out on the flush trimming of the bottom of the tray along the straight grain, especially if you are trying to remove to much material. Climb cutting or running the router CAREFULLY in the opposite direction will reduce potential tear out and damage to your tray.
I love your videos, your excellent at explaining your work!, and I appreciate you sharing your products that help with your jigs., not too many people are that helpful with their finds that help with their woodworking projects.
Nice job well explained, I always after sanding wash my wood with just a little plain clean water which makes the fibres stand up, then I sand again with about 200 grit sand paper, the fibres wont stand up again then I put my finish on, makes for a very smooth finish.
❤😊 Fabulous! Thank you for sharing this! I don't have most of these tools yet,...but it will definitely narrow down the tools I need for what projects i want to do. So many great tips and tricks with this. I just love it! I think maybe I'll like using my jigsaw better with the new blade. Thanks again!
It great technique with basic tools. I think you need dust collection on your router though 😊. One trick I use to reduce burning with flush trim bits is to apply one or two loops of painters tape onto the bearing, route, remove tape and route again. Last pass is very thin and totally burning free.
I really like this idea, maybe for a second cheap set, but it means you cant 1) use the point to create a small penetrating hole to center the bit from the other side 2) use the point to visually center your bit and 3) use the point to align into a punch hole
I am enjoying the videos and recently saw the one regarding glueing up boards to make a table top for example To manage the glue squeeze out I tape both edges with the green or blue masking tape Any glue that squeezes out is on the tape. No glue cant penetrate the fibre of the boards I remove the tape and scrap the joint lightly with a cabinet scraper which I make from an old hand saw Princess Auto ,Canadian Tire ,and Lee Valley are like candy stores to me Ron Finnen. Pender Island B C 0:15
5:20 you get a lot of burning if you don't move the bit because that bit isn't really designed to plunge. I can see in your description you have it listed as a plunge bit but the amazon page does not list it as a plunge bit. If you look at the bottom, you can see that there's about a 3/16 gap between the cutters. If you tried to just plunge straight down, the bit would bottom out on the yellow part that isn't designed to cut. It may work because it's angled and moving fast but what you would want to use is a spiral upcut or downcut bit. One is better for what you're doing here (flat bottom) but I don't remember which. Side note, if you're not already aware, you'll want to adjust your router speed for the size of the bit you're using. I'm not sure if those cheaper bits list it (I made the switch to whiteside about a year ago and they list the recommended speeds on the packaging). Using the right speed will help prevent burning and tearout.
Gracias me encantó tu video fue súper útil y sencillo después de buscar x mucho tiempo como hacer esto. Ya solo me falta el taladro de banco para utilizar mis brocas forstner 😅. Saludos 🇲🇽
Would a clear dust collection port get in your way? I love that the modern routers have lights to see what your doing. Im going to search to see if there is a way to retrofit my older Bosch router. One of the first routers i ever bought for myself is a heavy duty Porter and Cable. At the time it was "the" router to have in the shop. It is a beast and so that is why its in my router table. The Bosch I keep for benchtop work along with the Dewalt trim router. I would love a cordless, but these are is such great shape, there is no reason to stop using them. I baby my tools and keep them clean. I like to blow the motors out at least every few days during times of heavy use. I love watching how far your skill sets have grown. Way to go girl!
Beautiful work! I just had a look at the list of videos on your channel and have marked about 10 of them to watch later. I am very impressed with your woodworking skills! John Jensen from British Columbia. 👍😊. Subscribed
The quality of your router bits greatly contributes to how much, if any, burning you get. So I would suggest investing in higher quality bits, which will save you a lot of time later and allowing more time to produce product, not dust lol.
@DIYMontreal I have a suggestion for a new project...since you like to make these trays...how about a dust collection box? I forget what channel I saw it on unfortunately. The jist of it is this: Inside a large box create a sloped board that runs from the top of one edge to the bottom of the opposite board and silicone all inside seams. Drill a hole in the low end through the wall for your shop vac hose. Make a rabit edge for a hole-filled panel to sit on top. The holes need to be big enough for sawdust but not large chunks. Silicone the perimeter seam under the lid so the top remains flush. Perhaps counter sink some screws. Make the top melamine to match your workbench.
First time viewer of the channel. You did a great job of explaining everything. Nice to see it in use at the end. Great piece and great video, thank you!
Like you, I discovered the scrolling blades. Much better control of the cut in curved applications. I have also discovered that fleam-cut blades are far superior to stamped blades. They cost more, but save you much more than their cost in cleanup time...sanding, etc. I use Bosch blades exclusively...not sponsored by Bosch...because they cut rapidly, cleanly and can usually be found at most hardware emporiums. Whenever a sales associate tells me that their blade is better, I just walk away from my cart and leave the store.
Love this approach. Thank you for recognizing that everyone doesn't have all the equipment. Do you have thoughts to share if someone doesn't have a drill press?
I have enjoyed making those, except.............. the sanding has always been a deterrent. Hogging out the bulk of the material makes one heck of a mess but the sanding.............. Yikes! Inside sanding is just not my thing any more. I just don't have the patience. And at 80, probably not the time either.😁 Nice looking project........ as usual. JimE
I just recently discovered that same doubled sided tape. What an epiphany! 🤦♂️ Great video. Make yourself a vacuum box out of pegboard to stick your workpiece down on. It will save you a lot of mess.
@@DIYMontreal Yes. You just build a shallow box with a piece of pegboard for the top and a big enough hole in the side for a vacuum hose to attach. You do your sanding on the box with the vacuum running and a lot of the dust will be sucked up.
Tip to make a jigsaw easier to control; use two hands wherever possible. Cuts will be straighter horizontally and vertically. I learned this a while ago and now I too hate using them a little less!
Yeah, much easier. You can turn out Christmas or whatever gifts pretty quickly using this technique. Thanks! Now I have another use for my top bearing spiral flush trim bit.
WOW!!! That is SOOO cool... I'm a new kid with woodworking and this video told me I to can do some of this kind of work!!! I do have a question, if you don't mind... why do rotate the router clockwise (left to right) for the outer edges and clockwise for interior roundovers? Probably a silly question but I like understanding the why as well as the how :)... Thanks for the many great videos, Larry
I used that double sided tape, but had some trouble with the thickness of it causing a little bit of movement between the template and the workpiece. Switched over to using the double stick tape sold by Shaper (the ones that make the handheld CNC) and it's been fantastic. Just need to remember to use less cause it's so sticky.
Love these projects you may look into bits that have cutter edges on the bottom such as a dove tail bit then switch to the bull nosed cutter as you finish out to the inside edges this will give less burning and also give you the smooth rounded bottom inside edge you wand again router speed is essential and sading can be made much easier by using "Scotch Brite pads" goes by different name if other then 3m brand the lil drill sanders also come in a scotch Brite type called "Roloc" again "3 M brand name" they come in many ranges as material types too the aluminum Blue would work well for hardwood and between the pad and the relocation setup sanding wouldn't even be a chore anymore also switch to a 90° air powered die grinder and add an adjustable air valve to it with its much faster RPM it would make short work of cleaning up and smoothing the final product and greatly reduce time spent sanding I'm a master automotive mechanic 45+ yrs now and I e used the small 90° die grinders for gasket removal for nearly 4 decades now and they take a bit of practice to learn to have a light hand with but once you do youll never want to go back lol truly love your ideas and work if you wouldn't mind please send me a link to the tape and templates on my Facebook page Wade W McCollough Thank You Very Sincerely,Wade McCollough
Great video. You referenced a previous video that shows how to add the 12”x12” acrylic base to the router but I cannot find it on your channel. Can you please share a link?


Shop all my router templates here: (US) www.diymontreal.com/product-category/router-templates/
(Canada & Int'l) www.etsy.com/ca/shop/diymontreal?section_id=44184041
For links to the products used in the video, click on "...more" to expand the text below the video, just under the title.
One of the things I love about your channel…you say “I’ve been doing it wrong” ….. long ago I gave up on “experts” saying “you’ve been doing ir wrong” . Keep up the great content and thanks for keeping it real
Thanks for making a "simplified" version for those of us without a bandsaw and/or a router table. Very nice to see how easy the adaptions are to create the same lovely trays.
So glad you appreciated it!
You're such a gem; always came up with something simple and useful for us with a minimum amount of tools.
Learning new things is Fun at 59 yrs . Most woodworking tools I haven't touched in 45 plus years since school . Many times I've turned to RUclips to learn how to fix or make something. Thanks for Sharing. From Indiana U S A
I love your oversized router base. Here's a way to make your router even more stable... save those outside scraps 1:44 and loosely tape them back together and place them outside of the tray on your table top. 4:06 Now your tray is twice the size and your router is twice as stable. Sending lots of love💖 from sunny 🌞 Arizona 🌵. Take care of yourselves 😷.
Good tip! Don't feel it's necessary myself, but definitely good to have more support for someone starting out or less comfortable with routers.
@@DIYMontreal the best part is that it's free! 💖🌞🌵😷
Or even easier: carve the inside of the tray first, and only cut it out of the board when the inside is finished.
Great video, clearly explained and NO MUSIC!!! Thank you.........
I almost did not watch this video, thinking that this would be a CNC "build," of which I do not have. Then I saw you with simple tools and CELEBRATED !!!!!! Thank you so much for making these beautiful projects with tools that us poor folk use! Keep 'em com'in!
Oh never thought that might be the impression the video gave off. Glad you watched after all!
@@DIYMontrealI have a CNC and I also thought this would be related to CNCing trays
I really appreciate your humility at doing this a simpler way for the majority. A lot of learning points from this one thanks 🙏🏾
It is a real pleasure to find a lady that can compete with any man when it comes to working with wood and making a video. I like the way you teach and it is so far above many of the videos about woodworking made by man or woman. I definitely hit the subscribe button.
Shut up -Collin q
My routers are my favorite tool in my shop. I just picked up a cordless Milwaukee for portable sign making and so far the battery life and power are better than I expected. My next batch of things are going to be some of these trays.
Two hundred years ago they would have used a bit called a center bit in a hand held brace to achieve what you did with the forstner bits. I have a set and they still work great if you're into hand woodworking. Love your channel. Keep it up.
I bought one of your templates about a year ago and just got around to using it. Used the acrylic sheet and the tape you suggested (best tape ever BTW) and got great results. Just ordered those sanding attachments. Thanks, again.
Thank you algorithm. This is the content I wanna see!
Subscribing helps too 😉
Happy to hear the algorithm found you!
Just now watching🤓, and some times they really does work🖖
Happy to hear princess auto mentioned.. nice project. Definitely give me bunch of ideas . Thank you
You could use the waste for raised garden beds or poultry bedding. I've been using jigs for thirty-plus years and you've taught me a great deal. God bless.
I didn't realize how terrible my old template tape was until I tried the one that you recommended. Much better and cleaner! Thank you!
Glad I could help!
@DIYMontreal thanks for the lesson! I just got a free king router and free bits (about 30)...yes free! From a gentleman on fb marketplace...it looks like he only used 1-2 bits...he admitted he didn't understand it. Trying to start my own woodworking business repurposing items to keep them out of the landfill...
I just discovered you today. Love the fact you are a competent woman and Canadian! I'm in Nova Scotia...most videos are guys from other countries...definitely subscribed.
Nice work! I make a lot of wooden cases for my tools, using a technique my father showed me some time ago, eh-hem, I'll just say the pedestal drill that he used, and we still use today is over 60 years old! All the recesses are made entirely by using a series of holes saws in the pedestal drill. There is on occasion the need of a chisel to do some things, but I generally form the tray to the tool, so there is sometimes extra complexity. Round-overs and edge features are done by old school hand planes, that I really enjoy using. But after watching this I may consider increasing the number of router bits I have on hand. :)
Never seen trays like these before, excellent build and great edit, thanks.
Thanks!
Wow, had given up any hope of getting into the “tray business” until I saw your video. Thank you, I’m going to give it a go.
Awesome good luck!
Nice work! It bears mentioning that certain woods are prone to tear out on the flush trimming of the bottom of the tray along the straight grain, especially if you are trying to remove to much material. Climb cutting or running the router CAREFULLY in the opposite direction will reduce potential tear out and damage to your tray.
The forstner bit trick has saved me some time on router trays. Good tips!
I love your videos, your excellent at explaining your work!, and I appreciate you sharing your products that help with your jigs., not too many people are that helpful with their finds that help with their woodworking projects.
Amazing work, Marie! Beautiful tray!!! 😃
Stay safe there with your family! 🖖😊
Thank you! You too!
Definitely going to try these scrolling blades!
Thanks you for sharing! :)
I swear Forstner Bits are the most underrated! Love the work!
Nice job well explained, I always after sanding wash my wood with just a little plain clean water which makes the fibres stand up, then I sand again with about 200 grit sand paper, the fibres wont stand up again then I put my finish on, makes for a very smooth finish.
Great looking tray and I love this new technique. Thanks for the video.
I'm glad you liked it!
Great Job. Now, you have a new Fan from Brazil
❤😊 Fabulous! Thank you for sharing this! I don't have most of these tools yet,...but it will definitely narrow down the tools I need for what projects i want to do. So many great tips and tricks with this. I just love it! I think maybe I'll like using my jigsaw better with the new blade. Thanks again!
It great technique with basic tools. I think you need dust collection on your router though 😊. One trick I use to reduce burning with flush trim bits is to apply one or two loops of painters tape onto the bearing, route, remove tape and route again. Last pass is very thin and totally burning free.
Grind the point off your Forstner bits. It is not needed with a drill press and you will get flat-bottomed holes.
I really like this idea, maybe for a second cheap set, but it means you cant 1) use the point to create a small penetrating hole to center the bit from the other side 2) use the point to visually center your bit and 3) use the point to align into a punch hole
You make good points (pun not intended). Grind the points off only if you will be dedicating those bits for bowlmaking only.@@JustinShaedo
Great video! You have once again made a project look super simple! 🎉
Learning as I go! But it was so much easier (and faster) this way :)
I am enjoying the videos and recently saw the one regarding glueing up boards to make a table top for example To manage the glue squeeze out I tape both edges with the green or blue masking tape Any glue that squeezes out is on the tape. No glue cant
penetrate the fibre of the boards I remove the tape and scrap the joint lightly with a cabinet scraper which I make from an old hand saw
Princess Auto ,Canadian Tire ,and Lee Valley are like candy stores to me
Ron Finnen. Pender Island B C 0:15
5:20 you get a lot of burning if you don't move the bit because that bit isn't really designed to plunge. I can see in your description you have it listed as a plunge bit but the amazon page does not list it as a plunge bit. If you look at the bottom, you can see that there's about a 3/16 gap between the cutters. If you tried to just plunge straight down, the bit would bottom out on the yellow part that isn't designed to cut. It may work because it's angled and moving fast but what you would want to use is a spiral upcut or downcut bit. One is better for what you're doing here (flat bottom) but I don't remember which.
Side note, if you're not already aware, you'll want to adjust your router speed for the size of the bit you're using. I'm not sure if those cheaper bits list it (I made the switch to whiteside about a year ago and they list the recommended speeds on the packaging). Using the right speed will help prevent burning and tearout.
Gracias me encantó tu video fue súper útil y sencillo después de buscar x mucho tiempo como hacer esto. Ya solo me falta el taladro de banco para utilizar mis brocas forstner 😅. Saludos 🇲🇽
Great Technique Marie !!
Thank you!
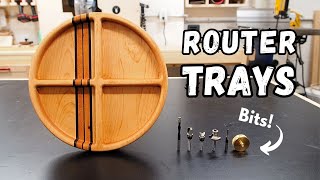
Very well presented and organized. I think these are better then cutting boards or charcuterie.
Would a clear dust collection port get in your way? I love that the modern routers have lights to see what your doing. Im going to search to see if there is a way to retrofit my older Bosch router. One of the first routers i ever bought for myself is a heavy duty Porter and Cable. At the time it was "the" router to have in the shop. It is a beast and so that is why its in my router table. The Bosch I keep for benchtop work along with the Dewalt trim router. I would love a cordless, but these are is such great shape, there is no reason to stop using them. I baby my tools and keep them clean. I like to blow the motors out at least every few days during times of heavy use. I love watching how far your skill sets have grown. Way to go girl!
Great job thanks for the the great ideas I'm getting into trying something like this in my woodshop
Great video and great tips thanks for sharing
Beautiful work! I just had a look at the list of videos on your channel and have marked about 10 of them to watch later. I am very impressed with your woodworking skills! John Jensen from British Columbia. 👍😊. Subscribed
The quality of your router bits greatly contributes to how much, if any, burning you get. So I would suggest investing in higher quality bits, which will save you a lot of time later and allowing more time to produce product, not dust lol.
Another great tutorial, thanks for sharing, you make, making things look so easy, thanks again.
Simply excellence in motion! Cheers from Down Under
Great video. Very accessible. Nice snack selection at the end. C'est Magnifique!.
Awesome work - and great tips!!
Thanks so much!
@DIYMontreal I have a suggestion for a new project...since you like to make these trays...how about a dust collection box? I forget what channel I saw it on unfortunately. The jist of it is this:
Inside a large box create a sloped board that runs from the top of one edge to the bottom of the opposite board and silicone all inside seams. Drill a hole in the low end through the wall for your shop vac hose. Make a rabit edge for a hole-filled panel to sit on top. The holes need to be big enough for sawdust but not large chunks. Silicone the perimeter seam under the lid so the top remains flush. Perhaps counter sink some screws. Make the top melamine to match your workbench.
First time viewer of the channel. You did a great job of explaining everything. Nice to see it in use at the end. Great piece and great video, thank you!
Awesome- I love it that you use basic tools.
Nice Video! By the way, we visited Montreal a few days ago! Nice city, but the traffic reminded me of our home Chicago!
Buen trabajo, y sabes que es lo mejor. Que es educativo y sin porno
Felicidades. Ya tienes un nuevo seguidor
Amazing skill, amazing video, easy to follow.. Thank you!!
So good
Bob
England
Great video and nice job
Turned out just as good!!
Great job, thank you.
Great tips thank you!! 🐝
Like you, I discovered the scrolling blades. Much better control of the cut in curved applications. I have also discovered that fleam-cut blades are far superior to stamped blades. They cost more, but save you much more than their cost in cleanup time...sanding, etc.
I use Bosch blades exclusively...not sponsored by Bosch...because they cut rapidly, cleanly and can usually be found at most hardware emporiums. Whenever a sales associate tells me that their blade is better, I just walk away from my cart and leave the store.
Still hate jigsaws... but better blades help :)
This is great! Also, love me some Princess Auto trips.
Gracias!!!!!! Saludos desde Uruguay
the scrolling blades are a nice addition to any jigsaw for woodworking.
Nicely done! Thanks for sharing.
Stay warm 😎
Cheers
Enjoying your tutorials!!
Love this video. Basic & to the point.
Good explanation of fine process. Thanks. God ess.
Love this approach. Thank you for recognizing that everyone doesn't have all the equipment.
Do you have thoughts to share if someone doesn't have a drill press?
I have enjoyed making those, except.............. the sanding has always been a deterrent. Hogging out the bulk of the material makes one heck of a mess but the sanding.............. Yikes! Inside sanding is just not my thing any more. I just don't have the patience. And at 80, probably not the time either.😁
Nice looking project........ as usual. JimE
Very beautiful videos excellent projects
Thanks!
I just recently discovered that same doubled sided tape. What an epiphany! 🤦♂️
Great video. Make yourself a vacuum box out of pegboard to stick your workpiece down on. It will save you a lot of mess.
Cool! The vacuum box is for dust/chip evacuation?
@@DIYMontreal Yes. You just build a shallow box with a piece of pegboard for the top and a big enough hole in the side for a vacuum hose to attach. You do your sanding on the box with the vacuum running and a lot of the dust will be sucked up.
Good vid; better idea for tray making. Well done!
Nice work..! 🙂
Great tips! I like the simple strategy used. Can you check your link for the acrylic sheet? It didn't work for me. Thanks! Dave
Canadian link: amzn.to/40czuXK
US link: amzn.to/3tOEkyv
@@DIYMontreal Thanks! That worked!
Worked for me as well! Thanks!
Tip to make a jigsaw easier to control; use two hands wherever possible. Cuts will be straighter horizontally and vertically.
I learned this a while ago and now I too hate using them a little less!
Great tips, Marie. For me, you could just fill the whole thing with M&M's (Smarties in Canada).
Bill
lol, go for it! And we have M&M's too ;)
Fun project!
Yeah, much easier. You can turn out Christmas or whatever gifts pretty quickly using this technique. Thanks! Now I have another use for my top bearing spiral flush trim bit.
Happy making!
@DIYMontreal you can get the mat material from the dollarama in Canada
damn fine tutorial. Good work on both the wood and the video!
Thanks!
Great info thank you
Love it!
WOW!!! That is SOOO cool... I'm a new kid with woodworking and this video told me I to can do some of this kind of work!!! I do have a question, if you don't mind... why do rotate the router clockwise (left to right) for the outer edges and clockwise for interior roundovers? Probably a silly question but I like understanding the why as well as the how :)... Thanks for the many great videos, Larry
I'm just starting out. Glad I found you. Please advise which videos are good for a beginner with few tools
I used that double sided tape, but had some trouble with the thickness of it causing a little bit of movement between the template and the workpiece. Switched over to using the double stick tape sold by Shaper (the ones that make the handheld CNC) and it's been fantastic. Just need to remember to use less cause it's so sticky.
very nice job
Love these projects you may look into bits that have cutter edges on the bottom such as a dove tail bit then switch to the bull nosed cutter as you finish out to the inside edges this will give less burning and also give you the smooth rounded bottom inside edge you wand again router speed is essential and sading can be made much easier by using "Scotch Brite pads" goes by different name if other then 3m brand the lil drill sanders also come in a scotch Brite type called "Roloc" again "3 M brand name" they come in many ranges as material types too the aluminum Blue would work well for hardwood and between the pad and the relocation setup sanding wouldn't even be a chore anymore also switch to a 90° air powered die grinder and add an adjustable air valve to it with its much faster RPM it would make short work of cleaning up and smoothing the final product and greatly reduce time spent sanding I'm a master automotive mechanic 45+ yrs now and I e used the small 90° die grinders for gasket removal for nearly 4 decades now and they take a bit of practice to learn to have a light hand with but once you do youll never want to go back lol truly love your ideas and work if you wouldn't mind please send me a link to the tape and templates on my Facebook page Wade W McCollough Thank You Very Sincerely,Wade McCollough
Thanks for the educational video. Lots of good ideas! Going to subscribe!
Awesome! Even I can do that!
Thankyou for the tips and video can we access these products in the UK Thankyou again
Yes, the templates are available for international shipping on my Etsy shop www.etsy.com/shop/diyMontreal
@@DIYMontreal thankyou
forstner bits are so much quicker than routing, and a lot less scary for making mistakes!
Agreed!
Great video. You referenced a previous video that shows how to add the 12”x12” acrylic base to the router but I cannot find it on your channel. Can you please share a link?
Sure thing, here it is ruclips.net/video/SqiOBUJi6f0/видео.html
Bonito trabajo.🇵🇪
Ah, a Google Chrome tray. 😉 Nice videos. I feel like I'm always too aggressive in removing waste. Hogging it out with a forstner bit is great.
Great tips. Any consideration to dust collection?
Excellent training video ty
Thanks. This was a great presentation. But did you use a bush when routing?
I loved! 💚💛🇧🇷🌻
Great video! Thank you…..
4:51 The router sounds just like the dentists drill when the video is sped up.