After viewing this video a few times, utilising the information provided, I was able to successfully change the leaking seals in the valve pinion body and the steering rack of my Nissan XTrail T30. After installation of the new seals, there are no leaks and the rack and pinion works like new. I therefore reiterate my comments made 3 weeks ago, that the the content and quality of this video is exceptional. I therefore recommend watching this video to anyone wishing to undertake a steering rack rebuild.
Good luck brother! The only thing I didn't include in the video was the punch mark on the big nut that holds onto the steering rack. Drill it out. It grips onto the thread.
Great video very thorough. I am thinking of doing this to a junkyard rack I bought to replace my worn one currently in my car. The issue I am having seems to be on both racks but on the shaft or rod (not sure all the terminology) that has threads on both sides for each inner tie rod when they are being tightened or looseneds the rod in the rock itself rotates slightly with it.. maybe about a 1/4" or less. It takes a great deal of force to do this but I am not sure if this can shift more easily when the vehicle is on the ground. Or is this even a big concern? Ultimately I am trying to figure out why the car is unstable at high speeds and seems to have a lot of steering play going over bumpy roads. Feels as if the wheels are kind of wandering a very small amount. Most of the suspension components around the rack are all new such as control arms, swaybar links, shock absorber etc. The rack is probably the only thing unchanged in the front end that has bearings and the sway bar itself.
I don't think anything from your tie rod to rack should ever rotate. It should only be side to side motion. That's very dangerous. I'd look into it if I ever you.
Thanks, I am rebuilding my 05 Altima rack. Didn’t know you had to protect the two sides seals with electrical tape. 😮 I just put mines in and they leaked on both ends 😅. But I’ll try again. With this method. And hopefully this time I won’t leak. Did yours leaked when you tried your rack?
Mine is good. You don't want to damage the seal, the slightly cut on the seal on the inside or outside will allow fluid to leak out during high pressure.
So I just tore apart one of my ps racks and the shaft with the teeth on it is slightly bent. Tried looking up what others have done and haven't found much, would you suggest continuing the rebuild or just buying all new rack?
If it's bent, I don't think it's good anymore. You need a solid straight shift to slide smoothly. There's a seal in there that's centered. It's not made to move with a bend shaft.
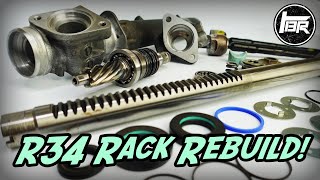
Hey I’m doing my rebuild now and using your video as reference I have 2 little o-rings left they’re both the same size do you know where they go? (12:16 they’re next to the 4 blue Teflon seals)
As Tony said it prevents it backing out. If you applied the force to remove it, say to do this procedure again, as long as you don't go overkill like he didn't, the tube should easily reform without damaged to the tube.
Look at the locknut for a CV axle. You hammer an indention into the axle thread but when you remove it down the road to replace the axle or other parts the nut reforms and doesn't damage the threads at all. It's best to always replace the axle nut but I've seen them reused and re-punched with no damage to the axle or nut.


After viewing this video a few times, utilising the information provided, I was able to successfully change the leaking seals in the valve pinion body and the steering rack of my Nissan XTrail T30. After installation of the new seals, there are no leaks and the rack and pinion works like new. I therefore reiterate my comments made 3 weeks ago, that the the content and quality of this video is exceptional. I therefore recommend watching this video to anyone wishing to undertake a steering rack rebuild.
Thank you for the kind words!
Only video where sides of seals are emphazised. Very good job. Nice.
🤟🤟
Very descriptive video, makes me more confident tackling mine now
Good luck brother! The only thing I didn't include in the video was the punch mark on the big nut that holds onto the steering rack. Drill it out. It grips onto the thread.
@@240Tony thank you for the heads up brother!
Good description with enough detail to tackle the job. Thanks.
Thanks bro. Good luck
wicked video, found this from your zilvia build thread, and im very impressed. i am going to have to do this soon. thanks for this one
Anytime Brother! 👊👊
Thankyou very much bro👍,,, your tutorial has helped me alot❤ keep it coming brother✌️
Your welcome! Glad it helped! 😁
Exceptional Video with good quality relevant details. After viewing this video, I am well informed to undertake this job myself.
Ty! Good luck bro
learn so much from watching your channel bro keep it up!
🙏🙏
Great work. That turned out mint 👌
Thanks!
Dental floss, what a great trick thanks!
It works!
Thanks again for very useful video.
Anytime bro!
Great video very thorough. I am thinking of doing this to a junkyard rack I bought to replace my worn one currently in my car. The issue I am having seems to be on both racks but on the shaft or rod (not sure all the terminology) that has threads on both sides for each inner tie rod when they are being tightened or looseneds the rod in the rock itself rotates slightly with it.. maybe about a 1/4" or less. It takes a great deal of force to do this but I am not sure if this can shift more easily when the vehicle is on the ground. Or is this even a big concern? Ultimately I am trying to figure out why the car is unstable at high speeds and seems to have a lot of steering play going over bumpy roads. Feels as if the wheels are kind of wandering a very small amount. Most of the suspension components around the rack are all new such as control arms, swaybar links, shock absorber etc. The rack is probably the only thing unchanged in the front end that has bearings and the sway bar itself.
I don't think anything from your tie rod to rack should ever rotate. It should only be side to side motion. That's very dangerous. I'd look into it if I ever you.
Great tutorial! Thanks
Thank you!
Thanks, I am rebuilding my 05 Altima rack. Didn’t know you had to protect the two sides seals with electrical tape. 😮 I just put mines in and they leaked on both ends 😅. But I’ll try again. With this method. And hopefully this time I won’t leak. Did yours leaked when you tried your rack?
Mine is good. You don't want to damage the seal, the slightly cut on the seal on the inside or outside will allow fluid to leak out during high pressure.
Hey great video! Do you know if the parts are the same for a RHD rack?
Sorry, I don't!
Good job brahda🤙🏽🤙🏽
Thanks bro!
So I just tore apart one of my ps racks and the shaft with the teeth on it is slightly bent. Tried looking up what others have done and haven't found much, would you suggest continuing the rebuild or just buying all new rack?
If it's bent, I don't think it's good anymore. You need a solid straight shift to slide smoothly. There's a seal in there that's centered. It's not made to move with a bend shaft.
Hey I’m doing my rebuild now and using your video as reference I have 2 little o-rings left they’re both the same size do you know where they go? (12:16 they’re next to the 4 blue Teflon seals)
Man, I don't remember to be honest. I'm sorry!
As long as you replaced all the ones you can see. Should be good.
On the rack lines into the cylinder housing.
What was the reason for this repair? What was it doing that you had to rebuild it?
They tend to leak at the seals over time. This rack is well over 30 years old. I figured I'd rebuild it while I'm doing my car
@@240Tony Thanks for the prompt answer.
How do I properly remove the punch lock from the rack so I don’t ruin the thread on the nut?
I actually don't know haha. I forced mine off. Someone told me you could drilled it out. But I'm not 100% sure.
Have you used this rack since this rebuild?
Not yet bro. Haven't got the car up and running yet. We'll know in a few months.
are the S13 seals the same as a R32 skyline gtst/GTR?
Sorry but I don't know the answer
👍👍
Why did you make a hole with a drill on the side that has the thread?
I used a punch and punch it. This pushes the metal down so that the end cap doesn't ever turn back out.
As Tony said it prevents it backing out. If you applied the force to remove it, say to do this procedure again, as long as you don't go overkill like he didn't, the tube should easily reform without damaged to the tube.
Look at the locknut for a CV axle. You hammer an indention into the axle thread but when you remove it down the road to replace the axle or other parts the nut reforms and doesn't damage the threads at all. It's best to always replace the axle nut but I've seen them reused and re-punched with no damage to the axle or nut.