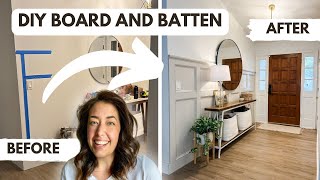
DIY Board and Batten - how to style textured walls

HTML-код
- Опубликовано: 29 сен 2024
- See below for products used
*EDIT : Audio is messed up at 8:35 - music uploaded loader than in my project. In the clip i just talk about caulking all the seams and using the 1x2 for the top ledge trim & applying Killz Primer before painting in order to hide any of the natural wood grain. Any questions - leave them below!*
We decided to tackle this project over a three day weekend. We went a little over but it was well worth it! Completely transformed our living room from a bunch of blank boring walls to an intricate inviting space. Leave a comment if you have any questions. Here is a list of the materials that we used:
4ftx8ft revolution ply plywood (wall paneling)
1x8x10ft whitewood board (baseboards and top trim)
1x3x6ft whitewood board (vertical and horizontal battens)
1x2x8ft whitewood board (top ledge trim)
Brad nailer kit:
amzn.to/2X2gwUv
Liquid Nails:
amzn.to/3hGUvCM
Stud Finder:
amzn.to/2OWYleD
Miter saw:
amzn.to/32ZI8xe
As an Amazon Associate I earn from qualifying purchases


Great job! Who cares what the pros say, as LONG AS YOU LOVE IT, that’s ALL that matters. I think it looks great. One question, can you see the grain in the wood you used to cover the texture? I need to cover paneling, so I think that think cover would work very well. Perhaps even use pancaking again, but the shiny flat side, or back, just sanding it a little first. Cutting it so your boards hid the seams is genius!
Kudos to you girls! You worked hard and it’s beautiful 👍👍❌♥️
Great job ladies....my only 2 cents I'll add is safety glasses
and shoes
OMG GORGEOUS
FYI when doing your base boards cut your seams at a 22% angle when butting them up together makes for a better fit but will done ladies. Also if your just painting the entire thing go with MDF no wood knots if your not wanting them to show.
Thanks! Definitely could have made the corners way nicer and now I know better! We decided against mdf but I have heard it is way easier to paint.
This is good inspiration for what I want to do with my house. I wanted to smooth out my walls but it looks like the panelling is sooo much easier and still looks sharp. Thanks for posting!
I wish I could come to your house so you could teach me how to use tools and how cut wood. 😣 You Guys did amazing! You don’t live in tennessee by chance?
Haha no in Florida actually! It’s really not that hard! Just start small, watch some RUclips videos and practice a bit - you can definitely do it. I never really touched a power tool before a couple of years ago. My first project was building my 6ft privacy fence around my entire yard. Just doing that repetitive project taught me so much
Great sharing..just wondering why did you have to use ply wood? Isn't the dry wall good enough to where the batten installed?
You could put it directly onto the wall but since my walls are textured the battens wouldn’t be exactly flush. The wood underneath just gives it a much more clean and smooth look
How many inches from the ground does the top of the board and batten start?
Start? we made the baseboards 8 inches if that’s what you mean. The entire board and batten is 6ft tall
@@devitodoes3269 ya thats what i meant just how tall it is, trying to figure out where to start mine (how high on the wal to go) thank you =)
You’re welcome. It’s all personal preference - we have super high ceilings in this room so we thought having the board and batten taller than us would work with the space
And slow down when you're panning. It made me a bit dizzy! But other than that, great work! Im inspired now.
I love love love how it turned out! Some of these other comments are just hateful, some DIYers don’t have the darn time to become an “expert” when holding a full time job. It’s your home and you make it feasible for other DIYers to brave their own at-home projects, not everyone can afford “expert” labor costs. Great job, you rock!
Thank you!!! I love this comment. The best way to learn is to just do it! You can always make improvements later but either way, it’s your house and no one else has to live with it 😂
The best, most informative vid on this application I’ve seen so far! Thanks!
I know this is an old video but thought I’d still ask. If I wanted the entire wall smooth (above your beautiful job) can I add the plywood every where on walls or would that look odd? You’re the only video I’ve seen where the entire room is done, just what I wanted to see. Thanks, great video! Oh and do you think how you did this, do you like it or do your eyes go to the textured areas? Thanks again
Great job! Looks fantastic and I love your style!
Nice Sierra! Looks nice. Sound is messed up at some points but you know that.
Nice job dealing with the haters in the comment section too xD. It's only gonna get worse so I like that you just say you're trying your best and not claiming to be an expert asshole.
LOL thanks Stefan!! Brian and I talk about the RUclips haters all the time, it’s so odd. But hey they are giving me a view so it’s all good
I'm jealous of all the tools you have.
I thought the same thing! I don't even have half of the tools, it's motivating to go purchase some! haha.
Loves it. I just don't think I personally like the white on white. At the very least I think the wainscoting should be a different texture like a semi-gloss to contrast the white on the walls. But you did an amazing job loves it!
we thought about painting it a different color!
Amazing job! :) Thanks for sharing!
This is beautiful. I have a concrete wall with textured plaster on top. Would I be able to do something like this? I think you said you put the wood up first because it was textured wall. But I missed how you secured it to the wall? Did you glue it and nail it? Because I wouldn’t be able to nail it into the concrete. Would I be able to do something like this do you think? Maybe if I just glue the wood to the concrete?
Yep glue and nails! I think glue alone would probably work fine for you. Not entirely sure about the textured plaster, haven’t worked with that. You can test a panel with just glue and see how it holds. Otherwise you might want to secure it with screws and then fill the holes with wood filler
Looks great... but... why didn't you just keep the plywood the same size. I get that you're hiding the seams with vertical trim but why not keep the plywood the same size and only trim off the end (if needed) to line up with the measurement for your vertical trim and then still lay your vertical trim over the sheet; it would be 1) a whole lot less work, 2) you would have a whole lot less plywood seams and thus less movement over time to worry about and 3) It would give you the exact same look... other than that... I think you did a great job and it came out great; if you love it, that's all that matters.
Super impressed Sierra. Nice work. LIke the lip on top for photos. Hollow out the back of one of the panels for a secret access mini bar :)
haha that is a great idea!
Love it great job.👏
Really lovely wainscotting.
You guys killed it! Looks amazing
Why didnt you keep the plywood in its original size? Why rip them down to those smaller strips just to put them back up? Just curious.
I wanted to line up the seams with the vertical trim so that the seams would be hidden
turned out great! just a small reminder that it's important to sand down the wood filler (for those who are rookies at this, like i was on my last project), which i'm more that sure you did. Again, looks great!
That looks really good!!
excellent!
Thank you for doing the before and after in the same lighting! Looks great.
I have a similar wall with 3/4 length panelling. I need ideas of how to "style" this wall, how to add some paintings etc. after the wall is built so that it does not too busy...
Definitely still need to style this wall more! Thinking of adding shelves
Beautifully done hunnies!
LOVE!
Lemme guess, you're a CL? LOL
Nice work
What a remarkable difference !
How much did the material cost
I'm interior designer from Egypt in fact I loved ur work really great
What dimensions did used ?
Where did you get that A frame console table from? (to the right of the door)😍 I know this was years ago but if you can remember lol.🫶
Really nice i want to do this myself question i cant figured out after you glue the boards on the wall i have texture also the top board how does it not lean in the top since its has some wood behind the bottom of it ?
The backer board goes all the way up....the top trim lines up with the top of the backing wood, or very close so that it doesn’t lean backwards
@@devitodoes3269 makes sense now thank you help out alot then the top lip covers it all thank you looks great
What not to do. Flip flops are a dead give away.
They are my house shoes 🙂
Great video but Please if you do another, mute out the sounds of your tools. Can barely hear your voiceover plus we just don't need to hear the loud tools to get the point.
Love it Sierra, you did a great job.
Looks gorgeous. Btw your center table is so pretty.
Thank you! That was a splurge from Anthropologie
Can you come and do my living room??
Yes I’ll give you the family discount! 😂
how tall are your ceilings in the living room
We have vaulted ceilings so they go from 10 ft to probably close to 20ft
This renter friendly??
Definitely not - the glue would definitely heavily damage the drywall if you had to remove
@DeVito Does can I not use glue, just nails?
Impressive work
Another video of how not to do it...cheap common board, expansion and contraction will make that look like garbage in no time,, no 45 degree angles, didn't sand the boards, wood grains will show. The battens meeting the door trim is horrible. True board and batten is seamless. This is what gives DIY a bad wrap.
It’s been a year and I just re-painted it and it looks better than ever. I’ve gotten nothing but compliments on it from people who have seen it in person and no one would nit pick the imperfections unless they were an expert woodworker themselves. I have learned a lot since this project and would definitely do things differently - especially mitering the corners. But I am proud of this project and I love having it in my home. DIY is for everyone and it’s how a lot of people learn any carpentry at all. I think you should think twice before gatekeeping and discouraging others.
@@devitodoes3269 Let me start this off by saying, I commend you for your efforts and to the untrained eye, I'm sure it looks good. My point is this is a "How To" video and others see this. That being said, it bugs me when people such as yourself post these cute videos on "How To" do something when you don't even understand the basics of carpentry. Now others are inspired to duplicate your errors and they think they have a new skill set. Carpentry is not difficult, but it does require some planning, trial and error, practice and a very keen eye for attention to detail. Once you can identify the errors in your work and perhaps point them out in a video for other to learn, then don't post a "How To" video until you actually know "How To" do it properly. RUclips is littered with this garbage and I reply to videos such as yours so others do not make the same mistakes. I am not a gatekeeper. I rather encourage people to look before they leap when videos like this make it seem so simple. Yes, this is a simple DIY project, but carpentry is all about the details. Good luck with your future projects. Learn from your mistakes, improve, and understand what you didn't do well then post a video. Have a happy new year!
If everyone waited until they were perfect then no one would ever try anything. Can I ask what the harm is in doing something imperfectly? I mean truly who cares. This is my house and my project and it looks great and others can do it too if they feel like it. A lot better things out there to be bugged by. Thanks for your input anyway & happy new year
@@patrickp8861 this woman has put time and energy into beautifying her home. She never claimed to be a pro. She’s posted content on HER channel for a positive reason. Your comments are mean and rude. The classy way she responded to your hateful negative spirit only demonstrates her integrity and shines a light on your ugliness.
There’s also a way to give constructive criticism ya know 🧐
"How to cover textured walls with textured wood". You made a lot more work for yourself by not using MDF. Stylistically/aesthetically, I think the wainscotting is way too high up on the wall, but not nearly as bad as the TV you mounted on the ceiling.
Wainscoting is 6 ft tall. Pretty standard for a large room and it’s all about personal preference. We like it. And I chose not to use mdf just because I wasn’t sure if I wanted all those chemicals hanging out in the main part of the house
The mdf is ugly and cheap looking too