RICHARDSON CAPS 3D Puff Embroidery Challenge at 1000 SPM - Mission Impossible?

HTML-код
- Опубликовано: 5 фев 2025
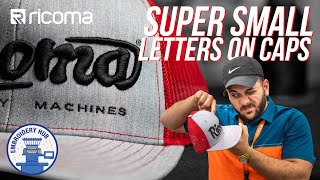
- This week we have a special how-to embroidery episode, where our embroidery guru Willy takes on the challenge of embroidering 3d puff on Richardson 112 caps. He's diving deep into the tips, tricks, machine adjustments and even the digitizing advice that will help you embroider these difficult caps the right way. In this video, Willy will also show us how to lower the cap driver.
It’s no secret that Richardson 112 caps are the most challenging caps to embroider on. That's why this week we are showing you the entire process of embroidering 3d puff on these “impossible” caps-from digitizing to cleaning up the final product.
With the correct technique, tools and expertise, you can successfully run these caps at 1000 spm on Ricoma machines. As seen in this episode, Willy uses our CHT2 4-head model to simultaneously embroider four clean, crisp caps at maximum speed.
How?
First, Willy adjusts the cap driver to rest as low as possible-without touching the sewing arm-in order to leave enough room for the thicker, structured Richardson cap. Leaving your cap driver too high will result in excess bounce when the machine begins embroidering. All you’ll need are your handy Allen keys and plyers to make this easy adjustment.
Next, Willy raises the presser foot on each needle used for your 3d puff project. Because 3d puff is raised and comes higher off the thick cap, raising the presser foot is essential to clean embroidery.
When the adjustments are made and you’re ready to begin, we suggest always running a test on stabilizer on ALL heads of your machine. This is not only to test the digitizing, but to make sure each head is properly calibrated and threaded and will help avoid ruining any blank caps.
Once the design is checked, it’s time to hoop your caps-easily the most important part of cap embroidery. Richardson caps do not require any stabilizer, so focus on hooping your cap as tight as you possibly can. If you leave any extra slack, your caps will move out of place and/or your design will lose registration.
When your embroidery is done, take a heat gun (or a lighter if you don’t have one), burn off any excess thread, and help the foam and thread settle together to look as neat as possible.
If you follow this tutorial and practice these tips and techniques, you’ll be embroidering 3d puff on Richardson 112 caps at max speed with your Ricoma machine in no time!
------------------------------------------------------------------------------------------------
Facebook Embroidery & Custom Apparel Mastery Group:
/ embroiderymastery
Join the Ricoma newsletter for educational blogs, videos, and live webinars: info.ricoma.co...
To learn more schedule a virtual demo today:
ricoma.com/US/...
Get our latest Ricoma embroidery youtube videos sent straight to your Facebook Messenger!:
manychat.com/l...
To learn more about our embroidery machines, visit our website:
www.ricoma.com


![Blox Fruits Dragon Rework Update [Full Stream]](http://i.ytimg.com/vi/EqDAp8udhm0/mqdefault.jpg)


This is a very good video. Excellent detail. I can't believe he stitched it at 1000 spm. Awesome.
Willy is the man! I was lucky enough to meet him. Very knowledgeable man. Ricoma is very lucky to have him. Awesome video man.
Couldn't agree more! Thanks for watching!
There are so many gems in these videos. I've been studying for the past 2 months 🧵
Let's go! We are so excited to see everything you've accomplished!
I have a Redline 1501 and this all worked for me as well on the structured Yupoong hats I had to do! Thank you for this amazing tutorial! It allowed me to finish and order and to feel more confident about making changes to my machine!
Thanks! When you upgrade, you know who to go to with the best expert knowledge! 😉
😞😞😞
Just when I thought that all of my puff was perfect... I see this!! never too late to learn new tricks!! Need to adjust!!! good video
Glad it was helpful!
Your doing an incredible jobs with these videos!
Thank you very much!
Beautiful. Inspiring! Thank you for all the tips.
Thanks for watching!
😲 important tutorial thanks so much for sharing I appreciate it
You are so welcome, glad it helped!
EXCELLENT VIDEO!! Thank you Willy!!!!
You are very welcome!
I have been embroidering for over 20 years and did not know you can adjust the hoop on the embroidery machine, thanks for the help.
You are so welcome!
Now you know 😂
Se la rifo el vato! More detailed videos like this please 👍
You got it
excellent video on how to set up for Richardson. I've done them in the past, but I hate them because of needle breakage off and on. I'm going to experiment and see if I can get them to run better! Thanks!
Glad you liked it!
I purchased a Highland 1501C and have been having so many issues trying to embroider Richardson 112's. I thought it was my machine but after watching this video i will make these adjustments and see if it helps. I wanted a Ricoma but couldnt get it financed unfortunately. I do see alot of similarities with the Ricoma and my Highland machine. I wonder if the cap drivers are interchangeable? I like how your cap drivers latch. Thanks for this video and when i bring my second embroidery machine in, its definitely going to be a Ricoma!
Thanks for your feedback! We hope to see you a customer one day!
Awesome tips, great video !
Glad you liked it!
I like using a little steam iron I iron the brime then after I hit the steam on the puff
Great feedback! Thanks for sharing.
willy!! You are the man!! great stuff.. this is the way your videos should be done... We need to marry Chroma + the machine process !! I am thinking that if the presser foot and needle adjustments will be a good idea for non Richardson caps....
Trying different techniques is the way to find the one that works for you!
Whoa! Great video and tips sir. I have 3 questions for you:
1. What did you set your X&Y parameters to?
2. Can those parameters apply for the TC1501?
3. What were those pins that you used to hold down the puff foam?
hi there! make sure to contact our tech support to find all the answers to your technical questions: ricoma.com/us/tech-support
Great video! Looking forward to the detailed digitizing video!! You showed the proper height of the presser foot for the cap and the puff, which key do you use to set it back to normal?
Your pressor foot should be adjusted back to how it was OR you can adjust it based on the thickness of the garment you'll be doing in the future, but you'll have to adjust it back the same way you did if you followed the steps in this video, with your screw driver and Allen keys.
This caps looks so goddamn nice. This would be the quality to aim for
That's Ricoma quality for you!
Wow! Great information thank you1
Glad it was helpful!
Where has this information been?.. I’ve been wondering why my 3D puff hasn’t been looking as good as everyone else’s . Really seems like a process to do 3D puff on Ricoma. On the cap driver, does it have to be reset after you’re finished or is it fine to leave it after the adjustments have been made? And I assume to change the footer back to how it was before doing 3D puff, correct?
You don't have to reset the cap driver. That should stay. But your pressor foot should be adjusted back to how it was OR you can adjust it based on the thickness of the garment you'll be doing in the future. That's why this pressor foot adjustment is applicable to many different types of garments!
Hmm interesting, so adjust the presser foot based on the thickness of the garment
Yep that’s precisely what it’s there for!
Let us know if you have any more questions!
Ricoma Embroidery Machines, I most definitely will, I can’t wait to try out 3D puff again after learning this
great video again! you guys know your stuff
Thanks for watching!
Love these videos! How do we ensure that the cap is not being pressed down too much? I'm having like a "puckering" or bubble effect where when embroidering onto a structured cap even without 3d puff. I end up having a bulge or bubble in places where there are gaps in stitching like in between letters.
Hi Andre! Thank you so much for the kind words. How's the tension?
Great video Willy - can you let me know how long it took you to embroidery one single hat with this design? I'm interested in created similar types of designs and it would be really helpful to know approximately how long it takes for the Ricoma to spit one out?
We ran this design at 1000 spm. So depending on your design and the amount of stitches it has you can calculate how long it will take. a 7,000 stitch design would take 7 minutes and so on.
@@ricomatv thanks guys - do you know the stitch count for the design in the video for the sake of estimation? I'm a design vet but an embroidery noob - thinking of making the leap and just needing a firmer grasp of the logistics
@@ricomatv ah i see that its 19000 stitches, thanks guys!
Thank you very much. I am sewing again. One question What speed do you do on hats?
If set up properly can do 800-1000SPM no problem
Wow this video was much needed. After all the adjustments are made will that affect non3D projects? Will I have to reverse the adjustments?
Yes! since 3d puff is thicker and higher the presser foot works best when lifted. for regular caps and flats you'll want to put the presser foot back.
The Otto Caps are also tough to embroider 3D puff
3d puff can be tricky! We have plenty more videos to help with 3d puff on our channel. you can find them here: ruclips.net/video/kW4LfHoHh10/видео.html
Great Video!!!
Glad you enjoyed it!
Amazing, Thank you for your video.. i'm sorry what's the name of the program you use? Thank you.
All our Ricoma machines come with out proprietary digitizing software, Chroma! That's what Willies is using in this video. To learn more about this software click here-> ricoma.com/US/software/chroma
Is the presser foot adjustable on the EM-1010? I keep breaking needles on hats.
Hi there, I suggest calling our support team to help you make any adjustments! ricoma.com/us/tech-support
Hi, I have a 20 needle machine. How do I adjust the needles I need to embroider on a Richardson 112? Thank you
Hi Annalise, thanks so much for watching. You shouldn't have to adjust the needles to embroider on caps. 75/11 or 80/12 needles should be fine. Hope this helps!
Hey willy, do you recommend those changes be permanent on the presser foot + Cap driver height adjustment?
ahh I just read the answer from Henry !!!
Thanks for watching Willy!
My Ricoma TCs lowest needle position is 172. Do I still use the smallest allen at this needle setting?
Pressor foot is lowered by using a screwdriver. Cap driver is lowered by using the same Allen key as shown
Question, on the digitizing part, did you remove the underlay stitching like zigzag, parallel etc.?
Yes you need to remove the underlay on caps
@@ricomatv thank you. 🙏🙏🙏
Tried this, not as friendly on my GS1501. There is a nut instead of a screw on the underside (bummer). Helped get closer, but that nut does not let me get very close.
I'm gad it was helpful to get a little closer at least!
Some great tips!
Glad it was helpful!
Awesome content
Thank you!
I'm subscribing. You the man😭
Welcome to the Ricoma TV family!
Why did he use two different size Allen keys when adjusting the 1st and 2nd needle ? Shouldn’t the setting/depth be same for all needles? How did he rotate the cap driver right and left to get to the screws? I have recently purchased an EM 1010 and I think I need to raise needle/pressure foot to allow for thicker materials. Thank you
Hi to get help with making thesis adjustments, contact our tech support here -> ricoma.com/US/tech-support
Because the larger Allen key is for the 3D puff needle because the pressor foot needs to be higher to accommodate the foam.
I press down to lower it and when i tighten the screws i see it raise up. i try to put pressure on it holding it down but as i tighten it raises....
Hi Lindsay, please send an email to service@ricoma.com and someone will be happy to help!
Do the Richardson caps create the same problem for an Em-1010? Or is the issue specific to the CHT2-1504?
Hello Richardson caps don't create a problem for our machines, this video just helps for smoother easier embroidery using our machines.
Do you still lower the presser foot even if you're not doing 3d puff on a Richardson 112 ?
Yes we recommend to lower the presser foot when working on these caps! For help, click here to talk to support-> ricoma.com/us/contact-us
Is there embroidery that can be made applicable to the Australian market, like animals, landmarks, Aussie slang, or local tourism areas and sport? Can floppy hats be embroidered too?
Yes! You can embroider on floppy hats and all other types of hates. You just need to right hoop.
after you change the height of the presser foot, what would you do if you want to put it back to how it was before you changed it? if that makes sense....
Hi! You change it the same way you changed it before!
@ yeah of course but how would you determine the height that the machine came as is what im asking.
Hey man, I’m using two layers of 3mm foam for my caps but they still seem less puffy than your caps with one layer. Tried decreasing pull comp, less thread tension, rethreading the machine etc. any advice?
Need to make sure to remove your underlay. Also there are several 3D puff videos with digitizing on our channel, make sure you’re following those tips
@@ricomatv yea I got those, I only digitize with a run stitch in the middle, unfortunately still don’t get the results I’m looking for :(
So after lowering the presser foot and finishing the hats. Should you raise it back up to normal hight to work on flats? Or is this hight on for flats also? 2:56
This is mostly for caps overall!
Can you tell me what digitizing software you used in this video?
We used our proprietary Chroma digitizing software, which come free with all our machines. You can learn more about it here-> ricoma.com/us/software/chroma
Can you lower presser foot for flats
Unless you have raised the foot, there is no reason to lower it for flats. The way they came from factory is set at 1.5 mm distance from the needle plate. Go to your needle button and hit the 178 degree button. The needle will go down and you can slide the front cover over and loosens the presser foot screw and adjust the height. Put the 1.5mm allen key under the foot to know the correct height.ruclips.net/video/8Gp2HdBB0Uw/видео.htmlsi=pgCiMkA5xxQf2twt
very well l make caps in guatemela thank you
That's great! Which machine did you use? (:
Can all this information work for an Em 10-10?
Yes, you can!
I need some custom 112 hats for my business, do I have to buy the hats myself for you to customize them.
Send an email to henry@garmeo.com and he can help you out
So this is the same process for a EM-1010?
Same process!
hey I am planning to get a machine soon and I was wondering if you can you do this on a EM 10-10 ,or does it.have a different proceeds and
steps for that style of machine?
The concept is the same. You need to adjust the cap driver and to adjust pressor foot height depending on the thickness of the garment you're embroidering. The steps are not exactly the same because the location of the screws etc. are located differently, but the concept applies across the board to all machines, and definitely applies to the EM-1010 as well
@@henryma1734 perfect! exactly what I need to know thanks again.:)
Thanks for watching!
Going to look at my 15 needle...see if this is similar
Let us know if it works for you!
@@ricomatv Will do.
Thanks a lot 🙏
Much support from 🇿🇦 ZAR- Durban Rich Future by DSK Clothing ❤
Thank you for watching!
So only if you're doing puffs? Or just Richardson hats?
Concept applies to all structured caps. Richardson caps just happened to be one of the tougher structured caps. So if you master this on Richardson’s you can do the other structured caps using same concept.
Concept applies to all structured caps. Richardson caps just happened to be one of the tougher structured caps. So if you master this on Richardson’s you can do the other structured caps using same concept.
Nice! Thank you!
Our pleasure!
Is there anyone giving information like this for the brother PR series?
Probably not. We have the most comprehensive content in the industry!
@@ricomatv dang you guys have great content thanks for the reply
Thanks
Of course! Thanks for watching (:
how thick is ur foam
Hi Christian! You can use 3mm depending on how thick you want the design you can double it up.
Where can I get this file? I don't see it in the description.
Hi Justin, this file is not available, however you can check out some designs through Hoopmade ----> hoopmade.com/
Wow, adjusting these feet is easier than on my longarm quilting machine - same exact process but don't have to take the whole front of the machine off.
The “front” of the machine is just a metal plate in this case, not that hard and just slides off. Plus you’re comparing a multi-needle machine to a single needle one.
Yes, that's exactly my point. To adjust my longarm needle bar or hopping foot I have to remove two tablets (the A-1 control and the Intelliquilter) and then the faceplate. It's a PITA. The Ricoma adjustment is obviously much less trouble.@@ricomatv
Was wondering if I could purchase the puff buffalo embroidery file from you. Would love to sew this out for customers here on the reservation
Hi Kasey! You can find some designs through Hoopmade --->hoopmade.com/designs
Great video. I found it is better to adjust with a hoop on the driver. The hoop sits lower.
Thanks for watching
Love the hat how can buy it?
you can download the design in the description and create it yourself!
@@ricomatv can you email it DON'T see it ezdontstopprinting@gmail.com
How can i order some hats with my embroidery on it.
Go to Garmeo.com you can order some stuff there
where can i get that file
Hi! We don't have this file available at the moment, but please check out Hoopmade for similar designs! ----> hoopmade.com/
Please also share the file so we can test if we get the same results :-)
you can download the file in the description below
can you give me the design file
Hi Mark! You can check out Hoopmade for some cool files! ---> hoopmade.com/.
i love it
Thanks!
How much does that machine cost?
Hi! Please submit a request with the team so they can help! ---> info.ricoma.com/Presidents-Day-Sale-2023/embroidery/s
steam the hats will help with needle breaking
Thanks for the suggestion!
Willy hermano, Where did you go??????????????????????????? No one explains like you do!
Hi! Willy was amazing and we wish him the best :)
Can someone helpdigitizing my logo?
Hi there, thanks so much for watching. This is a great question to ask in our Facebook support group, Embroidery and Custom Apparel Mastery. This group is meant for all lovers of embroidery with lots of resources and more members discussing topics and helping each other out and learning about Ricoma machines and other brands! We recommend you join this group as we'd love to have you! facebook.com/groups/embroiderymastery
I can help
This man is a f.cking genious
Thanks for watching!
If you buy a real machine you dont have to do this crap. I'm glad i cancel my Ricoma order.
Hi, we are so sorry that you feel that way, please let us know if you need anything.