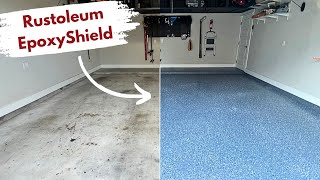
DIY Garage Floor Epoxy Coating

HTML-код
- Опубликовано: 13 июн 2022
- SUBSCRIBE: bit.ly/2LQB1gi
↓↓↓↓ LINKS BELOW!
Our garage/workshop floor was NASTY! I have always wanted to do an epoxy floor coating in the garage but honestly, it seemed way to hard to pull off. I finally decided to make it happen and I am excited to say that it worked! I saved a TON of money doing it myself and we couldn't be happier with the result. We use this area multiple times a day and every time I step foot on it I am thankful I did it. At the end of it all, it only cost me about $800 compared to nearly the $4,000 it would have cost me to have it done. Below, I have a detailed RUclips video, all the steps I followed to complete the project and the links to everything I used. I am certain that you can do it!
__________
Details on this project below.👇🏼 For more projects, check out fieldtreasuredesigns.com/blog/
Check out my podcast, The Field Treasure Show! spoti.fi/2CSJgFF
FOLLOW ME on Social Media:
Instagram - / fieldtreasuredesigns
Facebook - / fieldtreasuredesigns
Twitter - / fieldtreasure
Pinterest - / fieldtreasuredesigns
__________
GET PROJECT PLANS HERE: bit.ly/3LFs0nm
(As an Amazon Associate Influencer, I earn from qualifying purchases.)
///// FLOOR COATINGS
Rust-Oleum EpoxyShield Garage Floor Coating (2 Car Kit) Grey: amzn.to/3NEQkYe
Rust-Oleum EpoxyShield Garage Floor Coating (1 Car Kit) Grey: amzn.to/3QaROeA
Rust-Oleum EpoxyShield Clear High Gloss Coating: low.es/3MDK16b
-
///// CONCRETE CLEANING & PREP LINKS
Goof Off Concrete Cleaner & Oil Stain Remover: thd.co/3NDuaps
Zep Citrus Degreaser: amzn.to/3zpMIW1
Drylok Concrete Etch & Cleaner: thd.co/3O43oGG
Quikcrete Quick-setting Concrete Mix: thd.co/3aLhuOF
-
///// TOOL LINKS
Ryobi Pressure Washer: amzn.to/3wUcmiN (Amazon)
Ryobi Pressure Washer: thd.co/3N4D6Ur (Home Depot)
Quickie Outdoor Scrub Brush: amzn.to/39cWCj6
Brush Extension Pole (Don't be cheap as I broke one): amzn.to/3MDZaUO
Drill Attachment Paint/Epoxy Mixer: amzn.to/3MFNalM
Roller Brush Frame: amzn.to/3aDoltv
3/8 Nap Roller Brush: amzn.to/3xBCxw9
Angle Paint Brush: amzn.to/3QeYDfi
Paint Tray: amzn.to/3mvLUqO
Ryobi Blower: amzn.to/3O4fMWZ
Painters Tape: amzn.to/3H6iR6R
Margin Trowel: amzn.to/3O8VsUG
Bosch Random Orbit Sander: amzn.to/3MBg8U6
Mechanix Work Gloves: amzn.to/3NG4Wqz
///// PHOTO, VIDEO & EDITING I USE
Canon 80D: amzn.to/2VHhzab
Canon 10-18mm Wide Lens: amzn.to/2CNa2zh
Canon 50mm Lens: amzn.to/2COnzq8
Canon 18-55mm Lens: amzn.to/2Mepfwo
Rode Video Mic: amzn.to/2VIBR2V
iPhone X: amzn.to/2VrCf64
Tripod: amzn.to/2R9Qq12
iPhone Tripod Mount: amzn.to/2SzTd09
iMac: amzn.to/2VrstAJ
Recording to iPhone: amzn.to/2C0UshJ
Recording to computer: amzn.to/2BWNH0j
----STEPS!
STEP 1 Remove all the stuff on the floor and take low hanging items off the walls.
STEP 2 Pressure Wash the entire floor. Let dry.
STEP 3 Apply stain remover to tough spots or entire surface (I recommend entire surface). Then pressure wash.
STEP 4 Apply degreaser to tough pots or entire surface (again, I recommend entire surface). Then pressure wash.
STEP 5 Apply concrete etching to entire surface. Then pressure wash.
STEP 6 Let dry for 48 hours.
STEP 6.1 Use this time to apply quikrete, great stuff to fill gaps, caulk, and primer/paint to all areas of need.
STEP 6.2 Sand quikrete areas and finalize all paint touchups.
STEP 7 Mix the epoxy base and prepare to paint and spread decorative chips.
STEP 8 Paint the floor. (Have a buddy go behind and spread the decorative chips right away.) Allow to dry 24 hours.
STEP 9 Go across the entire floor with a brush or hand in a work glove to loosen any decorative chips that did not dry flat.
STEP 10 Blow out all the loose decorative chips. (There weren't many.)
STEP 11 Prep the clear coating mix by mixing in the non skid sand. (Highly recommend using some measure of it).
STEP 12 Paint the floor. Allow to dry 24 hours.
STEP 13 ENJOY!
Thanks for watching my DIY Garage Floor Epoxy Coating Video. Video and check out my project plans here: bit.ly/3LFs0nm  Хобби
Хобби


You can always identify a super nice guy by how he responds to critics. Great video and obviously a great guy.
Appreciate that, thank you. RUclips comments can be extremely bad so I try to as positive as I can.
Glad I watched, as I am a 61 year old who thinks he's still 30. After watching, I think I am going to have a professional do it. It exhausted me just watching all your hard work. Good job, though.
I’m glad it was able to help in that way. Sometimes that is just the way to go - pay to have it done. Thanks for taking time to comment and I hope your floor turns out great.
Hey man, pretty good job. For the etching process, the concrete should have been sprayed down first, and you should have used a watering can for the etch. I didn't catch the etch you used, but please make sure that you don't need to neutralize the concrete after etching as some of the muriatic acid etch products out there still require the acid to be neutralized with a baking soda / water wash down. For spalling, cracks, and imperfections you can use a 2 part - 100% epoxy filler. It's just going to adhere better is all. If you have expansion joints, consider using a fast-set polyurea. Spartan Epoxies offers a tubeset called JS100. For the flakes, I would do whats called a full flake broadcast. Essentially gives you an entire layer of paint chips for superior durability and drop protection. If you do a full flake broadcast, then 2 coats of urethane topcoat is needed. 1 coat for whats called the grout coat, and a final urethane topcoat as your finishing coat.
You should have used a 120 grit screen (drywall screen) to hit the flakes the day after application, and not gloves.
For the application, because you used a epoxy paint, and not a true epoxy, I suppose you may have had to apply that way. However, I would have poured the epoxy across the back wall, then used a flat squeegee to spread, then wore what's called gunite spikes. Which enable you to walk thru the wet epoxy. Then you can go on the floor and backroll using a high quality phenolic core roller cover, double weaved nap of course. Once you back roll you can broadcast your flakes, and since you have spikes you can walk around to broadcast them. We broadcast up in the air, typically using the term feeding the chickens as this is exactly what it looks like. This technique helps to ensure an even look. I think you did good for what you were doing there and thanks for helping the industry. It's important that people understand how important it is to apply a coating over their garage floor. These days you can apply all sorts of really awesome types of epoxy. Great job man. I hope this is received well and I promise I'm not trying to be negative. Just trying to help anyone here.
Dude, thanks for being so constructive and helpful in your comments. And thank for watching my video. You are one that I wish I could have learned from before I started my project. I appreciate you taking time to add to the knowledge base here and helping my viewers in such a positive and informative way. Thanks again and I hope many benefit from it!
Very good information here! I’ll definitely save your recommendations when I’m ready to do my garage, hope you can make a video as well to show us how is done!
@@diywithandrew No problem at all. Sometimes just jumping in and doing is the best way to learn. You can try to plan, and plot but at the end of the day when you get the experience and actually do a floor you learn so much as you know. Good luck man and great job again.
Thanks for the all the details, especially tools and items that you used for this project.
You bet! Thanks for watching and the cool comment.
Excellent, well thought out plan and execution. I've thought many times of doing this myself. I appreciate you sharing your experience. Thanks!
Thanks for the kind comment and I wish you the best on your project if you do it!
One of the greatest videos on the subject. Will mirror most people's experience. Thanks!!!
Thanks for watching and the kind words. Really appreciate that!
No grinding, and greatest video? Lol.
Hi , new subbie here!!!! Words cannot express how grateful I am for finding your channel!!! My husband and I recently purchased our home and our garage needed a touch up, badly! Well, with your step by step instructions WE DID IT!!! Our first DIY…EVER!! THANK YOU SO MUCH!!!!
Hi there. Thank you for taking time to share a really nice comment. I’m so glad to hear that my video helped! Great job on taking the chance to do a project yourself! I’m glad it turned out good.
I have a salon and the prices these floor ppl are calling out is giving me a headache so I’m going to try this. I’m so excited 😆
@@PreciousOlocha Please do it!!!!! It was not difficult at all. Exactly, when we were quoted thousands of dollars, this frugal woman said oh no, I’ll do it myself 🤣🤣😂😂
Ain't gonna last. No grinding? Lol. Don't listen to this clown. Definitely a failed floor in the near future.
Nice job, it's one of those projects that you really feel good about when it's done.
Thank you! Totally agree! Very glad I took the time to do it.
Boss, I am getting ready to do my floor, n I wanted to compliment you on your video, you explained how to do this perfectly, GREAT and in great detail. Thank you again, n your wife was a great help.
Thank you for watching and taking time to share a nice comment. I really appreciate that and good luck on your project as well!
Awesome. I was so intimidated by the process. But, you made this tangible for me. thank you and the wife for this.
Thanks for watching and let me know! Honestly I was mega intimidated by it as well but we just took it step by step and it turned out great. Best of luck to you on your project. If you end up doing it send me finished pics in instagram! @fieldtreasuredesigns
Thank you, getting ready for similar project!
Awesome! Let me know how it goes.
Great video. Well done. You did a great job showing all the important details and also what you might have done different if a next time. Thanks for taking the time to show us.
Thanks for taking time to watch and to write a nice comment. I really appreciate that!
Very nice!
Nice attention to detail (edges)! I’m waiting for it to warm up to do my patio
Thanks! Appreciate you taking time to post a positive comment. Awesome about your patio! I hope it turns out great.
Great video thank you for making everything clear!
Just a question; how long did every step take to dry?
Thanks for watching and the comment. I tried to wait at least 24hrs between coats and I think I waited 48 before doing the clear coat. Hope that helps!
This was a great DIY video, exceptionally helpful!!! Pretty much followed Andrew’s process (and incorporated some insightful comments - e.g., using 18” roller). Some other lessons learned:
1. New Rustoleum package has the dual pouches - makes it easier to mix together.
2. Epoxy is thick - roller was a little tricky and sometimes was splotchy, sometimes hard to get a consistent coat.
3. After the epoxy dried, had some dark spot discoloration in a few areas. Not sure why, not a major issue but only negative thing (note, it is not from the concrete).
4. Absolutely need 2 clear coat packages for a 2.5 car garage. It was was very hard to see where you may have missed (as he says) and missed a couple of areas after it dried. So I sucked it up and bought another one to complete the job.
Thank you again, Andrew!
Wow, Eric! So glad to hear that my video helped and that you got more help from comments. Thanks for sharing and adding to the knowledge here!
Great job on the garage floor. Looks amazing!
Thank you! I appreciate that
one of the best videos I have seen on this project. thx for posting!
Really glad to hear it. Thanks for letting me know and for watching. Really appreciate it.
Great video, very helpful. Feel like I can tackle it myself. Love your organized garage ….. nothing out of place.
Thank you very much!
Great Job Brother Ur Wife is a great helper too brother you guys doing so amazing floors
Thank you!
Wow you are a perfectionist. I enjoyed watching your work. Thank you for sharing!!!
Haha! That is so true. Thanks for taking time to watch and comment
Thank you, I was just about to do my garage floor and was unsure about how much I would need. Didn't think about fixing the small pot marks in the floor.
Thanks for watching and letting me know! Hope your floor turns out great.
I am working on my garage and contemplating whether to apply epoxy. I appreciate your willingness to share your experience; it provides valuable assistance. Thank you.
I'm glad to hear that my video helped. Thank you for taking time to watch and let me know! I wish you the best on your project!
@@diywithandrew My project got perfect, thanks to your guidance. I am not sure I can post a picture here; that'd be awesome.
Looks fantastic!
Thanks!
Great job! Thanks for sharing. Can’t wait to do mine …………. 👍🏻
Thanks! Hope yours turns out great.
This one heck of a video and a heck of a project ! It definitely inspired me to get the ball rolling this summer ! Thank you so much!
Man thanks so much for your awesome comment. Pumped it helped you! Thanks and good luck on your project!
Can you just add the poxy over your already painted floor? Just asking e
Thanks for sharing your experiences and process. I've had this product in the closet for 6 months and haven't brought myself to apply it yet. You gave some great tips & ideas. I know feel prepared to give it a try.
Thanks for taking the time to comment Tim. I understand having material ready for a project and not feeling ready to tackle it. I hope your project turns out great! Send me a picture of the finished result!
Awesome Thank you going to do mine as well, How soon did you apply the clear coat on the epoxy ?
Awesome! I waited 24hrs before the clear coat application. We live in a dry climate so if not dry I’d maybe wait 48hrs.
Nice job man! Thanks for the tips! On my list!
Thanks man! Really appreciate the comment. Good addition to the list! I think you will be glad you did it!
WOW, l have to do my garage floor! Thanks for sharing & uploading. Nice!
Awesome! Glad to hear it!
Great job, it looks awesome! 😃👍🏻👊🏻
Thanks, Fred! I appreciate you watching and taking time to write a positive comment.
Good job mate, done well! Thanks for sharing those learning opportunities.
Thanks for taking time to watch and to write a comment. You are what makes RUclips great!
Omg!! Great job 👏🏾 🎉 I’m impressed! The before and after is amazing. This gives me hope for my first home project on my floors 😁 Thanks for sharing. And ignore the trolls.
Thanks for watching and the kind words. I wish you the best on your project.
appreicated, I just did it and follow your guide , great video 👍🏼
Right on! Thanks for watching.
You did a good job man, and I learn from it!
Thank you!
Thanks!
Great video. Very informative. About to start my project and have the kit and all the materials. What clear epoxy did you use?
Thanks! Here’s exactly what I used on Amazon. (I get a small commission if you use my link): amzn.to/3UWUAbW
Very helpful Thanks!😊
Glad it was helpful!
Been cleaning my automotive shop's floors for year and honestly I think Dawn Soap, water, scrub broom, rinse and squeegee are the best floor cleaners.
Thanks for sharing
I enjoyed your video. My wife and I are having a company do ours. It's 6.50 a square. It's looking good. I hope all of ours last a long time. We surely enjoyed your video.
Thanks for taking time to write a nice comment. I hope yours turns out great and you get many years of enjoyment out of it. We are coming up on a year with ours and it still looks like I just did it and am so glad I did. Take care!
Nice job and thanks for the video!
Thanks for watching and the comment! 🙏🏼
Great job, Richard
Thx!
Great. I’ll do it on my garage floor. Where did you buy the stuffs? Thanks.
Awesome! If you check the notes below the video and click "more", you will see all my notes with links to what I purchased as well as the steps. Hope that helps!
Great video. I’m following your video to do my garage. But totally off topic, where did you purchase the shoe rack? Or was it a diy shoe rack?
Thanks! Oh man the shoe rack is awesome. Amazon. I actually just added a second we like it so much. Here’s the link: amzn.to/3WjuvSP
You sound like Rener Gracie! Thanks for the awesome video!
Haha! I wish I was good at Jiu Jitsu.
This is so much work and I applaud you/anyone who’s successfully completed this!! However, I am leaning toward patching/repairing the concrete cracks and buying a giant floor mat instead. I have two small boys and just don’t think I’ll have the uninterrupted time to do this right way and I don’t have the extra money to pay a professional.
Thanks for the kind words and yea I totally get that. Sometimes you have to pick the right solution to meet your time and money.
Did you have any wood in the floor to go over? Like against the wall or anywhere for expansion absorption? If so, any thoughts on epoxying over it?
I didn't have any wood. I have no idea how that would react. Sorry I am not more helpful there. Maybe the comments might have some advice?
great job
Thanks!
Detailed presentation ! very Beautifull !
Thanks for watching and for taking time to write a nice comment.
Looks great, good tips too. Here's my tip - use a 15 litre paint scuttle instead of roller trays (with disposable liners) 👍🏻
Thanks! And great tip. Appreciate you sharing.
thanks for sharing, can I just have the paint center mix or I have to manually do them ? sj
Thanks for watching! That’s a good question. I’m sure if you take them in and ask that they would mix for you.
Thanks for the video. I don’t see the link you have mentioned to use for tool required for the job.
You bet! Here are all the links: (they are in the show notes if you scroll down but I'm pasting them here as well) ///// FLOOR COATINGS
Rust-Oleum EpoxyShield Garage Floor Coating (2 Car Kit) Grey: amzn.to/3NEQkYe
Rust-Oleum EpoxyShield Garage Floor Coating (1 Car Kit) Grey: amzn.to/3QaROeA
Rust-Oleum EpoxyShield Clear High Gloss Coating: low.es/3MDK16b
-
///// CONCRETE CLEANING & PREP LINKS
Goof Off Concrete Cleaner & Oil Stain Remover: thd.co/3NDuaps
Zep Citrus Degreaser: amzn.to/3zpMIW1
Drylok Concrete Etch & Cleaner: thd.co/3O43oGG
Quikcrete Quick-setting Concrete Mix: thd.co/3aLhuOF
-
///// TOOL LINKS
Ryobi Pressure Washer: amzn.to/3wUcmiN (Amazon)
Ryobi Pressure Washer: thd.co/3N4D6Ur (Home Depot)
Quickie Outdoor Scrub Brush: amzn.to/39cWCj6
Brush Extension Pole (Don't be cheap as I broke one): amzn.to/3MDZaUO
Drill Attachment Paint/Epoxy Mixer: amzn.to/3MFNalM
Roller Brush Frame: amzn.to/3aDoltv
3/8 Nap Roller Brush: amzn.to/3xBCxw9
Angle Paint Brush: amzn.to/3QeYDfi
Paint Tray: amzn.to/3mvLUqO
Ryobi Blower: amzn.to/3O4fMWZ
Painters Tape: amzn.to/3H6iR6R
Margin Trowel: amzn.to/3O8VsUG
Bosch Random Orbit Sander: amzn.to/3MBg8U6
Mechanix Work Gloves: amzn.to/3NG4Wqz
Than you for this video! We are going to do our garage ourselves.
Thanks for watching and the nice comment. I hope you’re project is a success and you can enjoy it for many years. We are so glad we did it and even more than a year later it’s still awesome!
Thanks for this great video! It helped me get the right materials for my garage. Also, as an Argentinian myself, I just noticed you using the Argentine AFA shorts haha. You should be updating with the 3 stars now lol.
Thanks for watching and the nice comment! I am so glad you noticed the shorts! I have been to Argentina 5 times and have MANY dear friends there. Yes. I need new shorts with 3 stars! Viva Argentina! I also just launched a video reviewing the floor after 15 months of use if you want to check it out! It launches tomorrow. ruclips.net/video/1RouFd5c4YU/видео.html
Great video. With lots of tips/ideas. But here is a question. From what I have seen . .there are 2 types of Epoxy kits. One is water based. And the other is solvent or oil based. Is any one better than the other? Not only in terms of looks/final finish .. but also in terms of applying (the effort or difficultiness) of the epoxy itself? Please advise
Thanks so much for watching and commenting. Honestly, I don't know. All I can speak to is what I used. See the links below my video in the show notes for the exact product I used. I also just launched a video reviewing the floor after 15 months of use if you want to check it out! It launches tomorrow. ruclips.net/video/1RouFd5c4YU/видео.html
So nice. Love it
Thx!
Thanks so much for this video! I am excited to embark on this project. One question - when you were applying Etch and Cleaner and you said you did it in sections, did you wash off each section before moving on to the next? For example, did you etch, scrub, wash, etch, scrub, wash, etc.? I ask because it seems like that would get the surrounding areas wet which I can't imagine is ideal. Any tips? Thanks!
Thanks for watching and your kind words! Yes great question. I applied etching and cleaner in sections but I performed the rinse all at one time when I was done scrubbing each section. Hope that helps!
Looks good
Thank you!
Thanks for the video, very helpful.
Thanks for watching and the nice comment!
Great video congratulation, may I ask you… what product you apply in the last phase, like a transparent coat ( you use a bag ), thank you
Thank you very much! I really appreciate you taking the time to watch and comment. I will link to the exact product I used after my comments. Two tips: 1) buy more than you think you need just in case. 2) don’t apply where there will be direct sunlight. It will turn yellow. I hope that helps! Here’s the link: amzn.to/3SgDCTf
May have the garage done like this nice
Right on! We love it.
about to tackle this next month. Thanks for the tips and the process. Any update on your floor now? did it start to fade?
Awesome! I think you’ll be happy with it. The only thing is if there is any spot exposed to the sun, don’t put the clear coat in that area. Otherwise it’s awesome. I’ve got an update video that talks about how it’s lasted if you want to check it out on my channel.
Great job, well done 👍🏽
Thank you!!
Very nice, looks great 👍 👌
Thanks!
Great video! Always good content
P.S. long live the Newcastle sign!
Thanks my brother. Haha! She’s still hangin with me.
Congratulations looks great. I wish I could epoxy my garage but it's too much work cleaning it a patching it up. Your garage looks bigger great job for both of you. Now you can enjoy it.👍👍
Thanks. I appreciate you watching and taking time to comment.
I am going to give it a shot , question was it your first time? Thanks for the video
Awesome! I hope it goes well. Yes it was my very first shot at it. Thanks for watching.
Great work. Looks nice !!! I love how you have arranged your show rack at some elevation. How did you do that and where did you buy it?
Thanks! I bought the shoe racks on Amazon here: amzn.to/3Lc8zo9 //For the price you can't beat them and they have held up really well. I then bought 1/2" copper pipe straps to mount the bars to a piece of scrap wood I mounted to the wall. You can find those on Amazon here: amzn.to/3Nm4yjG
@@diywithandrew Thanks a ton. such a great idea to lift it up so that the floor can be easily cleaned :)
@@sameeranandtorvi Absolutely! We love it.
Thanks a lot to help
Definitely do after couple of days
Thanks again
Really appreciate!
Awesome. Glad to hear it!
Great, informative video. You kept it real, the good and the bad. After getting some quotes, you may have given me just the push I needed.
Thank you for the comment and for watching! I hope your project goes well!
I would apply one coat of paint without the chips first, on the second coat with chips. Good job. 👏👏👏
That’s a great idea. And thanks for watching and the nice comment
Great video. I'm a professional installer and one thing that's not discussed enough with epoxy coatings is the fact they are not UV stable. You can expect yellowing in areas that receive consistent exposure to natural light. Polyaspartic is the best coating material for a garage floor, but unfortunately it's not a DIY product due to its very short pot life.
Stefan, I’m honored you would take the time to watch and comment. You are absolutely right in that I didn’t mention anything about UV rays (didn’t even think about that fact) and didn’t learn that detail until about 3 weeks after filming and seeing the effect of the UV rays from the sun. After about a month I noticed yellowing on about 10” of area from driveway to garage floor where I applied the coating “outside” the garage doors where they rest on the concrete. There is now a yellowish strip along that section when viewed from outside. Obviously, had I known that would happen, I would have shared that in my video. It’s not the worst thing to have happened but it certainly doesn’t look great. Haha. Also good to know about polyaspartic. I will say that after almost a year, it is performed really well and I’m glad I did it. Thanks again for stopping by and sharing your knowledge with our community here.
Thank you for your input.
Hey Stefan where can a dIYer get polyaspartic?
What about Sherwin Williams?
@@johnfeather5405 there are several online stores that sell it, but not SW. Just be prepared, it’s quite expensive. It will generally cost between $1-$1.5/sqft just for the Polyaspartic.
@@totalgaragesolutionsllc6043 roughly $500-800 for the entire garage, definitely worth it though. Would it be weird to coat like 75% of it in regular epoxy then the exposed portions with polyaspartic or is the consistency just too different?
Looks great!👍
Thank you!!
Nice work. No acid etching or diamond buffing in your prep? This greatly helps the epoxy to bind.
Thanks. I did etching. Twice actually. It’s been a year and holding up great!
Great video. Looks great. I'm sure I have more thoughts on this but first impression - awesome video. Better than the videos these companies put out for their own products.
Thank you, Amos! I appreciate you taking time to let me know.
Got my sub with the Clemson hoodie! Clemson native here! Also, great video! Thanks for the info!
Haha! That’s awesome dude! Thanks and for joining. Welcome aboard!
Very nice job thanks for sharing
Thank you!
Beautiful
Thank you!!
Nice work looks good
Thanks!
Good job dude looks good!!!!!
Thanks!
What do you suggest for a more less slippery flooring. I did the epoxy about 10 years ago and dropped my motorcycle because the floor is slippery.
You definitely want to mix the sand in with the final clear coat. I mixed in all of it and I think that helps a lot.
Any tips on maintenance on these floors? Or anything to get stains off the epoxy? Or should you add more clear coat after a year or 2?
After almost a year we have had no problems with the floor. We clean it with a rag and a little cleaning solution in water in spots that have gotten a little dirty. So far that’s all it’s needed. Depending on the wear I assume another clear coat (after cleaning and drying) probably wouldn’t be bad. But that’s about the extent of my knowledge. Maybe another viewer can comment if they have more knowledge. Hope that helps.
I have a small storage out back but it has wood floors. Would I need to put concrete before doing this or can I put new wood boards? Ty!
I do not know how epoxy adheres to any other surface other than concrete. I might do more research before attempting but if you do it I’d like to hear how it turned out!
Super Nice and friendly video, well explained step by step DIYer, what not to forget and even sharing your mistakes. Thank you, liked and subsc
Wow thanks for the kind comment. I really appreciate that and thanks for watching. Welcome aboard!
@@diywithandrew 👍😀
What brand clearcoat are you using? I like the simplicity of that
Here’s the link: (I earn a small commission if you use my affiliate link) amzn.to/4akabqX
That was a nice video. I did my 2.5 car garage 10 years ago with the same Rustoleum product, in a very similar way, and it turned out great and has lasted forever. Looks today like it did when I installed it. Here are a few additional tips to consider, and a few commenters probably already mentioned these. Use a wider roller, I used a 12” or 15”, can’t remember which (but not a 9”). Use a disposable liner in your roller pan with a piece of cardboard underneath to catch drips. I painted the entire perimeter all at once, taped off along the walls, and quickly. Then you can roll the surface quickly as well with the larger roller. Not important if the edges start to dry and won’t hold the color flecks. The prep is absolutely the most important step in all of this. Filling the cracks and holes, I used an epoxy based concrete filler and then sanded smooth with an angle grinder. An orbital sander with the right grit is also great for this. Degreasing and cleaning is critical, but the most important is getting a good acid etch. What they give you in the kit is useless. I used muriatic acid (pool chemical), which is 31.45% (20 degree Baume) HCl (hydrochloride acid) that was available at the big box stores. It’s cheap too. Note: you HAVE TO USE EYE AND SKIN PROTECTION and be very careful with this stuff, but if you follow the precautions, use appropriate PPE, you will safely achieve a far superior acid etch in only one application. I diluted the acid with 2 parts water to 1 part acid, always pour the acid into the water (and never vice versa). Make sure you have good ventilation too. It makes for a really deep etch. Then you have to rinse really well due to the amount of fine solids removed by the etching. Pressure washer is great for this. A wet/dry vac also helpful. Of course if you have a diamond grit floor sander instead, that would be wonderful and less hazardous. 😊 I have another floor job coming up soon for a 3 car in our new house. Can’t wait!
Eric, thanks for your kind comment and for all of this great advice for our viewers. I think many will benefit from your wisdom and experience.
Hello. Should I do an acid etch or use a sander, or do I have to use both?Thanks In advance.
To s of spades, by all means use a floor sander with a diamond grit pad, if you have one. That is how professional installers do it, for a variety of reasons, one being the floor stays dry and they can put on the first coat immediately after vacuuming off the dust. The acid etch works just as well if you don’t have the floor sander, but the disadvantages are apparent.
@@90ERS Thanks for contributing, Eric! Appreciate you taking time to help educate our viewers.
My pro used the epoxy filler after the initial sanding for rough areas and cracks, then sanded it after it was dried overnight. Then applied the first epoxy coat. That gets rid of the rough imperfections you had in your floor.
How long did you let the epoxy dry before applying the clear coat
I think it was 48hrs
We’re there any oil spots that didn’t lift completely when degreasing? I have a few that I’ve scrubbed 4x and there is still water pulling off these spots, even after etching. Do I hit it again?
Yes absolutely. That's what I was worried about and why I did so many cleaning passes. However after a point I just went for it and I can say after a year and a half I haven't seen any issues with anything coming back up through. The only areas where there is any issues is the small areas up front where the sun hits the clear coat. It yellowed a little but thats IT. Hope that helps!
Thank you for the video. I was considering doing an epoxy floor for my garages. Not any more. I'll just clean the concrete and forget it. Plus, I have heard that the epoxy will chip. That could be from improper prep work. You won't likely have that happen. Thanks again!
Glad it helped you come to a decision. Thanks for watching and the comment.
Hey mate, great work. How much did it cost for the job?
Honestly I can’t remember exactly. I’m pretty sure it was at least under $700 total for all the cleaning products, the epoxy products and tools!
How long did you let the epoxy and clear coat dry before putting your stuff back in
I think I waited 48hrs to be safe!
I just wanted to ask If I need to do the first 3 steps if I have a new house and almost no stain garage? Would I still need Concrete etching or Do I start off with the power wash.
I am not a professional but if it was me and there was no staining, I would simply apply the concrete etching and then after a good power washing and 24/48 hours of dry time, apply the epoxy. You could also ask your builder if they have an opinion based on how they poured and finished the concrete.
I did my garage today and I would like to know when can I apply the sealer? Thank you
I am pretty sure I waited 48hrs. Hope yours turns out awesome!
Love it! Regards from Sweden.
Thank you, Lars! Great to hear from someone across the world. We have good friends who live in Sweden as well!
nice work. thanks for straightening me out. i was about to do this myself...now i will just pay a guy.
Glad it was helpful. Hope yours turns out awesome.
Impressive & great job..... I guess I missed the part when you mentioned how long it took you to finish the project... So how long again?
Really appreciate you watching and the kind words. I think all in all it took me about a week. I made sure to allow lots of dry and cure time between cleaning and coatings. Hope that helps!
Iam doing on this july 4 weekend.Thank you
Awesome!!! I hope it goes well. We still love ours over a year later.
I'm curious as I'm about to embark on this journey myself. A year later now how has it held up?
I just launched a video reviewing the floor after 15 months of use if you want to check it out! It launches tomorrow. ruclips.net/video/1RouFd5c4YU/видео.html
Great tutorial.
Thanks!
Hey how many days did the process take?
I think it took us about a week when we include prep, applications and dry times.
I bet it was a nice rewarding feeling after finishing! I’m going to do the same thing! Thanks for this knowledge, great reference video bud!
It definitely was and still is. Thanks for the comment and I hope yours turns out great.
What brand of concrete patch and repair product did you use?
Quickcrete. Here’s a link to see the exact product: amzn.to/3SfFaLK