MOST COMPLETE GUIDE! Revive Ryobi 40 Volt Battery ~ The Easy Way, and the Hard Way! | Gears and Tech

HTML-код
- Опубликовано: 27 фев 2022
- Ill show you the easy way to revive your 40 volt batteries, and the harder way. This will revive 99% of your dead Ryobi batteries. Also works on 18V 24 V or 36 V too!
Here are the Tools you need for basic Repair:
Security Bit Set - amzn.to/3HktJMS
Paper Clips - amzn.to/3t67B3B
For the Second Repair you will also need these items:
DC to DC Step Up Adapter - amzn.to/3HhRzZI
12VDC 6A Power Supply - amzn.to/3MF5axc
14 Gauge Power Wire - amzn.to/3shQ9di
Optional Tools and Supplies:
Soldering Iron Kit - amzn.to/3LZn4va
Alligator Jumper Wires - amzn.to/3hcNxH9
Volt Meter - amzn.to/3pgr809
Join the Gears and Tech RUclips Community Today:
✅ / @gearsandtech ✅
Add our Amazon Link to your favorites, and make all your orders through here. It doesnt cost you anything, but it helps us out!
🛒 A M A Z O N : amzn.to/41C3tYo 🛒
✅ SUPERCHARGE YOUR RUclips CHANNEL : www.tubebuddy.com/pricing?a=G...
JOIN OUR COMMUNITY!
✅ I N S T A G R A M : / gearsandtech
✅ T W I T C H : Twitch / gears_and_tech
✅ T W I T T E R : / gearsandtech
✅ F A C E B O O K : / gearsandtechyt
✅ W E B S I T E : GearsAndTech.com/
✅ Y O U T U B E : / @gearsandtech
~~~~~~~~~~~~~~~~~~~~~~~~~~~~~~~~~~~~~~
We hope you enjoyed this content, if you found it valuable consider donating. Every bit helps.
💥 paypal.me/GearsAndTech?countr... 💥
~~~~~~~~~~~~~~~~~~~~~~~~~~~~~~~~~~~~~~  Хобби
Хобби


Here are the Tools you need for basic Repair:
Security Bit Set - amzn.to/3HktJMS
Paper Clips - amzn.to/3t67B3B
For the Second Repair you will also need these items:
DC to DC Step Up Adapter - amzn.to/3HhRzZI
12VDC 6A Power Supply - amzn.to/3MF5axc
14 Gauge Power Wire - amzn.to/3shQ9di
Optional Tools and Supplies:
Soldering Iron Kit - amzn.to/3LZn4va
Alligator Jumper Wires - amzn.to/3hcNxH9
Volt Meter - amzn.to/3pgr809
Join the Gears and Tech Community Today:
ruclips.net/channel/UC87yYbCYEV-TqM9h6WU3Ccgjoin
Great video. Could you use the other good battery to charge up the dead battery? The good one is 40V and 5 amps
I tried that and it didn't work. But, if you connect it direct the cells like I show in the video it should work
@@salpatel7810 didn’t work for me either. In past I have been able to jump, but with this 40V no luck jumping 40V to 40V.
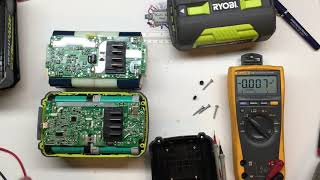
I have the tools and converter you recommended but cannot tell from your video where the negative grounding point is located. Is it one of the screws on the circuit board or is it the mound of solder on the circuit board?
It's the giant mound of solder on the circuit board
You can also try to test for power between that mound and the positive terminal. If it reads power then you have the right 2 points
When you apply 35v across the battery, the cells will usually come back at the same rate and the battery voltage will rise to equal the 35v charging supply i.e. 3.5 v across each of the 10 cell groups in series. When individual cells really die, they usually represent a short circuit so charging current will still flow into the other cells. If this has happened, your 35v may represent more than the maximum allowed voltage across the recovered cells, because the faulty cells are shorted. If you have 2 or more dead cell groups, 35v represents 4.35v across the 8 "working" cell groups. This is dangerous. Chargers handle this risk by monitoring battery temperature and will turn off the charging current. The worst thing you could do is to leave the makeshift recovery arrangement active when you are not around to spot a problem i.e. a hot battery.
The BMS inside the Ryobi 40 V battery MIGHT have cell balancing capabilities. IF it did it might be able to balance (equalize) all the cells as you charge the battery pack with the safety cut-off MOSFET defeated, which is what the RUclipsr is showing in this video. I don't own any 40 V Ryobi batteries, so I have no direct knowledge of their internals.
Thanks! Excellent guide to reviving these batteries. I was able to recover mine by resetting the controller. One correction: The security screws in my battery were T10-S, not T15-S.
The RST reset option worked like a charm! My light blinked green once and it is now taking a charge again. Thank you!
Just a tip I saw on another channel. When jumping the reset with a paper clip, push the black button at the same time. It worked for me and reset the battery. And, you can get a cheap torks security set at Harbor Freight for 7 bucks.
Thanks
Thank you so much! I ordered the security bit set and the up convert thing and it worked like a charm. My battery is now on the charger taking a charge. Thank you for your help! That is awesome!
For anyone attempting to open their Ryobi batteries without a security bit screwdriver - I was able to "convert" all 4 of the Ryobi battery screws into regular screws by using a fine, flathead screwdriver to break off the little nub that sticks out (which makes it a security bit). Be careful not to hurt yourself by applying too much pressure on the flathead screwdriver as you try to break off the little nub, but it is a solution in a pinch with some security bit screws.
Great tip
Thx! The RST jumper step worked for mine! Time to get to work. Just for clarity for others, you have to touch BOTH of the "circles" at the same time, and look for the 4 green led battery charge lights to luminate.
You’re a life saver! Reset worked perfectly! I owe you a beer sir 🍻
This worked great. My battery had the exact same symptoms. After following these instructions, it is back to life
Thank you so much, the RST trick worked for me! Saved me $180!!
This video was 100% spot on. Thank you so much for putting this on UTUBE
Great video! I'm going to attempt this this weekend. If all goes well, you're going to have saved me hundreds! I have four 4ah batteries that are dead. Thank you!!!!
for sure, even if only half of them work itll be worth it!
Great advice that saved me having to buy another battery or really another tool to get a cheaper battery. My battery would blink all 4 lights when I pushed the button, so I only had to go as far as the reset. One note that is a little hard to make out in the video: You must touch both RST terminals simultaneously. This is why he is bending the paper clip into an arc. I just used a staple. On my battery the first light blinked and I knew I was probably in business. Hooked up the charger and its-a-charging!
I already had a set of TS bits from Amazon for ~$5, if I remember right. Annoying, but have come in common for a number of similar fixes.
Thanks a million for this! The reset just brought back a battery for me.
Great explanation of how to reduce waste of valuable resources. Great content.
Your video was spot on, Got two batteries working again. thank you
Fantastic! Excellent video, nice explanations. The "easy solution" (processor rest) did the trick for me. Security Bit set ($15) is worth it. Saved $180.
The battery is not $200 you can get them for $59 on special with a tool.
You are a great communicator. Thanx for the info!
I used a 12v car charger that has power supply mode for the input and bought the little voltage booster/stepper and adjusted it to 35v. Now i have a chargeable ryobi battery thanks!!
Thanks for this video. I had the same issue due to the battery being stored for too long. Your explanation about the ground contact and the positive bypassing the control board was the key for me. I used another battery (which I had previously opened to do a reset on) to jump the fully discharged one. It was probably a lot riskier than using the voltage buster card but I was able to get enough charge into the battery to do a reset and then it charged fine.
yes, that is dangerous as there is nothing limiting the current. if there was a problem you could suffer an exploding cell.
Glad it worked, but I cant recommend that procedure for anyone.
An old school battery charger with s jump start function can get the cells to working voltage quick. Bypass the control board and apply at the end of the plus and minus at the ends of the cell array. Charge till batteries are slightly warm, like lukewarm cofee. Then let it sit. Measure each cell voltage. If any are low volts remove and replace the bad cell. If it charges up to 3.3 to 3.6v per cell then go ahead and hit the reset contacts. Alternatively applying a current limited voltage in excess of the cell sum through a brake light bulb or similar will wake it up. The voltage forces the balancing and output FETs to switch on. Then charge as normal. A cheap 24VAC transformer plus a diode and capacitor works well.
Thank you for your thorough explanation of this procedure. Just this morning I had to take steps to investigate my one year old 40 volt battery and the fact that it was not accepting any charge. I had same issue with no receipt and the battery was purchased new in November of 2023! I figured as you did what could it hurt to open it up and take a peek inside and see if there was anything obvious wrong. Well I did everything that you did except for the ‘R S T’ step. Now I can readdress it again with a new step in the procedure and see if I can get the same results! Again thank you so much and keep the information videos coming! 🤔👍🏼😎👏
Glad to help
I just wanted to thank you for this video instruction. I followed it exactly and was able to bring back to life my old battery that I almost threw out 2 years ago thanks again.
Glad to hear it worked
I followed your video and all I had to do was reset this battery thank you you saved me $85 in the US
The reset trick worked. Thanks 👍👍
Really nice job of explaining for regular/nontech folks...thank you!
Glad it was helpful!
Thank you sir! Reset worked like a champ and it’s recharging once again.
Glad to hear it helped!
It works, brought my aftermarket 40v battery back to life
Great job thanks I’ve subscribed because it was helpful easy to understand I have lots of Ryobi battery operated tools with a few batteries doithis thanks
This was EXTREMELY helpful. A simple reset seemed to do the job. X2. $240 saved
I did this and it worked 100% thanks
Thanks! The charging method you used worked on my 40v Ryobi battery.
Glad to hear it
This video saved me roughly $180
All I had to do was buy a torx security kit to extract the screws. The first trouble shoot “RST” worked for me
Can’t thank you enough!!
Awesome!
Thanks ! Best video yet for this project. I was about to donate 2 of my 5Ah 40v! I just bought a buck step up/down 8A board off eBay. Can’t wait to renew the batteries. Thanks again.
Glad it helped
The reset work for me first try, thank you!
Glad to hear it!
Bypassing the circuitry and waking up the batteries worked on my as well. I was fortunate to have a 30v power supply. Took about 1 minute as the pack consumed a constant current of 3 amps. Back on the charger, now it's charging.
This Works. A few cautions though (from a battery expert). Do not charge Li-Ion batteries when they are very Hot or very Cold (freezing). Charging Hot Li-Ion batteries shortens their life. Let them cool down first. Charging freezing cold Li-Ion batteries is dangerous.
When you charge a Li-Ion battery, Li+ ions travel to the carbon/silicon anode where they pick up an electron becoming Li metal atoms dispersed inside the anode. Below freezing the Lithium cannot penetrate easily and may start plating the surface of the anode. This Lithium metal is highly reactive, and may cause a fire when warmed up or when you try to use the battery.
Whenever you are charging Li-Ion batteries, If any cell in the pack heat up (as in too hot to touch) stop charging. Cells that fail this way cannot be fixed. The good news is that this is rare.
Normally, Li-Ion cells are not discharged below 2.5 - 3.0V. But it can happen, and that's when the BMS board in the pack will refuse to allow charging for safety. It is actually dangerous to apply a full charging current of several amps to a cell below 3V. But you *can* safely trickle charge them. Buy a DC-DC converter board that features CC/CV (Constant Current/Constant Voltage). Set the Voltage Limit to 3V/cell (e.g. 30V for 10 cells in series). Set the Current Limit to 0.1A or less. Now you can safely charge even a 0V Li-ion battery.
Let the pack charge slowly for hours. The slower the better. Think of it this way: you are shoving Li ions into an electrode that is severely depleted. Just be gentle and give them time to slowly move around and take up residence again. Once the pack is back up to 3V/cell check the voltage of each cell. If all cells are about 3V you can now safely recharge the pack to full voltage at the normal charging rate. Or you can just put it in the Ryobi charger to finish charging.
HOWEVER, if your pack is badly unbalanced (e.g. 9 cells at 3.2V and one cell at 1V) then do NOT continue. You cannot safely force several amps into the low voltage cells. It's probably best to recycle that pack. Any cells that did not trickle charge up to 3V will always be too weak, and replacing one cell in the middle of a pack isn't worth it.
Yup unbalanced batteries are a recipe for fire or worse.
Great video. Very good practical help with these frustrating Ryobi batteries.
I've had to do this a nukber of times now. Im not too impressed with ryobi batteries
@@GearsAndTech I've done two batteries several times over the last few years , getting old already with Ryobi. Good cells but bad engineering boards for practical use.
@@chuckh5031 I've checked inside a couple. Cells CID popped open on many cells. I followed others instructions on resetting the cells but am guessing once that happens cells are at end of useful life.
Excellent video.
Thank you so very much for this very informative video. One of my 4amp batteries was flashing all 4 lights, but wouldn't power my mower. Did the simple reset and then only 1 of the 4 lights came one. Put in on my charger and is now charging.
Great info. I had to perform the reset four times because it would charge for about two minutes and then start flashing green/red again. Eventually it started completing the full charge after the four resets.
I’m having the same issue but not the same result. It’s keeps reverting to defective ideas?
THIS is good info. I haven't even started any attempts yet - but I would probably give up after one or two tries if that happened to me. There is sometimes a value in stubborness!
Kudos to You.
Your excellent video saved me $179 × 2.
Appreciate You!!!
That's awesome! I'm glad it helped
I just checked both my batteries and they are all the way dead again. So I'll be doing this again really soon
Too early to tell if this is working for me. I have the battery currently charging on the step up system...and the voltage is slowly climbing. Thanks for this video. It is the most complete one I have seen.
THanks for the tip on reset. I was able to check my battery and it had 5+V but would not charge. After using the reset terminals and leaving them jumped until the leds came on I was able to put it on the charger and start charging it! Thanks for the tip!
Glad it helped
great video! I used your link to get the DC converter I hope it helps your channel and I subscribed 👍
Thank you for the tip to contact Ryobi, which I did do after watching your video and they are going to send me a new battery which thanks to you and your great advice saved me a few dollars which is very much appreciated
Are You Saying That The Barreries Sold With This Device Will Die After The First Year Of Use?
In my experience they have died every year
Your video is the type that I always subscribe to, well done! I have a 40 volt 6Ah battery that when I hit the test button only the left-most light and the 3rd from the left light up only. I didn't realize when I bought it that is was a RECON battery! My question for you is this battery toast!???
Great job thank you. Dont need to do yet but least i know now.
At goodwill they usually have a boat load of laptop chargers. For Dmm volt meter harbor freight has cheap one for around 5 to 7 bucks..thank you
It worked! Thank you!
Worked fantastically.
Glad to hear it
dude you just helped me reset and fix my battery! thank you!!
Glad I could help
Easy fix - hardest part was finding a TS 10. Thanks much!
Thanks! You saved me headaches and $$$$$
Well done! I don’t know if I have the patience to do all that, but I have the tools, thanks for sharing your expertise!
Thanks for watching! Let us know if you give it a try
It was great to hear this info from an actual electrician.
Glad you appreciated it. Hope you're able to save your battery
Thank you for the video and guide! Works really well. However, I've noticed charging with a 12v 6a charger causes a lot of heat. Using a 12v 1a charger gives much better results. Thanks again!
I bought a car battery trickle charger to revive some of my batteries. It does have different modes one being a 12v 1A. Is this what you used?
Great video, and excellent detail on how to go about resurrecting these batteries. I am quite surprised there hasn't been some sort of legal action about these batteries appearing to go bad forcing people to needlessly buy replacement batteries. And the overload/reset of the boost power supply was helpful since that is usually the way my luck goes too when I'm piece milling a solution for one of my problems, lol so thank you for leaving that in the video, it caught a potential snafu some people will encounter when they build up their restoration kit. Some of those boost supplies not only have a variable voltage control, but they also have a current limiting adjustment too, which would have fixed your issue with the overload/reset since you could have simply dialed back the current limit to a point the input supply could have handled the load without buckling. Cheers!
unfortunately for Lithium batteries to be safe they have to have the charge controller be super cautious. If anything, this helps highlight how bad lithium is. Any lithium battery out there can suffer similar issues
@@GearsAndTech Good point, and I suspect as time goes by there will need to be even more precautions taken as energy density per unit weight/volume goes up. I used to repair chargers for nickel cadmium batteries back in the 1980's, they used a simple thermistor bridge in the charger and another half was in the battery. As a discharged battery takes a charge, it absorbs the energy as a chemical reaction but once it has charged, that charging current gets turned into heat. The charger measures the termperture difference between the thermistor in it, and the one in the battery and turns off the charger once it sees the battery is getting warmer. Worked pretty well. I noticed the thermistor in the battery back, and I noticed once these batteries top off they seem to get warm too, so I guess they use a similar method for detecting the battery is charged. By the way, great suggestion about running that negative wire outside. I think I am going to try to find a way to install and wire in a small switch for the reset function as well since I would like to avoid opening the case all together. At the moment I'm trying to resurrect a practically new battery that got wet (just a couple of small spots of corrosion I was able to clean off), and I charged the battery with a couple of current and voltage adjustable power supplies that total 36VDC between them (in series) but it still doesn't seem happy. Worse case, I extract the batteries and test and replace them individually. I could buy a new battery, but where's the fun in that, right? Thank you for the follow up, may you and your family have a wonderful and prosperous New Year!
You could go low tech on the rest. Just drill a hole in the case in line with the button and use a pen or small screw driver to push it when needed
Cover with tape the rest of the time if moisture is a concern
There is nothing wrong with his battery that went dead. You should not be leaving his battery on the charger all winter. For storage of a lithium battery you should keep it 50% charged for the winter and not keep it on the charger and keep topping it off. This kills the battery. It’s his fault not Ryobi’s he was lucky to get a free battery.
yeah really
The RST trick worked - you are a legend!
Glad it helped
You save me a bundle on a new battery, thanks so much!
Glad I could help!
I rarely sub, but I immediately liked your style, so I subbed!
Awesome. Glad to hear it.
Come back any time
LOVE THIS! GENIUS!
Worked like a champ, best $13 I've spent in a while. I'm sure it won't work, but going to try to revive my Phantom 4 battery using the same method (different voltages of course).
In theory this will work on anything as long as the cells are good still
Thanks! This worked great for me. I left it charging for 4 hours and it got it to 19v and then reset worked and it’s now charging on regular charger again!
Great to hear!
Do you have to have the booster? Or is it safe to try without it@@GearsAndTech
Worked great for me, thank you so much!
Glad it helped!
I Have a 34 volts 4-amp Ryobi battery for over 2 years and still going strong.
four 18-plus batteries 5 years old.
Regular charging works for me.
I recently fixed 3 batteries a 30 volt and 2 18 volts but I was able to just use my car battery. I used 12 gauge speaker wire and I used some gator clips at both ends of the wire. It only took about 20 seconds with each battery to get them up to the point where the ryobi battery charger would charge them. You have to be careful using the extra power that a car batter gives you. I would have some leather gloves on when doing something like this in case the wires start to heat up you don't want to touch hot wires with bare hands. But it worked great and it worked very fast. Normally if you leave these batteries in the charger too long for whatever reason they will go below the working recharge voltage and ruin your battery. But if you get them before they have gone done too badly my method works like a champ. Using skinny gauge wires you would find that the wire will get very hot very fast.
Excellent!!
Really needed the link for the voltage converter.
My battery is a 4ah 40V and the screw size was a T10 security. The T15 isn't even close to fitting and the T10 security bit was tight, not loose. Great video! All I had to do was reset and now we're off and charging again!
Glad to hear it
The parts list is a gold nugget. Thank you for that!! One correction though: on my Ryobi 5AH 40V battery, the Torx screws have 6 "spines", not 5. The TS (Security) bits only have 5 spines -- mine have 6. That makes them THxx bits instead of TSxx bits. And my TH15 is too large, so TH10 is all that I have that fits. It's possible Ryobi has put different kinds of screws here, but just get a magnifying glass and count the "spines" in the screw and use TH bits if it is 6, and TS bits if it is 5. Awesome and very useful video -- thank you so much for doing it! Just saved me nearly $200 USD.
Also, to reset the microcontroller, on mine, I found the the "through" labeled "RST", and there is another "through" right next to it that shows 3.25V. I had to take both ends of a small paperclip and connect them both at the same time. After about 1 second, 4 green lights light up at the end of the battery, evidently to indicate the reset occurred. (If they don't come on by themselves, you can press the button at the end to make them come on -- not sure if this is required for the reset to take place or not.)
Thanks for your feedback. I haven't come across those 6 spline ones yet. I wonder if they switched what they use at some point?
There is another way of turning the Torx security screws: (1) Use a punch, screwdriver, or nail to break off the "security" pin; (2) Sometimes a tiny flat bladed screwdriver will wedge between the "security" pin and the drive sockets in the screw and the screw can be turned. I have a bunch of those Dollar Store "jewelers" screwdrivers that work fine. I can modify them with 600 grit sand paper (or a rock), to make them fit. I also have some tiny screwdrivers for my guns. They are very precise and engage screw heads securely. If you want some really nice screwdrivers: look for the gun manufacturers' or gunsmithing suppliers. They cost a few bucks each. I only use them on nice things. If any wear out, I can return the for a new one. Hey, you don't want screws to looked marred or stripped on yir Winchester!
@@josephsteffen2378 Thank you for the tips! I may need to employ that 'cause I now have one with the Torx threads stripped.... **long sigh**
Excellent , clear and thanks for tool llist
Hope it helped
Thank you so much for this!
Using your logic of using a 35V plus source to boost the cells I was able to get my defective battery working using my working battery that was at 39V to boost the charge up to 36.5 on the defective one!
Same method of just connecting + ve to +ve and -ve to the Gnd on the defective battery.
Nice work!
I found your video informative. I will definitely be subscribing to your channel.
thank you
Great. I have a dead 58v Echo battery n will try to pre charge it per your method n do a reset
Worked on my battery packs I have all the tricks for dewalt and Milwaukee battery packs thanks
Glad it worked
Simple reset worked for me. Charging it now....will see how it goes.
Glad to hear it worked
Thank you for doing this video. I just ordered the stuff off Amazon that you suggested and look forward to fixing most of theses batteries sitting around. Appreciate your time!!👊🏻👊🏻👊🏻🇺🇸
Reset worked for mines!!!
I just finished to build Ryobi 40 V charging apparatus based on your information, I will put the charger to work pretty soon. I encountered at least three different designs of batteries, two gave me hard time to locate the negative for by pass charging . I succeeded to reset one battery.
Glad to hear it's working
Call the 800 number with battery. they will want serial number to see if still in warranty period (1 or 2 years i forget). Got replacement battery and using it . Mind you, it should NEVER have failed. The Battery Management System should not allow discharge < 30 VDC and cells should not go bad unless they use bad/cheap cells to begin with. Excellent. Thank You.
Very good video! Very informative thank u
You're welcome
I have been over this several times and feel I understand it. saved 1, 5A battery , thank you. Please send a link to the dc to dc step up adapter you are using, you mentioned it would be here but after hours of looking, I just can't find it.
This is a great help! Thanks :-)
Glad it was helpful!
This is such good info. I wish it worked for me, but I had 2 batteries completely unrecoverable. I can charge them this way and they act like they are charged, will power a device, but they would never reset and thus the Ryobi charger only ever shows the error code.
Exceptional video sir.
Thank you kindly!
you can use a small drill bit on the centers for the security screws. they will come right off allowing use of standard torx bits
Yes. I've heard others do that too
Thank you so much!!! I used a USB charger for
5V power supply
glad it helped
I've had 40V Ryobi batteries going on 2 seasons now, stored in a typical garage with temps from -10F-110F. At the end of the season i charge all batteries until the chargers shut off, then simply put them on a shelf, seems to work for me thus far. 6ahs, 5ah, and a 4ah
I think the problem is leaving them in the charger
@@GearsAndTech Just picked up their battery power station along with a couple extra 8Ah batteries to increase capacity along with a spare rapid charger. The instructions that shipped with the charger make it pretty clear to take the battery off the charger once full and if storing more than 30 days recharge them as normal every 6 months. My guess is they don't use the common 'smart' charging technology and leaving it on the charger fouls stuff up. It also suggests not storing above 80F or below 50F.
It is a good idea to test the cells (or groups of cells) individually first. Sometimes the battery dies because one cell is defective while the rest may be fully charged. I had an 18 volt Ryobi 1.5 amp battery that died suddenly. When I checked it, 4 of the 5 cells read 4.1 volts and one cell read 0.5 volts. A dead cells usually shorts, but they can die open also. After replacing the bad cell, the battery pack was fine again. If you have shorted cells in a battery pack and you force voltage across them, they can go up in flames so be careful. A lithium battery fire is not easily extinguished.
When we check the voltage of the entire pack we are also confirming that no cells are open. If it was open we would have no voltage in the battery. Also we wouldn't be able to jump the battery like we are doing here because of that open cell.
The only risk is if we do have a shorted cell. But since we are only bringing the battery above 30v there is very little risk even of causing issues with a shorted cell. The battery just won't reset, or it will discharge quicker than normal
@@GearsAndTech I'm not saying your technique is not viable, just other things for people to keep in mind. There are people out there with zero experience who get badly hurt because they can't or don't really understand what is shown to them. My comment was not meant as criticism, just additional ideas and information. I often watch channels like yours not because I have no knowledge of the topics, but because even after many years of experience, there are always new ideas and tips to pick up. So keep up the good work.
I guess I should have looked at my battery before I went out and bought a set of security bits. Mine uses regular torx screws which I already had! I guess on the plus side I now have the set for the next time I need them.
Nice video, i got a question: I have bougth a lot of new 36v 1,5A ryobi, the are produced in 2018 and when i unbox them the voltage is 0 to 3 v and no light in any bar. i can charge the normaly and they work fine, but when i measure the voltage it says 19,3 V but all green bars are on ?
Tried this and it seems to be working, at least it’s charging now. I opted to bypass the security bit by taking a small headed punch and persuading the tip out of the way with a few hammer blows to the punch. Took off enough of the tip to allow a regular T10-15 to work. My circuit board has 2 holes for the reset. I used a paper clip to jump the two holes to do the reset.
Glad to hear it's helped
In the video you said connect the negative terminal of the battery to the Vout negative terminal but you are connecting the ground metal part of the battery to the negative vout part. Asolano mentioned in his comments too. Thanks for the in detail explanation that an non electrical person can do it.
No problem. Glad to help
As I understand it, you said since your original battery was only at 1V, it was pulling too much current to go to 35V (as configured on your DC-DC booster), causing the display to blink; this however, still slowly charged up the battery over the day or so you let it sit. What if you just set the target voltage lower to begin with (say to 12V)? Would this then allow your setup to more "safely" bring it to 12V, after which you could then set the booster output to 20V, then 28V, etc, in order to progressively reach 35V? If so, would this be safer since the setup wouldn't be trying to push too much amperage, thereby remaining cooler? Thx for the video!
Thanks!
Thank you, great video. If I have access to a power supply that outputs 35V or higher and more than 4A, do I need the DC to DC? The reset worked for me a few times but has stopped working so it looks like I need to do the power boost.
Yes, as long as you have 35v you're good. No matter how you get it
Nice guide. This is a little off topic but if you want a simple and environmentally friendly lawn mower try looking at push reel mowers. Modern push reel mowers are inexpensive(around 100USD), easy to push, light weight(around 30lbs) and don't use any consumables.
I have totally looked at those many times over the years.
@@GearsAndTech Cool. I got one 4 weeks ago after wanting to get one since last year. I thought it would be a good way to mow the lawn and get some cardio in at the same time but I was surprised at how easy it was to push.
Thanks man you're a genius 🎉🎉🎉🎉🎉
Appreciate the support. Thanks
Good tips
when you jump reset, at the same time, press the reset will do the trick without holding 30 seconds
any idea what a 4 light blink mean when I push the self test button?
It is currently measuring 30 volts between ground and the first POS contact
if I place it on the charger it says it is defective.