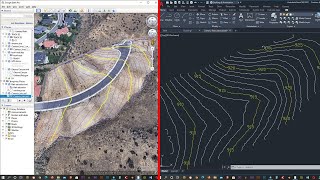
INSERTING GOOGLE EARTH IMAGE TO AUTOCAD | MAKE SITE PLAN IN AUTOCAD USING GOOGLE EARTH

HTML-код
- Опубликовано: 20 фев 2019
- INSERTING GOOGLE EARTH IMAGE TO AUTOCAD - This Tutorial video teaches the procedure to Insert a Google Earth image to AutoCAD software for various applications . You will also learn certain commands such as Attach , Align , Dist , Area etc.
#SabeerCAD #IntroductionToAutoCAD3D #AutoCADCivilModeling
THE STORY OF EVOLUTION - New features of AutoCAD 2021
• AutoCAD 2021 NEW FEATU...
Please LIKE this video if you liked it and SUBSCRIBE to my channel
/ sabeercad
Learn AutoCAD From Basics !
• LEARN AutoCAD FROM BASICS
Here is the Best method to create 2D drawings from a 3D Model , there by you can save a lot of time and effort !
• AUTOCAD 3D TO 2D NEW M...
This is an Introductory video of a course in 3D Visualization using AutoCAD 3D , 3DSMAX and Adobe Photoshop .
Please Click Here and ENROLL !
sabeercad.teachable.com
Please Visit and Subscribe
http:/ / sabtechtv For Technology related useful information . More videos will be posted in this channel


I usually just zoom in and print an image from google earth. I make sure the scale bar is on the image and I scale it in CAD. It's not 100% accurate but it's really close and good enough for my purposes
Thank you for the video. I often scale Google Earth images in AutoCAD for my drawings, but your method is better than what I do. I will check out your other videos. I'm an engineer in Nova Scotia, Canada and I'm about to start a site drawing for a job in Bangladesh, so this will come in handy. Cheers.
Thanks . This is perfect. Very helpful. Please continue posting videos.
Thanks for the explanation. Wasn't too difficult or advanced for a beginner to follow along. Great job.
When you are inserting any map (Google Earth image, FEMA FIRM, soils map, etc.) I recommend scaling the insert image to many times larger at first. That way, when you select the points on the image and align, the image will shrink down to the known points. That allows the potential margin of error to be reduced. So, insert the image, scale it up many times, select the points, align it to known points, scaling the image way down.
Good suggestion 👍
My first teacher and my inspiration, I learnt alot of things from your videos, back since 2012
Thank you for your beautiful update on site base map ,it was very helpful.
Very good presentation in sharing valuable information with a great smile, which shows the confidence. Thank you.
Thanks for your feedback 😍👍
@@sabeercad pp
And to save time finding out the distance of Station 1 & 2 you don't need to use AutoCAD application bcoz Google Earth already have a tool to measure the said stations. Just find it there. You're welcome 😊
You are right ...
This video was extremely helpful - thank you very much for making and sharing it... I feel much more exited about my work already :-)
Happy to hear 😍 All the very Best wishes...
I've been doing this for a while. I'm pretty good with Autocad so it was my preferred process for making plans for our house
പുതിയ ഒരറിവാണ്. നന്ദി
This was extremely helpful, as i have learnt something new.
I have watched your videos since I subscribed to your channel. I can honorably say that pretty much what I have learned in AutoCad is thanks to your dedication and patience to teach. Thank you very much
Thank you. Best wishes 👍👍😊
Thank you. I do it differently. This method is faster and you only need two points. I did not know about the "Align" command until I saw this video. I learned something from this video. cheers.
Nice and to much help full information sir
Now i can say" today i have learned something new" thank you sir for this video.
All the best 😊 👍👍
Thanks for replying sir,
Actually i just installed google earth to try it ,for my case it open correctly bt earth map not working correctly ,its getting slow, almost not moving .
How can i fix this ? Please give some suggestion.
I think , if the installation is perfect it should work properly . The performance issue may be due to low band width
Thanks for the tutorial.
Thank you for an easy-to-follow and detailed tutorials!
Thank you very much for the video from the bottom of my heart!
You are most welcome 😊
wow! thumbs up! this is very useful video tutorial, now i know already how to get the exact distance or the area of my lot..shukran sir.
Thank you 😍
You made it a very clear explanation, generally for everyone. I Finally seek out the video I was looking for. Thank you a lot.
Nice tutorial!
You can also hit "R" on the keyboard to orient the view to straight down, north up.
You are right 👍😊
@@sabeercad your whatssapp Number please?
ive spent hours and hours just to do this and here i found your video. thank you so muchhh!!
Thank u so much sir for this video. I was looking for this video. I use to work on this ten years back. But I dint know from where the Google image is got. As that part of work was done by some other team. But now I wanted to know about it as I wanted a site map to construct house. And my search is stopped here. Keep up the good work. It really helps.
iam thinking to learn this command from long time now i find this usefull comm, for me to work in autocad. Thanks Mr. Sabeer.
By far the best explanation of this I could find. Thank you so much!
Very good tutorial Sabeer. It will be very helpful for my site projects at remote areas. Thanks.
Happy to know ...
Another option is to use the integrated bing aerial imagery to find your area in C3D (sorry I don't know if this is available in base autocad) draw a rectangular polyline a bit outside your area of interest. Use the map export command to create an Esri shapefile which can then be opened in google earth, and then save the image much as you have shown, and import it back into autocad/c3d and align the border to your orignal points. The caveat is of course that you have to set your drawing settings to the appropriate coordinate system in advance.
Thanks for that good suggestion 👍
Thanks for share, from Bandung, Indonesia
Excelente, muito obrigado.
Thank you 😊👍
Ma Sha Allah 👌👍Excellent Presentation brother and informative
Nice video, very easy to do, cheers from Panama 🇵🇦 You're the best sir!
Thank you ! All the very best to you..
Thank you so much I learned something new...
You are most welcome 😊👍
Thank You sir .. Valuable information
Thank you so much. I have learned something new from your tutorial.
Thank you sir. Very helpful. given step by step and my requirement fulfilled
All the best 😊
My Best Lecturer thanks so much.
You are welcome 😊
Thanks,this is exactly what I was looking for 🙏
بہت خوب، ذبردست۔
This is amazing. I’ve learnt something new. Thank you very much
Happy to hear ...
Excellent, I'm using a 3rd party plug-in for the geo-mapping, hope this will be very useful when compared with that plug-in...
Thankyou so much sir ...it has really helped meh for easily scaling the image.
Happy to know. You are most welcome 😊👍
Sir I have 10 source points will it be easy to align that picture
the best presentation so far love from kenya
Thank you 😊👍
Thank you for sharing this, I followed you step by step and I can do what you have done successfully.
Happy to hear 😊👍
This video is useful for beginners also ! Thank you very much Sir !
Yah, today I learned something new technique about on merging Google earth and autocad
ruclips.net/video/4wt8BQncgr8/видео.html
learn in hindi
thankful for you to shared with beneficial video
Thanks for the tutorials sir !...
Wow so simple but never thought of it before. Thanks
I watched your tutorials on internshala👍🏻
What kind of computer system is better for auto cad 2020 and sketch up. And some. Others softwere related by civil fields??..
Sir,
This is the very old way.
Now Autodesk providing Bing map in AutoCad & Civil 3D. For that, You have to assign coordinate system in your cad file, on which you are working. For example coordinate system is UTM84-36n
Utm84 is the most comman projection system. You also mentioned in your video. 36 is utm zone. As you mentioned our earth is divided in 60 zones. 36 is one from them. And "n" is north. north will be consider if your area will from upper side of the equator. If you are choosing the area from below of the equator, then you have to consider s as south.
Now you can directly import and export kml/kmz files.
Please feel free to ask if you have any question.
Thank you
thanks for the information!
easy to understand ...even on muting sound of this video.. i did this ...great..
Thank you 😊
very good explanation, thank you so much. really appreciated.
Thank you 🥰
I got many information in your site thanks for your site
You are welcome 😊👍
Thanks, Sabeer, kindly do some more practical examples.❤️
Thank you. Nice turtorial
Thank you so much for your tutorial. I'm a beginner trying to learn Auto-cad. I've followed all the steps you recommend. However, my image doesn't look like perfect. Its orientation is a little off. Could you recommend me some trick to correct them? Thank you so much
The "pan and tilt" feature can be disabled in the Google Earth Options window. I believe that option is located in the "Navigation" tab. This will cause the view in Google Earth to always be orthogonal to the screen and eliminate the need to reset the view multiple times.
Thank you for the video.Your'e really teaches the proper way of converting google image to autocad.
Very clear and concise. Thank you. Very helpful
You are welcome 😊👍
Amazing demonstration. thank you.
Usefull cimmand thank you
A good Informative Video!!
Love it, thank you
You are welcome 😊👍
THANK YOU SO MUCH SIR 🙏🏼❤️❤️❤️
Waaw what a perfect explanation!. Thank you sir
You are welcome 🥰
Many Many Thanks, Its very helpful video. awaiting for your next video..
You are welcome 😊
I never comment for RUclips videos, but I thank you very much. Excellent video. Subscribed to your channel with one video.
Awesome content.
Thank you so much 😍
Thanks so much .... we miss your tutorials .
Will be posting ...
Thanks
very very helpfull video with easy and shortest approach, thank you
At least easily I learned something. Thank you!
VERY VERY VERY helpful!!!! Ty so much my CADfriend... Great job! Keep going
You are Welcome Anna 😊👍
Thanks for the video. Liked it. Very Much useful.
THIS HELPED ME A LOT! THANK YOU SO MUCH!
AMAZING SIR THANK YOU BIG HELP
You are most welcome 😊👍
Helped a lot
Dear Sir thanks for this informative video. can we also find out the depth or the waviness of any landscape by using such google images into the autocad?
Thank you so much, very useful and nice tutorials coming from your channel. Love it
You are welcome 👍
Thank you sayar..
It’s really cool!
You got a new subscription! 👍🏻
But How much will be the error chance ?
Thank you for the wonderful video, it was a great help.
Very useful Brother Alan from Bayombong,Nueva Vizcaya,Philippines
Excellent. Very useful to me for developing plot plans. Thank q.
You are most welcome 😊👍
Thanks for knowledge sharing! 👌
You are welcome 😊
Thanks a lot for sharing bright ideas.
Very accurate operating all commands and 3 software wow
thank you so much sir your way to teach better then our teacher love your video..👍
Crazy I Enjoyed a Lot ...And Give Video About Site Presentation in Photoshop
Thank you. Will try to upload..
thank you it worked so perfectly. Keep posting
You are welcome 👍
I am very much impressed and want learn how to convert AutoCAD drawing to laser cutting with desired scale becoz for model making purpose . thanks for your good intension teach person like me .
You are most welcome 🙂 Wish you all the best 👍👍
Sir, I want tip for laser cutting setup from auto cad
Very good and easy style of teaching. thanks very much
You are welcome 😍👍
very good and clear explanation Sabeer, thank you
You are welcome 😊
I liked the way of explaining.
Thank you 😍
당신은 천사다
Thank you very much sir, God Bless
Thank you so much sir... Helped a lot
Thank Bro very helpful
in order to skip the use of notepad, you can also trace a pline entering direct coordinates into the windows command