I remember paying insane amounts of 1997 to 2000s money just for VHS video how to for basic composite work. Quickly found we needed equipment that was far too expensive to go too far into it. Also getting the raw materials weere insane back then as well. We used a ton of select products out of Florida as they were on of the few who would sell in "smaller" amounts. Fast forward 20 years and I run across your youtube channel. Filled in some gaps I had in my self paid for and learned training, and gave me a location to order small projects t amounts of raw material from. Here I am 5 years after that still eagerly devouring every video. It's funny, never heard of intensifiers, but would make wooden bucks to do the same process. That silicone would have been a massive time saver back then!
Previously we had a mold-less wing video where we were teased with a molded wing if there was enough interest. I feel like this video is the spiritual sequel to that video that we never got. Thank you so much for sharing the wisdom and I am already looking forward to whatever new videos you have in the pipeline
Thanks Austin. That moulded rear wing video is still on the whiteboard in the video planning room and I’m certain it will come along at some point. There are similarities with this process but also some techniques that are quite specialised to (downforce) wing construction so still well worth us doing I think. Thanks for watching!
The fact that this part is able to be manufactured as one part is truly insane. I would think of maybe making a foam core part, and then doing a wet layup. Making a mold and doing prepreg layup is next level. The finish was perfect. I'm flabbergast.
Wet layup over foam maybe quicker. But there's an awfull lit of work in postnprocessing sanding filling etc. Of course you then don't and carbon finish on yhe exterior or such precice control over external form and its heavier. Also probably weaker
Making an extremely difficult project look like it is just regular hard to do. 🥰 The perfection of the part is only exceeded by the perfection of the instruction. Seriously, the talent required to teach at this level needs to be talked about. Next level.
The best part of this channel is its many dynamics with the viewers, even as the official company channel. On top of its expertise, easy-to-follow instructions, well-explained decision-making processes(arguably the most important ones in engineering), and constant focus on making the products and processes beginner and DIY friendly. I honestly could not find many flaws in you. *Edit: Oh, and all for free too!
Thanks for the kind works, feedback like this really does make all the long hard hours that we put into these videos worth it. As long as there are people who find the tutorials useful, we'll continue to keep making them.
Another amazing video. A co-worker and I were complaining about the poor quality of RVs being made in the US. He suggested we start our own company and build something good. I told him we couldn't make them cheeply enough to make them light enough. That got me thinking about a full carbon fiber roof with AC and vent flanges molded in. Keep it light and the raised flange wouldn't leak.
Composites can certainly be very useful in RV construction. As you say, significant weight savings and advantages in reliability and function from integrated mouldings. We hope to do some larger scale projects like this on the channel in the future.
fiberglass is tougher than carbon fiber and is the go-to material for RV's and boats for that reason! I'm sure there's a market for less tough but lighter carbon fiber too
I think that the Silicone Intensifier Compound precisely addresses the issue I've been experiencing with some pieces I've been making. What I've been doing to minimize the bridging problem in my pieces is placing them under pressure for 24 hours with the mold open, which helps me eliminate bridging. However, I still always end up with some imperfections that I have to fix later. I believe the Silicone Intensifier Compound will solve all my problems. I will give it a try, but thank you in advance for the tutorial.
I think it’s absolutely amazing that we are able to watch this kind of insightful and well produced content for free. I love this channel and learning about this subject. I hope this channel thrives for a long time and that you guys can continue making great content. Thank you for making this. Best wishes for 2025!!!
Absolutely amazing. This channel is just top tier in this industry. That's a lot of effort for a YT video and it shows... and this sort of info is normally guarded in the industry it seems.
Thanks, we really appreciate this feedback, and yes, there’s a lot of time and effort go into making this content but it’s something that we really want to do and enjoy doing.
Love it when the super experienced, talented guy hosting a channel "Easy Composites" ends the video by saying it's difficult and frustrating. More companies should post honest views...
Haha, yes, there were a few moments in this video, we could include them but maybe better to just acknowledge them at the end. The silicone intensifiers sticking the mould together took about an hour to separate, so we learned, fixed the method, and shared the benefit of our experience!
“And my favourite part, the de-bagging” said no self taught amatuer ever. It goes one of two ways, pure joy at what you’ve produced or a pile of scrap ready for the bin.
If you’ve not watched our other vids on prepreg then yes, check it out. It’s not always the case that prepreg is best but for smaller, more intricate shapes like this then it generally is.
@@easycompositestv I want to see this. A bit like the SpaceX Falcon 9 landing bloopers reel. Although, I'd really like to see first the blooper and then the... rewind six hours... we did X and that was the problem. There's a lot of learning possible from mistakes, and it's way cheaper to learn from OTHER PEOPLE's mistakes!
This was done using prepreg not infusion. Infusion would be impractical for such a shape made in one piece. You could make it as a separate top and bottom then join afterwards but then it adds more complexity.
Brings memories when I worked at a plastics factory vacuum forming certain polymers for aerospace and automotive industry. The most important job is for the pattern makers making moulds and jigs . The other snag working for a company that made hardstyling chavant clay very, very smelly place to work for still remember the secret formula that I know of by heart .
What a stunning looking airframe. ❤ Doofers is an appropriate name for those yellow things. Now you all know why these guys are mentioned by so many Tubers . Happy new year everyone. ☃️🎄
@@easycompositestv That would be great, I am currently designing a wing for my car and would like to see a wing tutorial for a smooth surface and trailing edge. I am unsure on how to do it. It would probably be a split mould with a lap joint in the front. But I am stuk on the trailing edge. Sandwiching the halves together (in my mind) could result in a longer tail or a weaker joint. If that makes sense haha Eagerly awaiting the video - Cheers!
Thanks for watching, you may be surprised to find that this wasn't our first time working with these materials and processes. 😜That being said, although we do have years of experience behind us, we are always trying to find simpler ways around these complex processes and share what we come up with. This hopefully means that even some of the more challenging techniques can be achieved with some previous experience and a bit of consideration.
OK, we’ll have a think about this. Hadn’t ever planned this drone to fly, but it could. There might be a good video in explaining the traditional hand layup technique for lightweight wings, so… watch this space!
Incredible job and it's beautiful. I really want to get back into flying drones, but all the stuff going on here in the US, its just not worth the headache
You've got me wanting to make a CF Iron-Man suit in my basement with this stuff, lol. Maybe lay it up with some Kevlar too, ya know for bullets and stuff. :D
Yes, peel ply (which is what it’s called) can be used to prevent the need for keying before bonding, however, peel ply absorbs some resin and on such a thin laminate there’s no resin to spare and so you’ll end up with slightly dry reinforcement in those areas. On thicker laminated though, peel ply is a good time saver prior to secondary bonding.
We haven't actually got a wing at this point as this UAV was never intended to be a finished model. We just needed a relatable frame to demonstrate the processes. Given the amount of people asking though it looks like we will be looking to make wings in a future video.
This is a very brilliant and educational video. But I have a question, Is it possible to use 3d printed parts as the "intensifier" (even if it may be sacrificial)? If so, which materials are suitable for this application?
What a good question! Honestly, we’ve not tried this but it could be possible. However, silicone is inexpensive (cheaper than 3D print, probably) and does the job so well (squishy, able to conform) that I think it’s unlikely that a 3D print would work as well. Possibly TPU, but the INTENSIL compound is so quick, easy and effective that unless you can’t get hold of some, it’s probably hard to beat with any kind of 3D print.
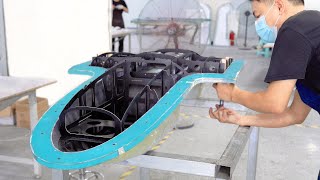
Would love to also see the process of making the wings, which is what I presume we see in the background. Spread tow fabric, and I guess intensifiers used for the sharp trailing edge?
It was very excellent and professional. Are these fibers pre-impregnated with resin? Does it dry by air or heat? If it is already stained, how does it not stick to the hand?
This is prepreg carbon fibre so the resin is already in the reinforcement. Take a look at the related videos linked in the description, they explain the XC110 prepreg in full detail.


![DO NOT MAKE CARBON FIBER PARTS AT HOME (Making Charge Pipes) [DIY] with CR-Scan Lizard](http://i.ytimg.com/vi/YNWu1-r5HGo/mqdefault.jpg)


Babe, Babe !!! Wake up !! Easy Composites uploaded another masterpiece ! 🥰
Coming~!❤️
I do wonder how many thousands of Men Childs are watching this all over the globe and feeling stoked to see another part of the drone project!
@@BadYossa dozens of us.... DOZENS!
Don’t get your babe hard that quick might give him a heart attack
If the journey is the destination, you will never arrive.
that part is just stunning, every video I watch I get more impressed by y'all skills!!
@@nickb193 also by the innovations and technologies involved
Thanks Nick, yeah it did come out well, we'll be doing plenty more like this in the future! Thanks for watching!
This is truly a masterpiece by a master technician. We all have benefited from this and all your videos. Thank you for sharing.
Thank you. We genuinely appreciate feedback like this and don’t take it for granted 😀.
Very few people are probably going to take on a project this difficult, but I definitely enjoyed watching it! Good call putting it up.
Thanks. Genuinely it wasn’t the original plan but we do listen to feedback because we don’t always know what viewers will or won’t find interesting!
Love to see the finished drone
OK, noted! We might see if we can build this out into a finished bird in a future video.
@@easycompositestv PLEASE do it :)
@@easycompositestv ditto
same
please do!
More videos! I absolutely love these tutorials . This information was guarded secrets 25 years ago when I first dabbled with composites on my own.
And 25 years ago when the Easy Composites founders (of which I’m one) started in composites!
I remember paying insane amounts of 1997 to 2000s money just for VHS video how to for basic composite work. Quickly found we needed equipment that was far too expensive to go too far into it. Also getting the raw materials weere insane back then as well. We used a ton of select products out of Florida as they were on of the few who would sell in "smaller" amounts.
Fast forward 20 years and I run across your youtube channel. Filled in some gaps I had in my self paid for and learned training, and gave me a location to order small projects t amounts of raw material from. Here I am 5 years after that still eagerly devouring every video.
It's funny, never heard of intensifiers, but would make wooden bucks to do the same process. That silicone would have been a massive time saver back then!
Previously we had a mold-less wing video where we were teased with a molded wing if there was enough interest.
I feel like this video is the spiritual sequel to that video that we never got.
Thank you so much for sharing the wisdom and I am already looking forward to whatever new videos you have in the pipeline
Thanks Austin. That moulded rear wing video is still on the whiteboard in the video planning room and I’m certain it will come along at some point. There are similarities with this process but also some techniques that are quite specialised to (downforce) wing construction so still well worth us doing I think. Thanks for watching!
@ be still my beating heart, there is still hope!
The fact that this part is able to be manufactured as one part is truly insane. I would think of maybe making a foam core part, and then doing a wet layup. Making a mold and doing prepreg layup is next level. The finish was perfect. I'm flabbergast.
The lost metal casting he demonstrated might also work
Wet layup over foam maybe quicker. But there's an awfull lit of work in postnprocessing sanding filling etc. Of course you then don't and carbon finish on yhe exterior or such precice control over external form and its heavier. Also probably weaker
Making an extremely difficult project look like it is just regular hard to do. 🥰
The perfection of the part is only exceeded by the perfection of the instruction. Seriously, the talent required to teach at this level needs to be talked about. Next level.
Thank you. We don’t take comments like this lightly. 🙏
your videos are top notch. whoever came up with making youtube videos and tutorials needs a raise!
The best part of this channel is its many dynamics with the viewers, even as the official company channel. On top of its expertise, easy-to-follow instructions, well-explained decision-making processes(arguably the most important ones in engineering), and constant focus on making the products and processes beginner and DIY friendly. I honestly could not find many flaws in you.
*Edit: Oh, and all for free too!
TripAdvisor is over there
@ ngl it does feel like a 5 star hotel of a tech/fabrication channel, I hate to write it like tone of a tourist
Thanks for the kind works, feedback like this really does make all the long hard hours that we put into these videos worth it. As long as there are people who find the tutorials useful, we'll continue to keep making them.
So glad you are uploading more.. Best videos bar none..
Thank you. We don’t take feedback like this for granted.
Another amazing video.
A co-worker and I were complaining about the poor quality of RVs being made in the US. He suggested we start our own company and build something good. I told him we couldn't make them cheeply enough to make them light enough. That got me thinking about a full carbon fiber roof with AC and vent flanges molded in. Keep it light and the raised flange wouldn't leak.
Composites can certainly be very useful in RV construction. As you say, significant weight savings and advantages in reliability and function from integrated mouldings. We hope to do some larger scale projects like this on the channel in the future.
fiberglass is tougher than carbon fiber and is the go-to material for RV's and boats for that reason! I'm sure there's a market for less tough but lighter carbon fiber too
It's a good day when a new video by Easy Composites comes out.
Been laminating for a good few years now but still picked up a few gems of knowledge there. Thankyou
Glad you found something useful there, in composites we all learn every day!
I think that the Silicone Intensifier Compound precisely addresses the issue I've been experiencing with some pieces I've been making. What I've been doing to minimize the bridging problem in my pieces is placing them under pressure for 24 hours with the mold open, which helps me eliminate bridging. However, I still always end up with some imperfections that I have to fix later. I believe the Silicone Intensifier Compound will solve all my problems. I will give it a try, but thank you in advance for the tutorial.
"Next time on EasyComposites, a project you can all do from home - we build an F-22 Raptor from scratch!"
Watch this space! 😅
This came exactly when needed for my hydrofoil project!! Much thanks from Canada.
Nice video, we usually use soft vacuum sealant tape instead of silicone, works like a charm.
you guys are at another level, prepreg is a complitely diffrent animal when i see videos of prepreg i feel like i dont know anything about composite
This is awesome! I'm actually working on a composite UAV for my internship right now, so this is perfect timing
Intersphere is an appropriate name.
Calculating the intense pressure on the vacuum bag is key.
Yellow goo is number one.
I think it’s absolutely amazing that we are able to watch this kind of insightful and well produced content for free. I love this channel and learning about this subject. I hope this channel thrives for a long time and that you guys can continue making great content. Thank you for making this. Best wishes for 2025!!!
Thanks very much, we really appreciate feedback like this. And, for sure, we plan to keep making content like this, it’s what we love.
Best channel for composite learners..🥰
Absolutely amazing. This channel is just top tier in this industry. That's a lot of effort for a YT video and it shows... and this sort of info is normally guarded in the industry it seems.
Thanks, we really appreciate this feedback, and yes, there’s a lot of time and effort go into making this content but it’s something that we really want to do and enjoy doing.
@@easycompositestv Glad to hear you enjoy doing it! My friends and I all enjoy watching every one and it gives us good ideas. Thanks for doing it all.
Love it when the super experienced, talented guy hosting a channel "Easy Composites" ends the video by saying it's difficult and frustrating. More companies should post honest views...
Haha, yes, there were a few moments in this video, we could include them but maybe better to just acknowledge them at the end. The silicone intensifiers sticking the mould together took about an hour to separate, so we learned, fixed the method, and shared the benefit of our experience!
“And my favourite part, the de-bagging” said no self taught amatuer ever. It goes one of two ways, pure joy at what you’ve produced or a pile of scrap ready for the bin.
I always admire talented people!! But in this case, I think everything it creates is a wizard!
Has transcended to a pure art form!
Haha! Thank you. Can’t tell you the hours (weeks, months!) that go into making 20 mins of video!
@@easycompositestvwe love it!
Wingfoil foils would be great.
Thanks bro. You’re always good for a banger
First class video - really love your easily understood guides.
Thanks 😀, glad you’re enjoying them!
frekin love these videos. the constancy and quality of easy to understand and informative videos cant be beat.
Thanks for your kind words, it really makes it worth all the effort and long hours which go into making these guides.
@easycompositestv ya i bet with having to film while laying up the part.
Your content is on a different level
Great Inspiration. Thank you for educating people ! Greetings from Baltics.
We want the video of the wing making from minute 22:36 Ahahahaha
Absolutely awesome work!
That is an absolutely beautiful part. Well done.
I don't even work in this area but is so satisfying to watch the procedures and results!
That is truly the best gift you can get between the Christmas and the New Year! :)
Thanks! It was a heck of a busy end of the year trying to get this ready for publication before we finished for a Christmas!
Awesome. I envy your surgically clean working environment and the videos that don't show all the b, s and t. Good, clean fun.
Haha, yes, well, as we all know, there is a hell of a lot of b, s and t to get to this point!
What a gorgeous part. This makes me want to get into the industry.
Nice work mate.
This looks freakin' amazing! Oustanding work, man
Kings of carbon tutorials nice one!
**NOW** it’s Christmas!
Merry Christmas Paul and all at EC.
What a beautiful treat to a Sunday night!! ❤
This is the cleanest "homemade" part I've ever seen.
It's certainly not the simplest thing we've made but we are pretty happy with the result.
Superb! Thks for sharing these high level tutos. Happy new year to everybody!
Thanks, glad you’re enjoying them. Happy New Year to you too.
What a lovely presentation. Great video.
Thanks for the feedback 😀.
thats crazy clean workmanship, holy moly.
very impressive work. those prepreg sheets seem very useful, way easier to work with and everything stays clean and tidy.
If you’ve not watched our other vids on prepreg then yes, check it out. It’s not always the case that prepreg is best but for smaller, more intricate shapes like this then it generally is.
Brilliant technique, thanks for admitting you too learn the hard way sometimes!
Haha, more often than you’d think! Maybe we’ll do a video about the ‘hard yards’ some day!
@@easycompositestv I want to see this. A bit like the SpaceX Falcon 9 landing bloopers reel.
Although, I'd really like to see first the blooper and then the... rewind six hours... we did X and that was the problem.
There's a lot of learning possible from mistakes, and it's way cheaper to learn from OTHER PEOPLE's mistakes!
love to see this video, i just needed help regarding this multi mold infusion setup, thanks easy composites
This was done using prepreg not infusion. Infusion would be impractical for such a shape made in one piece. You could make it as a separate top and bottom then join afterwards but then it adds more complexity.
Definitely living up to the name of the channel
Brings memories when I worked at a plastics factory vacuum forming certain polymers for aerospace and automotive industry. The most important job is for the pattern makers making moulds and jigs . The other snag working for a company that made hardstyling chavant clay very, very smelly place to work for still remember the secret formula that I know of by heart .
And what is the secret formula
@@yogamon Why do you want to know? .
The drone, looks like a very slick design!
Amazing quality video as always!
I already have the plane designed and I've been wondering how to start the project, this video is perfect
It was good timing then! Get in touch with our technical guys if you have any questions on the build.
What a stunning looking airframe. ❤
Doofers is an appropriate name for those yellow things.
Now you all know why these guys are mentioned by so many Tubers .
Happy new year everyone. ☃️🎄
Thanks. Happy New Year to you too. It was a crazy panic getting this video ready for release!
You guys are always killing it
Haha, thank you. Each vid about 4 weeks in the making 😀.
It's absolutely amazing. Would love to see the wing. Please show the full drone, including the maiden flight.
you make this job look easier good job
Easy Composite: posts video.
Everyone: Oh what a day! What a lovely day!!
Haha, thank you. We certainly put everything we’ve got into these vids!
I just watched a 24 minute ad and I loved it
Dude who does not even age, is again doing leisurely world’s best carbon fiber parts. Paul do you have Formula 1 background?
Not Formula One but he did start out making other motorsports parts for other classes.
Amazing video!
I am excited to see how the wings will be made.
Haha, OK, noted. Seems to be lots of interest in seeing the wings made so I think we’ll cover it soon.
@@easycompositestv That would be great, I am currently designing a wing for my car and would like to see a wing tutorial for a smooth surface and trailing edge.
I am unsure on how to do it. It would probably be a split mould with a lap joint in the front. But I am stuk on the trailing edge. Sandwiching the halves together (in my mind) could result in a longer tail or a weaker joint. If that makes sense haha
Eagerly awaiting the video - Cheers!
I freaking love geeking out on this stuff, thanks for the videos 🍻
You’re welcome, thanks for watching 😀.
Man u r a real professional, thanks for all !
These guys are legendary
Beautiful work as usual. Thanks.
just amazing work, u make it look way too easy
Thanks for watching, you may be surprised to find that this wasn't our first time working with these materials and processes. 😜That being said, although we do have years of experience behind us, we are always trying to find simpler ways around these complex processes and share what we come up with. This hopefully means that even some of the more challenging techniques can be achieved with some previous experience and a bit of consideration.
Pure gold! Thanks guys again!
Шикарное видео! Как всегда на этом канале.
Brilliant video, mate. Keep up the great work.
Thanks for the feedback. Keeps us going!
Fantastic matte finish!!!
Gorgeous! Amazing work!
Thank you for sharing your knowledge and expertise.
I need part two for the drone to be finished, I'm really interested in seeing it fly
dream on that's not were this channel is about.....
Haha, well maybe we'll send it up in the new year! Thanks for watching guys!
@@easycompositestvhappy new year too bro
I would love to see how you would make the wings for the drone also. Great video
Thanks for the top notch information!
you have the best videos .very well made !
Oh wow.
Thanks for the nice evening =)
Wow, that's quite a lot of skill demonstrated. We'd love to see the assembled drone flying and get some weight numbers
OK, we’ll have a think about this. Hadn’t ever planned this drone to fly, but it could. There might be a good video in explaining the traditional hand layup technique for lightweight wings, so… watch this space!
YES!!!!!! Thanks guys!
Added this video to my "DYI must watch again" list.
awesome video , i was literally just starting my drone design for composites , this was very useful
Glad it helped you out, get in touch with our technical team if you need any help or advice on the project!
Great timing 👏
What a treat! Thanks Paul
You're welcome thanks Jason!
Incredible job and it's beautiful. I really want to get back into flying drones, but all the stuff going on here in the US, its just not worth the headache
I am an Og follower since he had a beautiful long hair!
Haha! The Kayak repair vid! Also, lockdown 2020!
You've got me wanting to make a CF Iron-Man suit in my basement with this stuff, lol. Maybe lay it up with some Kevlar too, ya know for bullets and stuff. :D
Saludos 👋 gracias por compartir 👍 maximo respeto y mucha vibra positiva 😎
may be using some anti-adhesion fabric in gluing places when curing and remove it right before gluing prevent from sanding?
Yes, peel ply (which is what it’s called) can be used to prevent the need for keying before bonding, however, peel ply absorbs some resin and on such a thin laminate there’s no resin to spare and so you’ll end up with slightly dry reinforcement in those areas. On thicker laminated though, peel ply is a good time saver prior to secondary bonding.
How to prove you're a master, without saying you're a master...
First: click like. Second: watch the video.
Thank you. This is relevant in Ukraine :)
Yes!
Thanks for sharing this video! Would you share another video showing the manufacturing process of its wing?
We haven't actually got a wing at this point as this UAV was never intended to be a finished model. We just needed a relatable frame to demonstrate the processes. Given the amount of people asking though it looks like we will be looking to make wings in a future video.
Amazing job and product!
This is a very brilliant and educational video. But I have a question, Is it possible to use 3d printed parts as the "intensifier" (even if it may be sacrificial)? If so, which materials are suitable for this application?
What a good question! Honestly, we’ve not tried this but it could be possible. However, silicone is inexpensive (cheaper than 3D print, probably) and does the job so well (squishy, able to conform) that I think it’s unlikely that a 3D print would work as well. Possibly TPU, but the INTENSIL compound is so quick, easy and effective that unless you can’t get hold of some, it’s probably hard to beat with any kind of 3D print.
@@easycompositestvThank you! I was thinking some odd shapes and corners where may be hard to apply the silicone properly.
That’s a _curvy_ fuselage, I like it
Would love to also see the process of making the wings, which is what I presume we see in the background. Spread tow fabric, and I guess intensifiers used for the sharp trailing edge?
It was very excellent and professional. Are these fibers pre-impregnated with resin? Does it dry by air or heat? If it is already stained, how does it not stick to the hand?
This is prepreg carbon fibre so the resin is already in the reinforcement. Take a look at the related videos linked in the description, they explain the XC110 prepreg in full detail.
@easycompositestv thank you