DIY Built-In Firepit Benches

HTML-код
- Опубликовано: 10 сен 2024
- How to Make DIY Built-In Fire Pit Benches
Sponsored by CRAFTSMAN V20 for more info visit: bit.ly/2ESDswL
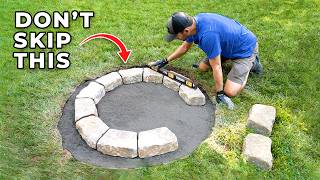
These simple DIY built-in fire pit benches are a simple and attractive design. The lumber costs are low and the skills required are minimal - a winning combination in my book! Just think, you could have these permanent benches built around your fire pit by the end of the weekend.
After using tree stumps for fire pit seating for years, it was time to replace the rotting stumps with something more permanent (and cost effective). These built-in benches are a big improvement for our outdoor fire pit seating.
Feel free to ask me any questions you have in the comments. I try to answer all questions in a timely manner.
For more detailed instructions, you can visit the full tutorial on the blog:
www.prettyhand...
MATERIALS & TOOLS:
(I've included affiliate links for your convenience. I earn a small percentage from a purchase using these links. There is no additional cost to you.)
MATERIALS:
2 ½" exterior wood screws: amzn.to/2MSVEZC
3/8" x 3" Lag screws or TimberLOK Structural Wood Screws: amzn.to/2BjQG3B
1 - 4" x 6" x 8' pressure treated post
1 - 2" x 10" pressure treated lumber (purchase length for your bench seat)
1 - 2" x 6"x 4' pressure treated lumber
Scrap 2" x 4" lumber (or other lumber to brace posts while concrete cures)
Quikrete
Drainage rock
TOOLS:
Craftsman 20V Max 6 ½" Cordless Circular Saw
Craftsman 20V Max 5" Random Orbital Sander
Craftsman 20V Max 1/4" Hex Chuck Impact Driver
Craftsman 20V Max 1/2" Drill/Driver
Craftsman 20V Max Jig Saw
Craftsman 20V Bluetooth Speaker
Tape measure: amzn.to/2EjPuhq
Hammer: amzn.to/2ND17UY
Stake
String
Spray Paint: amzn.to/2VvezwP
Shovel: amzn.to/2IL8fzB
Pencil
Combo Square: amzn.to/2EBBl08
Level: amzn.to/2T4Htan
Clamp: amzn.to/2MVvuVW
Drill bits: amzn.to/2UcJOMV
SAFETY EQUIPMENT:
Gloves: amzn.to/2IJA8bc
Safety glasses: amzn.to/2GxjFUT
Dust mask: amzn.to/2WIV5Gp
Hearing protection: amzn.to/2MTuTEu
MY WEBSITE: www.prettyhand...
SOCIAL MEDIA CHANNELS:
Instagram: / prettyhandygirl
Pinterest: / prettyhandygirl
Facebook: / prettyhandygirl
Twitter: / prettyhandygirl
OTHER POPULAR VIDEOS:
How to Change Your Doorknobs in 5 Minutes or Less: • How to Replace Door Knobs
How to Paint an Ombré Technique: • How to Paint an Ombré...
Faux Gray Woodgrain Tutorial: • Faux Gray Weathered Wo...
How to Install Security Film to Glass Doors: • Installing Security Film
How to Remove Paint from Door Hardware: • How to Remove Paint Fr...
CONTACT:
Email: PrettyHandyGirl@gmail.com


I like how you dug pits to reinforce the posts. Those benches look super sturdy! What a fun place to hang out this summer!
Great job. You fire pit and seats are great. Fabulous
area.
Thanks. We love using it!
What a great project! I love these seats. How nice to not have to pull cords out or stop mid project for a charge.
Nice work Brittany!! Those turned out great!
Thank you Jamison!
Great job Brittany! I love how the space turned out!
Thank you Adam!
Your yard is officially cooler than mine now. Great job!
Thank you. We've been here for over a decade, it's taken time.
Awesome transformation! I knew you were famous on Instagram, didn't know you were youtube famous too!
I only play the famous person online. IRL, I'm just the average neighbor lady. LOL!
Wow! how awesome is your space! I love how creative you were in moving those old stumps. Working alone can sometimes be VERY challenging!
LOL, yup, I hate asking for help. A woman's got a do what she's gotta do.
Love the video and I wish Craftsman would send me all those tools I could do wonders with them!
I bet you could build some amazing projects with the tools! Thanks for your comment.
Awesome transformation to make that space really functional. Also a ton of work and you make it look so easy!!
Thanks Jaime. Actually, besides the time frame, it wasn't too hard. But, I like working outside.
Craftsman is really stepping up their game. Great project!
Agreed!
OOooh I can't wait to toast marshmallows around that beautiful fire pit! Someday...!!!
BEAUTIFUL JOB! LOVE THE WHOLE FIRE PIT & BENCHES PROJECT! #CanDoGIRLS! #CRAFTSMAN! #DIY!
Thank you!
Appreciate that video one of the best ones out there!
Thank you Omar!
Yes cut the pressure treated end off exposing untreated wood then shove the whole post right down into the concrete. Thanks I needed that laugh. Run, just RUN from this channel!
Great benches brittany!
Thank you!
Great project Brittany!
Thanks Amy.
Great job! Greetings from Winterville, NC 🤗
Thank you! Hi back at you.
I loved those benches! How many days did it take you to make them?
You can usually accomplish this build in two days (you'll need an overnight period for the concrete to harden.) Length of time depends on how many benches you build and skill level.
Nice work 👍
Thank you so much Pepe Mora!
I need these! My benches are constantly tipping over.
They are super easy to make.
Looks inviting! Are you planning on oiling or staining the wood too?
I might stain the legs darker to match the wood storage shed behind the benches, but might just clear coat the tops with a deck sealer.
3/8" screws to attach the supports? Isn't that a little short? Each support would be 1.5" thick. Did I miss something?
3/8" wide. Sorry for the confusion. The anchor screws I used were 3" long.