1 Hour DIY Fire Pit | Build a Fire Ring With The Making Life

HTML-код
- Опубликовано: 21 апр 2019
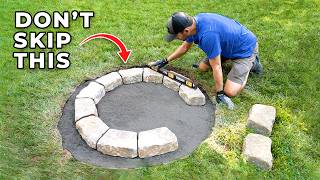
- This is a time lapse video that shows you how to build a DIY fire pit in one hour.
This is an easy DIY project that you can do in your own back yard.
We've had to move several times for jobs over the years and putting in a new fire ring is one way we put our stamp on the new property.
Tools for Building Your DIY Fire Pit:
Spade shovel- amzn.to/32qJDEr
Gravel rake- amzn.to/2CjtCpa
Three foot (or larger) level- amzn.to/2WvDnrj
Caulk gun- amzn.to/3eD2lv9
Wheelbarrow or lawn cart and tractor (Optional - helps save your back) - amzn.to/2CbOyyD
We purchased most of our supplies at Lowe's for about $90.
The stones are $2.38 each. We purchased 30 stones to complete this project. You could add an additional layer if you wanted a higher wall.
www.lowes.com/pd/Flagstone-Al...
We used Paver Base Step 1 stones for $3.98. We purchased one bag but we could probably have used two.
www.lowes.com/pd/Oldcastle-Ko...
We used Paver Sand Step 2 for $3.48 a bag. We used 2 bags.
www.lowes.com/pd/Oldcastle-Ko...
We used Liquid Nails Ultra Duty Poly for an adhesive for the stones. This one we purchased at Harbor Freight for $6.99. We used one tube, but you would want another one if you added another layer to your fire pit.
www.harborfreight.com/liquid-...
If you want more information about our DIY Firepit, check out our blog post on your website the Making Life: themakinglife.com/how-to-buil...
Music by: www.bensound.com
----------------
The Making Life is Ned and Hannah and we want to say thank you for watching! Don’t forget to comment, like, and subscribe! My wife and I created The Making Life in August of 2018 with the goal to encourage/inspire those who make to make more, and those who don't, to start.
If you enjoy our content, check out our other platforms below:
Website: Check out our blog! - www.themakinglife.com
Instagram: @the_making_life - / the_making_life
Facebook: @themakinglife1 - www. themakinglife1
Pinterest: The Making Life - / themakinglife4509
Disclosure: As an Amazon Associate we earn from qualifying purchases.


Man thank goodness for that precious little girl, you two wouldn't have ever gotten it done without her help. Wonderful video thanks for sharing!
Absolutely. She makes all of our projects doable and more fun!
My thoughts too. Bless her
Wife wants a fire pit for a Christmas Eve fire! Just what the doctor ordered. Later probably in the spring I will
Add a seating area using pavers. Thank you for this video and yes work goes by faster with helping hands!
Phenomenal! Hope the overview was helpful! Not a hard project and even if you mess something up you can still light things on fire in it!
Nice job. I like how you put sand between the joints on the first layer of blocks. I haven't seen anyone do that before. Oh,....and give your little helper a pay raise, she deserves it.
Thanks! The sand in the joints almost acts as poor mans grout/cement and stabilizes the stone. Once it rains on it, it actually firms up nicely. I’ll definitely give her a raise!
Nice job guys looks great.
Thank you for sharing your video. I have been trying very hard to figure out a special gift for my parents who are new land owners. I think they will greatly appreciate my little brother and I building one of these for them to enjoy on their property. Two thumbs up!
That’s awesome! I hope it turns out well!
Thank you much for the video and the blog details. Just did the materials purchase and build today.
Awesome! How did it turn out?
I love watching your little helper. She look like she had a lot of fun. And it's funny in the very last shot she has her shoes on the wrong feet!
James McDonald it seems like at this age, they still enjoy helping. I hope that continues!
Thank you for this video tutorial. I am starting mine tomorrow and after watching I feel much more confident about the project.
Awesome! Hopefully it goes great and you enjoy it for years! Three years later we are still using ours!
Great fun video! I am building a fire ring tomorrow and this was very helpful!
Awesome! I hope you enjoy it wonderfully!
Thank you for uploading this video! My husband and I made our fire pit over the weekend and your tutorial was so easy to follow! We love ours!
That makes me so happy! I hope you enjoy!!
1 year update - used the crap out of this firepit last summer, great investment. Noticed a couple weeks back about a third of the blocks were coming loose, so purchased some more landscaping stone adhesive to glue it all back together. In hindsight, would recommend others to not skimp on the adhesive as I did, probably would go with 2 tubes in between each layer.
in case anyone is wondering, I copied the same build here except I added a 3rd layer. No issues whatsoever with airflow.
Awesome update. I have a few loose blocks and I haven’t reapplied glue. Really no issues with ours just being loose. If it falls off I put it back. One cracked that I might replace. I checked the other day and Lowe’s still has the same style in stock. Thanks for for the update! It is one of my favorite things we’ve done on our property.
Nice family woriking!
Oh look at that cutie pie helping!! I love it!
Jane Doe She was a wonderful helper! And still is!
Great video. Thanks for sharing
RWA Handyman Solutions absolutely! Thanks for watching!
Nice work👍👍
Thanks for watching! One of our favorite projects and we use it all of the time!
Just came across your video. Well done, but I must say, your little helper grabbed most of our attention! lol Quick question, how has the Liquid Nails held up? Curious if the heat would affect it over time. Thanks again!
Some have gotten loose since then, but that is also from throwing logs into the ring, kids dancing around the blocks, etc.. I think the liquid nails really holds it all together as the blocks begin to settle into the ground and make a solid base over time. Ultimately, if the blocks loosen up, it doesn’t affect the functionality. And if it’s a personal preference to not have a few wiggly blocks, you can just reapply the liquid nails once a year.
To buy pre-made stones looks quite easy, anyway. I'm making my own stones. It's hard work, but quite satisfactory
That’s awesome. I’m sure that will be fantastic!
Are there any videos on how to make your own stones for a project like this.
Loved the great video. Now I want to build me one but have been wondering how would I go about cleaning this out when the time came. Looks like it would be a pain in the butt because I'm assuming you'd have to do it with a shovel yes?
Yes, use a shovel. I lay out my blocks I the size circle I want and then use the shovel to score the outside edge of the circle around the blocks. Remove the blocks and then dig out everything in the middle. Good luck!
@@TheMakingLife I mean how to clean out all the ashes after they build up after several fires.
@@imagineengine ahhh I gotcha.. yeah. We just dig them out and haul it over on our compost pile.
Does the Liquid Nails Ultra Duty Poly adhesive stand up to the heat or does that top row come loose?
About half loosened up over the past five years. I have not reapplied and the fire pit is fine.
We just built a pit using this guide. Just finished thank you! How long do you think the adhesive needs to be left alone before we have a fire?
I would say 24 to 48 hours. Awesome glad to hear that you guys made one! Should be fun for a long time
What are you pouring in the base besides sand (the grey stuff) and what are squirting on top of the 1st layer of blocks I’m guessing to secure the 2nd layer? Thank you
So a couple things go into the base… paving stone… comes in different sizes or grain/rock size. Can be bought at Lowe’s or other hardware stores. And yes, the adhesive is just concrete adhesive that works with masonry.
@@TheMakingLife thank you we found a new silver metal ring at a yard sale for $10 we had been thinking about doing a fire pit anyway so….know you said that wasn’t your favorite but we got it cheap so …we already have had a 12 in 12x15 ft red paver patio and was thinking maybe taking up some pavers and putting this ring in the fartherest corner from the house? We found some 10inch red retaining wall blocks for $1.86 each how do you figure how many blocks you need to buy?
Have you had any issues with the blocks cracking due to the heat of the fire? I've built a couple and have installed fire rings to protect the block.
I have had one block crack in the past three years. So very little to no issues.
what kind of blocks did you use . Any concern about them exploding without a fire ring?
We use regular landscape stones from Lowe’s. I think the exact product is in the video description. I don’t think that they are “fire rated” if that is even a thing, but we have had two different fire pits using these blocks and have had no issues. Have a couple blocks that have cracks in them from the heat but for a few dollars they are easy to replace.
KATE, That's mainly a worry for Gravel and Creek Rock regarding that and I'm pretty sure Granite is another
No worries with Landscape/Retaining Wall Blocks/Pavers and Brick. They hold excess amounts of heat
Nice but what are they putting in there. What kind of sand dirt etc.
There are two different parts. There are links in the description to the Lowe’s products. One is leveling gravel and the next is pavers sand. Start with the gravel and then the sand.
Have you had an issue staying lit. No air vents on bottom layer.
None whatsoever. I think with it only being two blocks high it is still getting air circulation. Additionally the blocks are not mortared together so there are some small gaps and holes throughout the blocks.
Any problems with bricks cracking since you’re not using a steel fire ring insert?
I have had two or three bricks over five years crack. If I really wanted to replace them, I would. But haven’t needed to.
What outside diameter is this? Looks good!
A little bit over four feet outside.. 3’-7” inside diameter. Thanks for watching.
@@TheMakingLife thank you.
How many blocks did you use? And what’s that sand and gravel?
Maria Reyna we used a total of 30 blocks but depending on how big or small you want you can use more or less. This seems to be a really nice size for us about 3.5 feet across. The gravel is leveling base gravel you can get at your local hardware store, we went it Lowe’s. Check the links in the description. Same with the sand - it is just playground sand bought from Lowe’s. Thanks for watching and feel free to ask any more questions!
@@TheMakingLife is the fire area (inside ring) 3.5 feet across? or are you including the outer ring as well?
HelAom yes it is. 3’-7” to be exact.
The Making Life thank you for the guidance, I went with 3 layers and it turned out great. only thing I’d suggest is getting one of those ground stompers to flatten the soil more (if I had to do this over)
HelAom awesome! I hope you enjoy your fire pit! One of our favorite evening events.
So you just use sand for the base meaning the fire is built right on top of the sand? any do you have any problems with that? i used lava rocks in mine but they are always wet and explode when they get hot.. just not ideal I am hoping I can just use sand and be good? is there any specific sand that you use?
Yep. I use the paver mix from Lowe’s. No issues whatsoever. Should be a link in the description! Good luck.
What is the purpose of the sand at the bottom of the pit and the sand on top of the bricks? Is it necessary to use glue on the bricks? What type of glue is that by the way?
The sand is used to level the paver stones. Glue is not necessary on the bricks but it helps hold things together. The glue was a construction adhesive in a caulking tube, compatible with masonry or concrete.
How often do you need to add sand when using..
Really only would need to add sand if you want to refill the gaps between the blocks. And that is personal preference. I prefer not to because it opens some gaps as the sand settles and allows better airflow to fuel the fire. The sand on the bottom just gets coveted by the ashes and you just have to remove the ashes when it builds up too much. Don’t overthink it! Hope you get one built and enjoy it!
Hi Ned and riley
KK Kimmel hey man!
can someone tell me what is the proper term for these rocks used for the fire pit.. thanks
www.lowes.com/pd/Flagstone-Allegheny-Retaining-Wall-Block-Common-4-in-x-11-in-Actual-4-in-x-11-2-in/1001844896
what are the dimensions of the pit (inner and outer)?
3’7” inside diameter. Outside is probably about 4’7” outer.
Where is the best place to buy the blocks?
Probably Lowe’s or Home Depot. Or your local hardware store if they have landscaping supplies.
Probably Lowe’s or Home Depot. Or your local hardware store if they have landscaping supplies.
What were the dimensions of the finished pit?
3’-7” inside diameter.
Thank you!!
1 hour?
Daniel Grossklaus yep... the time lapse video was about 58 minutes before speeding up from start to finish. That obviously doesn’t factor the time we spend going to Lowe’s to buy supplies.
Ummm , you did not build a fire ring, just saying.
Agree to disagree! Ha thanks for watching!