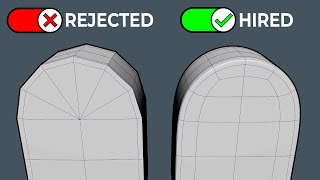
Maya Hard Surface Modeling: Cylindrical Shapes

HTML-код
- Опубликовано: 3 авг 2019
- ➡️ Overwhelmed with 3d modeling & Topology? Start creating Professional 3d models with my FREE guide:
www.clkmg.com/jlmussi/3d-mode...
➡️FREE Trial of my Maya 3d Modeling Course: bit.ly/3d-modeling-course-fre...
➡️FREE Hard Surface Modeling Guide: jlmussi.com/hsguide
Want to get better and faster at Hard Surface Modeling in Maya? In this Maya Modeling Tutorial, I will show you how to model a Complex Cylindrical Hard Surface Model quickly and efficiently.
Precision is key to Hard Surface Modeling in Maya and this video will focus on that.
In this Tutorial, I will cover the following Maya Modeling Techniques:
► Working with Symmetry
► Working with Instances
► Using the Bend Deformer
► Creating Panel Details
► Using the Multi Cut Tool
► Editing Pivots.
► Using Vert and Grid Snap
This 3d Modeling tutorial is great for Maya Beginners and Advanced users alike.
➡️3d Modeling Beasts Facebook Group:
/ 705710056658253
➡️3d Modeling Inspired Tees:
teespring.com/stores/jls-shop
➡️FREE Trial of my Maya 3d Modeling Course:
bit.ly/3d-modeling-course-fre...
➡️FREE Hard Surface Modeling Guide:
jlmussi.com/hsguide
On Social Media, Lets Connect!
jlmussi.com
/ jlmussi
/ jlmussi
artstation.com/jlmussi
#mayamodeling #mayahardsurface #jlmussi


Great tips JL, You popped up on my recommended a few weeks back, You're a solid teacher, nice vids with easy to understand explanations and fun to listen to haha :D. Looking forward to more content from you! Great stuff.
Thanks for the feedback Jake. Glad you're enjoying my content.
@@jlmussi hey man! I want to work with you. Please send me any task
Heya JL! Thank you for producing this video. I've struggled with this type of hard surface modeling for a long time. You are precise and straight to the point which I love in a tutorial. Look forward to more!
This technique is so useful! thank you for sharing this.
Thanks for your time and your share mate!
Thank god I was just wondering how to tackle this kind of shape.
Appreciate it!
another great tutorial, thanks.
I like that there's many different ways to approach things in 3D modelling, I can imagine a few other ways this could've been done, yours is distinct to your style and symmetry.
Really nice way to go about in inside of maya and keeps geo super clean! Thanks my dude, i been doing this in zbrush with live booleans then just array meshing and retoping manually, gonna give this a shot!
Even though i am new to Maya I like this guys energy and speed, it forces me to get better, faster. Its like he's challenging me to learn quickly. I am pushing myself so that one day i can be good like him. Nice work bro. Keep doing what you do. ❤️❤️
Great tutorial, thank you JL...
Thanks for a great lesson
Very good tutorial, thanks!
Thanks for good tutorial!
Great video, thank you for sharing this.
Thank you 🙏🏻
Great stuff!
Thanks JL
hey, Thank you so much , its really amazing technique for cuved hard surface, I tried after wathing this video and that was really awesome experience.I was struggling since many days but now, a very big relief.Keep motivating .Lots of love from India.
Epic! Thanks! :)
cool tutorial! tnx!
i wish 3d modeling channels had more visibility and subscribers here on youtube... your vids are awesome txs!!
3d modeling is a smaller market compared to others so that's somewhat expected. Not overly worried about numbers at this point, I'm happy to be make the complicated easier for 3d artists. Thanks for stopping by.
Nice vid bro! I'm proud to say you did it just like I would have, I'm on the right track!
Great minds think alike :-)
Thanks for the videos your legit man.
thanks for sharing, this is what i need. subscribed!
Welcome to the squad!
thank you..
Nice tip .thank you
i never thought about making a pattern for this kind of modelling,.. it looks way quicker than what i would do! xD
definetly gonna try this out ! :D
great video!
Thank You so much for share your techniques ! i follow your videos
You're welcome, thanks for stopping by the comments section.
I really enjoy your content JL, as an old guy (almost 34) that decided to do a career change and registered into animation school, i try to milk as much information i can from youtube.
i found your channel and almost immediately subbed :) keep up the great videos, i learn a lot!
Glad I could help in your 3d Modeling journey and welcome to the squad!
Thank for valuable Idea ☺️
Thanks for talking about density in one of these, it's so important to have the density of your base shape (ie cylinder). One tip that ive picked up too, is when you are duplicating something multiple times with the same transformation, you can press shift-d after the first time to repeat the last duplicate and transform. Cheers!
You know what.. I thought I knew that existed but second guessed myself by hitting the wrong shortcut. Then I was like did I do this in Maya or another package. Thanks for keeping me on the ball Austin :-)
you're a genius!!!
Hi' nice tutorial, I see your topology produces much better results than the one I was using departing from a subdivided plane. No having vertical edges does the trick. What's funny to me is that I can do the same stuff in a fraction of the time by using Blender with modifiers and a couple of plugins.
Great video as usual!
However, I noticed that you never use the "duplicate with transform" option, instead of duplicating and snapping several times over. It's sometimes much faster than "duplicate special" even.
Ctrl+D ; move the piece wherever you want ; Shift+D will duplicate it again and apply the same transform.
So for example you duplicate a piece and move it 100 units on the X axis and rotate it 10 degrees. After hitting Shift+D, the next one will be 200 units on the X and rotated 20 degrees. Shift+D again, 300 and 30. And so on.
You can use it to create repeatable patterns, or complete a cylinder after working on one of it's sides, or something like that. Just by quickly hitting Shift+D couple times.
This really helped me with a planar model I've been trying to get the pattern on. I've been working on a Cheese Grater and the spacing stuff here works really well.
Glad it helped Terry.
SUPER!!!
As always.. great tut & some super useful tips, techniques and processes! You mentioned your M2 Browning model, will there be a future tutorial showing how to create this or something similar? 👍
Thank you bro
Utilizo o blender e essas dicas estão ajudando muito
wow, awesome video :) thanks
You're welcome Santiago.
Really cool tutorial man. I was wondering how you were gonna turn it into a cylinder and I never thought to use deformers. Great work, thanks =D
Deformers are a must for hard surface modeling. You can model many complex shapes flat and deform them into place.
It's funny how deceptively simple it is. I went through my animation course completely lost on how to make circular patterns or hold punching in a material and its stuff like this that just makes me think how it's right there in front of you. Seems obvious now that I sat through.
Thanks very much for the video; I liked seeing your take on it.
Woah woah woah...that’s a Marlins hat! Nice dude
New sub, great video.
Welcome to the squad!
One Big Like💯👍😎
Gracias, me sirvió en Blender ajsjjajs
Please upload PBR texturing and lighting technique tutorials. I am very poor in this two subjects.
Удивительно какие классные вещи можно сделать с помощью стандартных инструментов
Thanks for the great tutorial. Is there any way to zoom close to a model like when I have merge two vertex, like whenever I tried to move closer by zooming in the model cuts off from the view I think the camera clips off the model so is there any fix
this might be a really lame questio but im working on a gun and i was wondering if i should make the low poly first or high poly because i dont know how to get around it. I also dont want too many polygons but i dont want ngons aswell
how would you use this workflow to get it to fit a predetermined cylinder shape. like how would you go about ensuring the accuracy of the plane dimensions and the curvature to get it in the specific cylindrical shape you want
This can be done the same just with far easier topology. If you use that much topology initially its harder cleaning sliding stuff up.
how did you select all the edge after grabbing one? how did you bring up the input options for the tool ?
You lika Arrimus 3D but in maya. Hope u Will release 3d Max tutorials as well
I must seek this Arrimus you speak of and battle him to the death. There can only be one. Lol I seen some of his work, he's great. Solid videos and channel.
18:19 Oooo Boi wait, can you feel the illusion or is it just me?
oh yeh man i did too
Awesome sir just GREAT so helpful myself Rony an animation CG VFx student
Glad to be of service Rony!
Note for me:
6:50
18:38
21:11
Your uti setup would give me such insane headaches
what is hot keys to bevel? offset and more function
Thank you for sharing! I was wondering, what's your computer setup?
A powerful laptop and a dell curved monitor. I can get you the specs if you really need.
curious, at around the 8:30 mark, why do the duplicate, why not select the extruded edges, move their pivot to the any edge vert on the left side more than one row down from where the edges originated, then just vert snap the edges up one row and save the time from the duplicate operation? Is this a case of many ways to skin a cat, or was there a specific reason you did it this way that i ma not seeing?
you can snap along a single axis when holding V, just hold V select axis you want to translate across, and move your mouse towards the point you want to snap along
Okay thanks for the tip.
@@jlmussi No problem hope it helps.
Thx for sharing, I have a wuick question, What’s the hotkey for merging edge?
Its a custom hotkey done via the keyboard shortcut editor.
great tutorial and tips, thx much ! i will disable my adblock for ur channel
could u make mascara brush in maya ??? plz plz
There is another quick way, create a cylinder with enough edges and use circularize tool 👌😉
Does it produce clean topo like this One?
@@CGKey Trust me....it doesnt.....
@@Mirakuruuu it does if you know how use it, in my opinion i would go for the circularize workflow
@@TrialSpring29 You're right. I found out a way to do it without getting any seams
One small problem here. After the bend deformer, the circles are not perfectly round any more... The have a small deformation because of the bend deformer
With which key(s) did you center the pivot?
You have to go to Modify and select Center Pivot. There is no default key
Hi JL, have you ever considered Blender? 2.8 is out and it has a setting in the preferences for "Industry Standard" controls. I have messed with it a little and I am considering switching from Maya to Blender. Thoughts??
Learning Blender is on the playbook. It's one of the few major 3D packages that I haven't touched. Honestly if you are a freelance 3D artist and outside the realm of a strict pipeline, you can model in just about any package you feel comfortable in.
@@jlmussi I am actually very comfortable in Maya - just not comfy with the price. jozf.artstation.com - Blender, being free, is VERY attractive.
sir. i have problems with uv editor.. plz help
may i ask your pc specs?
lol, in 3ds max it will take like 1 min to create the pattern, also, I think creating the pattern in illustrator than import it to the 3d package as a path would be more quick and easy !
oh really how?
Great piece. But i have noticed in all your videos that you don't know how to snap in a particular exes. you always use vertex snapping. what you just need to do is press V and transform to the axes you want to move pointing to vertex you want to snap into. (V + X axes arrow, it will keep snapping the vertexes along the way).
*sigh* 2:10 Holding tab doesn't paint selections for me. I wonder if this is a channel for beginners.
Great tutorial! And what a cool coincidence. I just finished texturing my model of a Browning 50 caliber machine gun. I just posted it yesterday. When it came to creating that particular part of the gun I was perplexed for a bit as to how to create all those holes? I ended up doing more or less the same thing you did which worked out quite well for me. But I was left questioning myself, as to whether or not that was the best approach. After watching your video I now feel comfortable with that approach. It's good to know that I did the same thing you would do. So thank you very much here's my version of the gun on Artstation
www.artstation.com/artwork/Vd9avP
Came out great Robert. That M2 is a beast of a design and pretty complex. Glad you pulled it off. My UV shells where insane on that model. I do want to go back and create the mount, shells and present it more like a still life. Yup you did it the barrel the right way...I guess great minds think alike :-)
@@jlmussi I actually modeled the M2 a while back. But I used it yesterday as the model for my very first Substance Painter project. I had to take the geo back into Maya to redo all my UVs. As you said the UVs for this was a pain. I laid all the UVs out on one tile so to get enough Texel density I worked at 4K. For some reason, SP doesn't like my graphics card ( GTX Titan ) and it fails to bake an Ambient Occlusion map. So before taking the model into SP I imported it into ShaderMap 4 and baked out the AO map there, the rest of the baked maps were done in SP. I am so impressed with how SP uses those maps to do its magic. I simply used a couple of Smart Materials that is all. So I spent lots of time in Maya with the UVs, and the result of that is a lot less time in SP but still getting great results. Anyway, thanks for taking so much time to produce all these tutorials. I really appreciate your work.
So I model for games and usually when I model any even simple complex shapes, is it just me that freaks out if that model goes passed 2k triangles and this is because I was taught to rely on baking lol a lot. So for all the other modelers out there if you are doing high detailed environments what the minimum polygon counts you guys have and this is not for that plane wall but simple regular props and not hero props because I know those have to be ridiculous in detail so the counts have to be a little high but your regular good old trashcan. I modeled a smart fridge with just one surface bevel and the whole prop came out to 1304 triangles and I noticed it and started merging edges to bring it to at least 700 triangles and deleting back faces after beveling. Then with curiosity I smoothed it and damn it was ugly. I should have left it 1300 when it looked nice. Lesson learned even if you make props for games don't be greedy and give that mesh the little polygon it deserves just not crazy like 5k then that's nuts lol. But yea just sharing my story.
How to model peppa pig (cartoon) in maya 3d please
Your link doesn't work on phones. Just so you know
why do u suffer yourself
u can create this shape using Zbrush faster and more convenient try it
i worked maya around 8 years then i learned zbrush and found out i wish learned zbrush sooner
so try to use each app to your purpose and don`t suffer yourself to do a job just only using one app
I use Zbrush as well, the package is great and has its strengths but not for a design like this. Yes you can create this shape, but with this clean of a topology as efficiently I doubt it.
Topology is bad,texture will stretch
mine dosent stretch hmm