Это видео недоступно.
Сожалеем об этом.
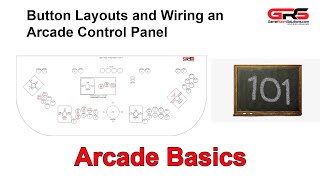
(Part 8) MAME Cabinet CP Build

HTML-код
- Опубликовано: 21 окт 2015
- In this video I select the type of button layout I will be using for the MAME cabinet control panel. Shows different types of control panel button configurations, an internet site where you can find and print button layouts, marking with pencil to ensure clearance inside the control panel box, and measuring for the placement of the joysticks and buttons. (Part 8 of ?)


![Baby Kia - WYG (feat. LAZER DIM 700) [Official Music Video]](http://i.ytimg.com/vi/avlLsOH_oJc/mqdefault.jpg)


coming along very nicely T-man, always watching to see what comes up next!
Thanks man. I decided to use that Japanese layout, and I think it will work well and looks more interesting than the blocky American layout.
so touching for an excellent video
video anda sangat bagus dan mempunyai mesej yang luas terima kasih
I'm going to use the same Japanese arcade style layout too. I don't like the America layout. It's easier to mass produce but a lot less comfortable.
love your work!
Thanks man, I appreciate that!
how did you print the button layout from slag coin to make them the scale accurate ?
It's been a while since I printed them, but I think there was an option in my printer settings tab that says "print to size" and I think that's what made mine come out accurately.
Hey torture bot
Nice job on the video! Now after watching your videos I now know what I want and need to do. I bought and 8 button kit with joysticks and now will get a trackball as well. My only question is what was the total dimensions of the top board?
Chris
Chris Capaccio 13 3/4" X 31 1/8". The frontmost corners I rounded with a belt sander so they wouldn't have sharp edges, and the t molding would go around them easier. The back side of the board has the dimensions I gave for the top, but it bevels slightly at the monitor plexi. So if you measured the board from the bottom, it would be the same, but the distance from the front to the back would be about 1/2" less. So it would be about 13 1/4".
The entire PPI is really confusing! If you select 300 its the size of a standard paper!
what size should the printouts be...
I believe I used an option in my printer settings tab called "print to size" and it made it come out exactly to scale like the creator meant for it to.
@@TortureBot what paper did you use? i'm trying it with A4 paper and nothing is working.
Standard printer/copier letter-size paper, 8.5"×11".
The images were indeed made for the American letter format, which doesn't exist here, i had to use paint to print it in pixel-perfect mode, worked beautifully with my country's default size, A4.
Also, wow, even 3 years later you still responded, thank you!
I do my best to respond to any questions or comments on my videos anytime I see a notification. Sometimes I don't get the notifications and don't realize until months later, but I try to to reply at that time.
My life has thrown me many curveballs in the last couple of years, and I have not been able to edit and upload videos. After working for 26 years at the same company and the textile business, my entire company closed the doors, and I am back in school at the age of 47 trying to get a two-year degree in industrial Electronics Technology.
I have learned so much in the last year, but I still have about two or three semesters to go. Luckily, since my trade was affected by foreign competition, I was eligible to have my degree fully funded. I chose Industrial Electronics Technology, because not only will it help me to obtain a high paying job in the future, but it has taught me many concepts about electronics which I love as a hobby.
When I get back on track to upload more videos in the future, I hope all of my subscribers will still be there to see what I have learned. I don't want any of you unsubscribing, so as long as you find my videos useful, I hope you will stick around. Thank you!
HI,
i cant print those to scale even if my life depended on it :((
i have tried to print to size .. different formats .. nothing .. im goin insane here
What is the physical format of the paper ? A4?
What program did you use to print yours?
SkullK I think I just printed straight from Windows XP. I can't remember my exact settings but I know I just printed to size and used standard American letter paper which is 8.5 by 11 inches.
Thank you for the answer :D .. i managed to do it using GIMP (seems that gimp recognized the resolution scale)
Thanks again
@@skull003 using gimp worked for me
Im pretty awere that you probably solved your problem hahaha, but i will let my help here any way! Maybe i can help other people, who knows huh!? Lol
Well im going to say what worked FOR ME, so if you are using an A4 paper, all you need to do to get your real scale dimension is choose the option "96 Pixels Per Inch" that is right below the layout image you want, once you are directed to another page where the image is, you can keep any other print settings by default, and you are ready to go, that's what worked for me, if you want to make sure, you can grab a ruler and measure its porporions based on the measurements in the image you just printed, i did it and everithing was matching perfectly
lol, whoever dimensioned these plans needs to take some drafting courses. I never understood this curved ergonomic button layout to fit the profile of your fingers. It makes no sense. You use your index finger most of the time in the heat of a game, maybe your middle finger. You NEVER use your ring finger or pinky give me a break, your not playing the piano here. You use one finger that pivots from your elbow not warrenting any curve at all. Straight is always best otherwise, you just get lost moving from side to side. Stop trying to be all fancy.
I'm not the creator of the button layout, but the site has a straight American layout like you would probably like. Only did a little drafting in 9th grade in high school so I would never pretend to be an expert at that either. One thing I can tell you though is that I use every single finger on my hand when I play a fighting game like Mortal Kombat. It would be extremely hard to pull off some of the combinations without using at least two or three fingers in succession, or at least you would not get the moves off as quickly and would probably be more easily defeated. The curved layout is the standard in Japan and from what I have read it gives the players an advantage because it is more natural to the curve of your fingers. It does not seem as natural in the United States because we are used to seeing the straight layout. I was going to go with a straight layout but I wanted to change things up and just give this a shot. It is actually working out very well since the cabinet is already finished and I have gotten a chance to play with the curved layout.