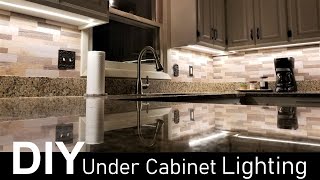
Ultimate Guide to DIY Cabinet LED lights - full install

HTML-код
- Опубликовано: 21 сен 2023
- Learn how to install DIY under-cabinet LED strip lights in your kitchen. Everything from selecting your LED strip lights, controller and power supply, to running your wires and installing the LED strips and diffuser channels. These LED lights will take your kichen cabinets to the next level and this video will show you every step you need to take to do it yourself.
Should you choose a ready-made solution like Govee LED light strips or Philips Hue Shapelight LEDs or go the full DIY route? We have everything you need to know right here.
In our next video we will show you how to automate your LED light strips using your home automation hub, plus other smart home ideas for your kitchen LED lights.
🏅 Affiliate Product Links
BTF-LIGHTING RGBCCT 5050 RGBWW(RGB+Cool White+Warm White) : tbiu.io/fXNMWgL7
GLEDOPTO ZigBee 3.0 LED Strip Controller : tbiu.io/jRUkeag6
ALITOVE AC 100-240V to DC 12V 10A Power Supply : tbiu.io/NDvGLOzO
Muzata 10PACK 3.3FT/1M LED Channel System : tbiu.io/4kWLPQBx
Thermostat Wire 18/6 - Brown - Solid Copper : tbiu.io/H3vVdaWp
DaFuRui 25 Pcs Lever Wire Connector : tbiu.io/DgwnCYhN
10 Packs Solderless LED Strip Connecto : tbiu.io/J0yNeRrA
Philips Hue Bridge : tbiu.io/cZe5TTeS
Wago Lever Nuts : tbiu.io/gsF4MMNc
❤️ Hubitat Elevation C-8 Home Automation Hub : tbiu.io/AmSViTyx
🎞️ Useful Videos
Hubitat Dashboard Drag and Drop : tbiu.io/Q2IbBqIB
How to Install User-Created Apps on your Hubitat Elevation hub [Hubitat Official] : tbiu.io/kGFj4b12
Hubitat Elevation C-8 Review - Smart Home Automation Hub [2023] : tbiu.io/55OuZYfV
Yale Assure Lock SL YRD256 WiFi Smart Lock Review : tbiu.io/ekP4GpWU
❤️ HUBITAT PACKAGE MANAGER - Install and Tutorial ❤️ : • MUST HAVE APP - Hubita...
== DIY Smart Home Guy Websites ==
Our How-To Website : tbiu.io/mgXuyoSN
Support This Channel : Consider leaving a 'Thanks' donation to support the making of this and other videos.
DIY Smart Home Guy Featured Products : tbiu.io/j0srj4um
Facebook : tbiu.io/Kj3kMyqD
Twitter : tbiu.io/VeMwOGI3
DIY Smart Home Guy creates how-to videos for smart home automation centered around Z-Wave and Zigbee devices. Review videos are generally centered around Hubitat Elevation, SmartThings and Vera. I personally run Hubitat as my primary smart hub, however I do test products on the hubs mentioned. I understand that a home automation hub is not a path for everyone. I chose this path because I am a firm believer is advanced automation and local control.
#DIYSmartHomeGuy #SmartHome #HomeAutomation  Наука
Наука


You never went over hownto incorporate these with wall switches. Can you explain that portion?
A touch of Vegas in your kitchen. How very 2020! Under cabinet warm white is all you need.
Vegas, baby. VEGAS!! Yeah, we mostly keep it white, but we do have some color automations to get the kids off to school: ruclips.net/video/-YweLYJ-vrw/видео.html
I haven't installed mine yet but my teen kid has infinite color led strip light in his bedroom, so yea, I just ordered plain no color light for my under cabinets hahaha
Nice job on reviving the channel, great job on the LED install. Love your sense of humor, DIY guy here and I couldn't agree more... Do it myself and save more money for golfing!
Thanks! Just need to stop committing to new projects so I have time to get out and play.
You may regret not using channels under the kick space. I have never had any luck with LED tape staying stuck. At least in the channel they will not dangle down if unstuck. Great video. Good luck from the UK 👍
Thanks! We’ll see. I figure the worst that happens is I add the channels later. So far my sticky strips are holding up in my bookshelves for a couple years.
Great video very informative. My previous LED cabinet lighting of at least 12 years just quit so I was not familiar with the new stuff. Your info led me to a much better understanding and a full Shopping Cart of what is needed. Thanks a bunch.
Beautiful! Glad I could help and thanks for watching.
This is a big help since I am looking for a guide on how to put strip lights using Nanoleaf on my cabinets. I will surely use this video as a reference. Thank you!
fantastic! let us know how it turns out
Excellent install!! Thanks for the inspiration on using the LED channel. I'm on my second install where I am reusing the Hue strips I pulled from our old home and installing it in our brand new home, and the channel will make it look much nicer without the LED dots...that was one thing that bugged me and now I know how to make it better this time. Thank you!!!
That is awesome! Going to try this as my kitchen is almost same layout. I bet your time spent on this cost you several rounds of golf. You hit this video straight down the fairway!
Thank you! Yeah, it definitely cuts into the golf time, but I've saved enough by doing home projects DIY that I'm cashing in my chips for a trip to Bandon Dunes. I'm sure I'll find some way to sneak some video from the trip into a future video.
Specialized presentation, glad to see our track was chosen by you😊
The Muzata LED channels look great!
Thanks... thanks Big Big... I watched this video many times, used your links to purchase parts, and Got-R-DUN. Love the outcome and although I very rarely write reviews, had to on this because it really helped throughout the process. Nicely Done 😎
Amazing recap for Kitchen lighting! keep up the great videos
Thanks! Will do!
You went full Clark Griswold on that control panel!!!
“Hallelujah! Holy *****! Where’s the Tylenol?”
I love his explanations! I’m about to blow up my home messing with this guy!😂
BOOM! Let's do it!
I’ve not had much luck with soderless connectors connecting to the LED strip, though the connectors you used for the cables is a great idea! In my experience, the connection ends up not working well after a while and the lights start flickering. I find that soldering the cables directly provides better long-term results, though it takes more time to setup and requires some soldering skills…
I was a little doubtful, but so far they have worked perfectly. I figure as long as they don’t get bumped there is no reason they should stop working. Soldering is definitely ideal but, above my pay grade.
Use 3m automotive double sided tape to install the channel to the bottom of the cabinets. Even easier than drilling and screwing.
Yeah, used 3m tape for the power supplies and connectors. I don’t even know how I would get a drill under the toe kick
Big help, thank you
You're welcome!
Perfect timing.... Just about to remodal kitchen and wasn't sure about the strip lighting aspect of it!
Awesome! It takes time; especially the wiring, but definitely worth it.
@@DIYSmartHomeGuy1 shoukd be easy... Drywall is fully being removed
Excelente
Thank you for the tongue in cheek humor. I laughed throughout the video.
Thank you so much for this!! Im about to do this exact project. Did you use a seperate zigbee controller for the top and under cabinet strips on each cabinet? To be able to indivdually control the top from the bottom.
Yes, I used three separate gledopto zigbee controllers. One for each level. Each controller needs its own power supply, too
Does the controller works fully with the hue bridge and scenes? I’m about to buy the led strip plus but this seems to give more light, what about the colors, are they close to the hue one?
great vid
Thanks!
Thanks for the video, couldn't have done it without watching it. I just completed installing the lights under the cabinets. I did 5 short runs, totaling about 28 ft of RGBW strips with a wt5 controller and a 24v 15a 360w power supply. Now I want to the same for the top of the cabinets. Would I need a separate controller and power supply? I would need to do 2 runs of 16ft RGBW strips. Thanks for any help.
Thank you so much! It depends on the power draw of the led strips if you’ll need a larger power supply and/or controller. My guess is that you have a large enough power supply but you might need another controller. And personally I would recommend a second controller for the top of the cabinets so you can turn the top and bottom lights on or off individually. Let me know the specs of your LED and I can give you better information hope that helps
What if I don’t want to create a home hub with voice commands? Is there a handheld/app controller you could recommend instead?
Did you run strips in parallel from one power supply and controller? Or does each power supply and controller run the strips in series. I would like to run multiple strips under shelving, but I would like to have one power supply and controller and do it in parallel. Is this an option?
What do I need if I just want to put this on a switch - not interested in switching colors etc. Just light and on and off switch and maybe a dimmer switch at the most.
Yes sir. Great video instructions & explanation. This was very helpful and I feel confident on stress starting this project!. I do have a smartthing hub in my family room but not sure if it's has rgbcc outputs. Can i still connect it to the led controller? Thanks again and wish me luck😂
Thanks! According to the gledooto website, Your smart things hub should be able to connect with the gledopto controller I have listed in the description. Hope that works out for you!
Great effort! I just went phillips hue 😅
Is there a controller that can be hardwired and not require plugging into an outlet?
Could you share some more info one what you used for the wall switch? It looks like maybe you used a lutron pico remote, but I don't understand how you'd integrate that with the zigbee LED strip controller. Does that require Hubitat? Thanks!
Yep, I used a pico and automate them together with Hubitat. But if you wanted to stick within the hue universe you could use a hue button controller and you wouldn’t need an additional hub. You can see how I setup my button controller in this video at about 6:44: ruclips.net/video/VXwVkAAHyfg/видео.htmlsi=44WBMovDGpEh_onk
Great video! Sub'd
Awesome, thank you!
What a great video I bought the transformer the power supply the LED lights. Please help. What LED connectors do I buy????
Sorry for the delayed response. I used these connectors to connect to the LED strip, then cut them in half and connected my long-run wires to the connector wires using toggle-style connectors: www.amazon.com/dp/B09L7P86FQ/ref=nosim?tag=onamzazhb-20
How many hours total? I did something similar using slyvania light strips and extenders hidden in the gaps between cabinets and plugged in above microwave on one side and fridge on the other. Unfortunately it didn’t pass the WAF so I removed them. I do have those RGBgenie controllers if you want them
I’m not sure I can count that high. The project was very start and stop because I was working around the kitchen remodel, but took much longer than I anticipated. But so does every project indo
Is there anyway I can make this light up different colors rather than one solid color?
As one of your million subscribers, I am interested in making inside cabinet lighting. Back in the day we would use micro switches.
That makes sense. Probably don’t need to connect to a hub unless you only want the cabinet light coming on when you open the door at night or something.
@@DIYSmartHomeGuy1 yes true. The main place I am talking about is dark and hard to see day or night. The ideas are flowing in this pea brain of mind the possibilities are endless I say!!! Lol
@brentjohnson6654 if you hard wired the lights and used micro switches in the doors to turn them on, it would probably be a lot cheaper than using contact sensors or something else that communicated with a hub. But those would offer some additional options like notifying you when someone is sneaking into the liquor cabinet.
How did you calculate the wattage per foot for these strips? I have 25' of strip needed and wondered if this power supply would do the job. Can't find the spec for these lights for the wattage per foot. Thanks.
Good Video.
Thanks! The strip should tell you the total wattage; just devide that by the amount of feet for the wattage per foot.
Would it not have been easier to fish the wire through the closet walls then straight under the cabinets? for top and bottom, not sure on toekick... Ur kitchen is kinda same lay out as mine and i already have a backsplash but i would assume if uwere to do it this way it would be easier and cleaner... Whats ur thoughts? great vid btw, hows those LEDs holding up? Any burn outs yet?
LEDs are holding up great! For the toe kick, yes, I ran the wires down along the inside of the pantry and through the wall to the toe kick. The biggest hurdle is making the jump around the sink for the upper cabinets. If you already have a backsplash in I would probably drill up into the cabinet and run the wire all the way up to the top and into the wall through there. It’s a lot of extra wire, but you should be able to hide it well doing it that way.
You are an inspiration. I've watched your video several times now. I am building a pantry with overhead glass cabinets over a countertop. I wanted to have two sets of lights. One is under the cabinets to light the countertop, and the other one is running in the overhead cabinets to light up what's inside. I assume I will need two controllers for this. As I do not have a smart home hub, can I control the lights another way or should I break down and buy a smart home hub. Also - How long did your installation take from start to finish?
Thanks
Thank you! If you buy the WiFi controllers instead of the zigbee ones you can control the lights with the app instead of using a hub. But I loathe WiFi and would recommend getting a hub. Hard to say how long this project took because we were in the middle of a kitchen remodel so it was very start and stop. But a normal human should be able to bang this out in a weekend.
@@DIYSmartHomeGuy1 THanks - It turns out my son has a Philips Hue Hub, so I went ahead and purchased almost identical to your system. I'm building a small Pantry/Office area adjacent to my kitchen and thought this would be a good place to try out the LED lighting. So far things have gone smoothly. I have tested one of the LED lights on the wheel using the Zigbee controller and everything is working properly. Since I'm installing the kitchen cabinets myself, I've been able to tweak the layout to accommodate the wiring. I need to buy more of the 6-pin solderless connectors, and then I'll start laying them out in the cabinets before I hang them on the wall.
Just a thought, couldn't you hide the wires by cutting out a thin piece of plywood and mounting it under the cabinets? you would have to be precise with your cuts, but their are plenty of videos out there that would allow you to match the paint.
That is a clever idea. Perhaps if the shorter people in my life complain about the exposed wires (I can't see them), I'll have to give that a shot
There are different conduit options for the wiring, it would look better
I want to install a dimmer switch to control my RGBW strips right next to the light switch controlling the already-installed lights for my kitchen. I don't want a wireless remote, nor do I need an app on my phone. Do I need a special controller to accomplish this?
There are a few options you could consider. Do you have a smart home hub of some sort or are you looking for purely self-contained control of the strip lights?
Hi. I followed many of your tips and got a great waf, however, per your video I purchased a hue bridge. Now I find out (reddit) that gledopto controllers are not working with hue bridge. How did you set these up on hue? Thanks
Sorry to hear your gledopto controller isn’t connecting. Did you get the zigbee version? When i connected mine i added it the same way i would add any philips hue light to the bridge. I haven’t had any problems, the only thing is you can’t use hue scenes on non hue devices.
@DIYSmartHomeGuy1 thanks for getting back to me. I used your Amazon link, so yes, I got the same zigbee used in the video. Do I need to reset the zigbee when searching in the hue app? Your prompt reply is both rare for some youtubers and very impressive. Thanks!
Is there an actual wall switch you recommend using these led lights?
If you need a switch that turns the power on and off and can give you a variety of scenes with different taps, inovelli would be a great choice. Keep a lookout for our next video and I’ll be ranking all of the smart switches (and more) in my house.
I used a Kasa dimmer light switch and my LED dims with the switch.
How did you hide the wire running from the cabinets on the right to the cabinet to the left? I don't see any place to hide them
I ran the wire into wall, down and out into the cabinet below the sink, ran it along the inside back of that cabinet, then back into the wall, up and back out of the wall at the upper and lower part of the upper cabinet.
@@DIYSmartHomeGuy1 Awesome, I didn't think about that. Thank you.
I looked into this at my old house which had 44 ft of cabinets. Choosing led strips, channel, diffusers, power supplies and controllers was more than I wanted to do. And I wasn’t willing to pay someone thousands to do it. So I sold my house. 😂😂
The new house would be easier to do, but I have more and better placed led can lights which really makes the under the counter lights unnecessary.
Sometimes selling the house to avoid a project is the best thing you can do!
Man every time i watch one of these videos im reminded how crazy messy and bulky this process is. I love lighting and wiring but my goodness. I cannot see it being worth it, yet. Its 2024 there has GOT to be an easier and cleaner way soon. Those exposed wires under the cabinets would drive me absolutely bonkers. The controller panel and power sources for such low voltage lighting are insanely bulky. Outlet adaptors? No way... Ill check back in 2025.😂
Here's an alternative to the smaller power supplies - always keep cost and amp rating in mind. John (the DIY Smart Home Guy OG) did a video many years back highlighting a single power supply. ruclips.net/video/IFF27gvq_3s/видео.htmlsi=A2medwrTT3J9-NQh&t=244
Like the video. Really didn’t like the advise on wire. Need to learn a bit about ohms law and how low voltage runs on wire before advising people.
Don’t skimp here. Use the 20ga stranded wire. It’s not a lot of money and it runs the low voltage perfectly!
with respect, those are the wrong strips. WS2812 is RGB+W which has a dedicated white and give the same white while still being individually addressable. For under cabinet lighting I prefer COB if you know you're going to stay white. That way no diffuser is needed and keeps you lower profile.
Cob lights are awesome, but we’re a lot more expensive when I started this project. For kitchen lighting, you’re right, excellent whites are important which is why I went with the RGBWW lights. I don’t think individually addressable lights in the kitchen are necessary, but if that’s what you’re looking for, go for it!
Just get some trunking under the cabinets, no?
;You really should segment your videos like everyone else, so if someone wants to jump to say, the electrical hookup parts, they can.
Lovely video, but agree with your wife, its a HOT MESS.
out of sight, out of mind?
I did the same without the cable mess for $200
Nice! And you were able to hide all of the cables? That was the biggest logistical hurdle for me which led to the project you see before you.
11:50 dude
yeah
this video has to add at the beginning and you can't skip either one. Beth gets a dislike video from me and I hope from everyone else. 0:07
Who is Beth and why should we dislike her?
Just get to the point this was the worst video ever
I knew I could make bad videos. Maybe even terrible videos. But never in my wildest dreams did I imagine I could make THE WORST video on RUclips. It is quite an achievement. Thank you, @A_reel_job_fishing. Please like and subscribe.
looks more of a commercial for using the "easy way out" for the headache you went through. I used the plug and play method with a bad back and spent $40 an an hour of my life to do the same size kitchen.. yeah for me right? it's automated, in all my smart home platforms, and turned on and off based on occupation. the sensor was a tick it up and forget it and it was $30. and yes the "plug is there" but it's easier than that stuff you got going on in your "closet"
I have no problem with anyone taking the easy way out. I watch a lot of RUclips videos for home projects and they always make everything look so easy. Then you get into it and often realize you’re in over your head. Sometimes scaring people off of doing a project can be just as valuable for them as teaching them how to do it.