DIY box build on our Unimog 4x4 truck Ep.1

HTML-код
- Опубликовано: 15 окт 2024
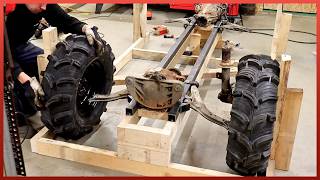
- This is episode 1 of our DIY Unimog camper truck build all the way in New Zealand! In this episode you get to see how we took the back canopy off, what materials we used for the box and frame and how we assembelled it!
Thank you so much for the support already! This is only our second youtube video and I am excited to share more with you. if you want to see more, give this video a thumbs up!


Awesome vid guys. Stoked to see the progress on the Mog build. Cheers.
Thank you mate! Hope to have another episode out soon 😊
2003, for our ExpeditionVehicle build, we went to a commercial truck-wrecker aka 'dismantler'.
We looked around at all their removed dry-van boxes...
... and chose the perfect size for our 1996 Ford CF8000 chassis.
.
A half-hour looking, a half-hour mounting it.
We tossed in some car-camping gear, and hit the road.
Total time -- about three hours.
.
We get the impression some folks prefer building rather than camping?
Well if we are going to live in this for 5 + years in New Zealands crazy weather we are going to need more than some camping supplies. But yes, Louis loves to build!
Make sure you silicone the gaps between the frame and the panels using a flexible silicone to stop water from getting into the gap and rotting them out.
@declan,
Wrong product!
Silicone has zero flex, it has no place on a vehicle.
.
2003, we mounted our windows in our ExpeditionVehicle using Vulcum 116.
Over two decades full-time live-aboard, the Vulcum 116 remains soft and pliable.
.
At the first bump, silicone caulk breaks, requiring a second then a fifteen application.
Although silicone caulk is utterly useless in its intended purpose, it is impossible to remove.
.
A putty-knife gives way to power tools.
By the third week -- family gone and neighbors questioning your sanity -- you are considering the nuclear option.
Trust me on this.
I watch your channel green with envy. It's great to see some local Canterbury content on such a project. Can I ask where you sourced the foam sandwich panels for the box. Was it local to Chch?
Amazing
Thanks joshy!
Great video, would be also a cool video to know where you got the truck from etc
Hey Ewen! We do have some videos on our Instagram mentioning how we purchased the truck but I’ll make a note for next RUclips video to share that info 😊
Looks to be a very cool build indeed, excited to see what's to come.
Question: No bracing needed for the box frame? Picturing a fully loaded box with shelving, Tall cupboards etc mounted to the walls and this whole box contorting whilst running through your typical 4x4 track. I am guessing the current frame and FG panels would suffice?
Hey thanks for the message
The folded steel frame is incredibly rigid on its own . To add to the strength I used a high bond adhesive on the panel to the external frame and then attached some 100x 100 aluminium angles on the inside using the same adhesive .
Together with a steel framed floor with plywood ontop it all ties together to create one strong , rigid and well braced unit
Also internal walls and cabinetry will all be bonded to the walls / floor and ceiling to add extra bracing elements
Following along on the next videos to see the process .
Loved the vid guys, can't wait for the next one🙌🏾
Thank you!! Next week it’ll be up 😄
Shit yeah 🎉