This Tutorial is my longest one yet, but it is very detailed and I explain everything step by step.Tip : try playing the video at 1.5 speed (press settings- playback speed - 1.5)it saves some time with longer tutorials like this one. Also these timestamps should help as well : Step #1 Understanding Dodge and Burn for Skin Retouch : 0:37 Step #2 Creating Photoshop Actions : 2:51 Step #3 Starting the Retouch 8:57 Step #4 Color Matching 30:03 Step #5 Using Healing Brush 32:50 Step #6 Dodge and Burn to enhance features 36:34 Step #7 Selective Color 40:40 Final results 42:44 Don't Forget to watch at full 1080p HD quality!
Alrighty, just finished the tutorial and it was excellent! I love dodge and burn more than anything. That tip of using the Selective Color adjustment layer to adjust the Whites is something I definitely will implement in the future. I tried it on an image right now and it gives the skin a nice shine! 😁
I've been watching dodge and burn tutorials the entire day and FINALLY found this one - this is the clearest and most educative one I've seen! Now I finally think I've got it and also understood what dodge and burn is actually used for. The other tutorials are usually kinda vague, they don't explain what the aim is and just dive right in, making the whole thing sound like a mysterious magic skin enhancement...
You are an inspiration to me... I'm a beginner, just finishing a course. I'm editing photos for an exhibition and honestly freaking out a little. Watching your tutorial calmed me a little so my sincerest thanks 🙏
I've only used photoshop once before... even though this an advanced technique, I got the hang of it soo quickly. I have even written every step into a note book as it is so informative. Im so thankful that you were willing to share this for free. 🥰
This is the best skin retouch video I have ever seen and for one simple underrated fact, it's 95% properly non destructive. Aside from the Colour correction and Clone Stamping (which takes very little time), you can apply this method of skin retouching to a smart object background layer from LR/ACR, and thus even after most of the skin retouch job you can pop back into ACR and choose a completely different render/preset job without having to do 100% of the work all over again vs visit back into LR/ACR as a Tiff and see your renders screw up against their native raw counterparts. If you stick with FS and other more aggressive methods for skin retouching then there is no coming back and before the work is done you have to be 100% certain that is the direction you want the image to down, with Irene's method you have more freedom (which can often please the client and save you more work down the line). Brilliant stuff.
BTW this picture was shot on Sony a7iii + Zeiss 50mm 1.4 at f1.4. I am loving the sharpness and the detail! Should I finally get a full frame Sony Camera?
Am really really thankful to find a great RUclipsr photographer explain every single detail ... thank you for this video you give lot of advice ... you are amazing
OMG ! This is one of the most amazing skin retouch tutorial I have ever watched . I have been looking a tutorial like this for months, until today I found this video. I had to pause the video at 25:40 to go down the comment section to write this comment. I'm so so so happy, thank you so much Irene Rudnyk. I have been watching ur videos for 2,3 months. Im a beginer photographer. Before i finish my comment I want to tell u one thing, you are such a beautiful talented Photographer. Wish u the best.
I've watched a few different dodge and burn tutorials and it always seemed so difficult and tedious but you've made it look so simple and I finally understand this technique! Thank you Irene 😘 amazing job as always!
Hands down this is the BEST Dodge and Burn video / tutorial on RUclips... and trust me I've watched many.. Irene takes her time and details everything she does, this is something most don't do. Thank you..
Hi Irene! Thank you for this tutorial. It was intimidating to me at first, but then I watched again and followed along while editing. I love the result of my photo. Its the most beautiful edit I've ever created, thanks to you! You're my favorite female photographer, your portraits are incredibly beautiful! Sincerely grateful to you.
Pretty positive this is gonna be one super helpful video! I'm about to take a small road trip but will watch once I arrive to my destination. Thanks in advance, Irene! 😁
.. You just saved my life! I've been pracrtising using the mixer brush and I have to say it is not easy at all! So I can across your tutorial right after I literally said "I give up" on the technique I am using, I need a new one and voila I came across this tutorial .. THANK YOU FOR TAKING THE TIME TO CREATE AND SHARE THIS!
Irene Rudnyk thank you so so much, the photo session was amazing I had so much fun, the client was so so happy with results and I’m having a new client this weekend, am so excited 😆 yaaaay, finally I’m doing something that I adore 💜 🥰🥰🥰
I put a laptop on one side to watch your tutorial, and another to follow every step . I spend the whole evening with this... is fantastic, I really appraciate it. It is long but it worth it. Now that I created the actions, I´m going to follow the whole thing again and at the end I will practice by myself. Thanks Irene.
Thanks Irene for this tutorial. I'm a beginner in photography and I used your technique on portrait photo shoot. I'm very surprised how it makes the photo more professional and respect the models as well. Very thank you for sharing it with us.
Thanks for this great tutorial. 💗 To fix the outline of the lips, where in the progress should I take care of that so that I don't ruin the skin texture?
ok so im studying photography and honestly this was so much better than what they showed us at uni lmao. Its my first time using dodge and burn EVER and honestly the retouch came out amazingg!!! thank you so much your videos have helped me A LOT
Hello Irene , thank you for sharing. I saw in your video that I ordered 100% Opacity and 100% Flow, so I suggest that you try different skins. Because I'm just a beginner.
I have always struggled with masks and adjustment layers and it wasn't until I saw this video that it finally "clicked". Thank you for being a teacher I can understand!!!
Thank you for providing a step-by-step method for skin retouching. Which Wacom tablet do you recommend? There's a significant difference in price between the Wacom Intuos Creative Pen Tablet and the pro version. Thank you again for your assistance.
enjoyed this video irene,i use a similar technique to this too,slight variation.i use the "R" key,to rotate the image in photoshop. just helps sometimes when brushing at slightly awkward angles.
Yes, it was easy to follow. Thanks for this video! Like every retouching technique, it takes a lot of practice to master this skin retouch solution, and a lot of patience is needed, as well
I have been using dodge and burn for a long time, but never changed the curves to luminosity. Will try that! I also rarely use the b&w/contrast layer because I realised I took more time editing, as I would see all the "problem areas". Thank you so much for this video ❤️
Since day I decided I wanted to take up photography I’ve been following you and learning all your retouch techniques and as you’ve got better and better I’ve learned these more advanced techniques.. I love it ! I love editing so much and I love shooting but I much better at editing than I am shooting which suck I need to shoot more. I edit all the time I’m always re editing my old photos as I learn or I download raw files from photographers that offer them and my Editing is leaps and bounds better than my photography.
Skins retouch for one minute...hahahahaha....i love that,but i am your FAN and i need to see that and i am shocked!!! You do not used spot healing brush tools...Easy to accept your job and i want to see more like this video and sure...about 10 minutes...a little bit short! Thank you so much IR & Anita!
Best dodge and burn tutotial! Thank you! But i still think that you can do similar effect with frequency separation) and this is for very high end clients, who gonna pay you a lot for all that time for one picture 😅
Loved this video do you think you can make this action so we can download it . Loved how you explained it and your work is amazing I was asking for some that’s not good with photoshop thank you.
Just finished the the video. Thank you again. From start to finish easy to follow as you stated, very well explained. I love the sequence and technique.
For those who don't know, Miles of Color is a well established photographer/editor. For them to come here and show Irene love like this is a big deal - No matter where you're at in your career you can always draw inspiration from those around you! Don't sleep on this! Also, thanks for your Frequency Separation tutorial.
I don’t know why I waited to watch this and follow along until now, I learned so much already can’t wait to continue practicing and get better ! Thank you 😁
This video is so fantastic!! I'm pretty new to photoshop. Irene did an amazing job explaining her skin retouching steps in a clear way that was easy to follow along with. Thank you so much!
Irene, Hi from Russia! I love Ur back stage videos so much! And this one is so helpful and clear to understand in spite of my low level of English. I will try this tutorial absolutely! Thank U!
You girl are amazing. Glad you share this. You leave something behind in this world. Sharing is caring. I'm sure your parents are proud of you. Wish you all the best ^^
Irene, THANK YOU SO SO MUCH!!! I will definitely try this myself, it does resonate way more with the way I would like to retouch instead of using frequency separation, this looks amazing. Thank you for sharing, I usually only watch your BTS, didn't know you do tutorials too, glad I found out. Regards from Portugal :)
Amazing as Always Irene. I am going to be photographing some family sessions. I cant Dodge and burn every pic. How would you tackle that? Thank you so much! ❤️❤️❤️
hey Irene! since i've watched this video, about a week ago, i've edited 6 portraits already using this technique. indeed it takes time, focus and patience to get the most out of it, but i gotta say... the technique is simple, the results are really amazing, and the process is almost therapeutic... i'm loving using it! thanks for sharing! would you happen to know who came up with this technique?
spot healing brush tool on "lighten" mode works wonders for removing facial hair without softening the skin as it only affects the actual hair and not the skin around it
I havent watched the video yet however, I appreciate the time and detail you seem to have put into this. Thanks in advance. Im sure I will learn a great deal.
great video. I just got another routine retouch makeup photo shoot and I was looking for help. Your video catch me and makes me feel alive again. Actually before I was using only spot and stamp most of the time for skin. But what you just taught me is remarkable. Thank you so so much for this video. Please make more like this. I really like the way you describe and keep the momentum catching of the whole video. Also your voice is amazing. peace :)
Great tutorial! I hit pause halfway through so I could order my editing tablet, lol (thank you). Also, can you make a video explaining how to retouch more "normal" skin? Better yet, perhaps a video where you edit skin with heavy acne or pock marks? Thanks, and keep up the awesome work. I learn so much from your channel.
Thank you so much for this tutorial. I have learnt alot. Please do more tutorial especially Color grading, I have learnt alot from your tutorial and style of photography.


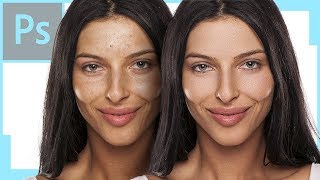


This Tutorial is my longest one yet, but it is very detailed and I explain everything step by step.Tip : try playing the video at 1.5 speed (press settings- playback speed - 1.5)it saves some time with longer tutorials like this one. Also these timestamps should help as well :
Step #1 Understanding Dodge and Burn for Skin Retouch : 0:37
Step #2 Creating Photoshop Actions : 2:51
Step #3 Starting the Retouch 8:57
Step #4 Color Matching 30:03
Step #5 Using Healing Brush 32:50
Step #6 Dodge and Burn to enhance features 36:34
Step #7 Selective Color 40:40
Final results 42:44
Don't Forget to watch at full 1080p HD quality!
Ура, ура! Наконец то такое долгожданное мной видео! Спасибо)
Thank you very much for this lesson. You're so amazing!
Fantastic job you have done. Thank you very much
@@AdrianDE01 I use Wacom Intuos Pen and Touch Small
I really appreciate this longer tutorial!!! Thank you so much for all of your hard work!!!🙏🙏🙏🙏🙏🙏🙏🙏🙏🙏🙏
Yess! This is basically how I do it now. I stopped using frequency separation a while ago. This keeps things way more natural looking. Great tutorial
frequency separation is so last year haha
Things only get wonky using FS if you go too far. I've been using FS for some time now and keep all of my images looking natural.
@@IreneRudnyk frequency separation is so 2-years ago retro it's back in
43 minutes and detailed! Thank you Irene, you're awesome! Super insightful and helpful for us that are learning retouching.
I think it's one of my favorite tutorials I have made so far :)
Alrighty, just finished the tutorial and it was excellent! I love dodge and burn more than anything. That tip of using the Selective Color adjustment layer to adjust the Whites is something I definitely will implement in the future. I tried it on an image right now and it gives the skin a nice shine! 😁
I just watched some of your vids, your editing is also amazing❤️
I've been watching dodge and burn tutorials the entire day and FINALLY found this one - this is the clearest and most educative one I've seen! Now I finally think I've got it and also understood what dodge and burn is actually used for. The other tutorials are usually kinda vague, they don't explain what the aim is and just dive right in, making the whole thing sound like a mysterious magic skin enhancement...
You are an inspiration to me... I'm a beginner, just finishing a course. I'm editing photos for an exhibition and honestly freaking out a little. Watching your tutorial calmed me a little so my sincerest thanks 🙏
I've only used photoshop once before... even though this an advanced technique, I got the hang of it soo quickly. I have even written every step into a note book as it is so informative. Im so thankful that you were willing to share this for free. 🥰
This is the best skin retouch video I have ever seen and for one simple underrated fact, it's 95% properly non destructive. Aside from the Colour correction and Clone Stamping (which takes very little time), you can apply this method of skin retouching to a smart object background layer from LR/ACR, and thus even after most of the skin retouch job you can pop back into ACR and choose a completely different render/preset job without having to do 100% of the work all over again vs visit back into LR/ACR as a Tiff and see your renders screw up against their native raw counterparts. If you stick with FS and other more aggressive methods for skin retouching then there is no coming back and before the work is done you have to be 100% certain that is the direction you want the image to down, with Irene's method you have more freedom (which can often please the client and save you more work down the line).
Brilliant stuff.
BTW this picture was shot on Sony a7iii + Zeiss 50mm 1.4 at f1.4. I am loving the sharpness and the detail! Should I finally get a full frame Sony Camera?
Irene Rudnyk absolutely! 😉
Atleast make a video on ur Sony Kando trip.. And ur experience of working with new gear.. As always love ur videos.. 🙏🏼 🇮🇳 🌹
Irene, you will love the 85GM too.
@@MrPedrocourelas Tried it out, and I still prefer the Canon 85mm 1.2 over the GM, but that zeiss 50mm 1.4 was fire!
Go girl! You won't look back! I use the Sigma MC-11 adaptor for my Canon lenses. My poor 5DIV is a $3000 back up camera.
Anita Sadowska was showing this awesome technique 3 years ago, but your workflow is even better.
Am really really thankful to find a great RUclipsr photographer explain every single detail ... thank you for this video you give lot of advice ... you are amazing
OMG ! This is one of the most amazing skin retouch tutorial I have ever watched .
I have been looking a tutorial like this for months, until today I found this video.
I had to pause the video at 25:40 to go down the comment section to write this comment.
I'm so so so happy, thank you so much Irene Rudnyk. I have been watching ur videos for 2,3 months. Im a beginer photographer.
Before i finish my comment I want to tell u one thing, you are such a beautiful talented Photographer.
Wish u the best.
I've watched a few different dodge and burn tutorials and it always seemed so difficult and tedious but you've made it look so simple and I finally understand this technique! Thank you Irene 😘 amazing job as always!
Hands down this is the BEST Dodge and Burn video / tutorial on RUclips... and trust me I've watched many.. Irene takes her time and details everything she does, this is something most don't do.
Thank you..
very good explanation, and the retouch looks natural, not like a fake skin
Hi Irene! Thank you for this tutorial. It was intimidating to me at first, but then I watched again and followed along while editing. I love the result of my photo. Its the most beautiful edit I've ever created, thanks to you! You're my favorite female photographer, your portraits are incredibly beautiful! Sincerely grateful to you.
That's awesome!!
Pretty positive this is gonna be one super helpful video! I'm about to take a small road trip but will watch once I arrive to my destination. Thanks in advance, Irene! 😁
I have watched many editing videos but you're the best & brilliant. you teach as a teacher.🧑🏫
This is the best retouch tutorial by far Irene so easy to follow and understand much appreciated
You are amazing! You are on your own league! You creativity is encouraging!! 👏👏👏👏 Fantastic work!!!
.. You just saved my life! I've been pracrtising using the mixer brush and I have to say it is not easy at all! So I can across your tutorial right after I literally said "I give up" on the technique I am using, I need a new one and voila I came across this tutorial .. THANK YOU FOR TAKING THE TIME TO CREATE AND SHARE THIS!
This is SO satisfying to watch! Thank you for this tutorial!
Followed all the way through. SO thankful to have a solid technique!
Thank you so much! All this knowledge and you shared it selflessly with us.
Tomorrow I’ll have my first photo session with a client, wish me luck, thanks a million Irene, I’ve learnt so much from you and still🥰🥰🥰
Good luck!!
Irene Rudnyk thank you so so much, the photo session was amazing I had so much fun, the client was so so happy with results and I’m having a new client this weekend, am so excited 😆 yaaaay, finally I’m doing something that I adore 💜 🥰🥰🥰
Really really interested video, I think it was the first time I understand the process, thank you so much, I just want to try right now
i love your videos so so much because i’m french but it still really simple to understand and you’re so talented ! thank you for all your videos !!
Who are u? And How u kept me attention for 43:14 minutes in a video withouth even noticing? 🤣
Really helpful, my favorite youtuber so far ☺️.
Great video Irene!
I put a laptop on one side to watch your tutorial, and another to follow every step . I spend the whole evening with this... is fantastic, I really appraciate it. It is long but it worth it. Now that I created the actions, I´m going to follow the whole thing again and at the end I will practice by myself. Thanks Irene.
That's awesome! I'm glad it was useful to you :)
Thanks Irene for this tutorial. I'm a beginner in photography and I used your technique on portrait photo shoot. I'm very surprised how it makes the photo more professional and respect the models as well. Very thank you for sharing it with us.
Thanks for this great tutorial. 💗 To fix the outline of the lips, where in the progress should I take care of that so that I don't ruin the skin texture?
Best one I've watched so far. All the other ones use that blur method that makes the skin look fake.
Cool very good, a complete transformation, so much better than the methods I was using shall change my process from now on BOSS!
ok so im studying photography and honestly this was so much better than what they showed us at uni lmao. Its my first time using dodge and burn EVER and honestly the retouch came out amazingg!!! thank you so much your videos have helped me A LOT
Hello Irene , thank you for sharing.
I saw in your video that I ordered 100% Opacity and 100% Flow, so I suggest that you try different skins.
Because I'm just a beginner.
I have always struggled with masks and adjustment layers and it wasn't until I saw this video that it finally "clicked". Thank you for being a teacher I can understand!!!
Thank you for providing a step-by-step method for skin retouching. Which Wacom tablet do you recommend? There's a significant difference in price between the Wacom Intuos Creative Pen Tablet and the pro version. Thank you again for your assistance.
wow this was amaziiiiing..PLEASE MAKE MORE VIDEOS LIKE THIS..thank you so so so much Irene
you are such a talented instructor I have ever seen. love you from bangladesh
Ooouuuu!!! I’ve only watched 5:31 and I already wanna say thank you!! 🙏🏾 ❤️❤️❤️❤️🙏🏾
I finishe it, it was amazing❤️
enjoyed this video irene,i use a similar technique to this too,slight variation.i use the "R" key,to rotate the image in photoshop. just helps sometimes when brushing at slightly awkward angles.
I'll try it out !
Hello Irene, i am a french photographer and i wanted to say thank you for this tutorial it's just super easy and i will try right now :-)
Yes, it was easy to follow. Thanks for this video! Like every retouching technique, it takes a lot of practice to master this skin retouch solution, and a lot of patience is needed, as well
I have been using dodge and burn for a long time, but never changed the curves to luminosity. Will try that! I also rarely use the b&w/contrast layer because I realised I took more time editing, as I would see all the "problem areas". Thank you so much for this video ❤️
Since day I decided I wanted to take up photography I’ve been following you and learning all your retouch techniques and as you’ve got better and better I’ve learned these more advanced techniques.. I love it ! I love editing so much and I love shooting but I much better at editing than I am shooting which suck I need to shoot more. I edit all the time I’m always re editing my old photos as I learn or I download raw files from photographers that offer them and my Editing is leaps and bounds better than my photography.
I love this tutorial. I might not get as meticulous as you do here, but overall it is a fantastic set of tools.
Skins retouch for one minute...hahahahaha....i love that,but i am your FAN and i need to see that and i am shocked!!! You do not used spot healing brush tools...Easy to accept your job and i want to see more like this video and sure...about 10 minutes...a little bit short! Thank you so much IR & Anita!
Best dodge and burn tutotial! Thank you! But i still think that you can do similar effect with frequency separation) and this is for very high end clients, who gonna pay you a lot for all that time for one picture 😅
Wonderful, thank you. I have gained so much watching this
Thank you Irene ,i have learnt soo much
Super grateful 😊
Я дуже вдячна за деталізований туторіал! Ви чудова блогерка і Вас приємно дивитись та слухати. Досі передивляюсь Ваші відео
Нет слов чтобы описать восторг от этого урока! Очень полезно и детально. Спасибо! Ваш канал просто кладезь знаний 💛💛💛
I love it! What settings for focus points did you used ?
Excelente trabajo y muy profesional, muchas gracias.
I really love this tutorial learned a lot. Thanks I’m wondering if new photoshop 2022 neural filter can do the same. I guess not
THE BEST SKIN RETOUCH TUTORIAL EVER!!! Thx so mush ❤️
Loved this video do you think you can make this action so we can download it . Loved how you explained it and your work is amazing I was asking for some that’s not good with photoshop thank you.
This is so great, I go take abbonnement on You. You turtorial and photografie are the best
Just finished the the video. Thank you again. From start to finish easy to follow as you stated, very well explained. I love the sequence and technique.
Very, very informative and clear for amateurs tutorial! Thank you
I’m practicing rn and came here for some extra tips. My hand is so sore from local dodge on burn 😩😩thanks for making this Irene! You’re awesome
For those who don't know, Miles of Color is a well established photographer/editor. For them to come here and show Irene love like this is a big deal - No matter where you're at in your career you can always draw inspiration from those around you! Don't sleep on this! Also, thanks for your Frequency Separation tutorial.
Tekkaman thank you bro ❤️❤️❤️
I don’t know why I waited to watch this and follow along until now, I learned so much already can’t wait to continue practicing and get better ! Thank you 😁
I’m just starting out so your tutorial provides a good guide as to how I should proceed. Thank you so muc!!
i cannot wait to try this!! THANK YOU you're amazing
This video is so fantastic!! I'm pretty new to photoshop. Irene did an amazing job explaining her skin retouching steps in a clear way that was easy to follow along with. Thank you so much!
Irene, Hi from Russia! I love Ur back stage videos so much! And this one is so helpful and clear to understand in spite of my low level of English. I will try this tutorial absolutely! Thank U!
погуглите Евгению Фатееву с Беларуси, если хотите научиться ретушировать.
absolutely incredible
You girl are amazing. Glad you share this. You
leave something behind in this world. Sharing is caring. I'm sure your parents are proud of you. Wish you all the best ^^
Nice technique !
I've seen something similar to this used to decrease the appearance of wrinkles
That's just PERFECT!!!!! Thank you so much, I was trying to find a good dodge and burn tutorial for ages!
There are better ones out there
now I got two techniques to play wit FS and DnB, awesome tutorial
one of the best edits tutorials on youtube. thank you for the new information. would love too purchase one of your tutorials online if you have one!!!
Awesome tutorial and very detailed if you don’t mind asking which wacom intuos tablet you recommend
Irene, THANK YOU SO SO MUCH!!! I will definitely try this myself, it does resonate way more with the way I would like to retouch instead of using frequency separation, this looks amazing.
Thank you for sharing, I usually only watch your BTS, didn't know you do tutorials too, glad I found out. Regards from Portugal :)
Amazing as Always Irene. I am going to be photographing some family sessions. I cant Dodge and burn every pic. How would you tackle that? Thank you so much! ❤️❤️❤️
Thank you so much, you explain so good. I watch all you turtorials.
Great tutorial
Omg Thank YOU!! This was amazing. Can't wait to watch more. This makes me want to use photoshop :)
Thanks a lot .. ur a great teacher with kind heart too explain wat u learnt in years n here u explain in mints . Thanks
Mil gracias por esta explicación tan detallada
hey Irene!
since i've watched this video, about a week ago, i've edited 6 portraits already using this technique. indeed it takes time, focus and patience to get the most out of it, but i gotta say... the technique is simple, the results are really amazing, and the process is almost therapeutic... i'm loving using it! thanks for sharing!
would you happen to know who came up with this technique?
I’m glad it helped! It’s a very old technique, don’t know who came out with it
Thank you so much for giving a lots of information 😊😊😊 nice to see this video keep it up 👍👍👍
spot healing brush tool on "lighten" mode works wonders for removing facial hair without softening the skin as it only affects the actual hair and not the skin around it
Awesome tip! Thank you!
Only a pleasure, Im glad I can give back a little for all your inspiration given out so freely. Love your work
I havent watched the video yet however, I appreciate the time and detail you seem to have put into this. Thanks in advance. Im sure I will learn a great deal.
great video. I just got another routine retouch makeup photo shoot and I was looking for help. Your video catch me and makes me feel alive again. Actually before I was using only spot and stamp most of the time for skin. But what you just taught me is remarkable. Thank you so so much for this video. Please make more like this. I really like the way you describe and keep the momentum catching of the whole video. Also your voice is amazing. peace :)
This tutorial is very helpful thanku for sharing
Thank you very much and I like the step by step teaching method of your videos.
Love this technique. You're always so informative and concise, Irene! The 43 mins flew by.
Love this in depth tutorial !
Great tutorial! I hit pause halfway through so I could order my editing tablet, lol (thank you). Also, can you make a video explaining how to retouch more "normal" skin? Better yet, perhaps a video where you edit skin with heavy acne or pock marks? Thanks, and keep up the awesome work. I learn so much from your channel.
Yes, you should get a Sony full frame camera! Thanks for the interesting video, it's always good to see different retouching techniques.
Nice work Irene !
Dodge and Burn has been the only way I retouch and the only way I will recommend to retouch skin.
Thank you for showing us this tutorial. 🙌🏾👍🏾🙌🏾
Thank you for such detailed tutorial I will be re watching it until I master this technique!
ThankYou for this in-depth d&b tutorial! Love your photography and how you keep everything soo natural!
This is great! Thank you for the wonderful work!
Best tutorial
Thank you so much for this tutorial. I have learnt alot. Please do more tutorial especially Color grading, I have learnt alot from your tutorial and style of photography.