Great build. How many layers of cloth did you use for this project. also did you weigh the bare hull. I have a deep v hull made of fiber glass, approx 1150 mm long, bare hull weighs in at 2.25 kg. Cheers.
@@martylondon6729 Thanks! I used 1 single layer of 650g/m² carbon for the entire hull, plus an additional layer in the back ⅓ of the boat. Keep in mind that the 650gsm plies I used are about 3 times the thickness of normal 200gsm plies which are more common, so if you're comparing against those, you would use 3 layers for the hull plus 3 additional for reinforcement. My bare hull weighs approximately 800g, however it is a lot smaller than yours, about 75cm.
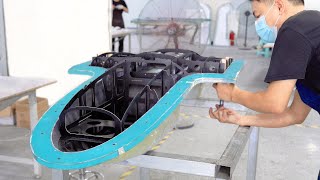
Surpassingly, this is the first video i've seen after searching just to find out how fiberglass/carbon RC boat hulls are joined together. I have seen tons of info and videos of people making boats out of wood and then laminating them with fiberglass or carbon. No videos though on how the typical rc boats are made with molds. With a mold that is typical of high quality RC boats there is not much information on the process of joining the top and bottom part of the mold. Your way seems logical for the size of boat but i wonder if this is even possible on a boat like a 72" Catamaran. I am not sure how you could get your hands up to the front of the hull to place strips of carbon to join the top to the bottom. I have heard of the "shoe box" method where the top and bottom sections are left with a little extra lip all the way around in order for the top to slip over top of the bottom just a little bit joining the two together. I am in the process of trying to figure out if printing a large catamaran 92 inches in order to glue it all together to make a mold but designing the boat is proving extremely difficult as their is not much to go off of. I specifically want to vacuum bag the it but have found out lately that all of the current large catamaran hull molds from nearly all the companies are not set up for vacuum bagging. Makes me want to do my own but it is a daunting project to take on. If i could get the molds made the rest is easy for me. The molds are certainly the hardest part in my experience. I am curious of your thoughts on a project like this and any other experiences you have with joining the top and bottom halves together.
This was the first time for me taking on a project like this so I don't have any experience, however here are a couple ideas: For a very large boat with little access space at the front like a catamaran, you could try to first laminate a strip of material along the whole length on the bottom of the hull. Then, while the resin is still wet and tacky, you could position the top half and go around adhering the strip using even a wooden dowel to help reach inside the tight areas. Alternatively, you could 3d print inserts with the shape of the two pointy ends of the hull (sorry, I don't know the specific name) and press them in while the resin is curing to keep pressure on the seam. Lastly, you could avoid using a strip of material altogether on the front and bond these front inserts to one side of the hull. Then when you join the two halves, you put adhesive on the insert itself, which joins and seals the hard to reach areas. Then the more accessible areas can be joined normally. This is what I could think of but I don't have that much knowledge about this topic
Great project, I enjoyed the video! The hull came out real good. How much was the mass of the empty hull? I'm currently building a twin drive mono. It is a wooden hull, but carbon laminated. Cheers, DJ
@@CozyRC It's actually a single ply of 650g/m² except for the stern and about 20cm of the very back of the hull which have 2 layers for rigidity. However this layup is probably overkill. 2 layers of 200g/m² with additional reinforcement in some areas would have been a better choice
If you're interested I could send you the stl files for the pieces which were glued together to make the pattern of the hull and the lid or a single stl file for the entire boat


Great build in every aspect. You should have more followers
Wooow it’s amazing
i want to do this so bad awsome video thank you for the info
Awesome project!! Well done.
Thanks!
Great build. How many layers of cloth did you use for this project. also did you weigh the bare hull. I have a deep v hull made of fiber glass, approx 1150 mm long, bare hull weighs in at 2.25 kg. Cheers.
@@martylondon6729 Thanks! I used 1 single layer of 650g/m² carbon for the entire hull, plus an additional layer in the back ⅓ of the boat. Keep in mind that the 650gsm plies I used are about 3 times the thickness of normal 200gsm plies which are more common, so if you're comparing against those, you would use 3 layers for the hull plus 3 additional for reinforcement. My bare hull weighs approximately 800g, however it is a lot smaller than yours, about 75cm.
Classy build , you need shooting for that wire link though, LOL
Very nice! 🤙
awesome)
Surpassingly, this is the first video i've seen after searching just to find out how fiberglass/carbon RC boat hulls are joined together. I have seen tons of info and videos of people making boats out of wood and then laminating them with fiberglass or carbon. No videos though on how the typical rc boats are made with molds. With a mold that is typical of high quality RC boats there is not much information on the process of joining the top and bottom part of the mold. Your way seems logical for the size of boat but i wonder if this is even possible on a boat like a 72" Catamaran. I am not sure how you could get your hands up to the front of the hull to place strips of carbon to join the top to the bottom. I have heard of the "shoe box" method where the top and bottom sections are left with a little extra lip all the way around in order for the top to slip over top of the bottom just a little bit joining the two together. I am in the process of trying to figure out if printing a large catamaran 92 inches in order to glue it all together to make a mold but designing the boat is proving extremely difficult as their is not much to go off of.
I specifically want to vacuum bag the it but have found out lately that all of the current large catamaran hull molds from nearly all the companies are not set up for vacuum bagging. Makes me want to do my own but it is a daunting project to take on. If i could get the molds made the rest is easy for me. The molds are certainly the hardest part in my experience.
I am curious of your thoughts on a project like this and any other experiences you have with joining the top and bottom halves together.
This was the first time for me taking on a project like this so I don't have any experience, however here are a couple ideas:
For a very large boat with little access space at the front like a catamaran, you could try to first laminate a strip of material along the whole length on the bottom of the hull. Then, while the resin is still wet and tacky, you could position the top half and go around adhering the strip using even a wooden dowel to help reach inside the tight areas. Alternatively, you could 3d print inserts with the shape of the two pointy ends of the hull (sorry, I don't know the specific name) and press them in while the resin is curing to keep pressure on the seam. Lastly, you could avoid using a strip of material altogether on the front and bond these front inserts to one side of the hull. Then when you join the two halves, you put adhesive on the insert itself, which joins and seals the hard to reach areas. Then the more accessible areas can be joined normally. This is what I could think of but I don't have that much knowledge about this topic
Nice 👍🏼 what CAD program did you use?
Thanks! I used CATIA V5 and Solidworks
Great project, I enjoyed the video! The hull came out real good. How much was the mass of the empty hull? I'm currently building a twin drive mono. It is a wooden hull, but carbon laminated. Cheers, DJ
Thanks! The hull is 30 inches long, just the hull (no lid, hardware or anything) weighs 550g. The lid is about 50g more
@@andreabotti99That is a lightweight, well done. What weight of weave and how many layers did you use? I guess 2 layers of 200 grams?
@@CozyRC It's actually a single ply of 650g/m² except for the stern and about 20cm of the very back of the hull which have 2 layers for rigidity. However this layup is probably overkill. 2 layers of 200g/m² with additional reinforcement in some areas would have been a better choice
@@andreabotti99Thanks for the info. Better have a bit extra strength, trust me 😎
Do you have the sli files or obj files want to make a life-size one
If you're interested I could send you the stl files for the pieces which were glued together to make the pattern of the hull and the lid or a single stl file for the entire boat