This is literally all I do. Would be great for people to see a backlit. double cross shooting with 2 cams, So no shifting the angle as you would do with one camera...Great work
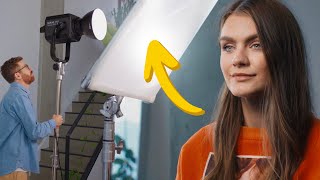
Shane Hurlbut gave the same advice in his old - but still amazing - cinematography course. He added that keeping the backlight coming from the same side as the key allows the actors for more freedom of movement. He showed examples of this setup and a 'sandwiched' one - the back from the opposite side of the key - and it was easy to notice. When the back and the key makes a sandwich, small changes in position make hard shadows on the nose or other parts of the face, thus making the light less real, and less pleasing. Keeping them from the same side allows actor to raise or lower their face, to move a lot, and they look great no matter what.
Wouldn't you be shooting into a nearside key/fill from the ultrabounce? From the reference of when the bounce is in, camera position wise it looks like a nearside key and not shooting into the shadow side. What am I missing?
@@f.jacobalvaradoDOP you simply put your key and your back on the same side of the talent, and place your camera a little further on the other side of the same talent.
The sun sandwich was a look. I don’t hate it, as it seems just to be one look in many looks, but I definitely don't prefer it over shooting on the shadow side from a visual standpoint. There's just far more dimensionality, which is more pleasant to look and understand imo. Shadow side also makes talent look more facially sculpted and can bring out jawlines and cheekbones, which no one hates ever. 😂 One thing I'm training my brain to do is see light levels as moods rather than exposure, which runs counter to technical convention. Its not always easy to break the hardwiring, especially because the colorist in me is like, "don't even think about it". I'm not saying blow out your highlights or clip your shadows, but I'm also not saying "never". I am saying put the mood of the narrative forward, as that would be the point.
Thanks for sharing, I'm new to cinematography but understand things from a stills perspective. I'm not sure that your simulated lighting software really helped you explain it that well, as there was a lot of re-adjustment that took time and wasn't immediately obvious. What I essentially understand you to be recommending is to have a strong backlight (rim effect) then use "short lighting" ie light the smaller side of face (in direction subject is looking) so the broader or "broad" side of face is darker (also has effect of slimming a face visually). Add negative fill (darken) the broad side if needed. One query, what would you advise if there is a second subject (back to camera mostly) engaging with original subject? If close to first subject and outside then any different lighting may appear a little odd (but explainable logically in an indoor or urban environment with multiple practical light sources that are possible).
As always great info! I’ve got a shoot coming up possible 2 shot at dining table daytime exterior with a moody look. I’m guessing I’ll need those 12x12 to cover both characters as they won’t be sitting side each other and maaaybe a top silk to diffuse? … still figuring it out…
@wanderingdp that's true! Would it be possible to make a video on how u get your ratios on set! Ik everyone's process is slightly different, I was just curious on your process
fantastic content and loving your patreon content as well!! As I continue to dive deeper and make this my full time career its been brilliant to hear from all the people you interview as well as the breakdowns you do on patreon! excellent!! thank you!
Awesome, loving the new content in addition to the breakdowns (from which I also learned a ton!) One question though, what is the minimal crew to achieve this? I'm still living in the small budget 4x4' land, haha. My guess is two guys per 12x12' frame?
most times you add the edge light with the neg fill placement. If you angle the neg correctly the ambient light will create the edge you are looking for. if not, light it up
OMG I just looooove your channel! This is such cool technique. I remember shooting outside with a scheme like this one, it is brilliant. The only 'but' was the wind. What do you do when the wind makes the reflector move and cast flickering bounce light on the actor?
if its a 12x12 or 8x8 then lots of sandbags and ropes in the corners of the frame. With like a 4x4 its the same thing but you usually dont need then ropes
Nice one, but on set you cannot change Lumens of a bounce really, which would defeat the purpose of the example real... or am I missing something... ? I mean you can slightly change it by moving it away or closer but not actually such large changes...
Would you say this general set up/concept of lighting is something you'd look to do when shooting interiors? of course with a backlight source much less intense than the sun or is it specific to exteriors?
Great video, thanks. When you reduced the intensity of the bounce....in the real world what bounce material would you use, or change to, to reduce (or increase) the intensity by 25%, 50% etc..? Thanks.
I'm not sure if it's possible but you might want to shut off that motion blur in the lighting software. By the way I want to say I fucking love this format. I've learned so much. Even outside of cinematography, I wish people did more of the same style of analysis. The repetition is part of why it's so valuable because you can see what's common across a million different pieces. Thanks for all of it!
Great video but I really thought I was getting a Lord of the Rings breakdown...got any of those on the Patreon? Would be an absolute gem if you broke down some of Andrew Lesnie's work as an example of the importance of balancing values to make lighting that isn't as motivated or naturalistic by today's standards still believable
So, I have absolutely no idea whats going on here, this is obviously like an augmented reality but, this is exactly how you would set it up on an actual shoot right?
this is not a trick its an absolutely standard lighting set up used for many years by many cinematographers, nobody will think you are a great DOP by using this technique, its that basic.


This is literally all I do. Would be great for people to see a backlit. double cross shooting with 2 cams, So no shifting the angle as you would do with one camera...Great work
Wow my man really pumping out that content and going all in on YT this year
I’ve been watching it the whole week😂
Desperately awaiting that Backlight tutorial, bro....that could make a world of difference to my cinematography.....
Same. I'm surprised that he's never given us a backlight tutorial...
patience is a virtue. coming soon
Thank you. I look forward to it :) @@wanderingdp
Shane Hurlbut gave the same advice in his old - but still amazing - cinematography course. He added that keeping the backlight coming from the same side as the key allows the actors for more freedom of movement. He showed examples of this setup and a 'sandwiched' one - the back from the opposite side of the key - and it was easy to notice. When the back and the key makes a sandwich, small changes in position make hard shadows on the nose or other parts of the face, thus making the light less real, and less pleasing. Keeping them from the same side allows actor to raise or lower their face, to move a lot, and they look great no matter what.
shane knows what time it is.
Wouldn't you be shooting into a nearside key/fill from the ultrabounce? From the reference of when the bounce is in, camera position wise it looks like a nearside key and not shooting into the shadow side. What am I missing?
@@f.jacobalvaradoDOP you simply put your key and your back on the same side of the talent, and place your camera a little further on the other side of the same talent.
It feels wrong to watch this for free. I’m signing up to the Patreon!❤
your images will thank you for watching.
I've been doing this with a 8x v flat and 4x floppy for 20 years. Sometimes I'll throw some bounce off the ground
The cine tracer demos are a great direction - It couldn't be any clearer. Thanks again for the remarkable education Sir Patrick
the clearer the better
The sun sandwich was a look. I don’t hate it, as it seems just to be one look in many looks, but I definitely don't prefer it over shooting on the shadow side from a visual standpoint. There's just far more dimensionality, which is more pleasant to look and understand imo.
Shadow side also makes talent look more facially sculpted and can bring out jawlines and cheekbones, which no one hates ever. 😂
One thing I'm training my brain to do is see light levels as moods rather than exposure, which runs counter to technical convention. Its not always easy to break the hardwiring, especially because the colorist in me is like, "don't even think about it".
I'm not saying blow out your highlights or clip your shadows, but I'm also not saying "never". I am saying put the mood of the narrative forward, as that would be the point.
I want to know how you would shoot a reverse if it was a two shot in pt ii of this. I remember reading about this technique a while back on your site
Love your content, but this is probably the best one ever. Keep making dreams come true.
best ever. wait till you see what is coming
Hey what tool are you using for the animation it's really cool
Thanks for sharing, I'm new to cinematography but understand things from a stills perspective. I'm not sure that your simulated lighting software really helped you explain it that well, as there was a lot of re-adjustment that took time and wasn't immediately obvious. What I essentially understand you to be recommending is to have a strong backlight (rim effect) then use "short lighting" ie light the smaller side of face (in direction subject is looking) so the broader or "broad" side of face is darker (also has effect of slimming a face visually). Add negative fill (darken) the broad side if needed.
One query, what would you advise if there is a second subject (back to camera mostly) engaging with original subject? If close to first subject and outside then any different lighting may appear a little odd (but explainable logically in an indoor or urban environment with multiple practical light sources that are possible).
As always great info! I’ve got a shoot coming up possible 2 shot at dining table daytime exterior with a moody look. I’m guessing I’ll need those 12x12 to cover both characters as they won’t be sitting side each other and maaaybe a top silk to diffuse? … still figuring it out…
I love your channel man! Two questions, where can I see all your work? And what software is that you used to demonstrate the technique? I need both!
Patreon has a ton of content! And the software is Cine tracer I believe. 70 quid on Steam
wanderingdp.com for all the breakdowns and podcasts and courses
Even though the camera is facing the opposite direction had me 😂 2:41
Man your content is amazing, I couldn't stop watching with this animation, like a videogame
good times
I love how easy this is and that is the brilliance of it. Thank you. Also, what the hell is that software you used? I want.
Its called Cinetracer. Available through Steam.
What is that virtual world software called?
How do you deal with maintaining a consistent exposure when the sun gets blocked by big clouds for like 30mins?
okay this set is perfect & looks the best , but what if you want to do the counter shot.???
schedule properly
Thanx, Will try it out🙂
let me know if it works
Thanks for the video!! Can you share what software are you using? Thanks.
Thanks for the tip. What is the name of the sim software?
Would love to see The Sopranos breakdown starting from season 1 till the end and how the cinematography improved as the seasons went on
Even the camera is facing other direction had ne 😂
Glad I found you, thanks bro.🎉
This day will remain in cinematography history as THE SUN WRAP legacy ...
The sun wrap hits youtube. LFG
That was highly informative and I'm understating.
that is the point. hope it helps
Fantastic tutorial.
Thank you! Cheers!
So i like the sun wrap bht i noticed in alot of movies i see a good amount of sun sandwich setups
there are a lot of bad movies out there
@wanderingdp that's true! Would it be possible to make a video on how u get your ratios on set! Ik everyone's process is slightly different, I was just curious on your process
GOAT! 🐐 thanks for making me a better cinematographer. For real💯
Very nice work sir❤
very cool, what if you don't have a large bounce and shooting solo?
just backlight it and add the level in the grade
It’s funny you used that thumbnail because LOTR actually does sun sandwiches a lot of the times
elves love a good sandwich
Thank you for this information. How do we handle this when the sun is directly above the subject and even an overcast day?
remove the bounce and backlight as if the sun is out. add more neg and make it bigger
Very cool to see you using realtime software to illustrate the concepts. What do you think of virtual production generally?
not a fan but they work
@@wanderingdp Thanks! I really enjoy your content
You've earned your $11 burrito on this one, brother.
If you are shooting on the same side as sun (Right side of subject/left side of us) and using sun wrapping, how is that shooting from the shadow side?
Would love to see someone try this in SE Florida and realize the winds and clouds are too unpredictable to make it usable or safe for a vertical 12’by
wind = no bueno
fantastic content and loving your patreon content as well!! As I continue to dive deeper and make this my full time career its been brilliant to hear from all the people you interview as well as the breakdowns you do on patreon! excellent!! thank you!
great to hear. The patreon community is where it is at
Awesome, loving the new content in addition to the breakdowns (from which I also learned a ton!) One question though, what is the minimal crew to achieve this? I'm still living in the small budget 4x4' land, haha. My guess is two guys per 12x12' frame?
two for everything if there is no wind
@@wanderingdp thanks
Sped up to 2x and still put me to sleep while fast forwarding
Amazing video. So does this mean you don't suggest using hair lights or rim lights on that other shoulder/side of the head?
most times you add the edge light with the neg fill placement. If you angle the neg correctly the ambient light will create the edge you are looking for. if not, light it up
Whats the software you using? I want it to practice!!
awesome thank you
OMG I just looooove your channel! This is such cool technique. I remember shooting outside with a scheme like this one, it is brilliant. The only 'but' was the wind. What do you do when the wind makes the reflector move and cast flickering bounce light on the actor?
if its a 12x12 or 8x8 then lots of sandbags and ropes in the corners of the frame. With like a 4x4 its the same thing but you usually dont need then ropes
lots of rope
You are the best. Thank you for helping me get better!
Happy to help!
You’re a legend. Thank you!
yeow
You’ve been such a help for me. Thank you 🙏
Happy to help!
Nice one, but on set you cannot change Lumens of a bounce really, which would defeat the purpose of the example real... or am I missing something... ? I mean you can slightly change it by moving it away or closer but not actually such large changes...
you set the level on the bounce by angle and distance. cinetracer isn't great at accuracy so you have to use your imagination a little
Gold!
Dang this is so simple but so good
like all good things
Killing it My Guy!
yeeeeow
Silly question, what kind of material would you use for the wrap ? (white material)
ultra bounce
Great tip 🎉
Such great information! Thank you very much!
Glad it was helpful!
Isn't this just standard 3 point lighting? Key, fill, rim?
Would you say this general set up/concept of lighting is something you'd look to do when shooting interiors? of course with a backlight source much less intense than the sun or is it specific to exteriors?
same everywhere
greeeat tip!
thanks!
No problem!
Did you reupload this yeaterday
Great video, thanks. When you reduced the intensity of the bounce....in the real world what bounce material would you use, or change to, to reduce (or increase) the intensity by 25%, 50% etc..? Thanks.
usually ultra bounce or muslin. you reduce by just wasting some of the level by repositioning the bounce either in angle or position.
@@wanderingdp Got it. Thank you!
Dude omg just thank you!
Glad I could help!
I just subscribed to your Patreon, really enjoying it
Please do a breakdown for the shortfilm, Festival of Slaps, Omeletto
send me a link and i will have a look
@@wanderingdp ruclips.net/video/7IHXgpeBCew/видео.htmlsi=77sZMN51q0Ejbd1D
How do you light yours youtube vídeo?
Whar lights do you use?
it is all in the description.
As always I am a sun sandwich enjoyer (assuming the camera is still on the shadow side)
you do you. sandwiches have their lovers
I'm not sure if it's possible but you might want to shut off that motion blur in the lighting software.
By the way I want to say I fucking love this format. I've learned so much. Even outside of cinematography, I wish people did more of the same style of analysis. The repetition is part of why it's so valuable because you can see what's common across a million different pieces. Thanks for all of it!
cinetracer content for the win. will do more going forward
@@wanderingdp I was praising all your tutorials in general!
This is nice! Thanks man!
Glad you like it!
Great video but I really thought I was getting a Lord of the Rings breakdown...got any of those on the Patreon? Would be an absolute gem if you broke down some of Andrew Lesnie's work as an example of the importance of balancing values to make lighting that isn't as motivated or naturalistic by today's standards still believable
i think i've done two different lord of the rings on Patreon
Sun wrap = ☀️⬜🧍🎥⬛
Sun sandwich = ☀️🧍🎥⬜
yes
What happend when you don't have a big surface to bounce the sunlight? It could be good to put the sun more at the side and not straight in the back?
no i'd rather have it flat and backlight and lift in the grade
@@wanderingdp thank you for the answer, I'll keep it in mind for the next projects. And thank u for your videos, it helps me a lot
Dankeschön❤
so helpful
How would you set up a conversation in the same setting?
schedule one side of the conversation before lunch and the other side after
So, I have absolutely no idea whats going on here, this is obviously like an augmented reality but, this is exactly how you would set it up on an actual shoot right?
Knowledge bombs this week 👏
you know it.
He's not wrong my dudes
man you are amazing!
legend
what is the name of the app they are using?
forehead palm slap
What software is this ?
Cine Tracer
gold
gold jerry
Dang. What program is that?
cine tracer
@@freemaxb212 Thanks!
LFG!!!
you know it
Awesome ❤❤❤
Thanks 🤗
I have a trick!
one of the greatest tricks
more tricks pls 😉
ok
What visualization app do you use?
cinetracer
Whats the name of this 3d programm! :D can't find it, not even gpt nows about it, someone tell me you're secret!
I know your comment is 3 months old but I think it’s cine tracer on steam
@@snagingapple84 thanks man!!
Now we are smart.
correct.
W trick
pump it up
Please, show your setup at home!
when i hit 100k
This could have been explained in 1 minute. Instead of fiddling around with that software for 12 minutes, just cut to the steps and the end result.
this is not a trick its an absolutely standard lighting set up used for many years by many cinematographers, nobody will think you are a great DOP by using this technique, its that basic.
why don't average DPs do it more then? they could become great really fast