1. When you can it is always better to light the scene than the shot. Minor adjustments for each shot ends up saving time and keeps lighting more consistent overall. 2. Don't overly stress about the lighting being 100% consistent.
Yeah a few months ago I did a beach shoot with a gold reflector at Golden time and it was beautiful! When he said he didn't know why they existed my first though was, you gotta go outside more
The biggest “a-ha” moment for me was learning that the larger the source the softer the light, the smaller the source, the harder the light. So much can be learned from lighting just using that simple rule. It’s obviously a deeper well to dive into, but you can start there and get pretty far.
Yeah, but it also depends how far or close it is to the subject. Take the sun for example, is biggest light source , but that's why it projects hard shadows, cause it's far away from the subject. But if your source of light was close, the shadows would be more blurry and would also create a soft light.
@@gaudiangeles1509 Light source size is of course relative to the subject being lit. A huge bright light really far away is a small bright light relative to the subject, and would create a hard light source. The principle of larger and small sources still applies and I stand by that it’s a great starting point for beginner and more advanced lighting techniques.
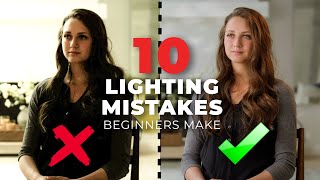
🎯 Key Takeaways for quick navigation: 00:03 💡 *The importance of early career learning of lighting techniques, using the Nanlite Forza 5002.* 00:18 🎥 *Demonstrating lighting setups with a Canon C70 and a monitor, featuring Alla as the model.* 00:32 🌞 *Controlling studio light by closing big windows before starting with lighting setups.* 00:49 🚪 *Emphasizing light placement and moving the subject away from the wall to enhance depth and focus.* 01:30 🖼️ *Adding depth for a better separation between the subject and the background, improving video setup.* 01:44 📽️ *Adjusting lighting for a neutral, well-lit setup suitable for interviews or beauty shots.* 02:12 🎬 *Changing light placement to the side for a cinematic effect, illustrating the impact of light direction.* 03:09 👀 *The role of light direction in relation to the camera and the subject's interaction with it.* 03:36 🔆 *Highlighting the advantage of using a brighter light than expected for flexibility and control.* 04:19 💡 *Discussing the balancing of light ratios for indoor setups and the use of powerful lights for background fill.* 05:28 🆕 *Mentioning improvements and features of the Nanlite Forza 500 Mark II.* 06:39 ☀️ *Discussing the trend towards soft light in modern cinematography and the importance of the size of the light source.* 07:39 📐 *Explaining how the distance of the light affects its softness, emphasizing the need for larger diffusion sources for distant subjects.* 08:07 🌟 *Recommending white bounce for a more natural fill light over silver or gold.* 08:50 🌈 *Stressing the importance of matching tint (green or magenta) in addition to color temperature for consistent lighting.* Made with HARPA AI
Videos like this are what enables anyone to become good if they desire. So much useful information in a nice quality concise package. Thank you so much, i can’t believe it’s free!
This is good stuff. I like this style of video. I would have liked to see a split comparison every time there was a change. Like, straight on lighting VS a little from above for example.
You’re totally right, I would have liked to do that too but feel like I didn’t quite nail the example there so it didn’t properly showcase the technique. It would have really shown more with a soft box
This is a focused look at lighting fundamentals. It is highly valuable information for anyone who wishes to instantaneously take lighting a scene to the next level. I learned a thing or two myself. 👍
Would love to hear any thoughts you have on lighting for a lounge style podcast setup, since that has some unique constraints: multiple subjects & multiple concurrent angles, mostly not looking into camera, but still a more RUclips, presentational vibe, often a small space, but has to fit a lot of gear.
Thanks for the video! You may want to use the gold reflector to create a certain effect, for example I used it to create fire reflections on a model's face.
Thank you Tyler, you're really good at explaining in a very calm and confident way. Late bloomer here! I don't get to play with lights at work. So, this vid definitely helps with a. a lot of challenges I come across. Thanks again.
99% of youtube lighting advice is basically just „how to make pretty medium closeup shots of static subjects, by having a big light source just out of frame.“. Free education is never a bad thing, but I found that this „crutch“ of using light sources like that can actually slow down your progress as a (narrative) filmmaker and build bad habits.
I agree with you. I was feeling the same way. To be devils advocate, these are fundamental techniques that DO help but theyre just the very tip of the iceberg and kind of send newbies down the wrong road. Tbh most of the setups in this video screamed “RUclipsr” to me, even the “cinematic” setup. Very Sourcey lighting and not natural. Diffusion and bounce are wonderful but I rarely see fresnels, spotlights, or even barn doors mentioned in videos like these. Shit, even cheap as dirt cinefoil. You want to control your light more than just diffusing it or bouncing it a lot of the times. Now there are some great setups using bounce like cove lighting etc. But that’s multiple bounces to wrap your subjects face not just one sourced diffused. To me controlling/subtracting light is much more crucial than anything. You can have hard sources but will still look amazing if it’s controlled. Learning how to flag, block, and cut away light will be much more valuable than buying a 5x7 diffusion frame imo.
Actually I was considering how hard it is to stay present and hold a neutral expression while possibly bored or simply holding the same position for an extended amount of time...not the most challenging job, but does actually take effort.
Agree with most of this except the whole "looking into the camera" vs "not looking into the camera". That has little relevance on how "cinematic" something is and if you want to have the contrast ratio looking down the barrel you just move your lights for that.
Excellent job Tyler. Your tutorial was very easy to understand and follow. I had to subscribe. I don't own any Nanlite, but that will change as well too.
This has been the most helpful lighting video I’ve seen, and that’s with all the others NOT having a shameless plug, this one still tippy tops by far. Thank you for creating quality content. 💪🏼
Bounce light into ceiling or walls to get a very natural looking light. Just because the source will be so soft and will actually not be pure white, which is most of the time exactly what you want. For doc projects is probably my fav thing to do aputure f22 and bounce that to the opposite side where camera will be.
Big piece of advice I would have taken sooner: get nice stands! Good c stands and combo stands are key. But we often overlook that part. I used crappy plastic stands for way too long 😅
@@stalmanfor safety, always put the knuckles on the right that way it tightens with sag over time. I noticed on your 4x4 frame you had the knuckle on the left. That’ll get you a talking to by the Key Grip - don’t ask how I know lol 😂
I mean if you're going to point things out, then I would also keep the frame on an arm to allow for more flexibility/reach and on the fly changes, even if the initial position doesn't call for it :) I also learned to bag the front/taller leg of a c-stand@@KenDavis-uo8kq
8.39: "Never use gold, I don't know why that exists." I have good experience with using the gold bounce on people who don't have caucasian skin, especially with photography. Love the tutorial and the clear examples you give here! I always take away something after having seen your videos.
Thank you so much Tyler! You are very knowledgeable and I'm glad I found you! (I sub'd). Quick question? Why / How (around 4:00min) did turning up the Forza to 100% add more blue coming through the window? Also, I'm not sure I saw more blue there? (total noob here) 🙂
You would use a gold reflector to match your cooler lit subject to a warmly lit background. This is a preference thing though, I myself have never used it because especially in natural lighting conditions I think the differentiation between cooler shadows and warmer highlights looks quite natural, but in some cases I can see how it would help with a particular vision.
Easiest way to raise exposure in a place - bounce a light off the ceiling. I tried this for the first time on a project a few months ago, and my mind was blown. Light spaces, not faces.
"Light spaces not faces" is not good advice at all my friend. You need to balance the subject light and the environmental light. If you just light the space, the subject will not stand out.
Make sure to skirt the wall or bounce it off a wall vs ceiling even if there is a touch of color. Or something like that. It will have so much better shape.
At about 6:45 you said that soft light has been a trend since we moved away from film when we needed bigger brighter lights so they were usually hard - um no! I shot film, negatives and transparencies, 6x6 Hasselblad, 35mm, and 4x5. I had HUGE softboxes and scrims. Sorry but digital photographers did not invent soft light. That's a really inaccurate statement. Reflectors - gold ones exist because they do a great job when used outdoors or if you're on a budget and need a quick rim light or hair light. Do you know what to do with a black one?
Definitely my biggest one for photography has been that I don't have to shoot light straight at my subject, often feathering the light past them has a much softer effect.
Good tutorial here, nicely presented with little fluff. Advice I would have given myself earlier is to bring some props to stage an otherwise sterile scene. The typical office ficus tree that made it into 75% of my corporate talking heads was such a tiresome trope. Also, thanks to cellphones, the client can walk me through the shoot location virtually, and I know better what I'm up against, and can even pre-viz on cheap software like Set.A.Light 3D to show 'looks' to the client prior to shooting.
My advice to my earlier self would be to invest in a solid lighting kit from the start! I've spent more money "building up" towards better lights when I should have just bought 1-3 solid lights from the beginning.
Depends - for indoor and "professional" portrait style for sure. But on average i am super happy with just: - one cheap, small LED light/flooder with like 8x15cm size and 1000lm and adjustable color temp - a "Nitecore TUP" keychain flashlight modified with a high CRI light and diffusor as tiny/support light, both on the EOS R7 mounted either via GoPro cage or smartphone clamp. - internal flash on my point and shoots for basic stuff Sure enough often i would just need more power, but if i know it i have anyways a 7000lm Noctigon Meteor M43 "cola can" flashlight which makes everything to day.
This was actually a really well done tutorial on a few of the fundamentals. Good stuff. There's not much out there of this caliber without useless self promotion and unnecessary asides strewn throughout the entire thing.
I’m not sure if this video is a coincidence or a direct result of my question in your recent video but thanks! This is exactly what I was looking for 👍
The knuckle holding your frame is incorrectly set up. The lock off for the kunckle should always be on the right, so that the weight of the item being rigged helps keep it tight, rather than loosen it over time.
Nice, almost end of the year, time to invest in a new light to drop the yearly profits a little bit haha. Thanks! would a big umbrella also help or would you rather shoot through the diffused white panels.
Great video. Something off topic, when I saw the magician guy in this video, I thought you had Steven Yeun (known as Glenn from Walking Dead) as your special guest :)
Sometimes, less is more. With the current cameras, it's more about contrast control than illumination. Camera tech has really helped us over the last 5 years becoming much more sensitive. Good tutorial.
shooting from the dumb side and always figuring out a way to backlight was mine. took me a while to accept that even fill and bounce can be back light. it was something i knew but on set I'd forgo
Hello, thank you for your wonderful videos. I am writing from Turkey and unfortunately everything is very expensive in our country. The cheapest shooting light is equal to our 1 month's working fee. That's why we need to focus on cheap and effective solutions. I need a lighting system for interview shooting of doctors in clinics. In your opinion, which 2 low-budget but effective lights should I buy for this purpose?
My tip to my younger self would be buy the most expensive, large and powerful light before you buy all the small cheap ones and get really good at making that 1 light illuminate your whole scene. And then learn the power of negative fill for depth. Lastly, get items to be able to modify practical lights of any kind and have those always available. The look of your videos will change so fast with those 3 things + this lighting tutorial video above. Bonus would be get IR ND filters because non-IR NDs add unwanted color shift and skin tone changes to your footage🤘
Man that Apple-esc opening zoom! 👍 Thanks for the invaluable tips, Tyler. Think I could test out lighting effects virtually in a game engine before setting thing up physically?
Good video. On last part where you talk about the G/M adjustments to your fluorescent lights, you left out that after adjusting people should do a proper white balance. Otherwise it will just have the greenish tint since you would adjust the 500 to match the fluorescents. Also for people starting out, they should always have handle on grip head on right side for safety. If a flag, floppy, bounce or diffuser starts to fall, it will tighten onto itself.


1. When you can it is always better to light the scene than the shot. Minor adjustments for each shot ends up saving time and keeps lighting more consistent overall. 2. Don't overly stress about the lighting being 100% consistent.
Yep, a mix of both and controlled is the pinnacle
light the scene, put the key on wheels, move the key based on the direction your talent is facing / the effect you want, and your camera angle
An interview is not a "scene". Light it once and nothing changes
I've used Gold for the last 20 years, not sure why this would be a "don't know why that exists" , Natural sunlight has a gold/yellow tint to it.
Exactly.
I gues you mean towards golden hour? Bc all day is cool
I know right? That and "back in the days of film when the lights were hard" got me
also very much depends on skintone .. subtle gold makes darker skin tones look very beautiful
Yeah a few months ago I did a beach shoot with a gold reflector at Golden time and it was beautiful! When he said he didn't know why they existed my first though was, you gotta go outside more
I use gold reflects at sunset to match the sun's color.
100% correct, gold has it’s place. Dislike how RUclipsr disrespect stuff with which they know nothing about.
The biggest “a-ha” moment for me was learning that the larger the source the softer the light, the smaller the source, the harder the light. So much can be learned from lighting just using that simple rule. It’s obviously a deeper well to dive into, but you can start there and get pretty far.
flash on the ceiling or behind you at a wall at high power is always a good idea for example
Yeah, but it also depends how far or close it is to the subject. Take the sun for example, is biggest light source , but that's why it projects hard shadows, cause it's far away from the subject. But if your source of light was close, the shadows would be more blurry and would also create a soft light.
@@gaudiangeles1509 Light source size is of course relative to the subject being lit. A huge bright light really far away is a small bright light relative to the subject, and would create a hard light source. The principle of larger and small sources still applies and I stand by that it’s a great starting point for beginner and more advanced lighting techniques.
I work in 3D, and lights in 3D renderers follow this same rule. So many early artists, sometimes senior artists, dont remember or know this.
and that "large" is from the perspective of the subject. The sun is HUGE, but from the perspective of the subject, it's only a few inches in diameter
🎯 Key Takeaways for quick navigation:
00:03 💡 *The importance of early career learning of lighting techniques, using the Nanlite Forza 5002.*
00:18 🎥 *Demonstrating lighting setups with a Canon C70 and a monitor, featuring Alla as the model.*
00:32 🌞 *Controlling studio light by closing big windows before starting with lighting setups.*
00:49 🚪 *Emphasizing light placement and moving the subject away from the wall to enhance depth and focus.*
01:30 🖼️ *Adding depth for a better separation between the subject and the background, improving video setup.*
01:44 📽️ *Adjusting lighting for a neutral, well-lit setup suitable for interviews or beauty shots.*
02:12 🎬 *Changing light placement to the side for a cinematic effect, illustrating the impact of light direction.*
03:09 👀 *The role of light direction in relation to the camera and the subject's interaction with it.*
03:36 🔆 *Highlighting the advantage of using a brighter light than expected for flexibility and control.*
04:19 💡 *Discussing the balancing of light ratios for indoor setups and the use of powerful lights for background fill.*
05:28 🆕 *Mentioning improvements and features of the Nanlite Forza 500 Mark II.*
06:39 ☀️ *Discussing the trend towards soft light in modern cinematography and the importance of the size of the light source.*
07:39 📐 *Explaining how the distance of the light affects its softness, emphasizing the need for larger diffusion sources for distant subjects.*
08:07 🌟 *Recommending white bounce for a more natural fill light over silver or gold.*
08:50 🌈 *Stressing the importance of matching tint (green or magenta) in addition to color temperature for consistent lighting.*
Made with HARPA AI
Videos like this are what enables anyone to become good if they desire. So much useful information in a nice quality concise package. Thank you so much, i can’t believe it’s free!
Gold reflectors exist when shooting darker skin, adding warmth.
Also, if shooting on a beach or in a desert.
during sunset as well
The quality of your tutorial are amazing… love watching and brushing up my lighting skills with them❤
Thanks, mate! This was really helpful! I’m looking forward to watching more of your videos as well. Thanks again!
I've learned more from this video alone than I did in school. Thanks, Tyler!
This is good stuff. I like this style of video. I would have liked to see a split comparison every time there was a change. Like, straight on lighting VS a little from above for example.
You’re totally right, I would have liked to do that too but feel like I didn’t quite nail the example there so it didn’t properly showcase the technique. It would have really shown more with a soft box
Amazing advice expressed very concisely! Super work
This is a focused look at lighting fundamentals. It is highly valuable information for anyone who wishes to instantaneously take lighting a scene to the next level. I learned a thing or two myself. 👍
Would love to hear any thoughts you have on lighting for a lounge style podcast setup, since that has some unique constraints: multiple subjects & multiple concurrent angles, mostly not looking into camera, but still a more RUclips, presentational vibe, often a small space, but has to fit a lot of gear.
So rad, thank you.
Infinite love & gratitude from Colorado
Thanks for the video! You may want to use the gold reflector to create a certain effect, for example I used it to create fire reflections on a model's face.
This is just great, great content! Very helpful for a wide range of people! You're awesome, Stalman!
Bro, just now i found your channel. Gold. Quality.
Thanks Tyler for excellent advice! It helped me orient for future needs.
Solid video quality and lots of great information. Look forward to going through more of your videos.
Thank you Tyler, you're really good at explaining in a very calm and confident way. Late bloomer here! I don't get to play with lights at work. So, this vid definitely helps with a. a lot of challenges I come across. Thanks again.
99% of youtube lighting advice is basically just „how to make pretty medium closeup shots of static subjects, by having a big light source just out of frame.“.
Free education is never a bad thing, but I found that this „crutch“ of using light sources like that can actually slow down your progress as a (narrative) filmmaker and build bad habits.
I agree with you. I was feeling the same way. To be devils advocate, these are fundamental techniques that DO help but theyre just the very tip of the iceberg and kind of send newbies down the wrong road. Tbh most of the setups in this video screamed “RUclipsr” to me, even the “cinematic” setup. Very Sourcey lighting and not natural. Diffusion and bounce are wonderful but I rarely see fresnels, spotlights, or even barn doors mentioned in videos like these. Shit, even cheap as dirt cinefoil. You want to control your light more than just diffusing it or bouncing it a lot of the times. Now there are some great setups using bounce like cove lighting etc. But that’s multiple bounces to wrap your subjects face not just one sourced diffused. To me controlling/subtracting light is much more crucial than anything. You can have hard sources but will still look amazing if it’s controlled. Learning how to flag, block, and cut away light will be much more valuable than buying a 5x7 diffusion frame imo.
Model: This is easy money lol.
90% probably a friend or TFP
Isn’t it always easy money for models lol
It's actually not easy. I did the same with a gf and she really got tired of it just sitting in one place or holding something
Model after reading this comment “where’s my money?”
Actually I was considering how hard it is to stay present and hold a neutral expression while possibly bored or simply holding the same position for an extended amount of time...not the most challenging job, but does actually take effort.
Don't be afraid of contrast, shadows are good they won't bite you
I agree. I barely use bounces. Would rather go for negative fill to create more shadows
Agree with most of this except the whole "looking into the camera" vs "not looking into the camera". That has little relevance on how "cinematic" something is and if you want to have the contrast ratio looking down the barrel you just move your lights for that.
Excellent job Tyler. Your tutorial was very easy to understand and follow. I had to subscribe.
I don't own any Nanlite, but that will change as well too.
The specular gold reflectors were a wedding photographers' secret weapon back in the film days. Those and Metz flashes 😂
Love this! Could you make a video about lighting for product videos/ photos? 🙏🏽
the gold side of the reflector is for specific effects my guy, that why it exists HAHAH
ur a vibe bro, thanks for the good personality and great tips! keep shootin!
Tyler, great video! Well done and I enjoyed your deliver.
Really good video! I have followed you on Twitter for a long time but recently jumped to your RUclips channel. Great content, thank you!
Great insight and great information. Lots to unpack, and you did so seamlessly. A very big thank you
This has been the most helpful lighting video I’ve seen, and that’s with all the others NOT having a shameless plug, this one still tippy tops by far. Thank you for creating quality content. 💪🏼
Wow, this wasn’t just another lighting video. Exceptional amount of info covered. I love playing with lightning.
amazing tips man , huge thanks!
Book lighting is a really good one to master.
Thank you, Tyler! *This was incredibly helpful.*
tyler thank you so much for all your advices !!
Bounce light into ceiling or walls to get a very natural looking light. Just because the source will be so soft and will actually not be pure white, which is most of the time exactly what you want. For doc projects is probably my fav thing to do aputure f22 and bounce that to the opposite side where camera will be.
I use the gold outdoors. After you balance the skin, the sky should have a little more blue. Great video.
Great stuff - I will be using this with my photo class!
Big piece of advice I would have taken sooner: get nice stands! Good c stands and combo stands are key. But we often overlook that part.
I used crappy plastic stands for way too long 😅
That’s a good one, in the early days I had a few light fall over on flimsy cheap stands
@@stalmanfor safety, always put the knuckles on the right that way it tightens with sag over time. I noticed on your 4x4 frame you had the knuckle on the left. That’ll get you a talking to by the Key Grip - don’t ask how I know lol 😂
I mean if you're going to point things out, then I would also keep the frame on an arm to allow for more flexibility/reach and on the fly changes, even if the initial position doesn't call for it :) I also learned to bag the front/taller leg of a c-stand@@KenDavis-uo8kq
Seen a lot of your videos - I think this is my favourite so far 🤗 So pedagogic and well explained. Great job!
You didn't seen it, you saw it
@@Crazy_Dashcam_Videos eminent insights
I have the forza 500 1st gen, I really like that the mark2 version has plus and minus green
Every daylight fixture should have it, even when they should match they never do
8.39: "Never use gold, I don't know why that exists."
I have good experience with using the gold bounce on people who don't have caucasian skin, especially with photography.
Love the tutorial and the clear examples you give here! I always take away something after having seen your videos.
Lighting zombies?
I worked as a Grip for years and we often pulled out the gold lame for darker skin complexions
Yes exactly, they make a great hair or rim light too
Gold is also intresting for product photography.
It also works for emulating candle light flicker.
That was a great, short video with lots of good info! 👍👏
Lots of great tips here. Thank you
My young Padawan, lights should be a priority in that shopping list!
Hey Tyler, nice video, try using flags, it will change the whole dynamics, also a poly fill from under the subject just out of frame. 😊
Great job! Thanks! I will say check the location power before plug anything!
Gold works best for dark skin tones
Very helpful. Kudos to you. Thanks.
Thank you so much Tyler! You are very knowledgeable and I'm glad I found you! (I sub'd). Quick question? Why / How (around 4:00min) did turning up the Forza to 100% add more blue coming through the window? Also, I'm not sure I saw more blue there? (total noob here) 🙂
Gold for golden hour outdoor shooting...
You would use a gold reflector to match your cooler lit subject to a warmly lit background. This is a preference thing though, I myself have never used it because especially in natural lighting conditions I think the differentiation between cooler shadows and warmer highlights looks quite natural, but in some cases I can see how it would help with a particular vision.
PS this is a great video! Some actual solid lighting advice instead of it being gear focused. :-)
links for the tv/monitor + rolling stand + any accessories??
Easiest way to raise exposure in a place - bounce a light off the ceiling. I tried this for the first time on a project a few months ago, and my mind was blown. Light spaces, not faces.
used keylight for faces. fill light for bouncing, it will create a pleasing scenery
"Light spaces not faces" is not good advice at all my friend. You need to balance the subject light and the environmental light. If you just light the space, the subject will not stand out.
Make sure to skirt the wall or bounce it off a wall vs ceiling even if there is a touch of color. Or something like that. It will have so much better shape.
Amazing! Is there a smaller version of this light I can use for my work videos inside small spaces?
At about 6:45 you said that soft light has been a trend since we moved away from film when we needed bigger brighter lights so they were usually hard - um no! I shot film, negatives and transparencies, 6x6 Hasselblad, 35mm, and 4x5. I had HUGE softboxes and scrims. Sorry but digital photographers did not invent soft light. That's a really inaccurate statement.
Reflectors - gold ones exist because they do a great job when used outdoors or if you're on a budget and need a quick rim light or hair light. Do you know what to do with a black one?
great video, tyler! beautifully put together
Definitely my biggest one for photography has been that I don't have to shoot light straight at my subject, often feathering the light past them has a much softer effect.
This video helped so much with my college film course, thank you!
Great video as always tyler.
Good tutorial here, nicely presented with little fluff. Advice I would have given myself earlier is to bring some props to stage an otherwise sterile scene. The typical office ficus tree that made it into 75% of my corporate talking heads was such a tiresome trope. Also, thanks to cellphones, the client can walk me through the shoot location virtually, and I know better what I'm up against, and can even pre-viz on cheap software like Set.A.Light 3D to show 'looks' to the client prior to shooting.
Wow, I appreciate this so much!! Thank you!
My advice to my earlier self would be to invest in a solid lighting kit from the start! I've spent more money "building up" towards better lights when I should have just bought 1-3 solid lights from the beginning.
Depends - for indoor and "professional" portrait style for sure. But on average i am super happy with just:
- one cheap, small LED light/flooder with like 8x15cm size and 1000lm and adjustable color temp
- a "Nitecore TUP" keychain flashlight modified with a high CRI light and diffusor as tiny/support light, both on the EOS R7 mounted either via GoPro cage or smartphone clamp.
- internal flash on my point and shoots for basic stuff
Sure enough often i would just need more power, but if i know it i have anyways a 7000lm Noctigon Meteor M43 "cola can" flashlight which makes everything to day.
This was actually a really well done tutorial on a few of the fundamentals. Good stuff. There's not much out there of this caliber without useless self promotion and unnecessary asides strewn throughout the entire thing.
I’m not sure if this video is a coincidence or a direct result of my question in your recent video but thanks! This is exactly what I was looking for 👍
I've shooting more than 5 years, and still I got more knowledge from your video
keep going with that kind of High Quality content
This is great! Nicely done.
Thx for the tips. Great advise
Amazing video! ❤😊
The knuckle holding your frame is incorrectly set up. The lock off for the kunckle should always be on the right, so that the weight of the item being rigged helps keep it tight, rather than loosen it over time.
Nice, almost end of the year, time to invest in a new light to drop the yearly profits a little bit haha. Thanks! would a big umbrella also help or would you rather shoot through the diffused white panels.
Great video , what’s the 5x7 frame?
Great video.
Something off topic, when I saw the magician guy in this video, I thought you had Steven Yeun (known as Glenn from Walking Dead) as your special guest :)
You definitely earned a subscriber with this video
Thanks for this Tyler👊
Sometimes, less is more. With the current cameras, it's more about contrast control than illumination. Camera tech has really helped us over the last 5 years becoming much more sensitive. Good tutorial.
Gold is great for working during sunset and with darker skin tonnes.
Thats a myth I would love to bust, I think it's just received wisdom that's actually bad advice
Sorry I don’t think you really know what you are talking about regarding gold. Do you get a kick out of disrespecting stuff you don’t like?
Learning a lot. Thank you!
shooting from the dumb side and always figuring out a way to backlight was mine. took me a while to accept that even fill and bounce can be back light. it was something i knew but on set I'd forgo
Learnt so much in 9 minutes. Thanks
Nice Vid!
If I am just starting out with a home RUclips / Online Class set-up? What would be your minimum light setup? With lower budget?
Thanks!
Hello, thank you for your wonderful videos. I am writing from Turkey and unfortunately everything is very expensive in our country. The cheapest shooting light is equal to our 1 month's working fee. That's why we need to focus on cheap and effective solutions. I need a lighting system for interview shooting of doctors in clinics. In your opinion, which 2 low-budget but effective lights should I buy for this purpose?
Great work Tyler!
My tip to my younger self would be buy the most expensive, large and powerful light before you buy all the small cheap ones and get really good at making that 1 light illuminate your whole scene. And then learn the power of negative fill for depth. Lastly, get items to be able to modify practical lights of any kind and have those always available.
The look of your videos will change so fast with those 3 things + this lighting tutorial video above.
Bonus would be get IR ND filters because non-IR NDs add unwanted color shift and skin tone changes to your footage🤘
Hey Tyler would really appreciate next time if you mention the name and the kind of diffusion materials you use to demonstrate.
rip-stop nylon is standard
Thanks for this. What stand & monitor do you use?
Gold reflector is for covering your subject if it gets hit by a falling lightstand.
Man that Apple-esc opening zoom! 👍
Thanks for the invaluable tips, Tyler. Think I could test out lighting effects virtually in a game engine before setting thing up physically?
Great video thanks.
Very informative, thank you!
Good video. On last part where you talk about the G/M adjustments to your fluorescent lights, you left out that after adjusting people should do a proper white balance. Otherwise it will just have the greenish tint since you would adjust the 500 to match the fluorescents. Also for people starting out, they should always have handle on grip head on right side for safety. If a flag, floppy, bounce or diffuser starts to fall, it will tighten onto itself.
Yes good point!
Fantastic video
fluorescent lights can you share the link which tubes did you use?
They’re from www.waveformlighting.com
Not quite cinema level but pretty good
@@stalman Thank you so much ❤️
I would pay good money just to have the natural light in your studio. Those windows are gorgeous.
what monitor are you using ?
Cool monitor, what brand is it?