Thank you for taking the time to do all these tests and for sharing! Now I won't have to run to the copy center for laser prints :D You have the patience of a saint! 😃
Wow! That was a lot of hard work! Thank you so much for doing all of that, going into that level of detail, and sharing the process and the results with all of us.
Thank you so much for experimenting with all the materials and processes and for sharing! Now I have a much better chance of being successful at transferring.
Great demonstration sir and I'm so happy you found some acceptable results! I consider myself a traditional & mixed media artist who enjoys experimenting, especially with acrylic mediums and the like! Although I do understand a bit about lino printing, I haven't tried it myself yet. I have an inkjet printer. For several years I too have been trying to master a diy technique for successful inkjet printed transfers so I can combine and replicate my own images, photos and drawings to create my own original art. So far I have had very little success with inkjet prints. For me the process is hit or miss and def not reliable. I used several inkjet printing papers, acetate & over-head projector film along with lots of standard printer paper. I've tried transferring on to 300 gsm art paper (for watercolour & acrylic painting), canvas, cardboard, mount board, mdf, plywood, plastic and more using a multitude of adhesives and mediums. And all that laborious finger rubbing failed to give me the clean, crisp finish I wanted. There are so many variables to consider. The most decent result was achieved using printable transparent film specifically for inkjet printers along with acrylic mediums. But the ink still showed signs of bleeding & smudging along with blank patches where the medium had dried too fast for the print to adhere! I did learn that applying the surface medium with a brush made the layer uneven so some bits dries before others. Spreading with a credit card or similar gave a better, more even layer. I think it's all about the water-content and fluidity of the medium used. Inkjet inks do not play well at all with liquids so acrylic gels are generally recommended as they are less 'fluid'. It's also a learning process and often quite exciting! Anyway. As time passed I became so fed up and disillusioned with the lack of progress that I decided to shelve the idea. I had a new idea.. to invest in a laser printer! So I did. Should have done so a long time ago. Success was pretty well instant using both standard printer paper with rubbing and no-rub transparent laser printer film. The results were fab! Note 1: Keep in mind that I do not have to worry about having medium on my surface as I can paint over or combine it with my process. But for lino-printing, I do understand that glues, mediums, etc. on the surface of the lino may impact the print quality and ink adhesion - or even create new and interesting effects. Now wouldn't that be nice! Note 2: There is a product called Inkjet Fix Matte by Ghiant - an aerosol that can be sprayed onto inkjet prints. The tin says: "Fast drying varnish for fixing and protecting inkjet inks". There may be other similar products out there. I have it here but haven't tried it yet (not since I got the laser printer!) Maybe this could be useful? In all, I really hope I have helped someone out there!
Thanks so much for sharing your experiences. I also had a Laserprinter for a long time and you are absolutely right. Laser is just simply waaaay better flr transfers. But since mine broke and I have and use a big Inkjet I dont want to dedicate the money and more importantly the space for an additional machine.
@@eastofawesome I absolutely get it! The laser machine I got is an all-in-one (print, scan, copy, etc) colour printer and is twice the height & bulk of my all-in-one inkjet printer (which I still have for now. I will part with it at some point tho!) There are other laser models available that are much smaller and cheaper that do mono/black only printing. My man got a new all-in-one mono laser printer for £109 so I imagine one that does printing only would be even cheaper. It's also a lot smaller than mine coz it requires only black toner. Anyhoo, thanks for allowing me to share one of my few successful moments on my 'image transfer' journey!
Appreciate the time and effort of doing the comparison! I have attempted the modpodge transfer and it worked great. I noticed that I sometimes inadvertently peeled away the modpodge layer that holds the ink in spots during carving. Now that it is time for printing, I'm wondering if I should try to remove the modpodge layer as there may be rough spots. I have no idea what to use as my research led me to acetone, but that this may damage the lino. Any ideas?
Yes, I should make a follow up video sometime. I have noticed the same thing so what I did was give it a light sanding with a fine sandpaper. Then you need to make sure you get all the dust out of the fine lines of your carving. That worked and I was able to print nicely with the block. But then after printing I went to clean the lino block - what I usually just do with warm/hot water in the sink. After some light rubbing with my hands I noticed the Modpodge/Ink layer starting to peel of. So now this is what I always do before printing: Just using warm water (I let it pour directly on the linoleum) soak in a bit and then quite easily rub of the whole transfer layer. Only downside to this is that you need to wait and properly dry the block before you can start printing. (I use paper towels around the lino and a few big books so it dries staight) You could also use Acetone as I already used that directly on the lino for another transfer method (You see it in I think the „memento mori“ print video). But its a harsch chemical substance so I would suggest to the simple warm water method first. If you posta picture of your final print somewhere then make sure to send a link! ✌️
Thanks so much for a great side by side comparison of transfer methods. I've been looking for more detailed transfer options but frankly any of these would seem to work. I curious about how much detail is needed to achieve a good result in carving?
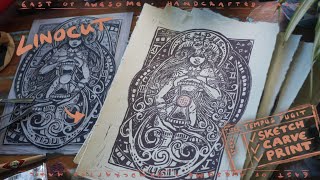
Sorry to give that annoying answer, but ... it depends ... ✌️Depends on how detailed your artwork is in the first place AND how accurate you want to be when carving it. In this case I had a very detailed artwork where I had even planned little grain marks and I wanted to cut the Lino as close to the artwork as possible so I wanted a very detailed transfer. But if you have a artwork with let's say rather bigger more graphical elements or if you are cool with a more creative carving style where you make some stuff up as you carve then a rougher transfer might be perfectly fine for you.
I used to stain the Lino simply with deluted acrylic colors. Lately I switched to chinese ink-sticks when I saw that they are also available in colored versions. Thats what you see here in the video. The ink stick gets rubbed on a natural wet chinese stone and that's what sets the pigments free. There are links to all the stuff in the video description above. Hope that helps! ✌️
Didn't realize that the music is so loud. Sadly you can't edit such things on existing videos. But I'll remember to check that for future videos. Thanks for letting me know! ✌️
Vielen Dank für dein Video die Aufkärung der unterschiedlichen Klebstoffe ist sehr Hilfreich ;) Kannst du mir als weiteren Tipp ev. sagen was du da zum Einstreichen der Linolplatte verwendest ab min 7:00? Liebe Grüsse weiter so :)
Das sind chinesische Tusche Blöcke die mit Wasser auf einem Naturstein gerieben werden. Links zu sowas hab ich in die Beschreibung gepackt. Alternativ hab ich aber auch schon mit einfacher verdünnter Acrylfarbe gute Erfahrungen gemacht. ✌️
I transfer my inkjet drawings to my lino with Bestine. I used to use blending markers, but they changed the formula so I switched to Bestine. The Smell isn't the best.
Hi! I used the acrylic method with a laser jet print, but when I used my carved block to print the thin layer of acrylic effects the way the ink applies and transfers to the paper. Do you have any ideas? I had to sand the entire block down, removing the transferred lines completely - which caused major issues as my design was planned as a reduction! Any suggestions on how to help would be much appreciated!
sry for the late reply, I have been on some kind of internet hiatus for a while. Sry to hear of your troubles. did you use the acryl to stain the lino bvore the transfer? Have you solved the issue in the meantime?
I know it's been 11 months, but Im wondering how the cut went, I did try this technique but when cutting it it didn't feel smooth. I got rigged lines and struggle to get a smooth cut.
you can see the cutting process in this video: ‚Vide Diem‘ Linocut Print: How to carve super detailed Artwork ( ruclips.net/video/GQY8l0xjIX4/видео.html ). I did not notice any difference in the feel of the cut. Maybe there was still some paper left? or the Glue layer was thick? 🤷♂️
@@eastofawesome thank you for answering, really appreciate you!! Yeah, I believe that was the cause, the glue layer being too thick. Great videos btw, very inspiring and helpful! Much appreciated
Might work as it also has that glue/sealing thing going ... have none here but I'll let you know if I manage to give it a try. Or maybe you can try and let me know! ✌️
@@eastofawesome thank you for a reply, im still learning how to use the gelli plate, however, gel medium works when I use it on my gelli plate, but I haven't tried doing it your way, so I'll give it a go, I'm new to this form of art so I'm still experimenting and practising. Cheers!


Thank you for taking the time to do all these tests and for sharing! Now I won't have to run to the copy center for laser prints :D You have the patience of a saint! 😃
haha, maybe I have just cut out all the angry stomping, cursing and crying ... ✌️
Glad it was of help!
How we suffer for our craft. Great video. Thank you.
Sometimes we have to I guess ... Thank you!
Thanks for going through all that pain for us! Great trick to use! 🙌🏻🙏🏻
Hehe, thank you! It was for a good cause ✌️
Wow! That was a lot of hard work! Thank you so much for doing all of that, going into that level of detail, and sharing the process and the results with all of us.
Hey Ariana, thanks for the nice words! Glad if it helps! ✌️
Thank you so much for experimenting with all the materials and processes and for sharing! Now I have a much better chance of being successful at transferring.
Good luck! if you are not as impatient as I was, then best just let it dry overnight to be on the save side
Great demonstration sir and I'm so happy you found some acceptable results!
I consider myself a traditional & mixed media artist who enjoys experimenting, especially with acrylic mediums and the like!
Although I do understand a bit about lino printing, I haven't tried it myself yet.
I have an inkjet printer. For several years I too have been trying to master a diy technique for successful inkjet printed transfers so I can combine and replicate my own images, photos and drawings to create my own original art.
So far I have had very little success with inkjet prints. For me the process is hit or miss and def not reliable.
I used several inkjet printing papers, acetate & over-head projector film along with lots of standard printer paper.
I've tried transferring on to 300 gsm art paper (for watercolour & acrylic painting), canvas, cardboard, mount board, mdf, plywood, plastic and more using a multitude of adhesives and mediums. And all that laborious finger rubbing failed to give me the clean, crisp finish I wanted.
There are so many variables to consider. The most decent result was achieved using printable transparent film specifically for inkjet printers along with acrylic mediums. But the ink still showed signs of bleeding & smudging along with blank patches where the medium had dried too fast for the print to adhere! I did learn that applying the surface medium with a brush made the layer uneven so some bits dries before others. Spreading with a credit card or similar gave a better, more even layer.
I think it's all about the water-content and fluidity of the medium used. Inkjet inks do not play well at all with liquids so acrylic gels are generally recommended as they are less 'fluid'.
It's also a learning process and often quite exciting!
Anyway. As time passed I became so fed up and disillusioned with the lack of progress that I decided to shelve the idea. I had a new idea.. to invest in a laser printer! So I did. Should have done so a long time ago. Success was pretty well instant using both standard printer paper with rubbing and no-rub transparent laser printer film. The results were fab!
Note 1: Keep in mind that I do not have to worry about having medium on my surface as I can paint over or combine it with my process. But for lino-printing, I do understand that glues, mediums, etc. on the surface of the lino may impact the print quality and ink adhesion - or even create new and interesting effects. Now wouldn't that be nice!
Note 2: There is a product called Inkjet Fix Matte by Ghiant - an aerosol that can be sprayed onto inkjet prints. The tin says: "Fast drying varnish for fixing and protecting inkjet inks". There may be other similar products out there. I have it here but haven't tried it yet (not since I got the laser printer!) Maybe this could be useful?
In all, I really hope I have helped someone out there!
Thanks so much for sharing your experiences. I also had a Laserprinter for a long time and you are absolutely right. Laser is just simply waaaay better flr transfers. But since mine broke and I have and use a big Inkjet I dont want to dedicate the money and more importantly the space for an additional machine.
@@eastofawesome I absolutely get it! The laser machine I got is an all-in-one (print, scan, copy, etc) colour printer and is twice the height & bulk of my all-in-one inkjet printer (which I still have for now. I will part with it at some point tho!)
There are other laser models available that are much smaller and cheaper that do mono/black only printing. My man got a new all-in-one mono laser printer for £109 so I imagine one that does printing only would be even cheaper. It's also a lot smaller than mine coz it requires only black toner.
Anyhoo, thanks for allowing me to share one of my few successful moments on my 'image transfer' journey!
Appreciate the time and effort of doing the comparison! I have attempted the modpodge transfer and it worked great. I noticed that I sometimes inadvertently peeled away the modpodge layer that holds the ink in spots during carving. Now that it is time for printing, I'm wondering if I should try to remove the modpodge layer as there may be rough spots. I have no idea what to use as my research led me to acetone, but that this may damage the lino. Any ideas?
Yes, I should make a follow up video sometime. I have noticed the same thing so what I did was give it a light sanding with a fine sandpaper. Then you need to make sure you get all the dust out of the fine lines of your carving. That worked and I was able to print nicely with the block. But then after printing I went to clean the lino block - what I usually just do with warm/hot water in the sink. After some light rubbing with my hands I noticed the Modpodge/Ink layer starting to peel of. So now this is what I always do before printing: Just using warm water (I let it pour directly on the linoleum) soak in a bit and then quite easily rub of the whole transfer layer. Only downside to this is that you need to wait and properly dry the block before you can start printing. (I use paper towels around the lino and a few big books so it dries staight)
You could also use Acetone as I already used that directly on the lino for another transfer method (You see it in I think the „memento mori“ print video).
But its a harsch chemical substance so I would suggest to the simple warm water method first.
If you posta picture of your final print somewhere then make sure to send a link! ✌️
good point!
Super Interesant :)! Ich glaub' meine Hände hätten nach einmal Papier abrubbeln bereits das Handtuch geschmissen.
Hehe! Wenn ich jetzt nicht gerade das Video aufgenommen hätte, hätte ich es bestimmt auch bei dem ersten halbwegs brauchbaren Versuch belassen ...
Thank you for showing all of your process, not just the successful part
Haha, your welcome. Sometimes it helps to see where someone went wrong I guess. ✌️
Thanks so much for a great side by side comparison of transfer methods. I've been looking for more detailed transfer options but frankly any of these would seem to work. I curious about how much detail is needed to achieve a good result in carving?
Sorry to give that annoying answer, but ... it depends ... ✌️Depends on how detailed your artwork is in the first place AND how accurate you want to be when carving it. In this case I had a very detailed artwork where I had even planned little grain marks and I wanted to cut the Lino as close to the artwork as possible so I wanted a very detailed transfer.
But if you have a artwork with let's say rather bigger more graphical elements or if you are cool with a more creative carving style where you make some stuff up as you carve then a rougher transfer might be perfectly fine for you.
Thank you for the time you imparted to keep this art alive. 1 question what are you using to tint the plate?
I used to stain the Lino simply with deluted acrylic colors. Lately I switched to chinese ink-sticks when I saw that they are also available in colored versions. Thats what you see here in the video. The ink stick gets rubbed on a natural wet chinese stone and that's what sets the pigments free.
There are links to all the stuff in the video description above.
Hope that helps! ✌️
@@eastofawesome thank you for the very timely response
you are very welcome! Let me know what works out for you!
Thank you so much! This was super helpful!
Thanks, glad it helped!
This is brilliant, thank you so much for this!
thank you! ✌️
Enjoyed it very much but the music is overwhelming maybe turn it down a bit
Didn't realize that the music is so loud. Sadly you can't edit such things on existing videos. But I'll remember to check that for future videos. Thanks for letting me know! ✌️
I like the music, but I might be going deaf lol
@@eastofawesomenah bro the music is great!
Nice blog you know you can use lodge lodge as a glaze
Thanks John! Is "lodge lodge" just a autocorrect from "mod podge"?
Vielen Dank für dein Video die Aufkärung der unterschiedlichen Klebstoffe ist sehr Hilfreich ;) Kannst du mir als weiteren Tipp ev. sagen was du da zum Einstreichen der Linolplatte verwendest ab min 7:00? Liebe Grüsse weiter so :)
Das sind chinesische Tusche Blöcke die mit Wasser auf einem Naturstein gerieben werden. Links zu sowas hab ich in die Beschreibung gepackt. Alternativ hab ich aber auch schon mit einfacher verdünnter Acrylfarbe gute Erfahrungen gemacht. ✌️
@@eastofawesome perfekt danke für deine Hilfe :)
I transfer my inkjet drawings to my lino with Bestine. I used to use blending markers, but they changed the formula so I switched to Bestine. The Smell isn't the best.
Thanks Scott, never heard of that one. Do you think it might be an upgrade to the modpotch process I showed here and I should give it a try?
Hi! I used the acrylic method with a laser jet print, but when I used my carved block to print the thin layer of acrylic effects the way the ink applies and transfers to the paper. Do you have any ideas? I had to sand the entire block down, removing the transferred lines completely - which caused major issues as my design was planned as a reduction! Any suggestions on how to help would be much appreciated!
sry for the late reply, I have been on some kind of internet hiatus for a while. Sry to hear of your troubles. did you use the acryl to stain the lino bvore the transfer? Have you solved the issue in the meantime?
Please where do youby linoleum
I buy it at our local art and craft store. ( it's called boesner but they are only in Germany I think)
I know it's been 11 months, but Im wondering how the cut went, I did try this technique but when cutting it it didn't feel smooth. I got rigged lines and struggle to get a smooth cut.
you can see the cutting process in this video: ‚Vide Diem‘ Linocut Print: How to carve super detailed Artwork ( ruclips.net/video/GQY8l0xjIX4/видео.html ). I did not notice any difference in the feel of the cut. Maybe there was still some paper left? or the Glue layer was thick? 🤷♂️
@@eastofawesome thank you for answering, really appreciate you!! Yeah, I believe that was the cause, the glue layer being too thick. Great videos btw, very inspiring and helpful! Much appreciated
Try putting less glue, it will be easier to rub off the paper and not the print.
thank you, Ill try that next time!
Wouldn't matt or gloss gel medium work? Cheers!
Might work as it also has that glue/sealing thing going ... have none here but I'll let you know if I manage to give it a try. Or maybe you can try and let me know! ✌️
@@eastofawesome thank you for a reply, im still learning how to use the gelli plate, however, gel medium works when I use it on my gelli plate, but I haven't tried doing it your way, so I'll give it a go, I'm new to this form of art so I'm still experimenting and practising. Cheers!
I’ve used gloss medium for this and it works
an deinem Deutsch mussu aber noch arbeiten 😂
tjoa, wer nich, oder!? ✌️🙂