Making Mars out of Cherry

HTML-код
- Опубликовано: 9 июл 2024
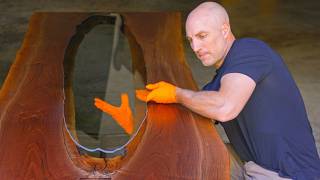
- I have made the planet Mars from a dodecahedron made out of cherry wood. The dodecahedron is made out of pentagons that have the terrain of Mars carved into them. I put the pentagons together to make the sphere of the planet. I did a similar project about the moon a few months ago and in that project I had trouble keeping the seams between the pentagons small. In this Mars project, I was able to hold the pentagons with a mortise and tenon on my table saw jig. This allowed me to cut the angle between the different pentagons along the sides of each pentagon by holding them from the center instead of from the edge. This minimized the seam between each of the pentagons creating the final form of Mars.
Tools used in this project can be found at
www.frankmakes.com/
Avid CNC: www.avidcnc.com/
OneGuyInAShop: www.etsy.com/shop/OneGuyInAShop
To see upcoming projects follow me on social media
Patreon patreon.com/user?u=16151185&u...
Instagram / frank.howarth
Facebook / frankmakes
0:00 (introduction)
1:31 (dust boot)
2:53 (pentagons)
10:00 (attaching pentagons)
14:46 (finishing)
16:20 (conclusion)  Хобби
Хобби


I will never get tired of the stop motion you put into these videos. These small animations take a lot of time to create and I am glad you do it. This sets your videos apart.
They must take nearly as long to make as the project itself
I would watch Frank make simple boxes for hours because the story telling is so great. The animations and the past film clips add to the story telling like characters in the story. The production quality is top notch as well which brings it all together in videos that are enjoyable on the first as well as the tenth watch. I would also say this his voice is the best for narration of any of the RUclipsrs I watch, so soft and calming, to listen to.
The Rover is so good
I've been watching Frank's videos for years and that Squeaky Clamp inch-worming it's way across the screen still just makes me smile.
the internet does not deserve you Frank......the attention to detail in your videos, the stop motion, the goofy Mars rover....it's all too darned good.
Aww thanks
Watching your videos is like watching a Pixar movie about woodworking. Love It!
I love how the grain kind of looks like the lines in a topo map!
If you cut the seams at a very slightly steeper angle, then it would mostly be the outer edge that makes contact first, should close the gaps ;)
“And I took a Martian sample”
This is why we yell out with excitement “Frank posted!!!!”
Some of the most creative editing I’ve seen from you, Frank 👏
Try a vacuum bag for clamping! It’ll give strong even pressure without damaging the topography. Also, I loved the rover shenanigans!
One proven way to put it under equal spherical pressure for glueing all together would be a vacuum bag. You'll have to modulate the pressure/evacuation rate and probably help a little with a rubber mallet to position the pentagons relative to each other, but it works extremely well where there is no way to clamp an object for its spheric form (or its dimensions). We glued 60 foot lamellated yacht hulls in one piece that way, so a model Mars shouldn't be too much of a hassle to vacuum bag I reckon. Thanks for sharing Your wonderful projects!
Goodness Frank not only are you an absolutely gifted craftsman but your filmography and editing skills are near unparalleled!!! Some of, if not the most, stunning and captivating videos in the entire “maker” category!👏🏻👏🏻😍
For exaggerating the terrain without blowing the scale of the mountains, you should use a logarithm filter on the heights. Basically you could set it so the mountains stay the same height, nothing will switch heights, but your medium spots will get the most oomf out of it.
I was going to suggest logarithmic vertical exaggeration too. Not sure whether that will do valleys correctly, but it's definitely something that can be examined in a digital model before making sawdust.
Unbelievable. You decide on something difficult to impossible, then you make it. Be comforted, we will not (be able to) steal your ideas. 👍🏻👍🏻👍🏻
I kinda like the moon's seams. While accidental, it feels like an artificial world from some sci-fi story. Ooo, you could do it on purpose with cityscapes and agriculture tiles.
Have you thought about using a plastic bag and a vacuum for clamping for a hopefully uniformly inwards pressure?
Was gonna say the same
Yep that was going to be my suggestion
could be problematic with shapes that are closed off to the vacuum bag like a hollow sphere. You'd probably get some pressure differences while closed in the vacuum bag or later after adjusting the air pressure to the normal level.
same response, seems that this would be best
One small hole eould solve that problem.@@Craftlngo
Thanks for such cool projects and for sharing your journey!
I think your film making is exceptional, only narrowly exceeded by your ingenuity and skill with the wood. Nice one, love the whole premise and the rover was the cherry on top.
The mortice was a stroke of genius. Only think I think you could do is add locating pin holes with CNC to it. So it could be re-located back and forth from table saw.
You could use a tapered endmill or just a ball endmill with a lot of step down passes to cut the mating faces on the CNC in the same setup where you cut the locating pockets on the underside of the pieces. It would eliminate the extra step of putting them on the table saw and probabaly get you mich more accurate parts since all 5 mating faces of each piece would be cut in a single setup
Your such a wonderful story teller in this medium....thank you!
Beautiful project and great vid as always. For clamping you could try wrapping with surgical tubing. With some tension and many overlaps, it will look like a big ball of twine, but we use this technique in guitar repair for gluing fretboards. Worth a try I think. Cheers.
And next You need to make a Snickers out of Walnut 😄 Awesome work! Respect!
Stunning filmmaking Frank, as always 🧡
How is it that you don’t have 2M subs? Amazing skills, video creation, and narration. I’m always blown away by your content. Masterful.
Once again, a one of a kind project from the great Frank Howarth.
I love your videos Frank! Thank you for sharing your talent and artwork with us! I look forward to every video to publish!
This looks really cool. Great job Frank
This looked great! And I love all the camera work you do.
I hope you're planning a full solar system. That would be so cool!
Frank, it amazes me how your mind works to think of these projects as well as how to accomplish them to the degree you do.
This work is getting better and better Frank! I have an idea how to get the seams even tighter. You'd have to setup the Table Saw blade to the middle of the sphere instead of a pentagon that is somewhere arbitrary placed on the underside of the dodecahedron. In this way you'd get precise transitions between each tile, even with different elevations on the surface of the planet
Have you tried adding a core to the planet? The core being essentially a jig on the inside of the sphere, much like the one that holds the pieces in the saw and CNC machine. Except this one is 3D and allows you to stick all the plates of the "crust" accurately together.
This is incredible. I can't wait for Saturn and Jupiter.
I've been wondering how I'm going to do those. My daughter really wants me to make Saturn.
@@frankmakes little stones (pebbles) encased in transparent resin for the saturn's rings?
The rover cracked me up every time it appeared! 😂 I can't wait until you do Saturn!
I absolutely love this one. It turned out amazing.
LOVE the rover.
That's pretty cool and so creative! Love watching you make stuff!
Looking forward to Saturn in this series. 😁 These are fun, and I can see how you improved over the moon model with this one. Thanks for sharing!
That was so much fun. It looks so good. I love the solutions you came up with. Thanks again!
While that dust boot looks great on there, it pails in comparison to your talent and what you provide our woodworking community. I'm glad you like it and I hope you enjoy it for a long time. Thanks for the shout out!
That's great, Frank. If there's a better way, you'll find it if anyone can.
Bill
You have several more celestial bodies to practice on and refine your techniques. It would be interesting to see our solar system as a mobile hanging in the shop.
You’re such a poète ! ❤
Rather than lots of belt clamps, you might try vacuum bagging the whole planet.
Incredible work as always Frank. Thanks for sharing.
Maybe do the terrain elevation with a log scale?
The moon was pretty cool, but the mortice key takes it to a new level.
I wonder what that would look like
Beautiful! I always look forward to your videos.
Really appreciate how you explain your building process on these wonderfully complicated projects in ways that makes sense. Great video and work.
Wrap the sphere in cling film. You can start off just snugly going around, and then increasing the tension as you wrap will squeeze it all together. Or lots of rubber bands.
Your videos are THE BESTEST!!!!
Interesting idea making 3d shapes on a cnc router, its got me thinking about a few future projects :)
Fascinating! ❤❤❤
Thanks for sharing.
15:59 i think the solution you should consider is to make the sphere perfect (that is to say, that all of the joins you have, should be correct, flat against one another) before you make the final surface cuts. And the only solution i can think of... is to ditch any kind of biscuit or glue and make an internal dodecahedron, with a small dish on the faces (akin to what castings have, where only the edge sits on a surface, to minimize the work the machinist has to do to make that surface flat) where only the intersections of the faces of the dodecahedron meet, are raised. And to make the faces of the sphere "sit down" on those edges, you can insert in the center of the faces of the core, threaded inserts, where screws would pull these faces down. Those screws would then covered on the sphere side with plugs, which you can machine (to have features) in a jig, to match the holes drilled in the faces down to a T.
Extra work, but it eliminates the chance of glue messing things up, faces not meeting etc. Once you have this sphere and its core down pat, you can disassemble the whole affair, put your "segments" in MDF slots with the exact shape negative machined in, and hold them down via the screw to be machined. One issue is (however) presented in this, and it's the fact that depending on how much gronk you put on the screw, the face of the "segment" will be warped, and won't match, so... perhaps there's washers under the slot that only allow the face to go down an exact amount that matches both dodecahedron core and the negative support on the CNC.
One other nutty method would be to lower that part of your CNC table at 90, make a cradle that picks up on the holes in the sphere and machines each "segment" on the sphere as is. That way, you won't have issues with the features (or raw faces) interfering with your work. If the holes you cut, have an extra step, besides the one for the screw(and a washer), then that step can become the register, which would be (assuming the sphere is accurately assembled) pretty precise as references go.
Just some thoughts on how i'd try to approach this. Whenever glue's involved in stuff like this, you inevitably end up having issues. Even the greatest museum pieces exhibit this kind of problem. For that very reason, the master workers of the past centuries had these features (that were supposed to match) as fascias or used other methods like carving in place. Small cheats to achieve an even item.
I was beginning to realize any glue with something this complicated was going to raise issues. Some kind of mechanical connection might be better
FRANKIIIIIIEEEE! Happy holiday weekend!
Thanks for the video!
Looking good.
Cool project. Are Mars and the Moon to scale? Earth next?
Enjoyed the video. Thanks for sharing
Cool
Edits franks well done
Again, An Amazing piece of art and masterful workmanship!
Amazing.
I'm no woodworker, but I do play with modular origami from time to time, and it seems like part of the problem you have with assembly is the angle at which you have to insert that final piece -- it's almost perpendicular to the angle of the biscuit. If you assembled it as two halves first and then pushed the halves together, that might let you get away with a lot less wiggling in the end.
mwahahaha, this was the method I commented on the moon video to fix the filtering problem; glad we came to the same solution and it worked!
A rotary brush, wire or nylon, might make a similar surface texture that the cnc finishing bit does. That way the seams blend with the field more.
Love the mars rover cameos and cutschenes :-)
Nice work!
Wonderful! The color will get redder and redder and look more mars-like in a short time. I was thinking that if you could devise a clever (very clever!) indexing method, you could sculpt the terrain after assembling the sphere.
That underside cut is difficult, yay for jigs
I know it's not quite what you're going for, but you could potentially make an over sized sphere with two holes in opposite 'ends' like the north and south pole, and cnc the sphere in its entirety on your cnc machine with a 4th rotary axis. Im not sure if you have one actually. But then you could just plug the north and south pole holes with seperately made plugs that match the terrain and you're guaranteed to have perfect seems. Just an idea but its definitely quite a challenge making it out of 2D pieces as you say. It was a joy to watch!
I've wondered about just doing it on the fourth axis. I think the northern and southern regions would get distorted, but maybe that would be interesting
Truly amazing work, Frank! It turned out great! 😃
Stay safe there with your family! 🖖😊
Nice. I guess you will have to add 2 axis of rotation on your CNC to be able to carve directly on a sphere.
That would be nice. LOL
I’m glad you are still enjoying the Fairchild rotary tool I sent you a while back. I thought you would like it.
Thanks again, I use it more than I would have thought
Cool!
I love these globes, but fyi, you made a mirrored Mars. At some point in the process, you must have accidentally inverted something.
Good catch! Did you check on a map, or do you know Mars' terrain by heart for some reason?
@@hadinossanosam4459 I am a bit of a Mars nerd. Olympus Mons, those 3 mountains in a line, and the giant canyon are pretty iconic in my mind. I did double check on a map to make sure it wasn't just upside down or at a weird angle.
I think taking the log of the surface height should show off the small details and crunch down the high mountains some
What about an oversized sphere mounted to the cnc and then carve out the surface?
fantastic project and video what a great amount of info!+
Jupiter, please. Then Saturn. Keep ‘em coming.
Genius!
Look up "Hexakis Octahedron" It is a cube inflated to a sphere. It maps perfect to a cube map. And like a cube it has 12 seams. 6 faces. The bevel angle would be 45deg. It is a much cleaner shape than the one you are using.
Looks great! Will you be doing all the planets?
We are witnessing a staggering intellect.
I bet those biscuits all end up being a different size frank.
Great Video!! Maybe adding a 4th axis to the CNC could result in a sphere. Should work.
What an interesting project. Quite a bit more refined, as compared to the "moon" globe. [enjoyed the shenanigans of the Mars rover...]
Next one will be Saturn, a bit of saw dust mixed in a ball of epoxy :)
I admire your work.
Don’t know if this works but you can probably try tu use a vacuum bag for the gluing.
This will apply a constant pressure on each hexagon
Hugh fan! Keep em coming!
Комментарий в поддержку канала и ролика, а также труда мастера.
Refreshing to see someone using biscuits again. They somewhat faded from woodworking.
Fav part of this is the mars rover clambering over your tools lol
OMG OMG OMG!!! I am fantasizing about a whole Planet series!!! I can't wait to see what you do for Jupiter!!! I can invision so many different spiecies of wood for Jupiters color bands 🙂
I've been wondering how to do Jupiter. I have a fantasy of finding a big hunk of wood that has just the right pattern in it and a knot in just the right place to make the storm
@@frankmakes Oh wow! i didn't consider a single piece of wood. A knot would make for a good storm! In my mind, I see a stack of thinly prepared slabs stacked in "just the right order" and then turned to be the sphere. The trick would to be not to "chase round" in too many directions becuase that would affect the visible layers (right?). I have to admit, my turning experiance is limited to watching you for the past several years now hahaha. I super enjoy your work! Thank you for sharing your passion with us!
Hey Frank, you might have more luck if you cut the angles on the back of the segments with the CNC at the same time as you cut the mortise. That way you don't have to rely on your table saw getting the angle perfect. It will be a little trickier to clamp to do the surface side, but the added accuracy might be worth it.
I had the same thought. This might require a tenon based clamping setup. a vacuum hold down perhaps? Then the pieces should be ready to assemble (with added biscuits) right off the cnc.
And thanks for being awesome Frank. You make the world a better place.
I thought that's what he was going to do. It's amazing how the mind can get stuck following a process simply because that's what you've always done.
Not that I would ever think I had an idea you had not already tried but what about cutting your angle on the table saw one degree off so that the tops of the seams come together 1 degree before the bottom of the seam. Trick used in moulding.
What if you carved out two matching "bowls" and lined it with stiff foam and packing tape/plastic wrap for clamping. Similar to what you do for turning spheres, but bigger.
have you considered making the sphere out of your wooden pieces and then trying to cut the surface contours out on the CNC table using some sort of jig that allows you to rotate the sphere in place?
I wonder how it would work to make an inverse version. With the terrain effects on the inside, followed by pouring in some resin or silicone. I don't know if you could carve it in two pieces like 2 bowls and then connect them that way or if you would need to use your pentagon method. I don't have any experience with CNCs.
Great video as always. I love your channel.
is Venus next?
Hey Frank, have you ever heard of Lignolok pneumatic nails? They could be of some use for CNC workholding.
How about the earth with the sea floor terrain as well? Lots of detail in that map.
Great work.
I've been thinking about this very thing.
I wonder if wedges (like apple slices) would be easier to align and assemble than pentagons?