Using Fiberglass Resin with 3D Prints | Boba Fett Part 6

HTML-код
- Опубликовано: 4 фев 2025
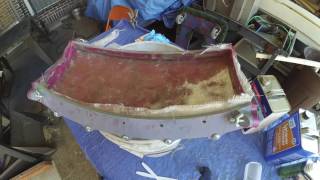
- In this video I will show you how to use fiberglass resin to add strength to 3d Prints. This is a basic fiberglass resin kit DIY. Welcome to part 6 of my Boba Fett Cosplay series, I really hope you enjoy it!
Tools used:
Fiberglass Resin Kit:
www.amazon.com...
Gloves:
www.amazon.com...
Respirator Mask:
www.amazon.com...
TikTok:
@galaxybuilt
vm.tiktok.com/...
Instagram:
@galaxybuilt
Shot on:
Canon T3i, GoPro Hero8, iPhone 13 Pro.
Edited on: Adobe Premeire Pro
Voice Over recorded on:
Blue Snowball via Audacity
Music Track(s):
Intro:
Title: Happy Days
Used in accordance with Audio Hero licensing.
Title: Luv
Artist: Bomull
Used in accordance with Epidemic Sound licensing.
Thanks for watching!


I just learned the trick using uv resin to smooth the outside, now I can add strengthening the inside important parts to that 😁 thank you.
Next ... I gotta start printing 😳
That's fantastic! Yeah I have started using UV resin to smooth the outside quite often, its so much faster!
I did something similar with all of my 3d-printed Mando plates. But be warned: this strengthening technique does not prevent your plastic plates from breaking when being knocked or falling on the floor (depends on the flooring - carpet provides a higher chance of survival than tile). But there is higher chance that all of the fragments will stay together. Also, I never bought such a kit, but large quantities of expoxy resin and large packs of fibreglass mats meant mostly for boat repairs from the usual sources (I always get the 300 gr kind - plenty strong). Also, I never cut it with scissors, but tear the mats into smaller pieces. This way, pieces overlap way better and creates a stronger bond.
That’s great advice! Thank you!
Awesome work, cant wait to start my BoBF version, once I get my printer 🙏
So, where is part 7?? 🤯😂
Coming very soon!
@@GalaxyBuilt im excited 🤗🤗
Super awesome Boba Fett costume
Thank you so much!
Just wondering, would you use this method on a helmet? I've been reading that fiberglass can be quite irritating to the skin.
At 0:48 you state that the resin is strong without the cloth. This is known not to be the case. Without fibers in the resin cracks propagate unchecked. Adding resin to a porous surface might add strength but for other surfaces all you would be doing is adding weight.
Thank you
Amazing work I have been waiting for another boba fett video 🎉
Thank you!! I have more videos coming I assure you! Really appreciate the support!
Np I love your content mostly boba fett :)
Nice work buddy 👍
Thank you so much!
Great build with a lot of cool tricks! Will this be continued? Been a while since the last update here.
Editing next part now!
Great vid. Doing my first set of armor. I was thinking about reinforcing with fiberglass but was doubting myself as I’m using resin to smooth the outside. The backplate for jet pack I feel is critical to be reinforced.
Got to check out the rest of your vids.
I am super glad this video helped you! The first time I used fiberglass resin I was pretty nervous, but it turned out to be easier than I thought. Let me know if you have any questions!
great video man, is there gonna be a part 7?
Thank you! And actually, yes! Life has been crazy but the next part is nearly done being edited and should be uploaded soon!
I need a part 7!
I’m nearly done editing it, I’ve been so busy!
What type of filament used for the parts?
I almost always use PLA+ filament for my cosplay!
Quick question; Have you had any issues with the exothermic reaction's heat warping or damaging pieces at all? I originally tried to 'rondo' my 3D printed armor (resin + body filler) but it seems to have gotten too hot and ended up warping some parts to the point where I had to re-print them. That's a bit different than just the fiberglass resin by itself, but I'm curious if you noticed any issues.
I have not has issues with this particular fiberglass resin getting too warm for 3d prints. However, I've used Epoxamite 101 in the past and noticed that if I had the correct amount of hardener or a little bit too much, the reaction would be too fast and "smoke" as it dried. Using a slightly lower ratio of hardener helped, just took longer to set. I hope that helps!
Did you use the cloth for the smaller parts as well? I need to reinforce my smaller parts because they are too flimsy and had issues with warping on. I was told by a couple people to do the inside of my parts with fiberglass resin to reinforce so just trying to do my research before I start 😂
It’s probably a good idea for extra strength! I didn’t do it on the smaller pieces of this armor though, because I didn’t want to add to the thickness of the back of the pieces. Also, I had already painted them when I finally got around to this step, so I didn’t want to have to sand. But it’s a great idea!
I'm planning to do some armor, how do I reinforce the outside? Use resin? Or resin and fibreglass? I don't want to lose detail on the exterior of a helmet or chest piece etc. But don't want it to be at risk of caving in
Are you printing it with enough walls and infill? Doesn’t take much to keep it from caving in. I would say that if you’re concerned you can definitely coat the inside or hidden parts with fiberglass resin. It works quite well to add strength. I highly recommend doing this for seam lines between pieces for sure
Thank you for getting back to me, I printed a mando helmet at 13% and added resin on the inside and it holds up well. I also used some kind of filler that hardens and sanded on the outside but just wondered if there were any other tips or tricks I didn't know about haha
Thats awesome!
@@CamoKiid
Wait but what about temperature?
Resin gets hot while it cures, does it affect the 3D printed piece?
True! The curing resin is an exothermic reaction. However, in my experience it’s not a hot enough reaction to warp prints.
Your boba fett series has been insanely useful, thank you so much! I’m looking to follow it pretty closely, I’m just looking for 2 alternatives. Do you have any ideas on what could be used instead of fiberglass? I’m also looking for an alternative to heating the glue when connecting the pieces, which I’d prefer not have to heat. Any helpful hints would be appreciated! I’m just in the beginning stages and yours looks amazing!
Thank you so much! I am glad the series is helping! I've got several other parts on the way, just a little slow to getting them edited and uploaded. So I assume you're saying you're concerned with plastic welding the pieces since it melts the glue which is very toxic. I totally understand that. And I also understand the hesitancy to use fiberglass resin. One way to potentially get the parts to fuse together a bit better is a product called 3d gloop. It essentially welds the parts without the need for a soldering iron or toxic smoke. Then you could potentially take a cut up piece of 3d printed raft or some other piece of plastic or even wood or metal and use it as an overlap on the inside between the pieces to help give them strength and support without the use of fiberglass resin. I think gluing something strong to the inside of the part that spans across the seam line would help give lots of support and strength. My concern with gluing these and leaving it at that was the glue is on such a small surface area, I didn't want the part breaking. Especially something like the back piece which also needs to hold the weight of the jetpack. I really hope that helps! Let me know if there's any other questions I can answer!
@@GalaxyBuilt thanks for your quick and in depth reply! I really appreciate it. Those are great alternatives and your concern about the weight of the jet pack is a great point that I hadn’t considered. Excited to see the rest of the series and can tell how much work putting these clips together must be, I know I can’t be the only one really looking forward to them! They’re so well done!
@@TaliaHamilton98 Thank you very much I really appreciate that!
Thanks man
Thank YOU!
When sanding is the dust safe to get on skin?
Yes, to my knowledge the dust is fine to get on skin or clothes, but do not let it get in eyes or breathe it in, I hope this helps!
This is the tutorial I been looking for but Is it safe to do for a helmet ?
It is, yes! I have done it myself. This is a great way to hold the seam well. I would just encourage sanding extra extra good as the fiberglass cloth poking at the head would hurt extra bad. And maybe add some extra resin on top. Or just make sure there’s good padding inside. I am so glad the video helped!
No. A respirator needs to be used in both steps. Your brain is important too, not just your lungs. A vapor cartridge is needed for the resin and particulate filter for sanding. OUTDOORS.
Great suggestion thank you
Been 8 months, you gonna finish this series?
Oh I know! I have had so much going on! I will be finishing this series and should be uploading another part quite soon!
I am exactly at that stage for my jetpack.
That's fantastic! Assembling all of these larger pieces was tough but once I got passed that hurdle the project really felt like it was downhill to the finish.
@@GalaxyBuiltMine was from one of my Garrison Members that passed on. I'm trying to get it back into trooping status. Yours is turing out great.
Thank you!!
Updates!!!
Next part should be uploaded soon!