DIY Power Rack Part 2

HTML-код
- Опубликовано: 26 июн 2024
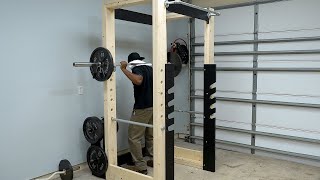
- In this video I start building my folding power rack. First I made the side walls to the power rack, assembling them at the fixed structure in the room. Next I fixed the overall width of the power rack to fix the barbell better. Then after drilling lots of holes for squats, bench, safety bar positions, and my pull up bar, I made my J Hooks and started finishing it out. I made a nice little shelf that sits on the wall for my phone or bluetooth speaker and called this project complete!
#HiddenHillsSkillz
#FoldingPowerRack
#DIYPowerRack
#DIY
Links:
(When available, I use affiliate links and may earn a commission)
Tascam Lavalier Mic: amzn.to/33ABPm6 (Amazon USA)
Fusion 360 model of Power Rack: hiddenhillsskillz.gumroad.com/l/NSRyE
Epidemic Sound referral link (Where I get my music): www.epidemicsound.com/referra...
-- SOCIAL MEDIA --
hiddenhillsskillz
hiddenhillsskillz
-- DISCLOSURES --
I often link to products & services I regularly use and think you might find helpful. Wherever possible I use referral links, which means if you click one of the links in this video or description and make a purchase I may receive a small commission or other compensation. It does not cost you anything extra to use them, and they help me to be able to create more videos for you.
I'm a big fan of Amazon, and many of my links to products/gear are links to those products on Amazon. I am a participant in the Amazon Services LLC Associates Program, an affiliate advertising program designed to provide a means for me to earn fees by linking to Amazon.com and related sites.
Timestamps:
00:00 The Power Rack Part 2
00:23 Intro
00:33 Building Side Walls
01:19 Installing Side Walls
02:30 Fixing Power Rack Width
05:28 Making J Hooks
07:48 Drilling Holes For Squat Position
09:01 Drilling Holes For Bench Press
09:31 Drilling Holes For Safety Bars
11:24 Making Shelf
11:48 Painting
11:56 Installing Support Brackets
13:00 Final Montage
13:59 Outro  Хобби
Хобби


![Gunna - back in the a [Official Video]](http://i.ytimg.com/vi/oBrbejOHjLw/mqdefault.jpg)


when I was a kid there was a slogan "GOOD OLD AMERICAN KNOW HOW" ... great design and execution
Thank you very much for the kind words!
Awesome! I'm currently in the process of getting a house, but building my own power rack is a priority when I have more space, and I'll definitely be using this as the basis for mine. Great work! Hopefully you enjoy using it! :)
That's awesome! Glad to hear it. I love using it, so far no issues!
this is an amazing build, thanks for sharing
Thanks so much for watching! Glad you enjoyed it!
Good looking Power Rack! 😉
Very cool design, well thought out!
glad to see part two! turned out great.
recently made my own power rack, didn't like the 4x4's I was seeing (or the price LOL), ended up gluing 2x4's together then milled them down to 3x3.
Made my plywood gussets more trapezoidal for added strength, and through bolted using carriage bolts (meant to have the smooth head on the inside on the rack, but got mixed up and did them both the same way, have been too lazy to fix it yet)
drilling 3/4 holes every 3.5 inches on the uprights took a full 3 hours on the drill press. I sourced some 3/4 cold rolled steel for the safety pins, and some 1inch pvc for sleeves on them.
thinking I might cut a repair coupling down into small strips and glue them on to make the ridges you had with the hose clamps.
my wooden j-cups are held on using 1/2 inch bolts with the bolt hex head counter sunk into the wood so I wont hit the bar on them, on the back I have a large washer and wing nut.
my j-cups have a tall back on them that keeps the bar from hitting the uprights when I rack, also means they over lap more than one hole so I have a second bolt there as well.
Am realizing now I should make more sets of J-cups, like you did, so I don't have to move mine for each lift
Legit!!!
Excellent build! are you thinking of adding cable pulleys?
I am considering that! I recently bought the cable pulleys, but I'm not sure the best way to integrate them. I bought two, but seem to only be able to mount them up high. I kind of want to figure out how to change heights for a low pull and mid pull option.
amazing i subscribe after 20 sec of video .
but is its enouto hold heavy barbel like 150 or over ?? and when you do bench press . is it ennough resistant for hold the bar ?
Yes it's definitely able to hold 150+ lbs. I've loaded about 375 on it in the rack and it's held up great!
Kevin, does the front 4x4 touch the floor....if so how are they able to be raised so you can fold it?
The wood is raised off the floor, but I have leveling feet underneath. So I give each side a little lift and spin the leveling foot to retract it before closing it up.
J hooks are designed incorrectly. Put a 2x4 behind them then a hole thru top of 2x4. Now its shaped like a j and gravity is your friend, not your enemy.