Ok hear me out, if the supercharger doesn't fit under the hood make a dodge dart style hood scoop kinda of like the v1 rally miata and plump the intake to it and put the filter in the opening 🦍
Your fabrication skills have peaked. The only way to up your game is with new tools and techniques. Tim to learn carbon fiber casting, get legit CNC machine, etc.
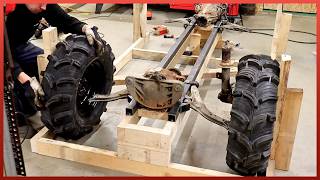
I would highly recommend putting a sleeve through the frame where the cantilever bolts go through, it will limit the frame from being punched/crushed, also increase strength a lot seal the frame from debris going in etc... Offroad trucks do this often and bolts through frames without sleeves fail
It would be very easy to replace the spacer you used with one that's the same diameter but that goes through the frame to the other side and is welded in both sides of the frame, big improvement!
@@austindotson5104 I think that was in reference to the spacer he welded to the outside of the frame, it's just weird phrasing. There was no footage of the inside of the frame being sleeved; just hole drilled, bolt plopped in, and welded
This was my thought too, I would imagine it is probably okay on a truck that light, but I definitely would have liked to see that bolt sleeved so it doesn't bend inside of the frame and make a link in the frame itself
@@austindotson5104 if he did that's great looks to me like it's just got the spacer off one side which will put quite a bit of single shear side load on that bolt and frame and if it's not sleeved inside would be a weak point, just want to see him succeed cause I'm building a similar Toyota drift truck
Probably a good idea to make a rear bash bar, in case you give a wall a little love kiss. Better to make another bash bar than the whole rear suspension.
@@bobhilly546312156332 how come? We don't use fractions to measure distance but we use for other things. Come on, you can't be serious saying 1/4 mile is easier to use than 400 meters? And if you wanna say 500m in Murican? 1/4 of a mile plus 109 yards, 1 foot and 249/250 inches? Man, it's so much easier and intuitive to use a system with base 10, just try it and you will abandon miles, gallons and pounds really fast. 😬
@@e36blur Says the guy with a German car. Plus 99% of your sockets are in mm so the drive size of your ratchet is irrelevant. Same as your wheel size since you put metric sized tires on thoses wheels lol
You should adjust the coilover and it's mounts so that the coilover bottoms out on its bump stop before the axle crashes into the frame. This will ensure that the shock is not overextended during droop, as that would ruin the coilover instantly. A limit strap to control droop would be a good idea as well. This machine is looking awesome, a stark contrast to it's first iteration! Can't wait to see it on the track!
This is looking sick, I'm just concerned about the cantilever bolts not having any vertical bracing since they will be experiencing tons of vertical stress throughout the travel range.
Very nice fabricating! I just wanna leave 2 thoughts here, 1, as others have pointed out the chassis side of the coilover needs to pivot too since the bell crank moves just a little bit up and down as the suspension moves, 2, I would have put the suspension on the front side of the axle just in case the rear quarter hits something, it would've been a safer spot for the custom setup. I hope this message gets to you keep up the good work!
yeah i was noticing the shock body raising and lowering through the articulation, meaning it would either need to pivot on the rear mount too or make a new cantiever that keeps the shock body perfectly stationary through suspension travel. I cam to the comment section specifically to see if anybody else had noticed this
The coilover really need to be the double eyelet type, not a strut mount top mount type. I know he wants to keep it 240 parts but that’s the totally wrong design of coilover for this application.
I just saw the Project Tour t-shirt that you released and I checked the dates and I’m like “there’s no way I have been watching since 2017 with the rally Miata” but here we are. Caleb you have always been an og, I’m so happy I was able to find your channel 6 years ago, I have always enjoyed watching your content, I can’t wait to see drift truck v2 when it’s complete.
@@roachwerks3043 it might not be a 1.5tone truck with shock movement of say 30mph is over that amount of force it can handle, because it is only held on the one side it might actually not be enough
@@tylerreed7385 when you have a clamping arrangement, the only force the bolt really “sees” is the clamping load. Almost all of the shear and lateral load will be channeled from the heim joints onto the sleeve and directly to the frame. The friction force the bolt creates would be tremendous and you would need a crash impact to defeat that. Sure it could be a double shear arrangment, but that doesn’t seem entirely necessary. Source: mechanical engineer ;)
I was thinking in the last video: come on, leave this 3/8 minus 4/6 multiplied by 4/7 and whatever and turn to metric, its way easier and intuitive! Glad you adopted it! 😁
Holy moly I just realized that I have been watching you for 6+ years crazy how far you've come from making forza content to doing real & insanely dope project like this one. From making crazy cars in forza to crazy (even cooler) cars in real life absolutely blown away.
If you're going to put the radiator under the bed, behind the rear axle, make sure to properly protect it from debris. If you're unlucky, popping a tyre could do some real damage to your radiator or hoses if you don't. Have you considered putting the fuel cell in the rear and the radiator between the axle and the cab? Anyway, I love to see you build on this level, keep it going, you're absolutely killing it!!
Guys used to run coolers and stuff in the same location on mr2's and always copped damage from rocks and shit. So would hate to think about a tyre or something letting go.
Your ability to design and fabricate has gotten to be so impressive. I started following when you first turboed Molly the Miata with the Flyin Miata kit and now you're building a custom truck from the ground up
That suspension looks soooo cool. Can’t wait to see it in action. Need some go pro angles of the suspension working when you first drive and then drift it. That’ll be so cool. Maybe if you get a outside angle and a cantilever angle. Such a satisfying build to watch.
designing effective bell cranks can be tricky, the weight of the bell cranks can effect damper response but in this application I dont think itll effect you too much
It is looking very nice, the only thing that I noticed is that you welded the top mounting brackets of the springs of the cantilever setup strait to the bar. The springs are under a lot of pressure longways because they can not pivot at the end. If the bar can rotate or the springs have an pivot system in it, than it is ok. If not, you have springs that want to go in a banana like shape while they can only compress in 1 direction. I see it already in the video. That is why cantilever springs have at the bottom and at the top horizontal mounting bracket other than a vertical top and a horizontal bottom mounting bracket relative to the springs itself.
This is the sickest parallel 4-link I've seen in a truck. I love the stance, too. Not to mention that a little squat will transfer some needed weight to the rear for better grip. Now, I know the front suspension is done, but I learned something really interesting recently about tire slip angle and how it relates to Ackerman steering geometry. Basically, the more load you have on a tire, the greater the slip angle can be without losing grip. To that effect, Formula 1 actually uses ANTI-ackerman since their outside tire is seeing more load than the inside due to weight transfer and downforce. The reverse is also true, the LESS load on a tire, the LESS slip angle it can have. So I had an epiphany after a few moments of thinking and realized that DRIFT CARS load up the leading front tire, but UNLOAD the trailing front tire in a drift. However, with Ackerman steering, during a DRIFT, the outside tire (in regards to the direction you're turning), which is trailing behind you with less load is the one that has a greater difference of angle compared to the direction of travel. Which means it experiences more slip angle with less load and therefore drags along while adding no control the the steering. Basically, it would give you WAY more front control if you switched your steering to ANTI-ackerman steering. It'll just drive a little strangely at low speeds when NOT drifting. Kinda like the front end equivalent to a welded diff skipping the tire. It'll also wear tires slightly faster in grip driving situations, though with high speed and good load transfer, it'll once again have MORE grip in the twisties with anti-ackerman.
So much respect to the amazing quality of your vids, and also the immense quality of the fabrication you do. Its so so so much better than you did in the old shop. Keep up the amazing work😍
You may need spherical lower shock mounts as the rotation from the cantilever might blow out that rubber mount pretty quickly, also it might be better with rear mounted tank and rad might have to switch locations due to the drive shaft
comment on your welding ... adjust the wire feed to eliminate the splatter , clean out the nozzle , spray weld spatter eliminator. the voltage changes will be minimal after the speed is adjusted
Really coming along nicely! Also congrats from Canada for switching to metric. :P Seriously though I find myself using both... depends what I'm doing. But to measure something so I can cut something to match, metric is just so much easier.
I had an idea for the bed set up with regards to keeping it flat for storage. You should have the flat floor with side storage binds like the ram bed storage. Just my two cents. Keep up the great work going you’re killing it
drawers and stuff like that isn't a good idea considering that it's a drift truck, it's going to get banged up sooner or later. Better to keep the bed simple and replaceable.
Love this channel. Been a fan for a lot of years. It's always great to see the mathematics an actual build process an how evryhting works an functions is amazing. You don't see that very much anymore.. only other channel I know of is Jimmy oaks
Nice work and great video as always! Have you considered making the top hat mount flexible? I am slightly worried that the non-linear movement of the cantilevers might exert too much sideways forces on the shock.
The coil overs need to pivot on both ends, for sure, otherwise goodbye shock body. I’m interested to see if the cantilever bends the bolts it rotates on, I’m hoping not. Other than that, sweet setup! I saw others saying the coil overs should be positioned Infront of the axel, you could but I would rather have suspension out back rather than the fuel tank. That sounds like it could be an eclipse repeat. Can’t wait to see the next episode!
Your shocks are going to be bowing because the pivot joint lifts a little. Should add a pivot at the coilover hats. It doesn't seem like enough to show any issues, but after about 10-20k miles, it may wear out.
I know you’re in Georgia, but I had a car with heim joints on the front control arms up here in New England. They lasted 6 months before they were no good after daily use. Make sure you keep an eye on them if you plan on driving this thing around a lot
Not to be rude but the rear of the shock should also be able to pivot. The motion of the shock is not straight back to the mount it has a tiny radius, so your putting a lot of load on the shock when compressed. Not hating just some advice
Those bolt "spacers" connecting the pivots for the cantilevers should be braced in the vertical direction, not just horizontal. Just one more gusset for each should be enough.
Cooool! I love this truck. I'm so glad its getting the attention it deserves. I cant wait to see you competing at klutch kickers with it ;) I think you could fit 4 spare wheels between the roll cage bars , you could make specific quick release bars/mounts for those so you can easily and securely carry your drift spares with you.
That bolt you’re using to mount the rear triangles to the frame looks very cantilevered out into space. It’s hefty, yes, but it looks like it’s asking to bend. Is there any way to tie the end of it to the crossmember?
@@DullBoyJack I agree but with the overall weight in the rear, it may be just fine. The only thing I'd of done different, not knowing if single shear would be enough, is had the bolt removable. Especially since he sleeved inside the frame. Not gonna be a fun time if the single shear setup bends and you have to remove the welded bolt.
Is your rear mounting point of the shock aible to pivot? When the shock compresses, the front will move up a bit because of how your cantillever suspension works…


Forgot to mention, the Finesser Giveaway is only available for people in the US!
:(
You already got it rolling on a chassis so now the one thing you have to do is just making it run
Man I love and I have to go to school but I still have time to watch your videos
Ok hear me out, if the supercharger doesn't fit under the hood make a dodge dart style hood scoop kinda of like the v1 rally miata and plump the intake to it and put the filter in the opening 🦍
Your fabrication skills have peaked. The only way to up your game is with new tools and techniques. Tim to learn carbon fiber casting, get legit CNC machine, etc.
I would highly recommend putting a sleeve through the frame where the cantilever bolts go through, it will limit the frame from being punched/crushed, also increase strength a lot seal the frame from debris going in etc... Offroad trucks do this often and bolts through frames without sleeves fail
It would be very easy to replace the spacer you used with one that's the same diameter but that goes through the frame to the other side and is welded in both sides of the frame, big improvement!
He said in the video it’s sleeved on the inside at 23:15
@@austindotson5104 I think that was in reference to the spacer he welded to the outside of the frame, it's just weird phrasing. There was no footage of the inside of the frame being sleeved; just hole drilled, bolt plopped in, and welded
This was my thought too, I would imagine it is probably okay on a truck that light, but I definitely would have liked to see that bolt sleeved so it doesn't bend inside of the frame and make a link in the frame itself
@@austindotson5104 if he did that's great looks to me like it's just got the spacer off one side which will put quite a bit of single shear side load on that bolt and frame and if it's not sleeved inside would be a weak point, just want to see him succeed cause I'm building a similar Toyota drift truck
Probably a good idea to make a rear bash bar, in case you give a wall a little love kiss. Better to make another bash bar than the whole rear suspension.
It’ll help the weight balance too
with a raised jack point too so he can still jack it up ez if it’s dirt nasty low
Welcome to the metric system, it's a pleasure to have you join us. Remember this moment, 80 past 2 on April 47th!
The metric system is a joke to can’t even understand fractions
@@bobhilly546312156332 you speaking English?
@@bobhilly546312156332 how come? We don't use fractions to measure distance but we use for other things. Come on, you can't be serious saying 1/4 mile is easier to use than 400 meters? And if you wanna say 500m in Murican? 1/4 of a mile plus 109 yards, 1 foot and 249/250 inches? Man, it's so much easier and intuitive to use a system with base 10, just try it and you will abandon miles, gallons and pounds really fast. 😬
Ahh yes the metric system. Let me know what size rachets you use and the wheel size as well please!
@@e36blur Says the guy with a German car. Plus 99% of your sockets are in mm so the drive size of your ratchet is irrelevant. Same as your wheel size since you put metric sized tires on thoses wheels lol
You should adjust the coilover and it's mounts so that the coilover bottoms out on its bump stop before the axle crashes into the frame. This will ensure that the shock is not overextended during droop, as that would ruin the coilover instantly. A limit strap to control droop would be a good idea as well.
This machine is looking awesome, a stark contrast to it's first iteration! Can't wait to see it on the track!
He’s not jumping it lol
This is looking sick, I'm just concerned about the cantilever bolts not having any vertical bracing since they will be experiencing tons of vertical stress throughout the travel range.
Very nice fabricating! I just wanna leave 2 thoughts here, 1, as others have pointed out the chassis side of the coilover needs to pivot too since the bell crank moves just a little bit up and down as the suspension moves, 2, I would have put the suspension on the front side of the axle just in case the rear quarter hits something, it would've been a safer spot for the custom setup. I hope this message gets to you keep up the good work!
yeah i was noticing the shock body raising and lowering through the articulation, meaning it would either need to pivot on the rear mount too or make a new cantiever that keeps the shock body perfectly stationary through suspension travel. I cam to the comment section specifically to see if anybody else had noticed this
the top of the coilover should have a ball joint
The coilover really need to be the double eyelet type, not a strut mount top mount type. I know he wants to keep it 240 parts but that’s the totally wrong design of coilover for this application.
@@Patrick94GSR It's a pillow ball. Doesn't it have plenty of rotation to compensate for vertical movement of the shock bottom?
@@802Garage perhaps. Still think double eyelet would be a better fit though.
I just saw the Project Tour t-shirt that you released and I checked the dates and I’m like “there’s no way I have been watching since 2017 with the rally Miata” but here we are. Caleb you have always been an og, I’m so happy I was able to find your channel 6 years ago, I have always enjoyed watching your content, I can’t wait to see drift truck v2 when it’s complete.
Switching to metric is an awesome move! You were driving me nuts with all the 16ths and 8ths and stuff!
Hopefully for some of those bolts they have a high enough shear force rating, especially the cantalever bolts.
I am sure he looked into that. If not, they will break and he will fix it.
Grade 8 3/4” bolts have a shear strength of 40,200 lbs
@@vic2982. 40k lbs isnt enough for you? the shear of those bolts is probably stronger than anything in the truck lol
@@roachwerks3043 it might not be a 1.5tone truck with shock movement of say 30mph is over that amount of force it can handle, because it is only held on the one side it might actually not be enough
@@tylerreed7385 when you have a clamping arrangement, the only force the bolt really “sees” is the clamping load. Almost all of the shear and lateral load will be channeled from the heim joints onto the sleeve and directly to the frame. The friction force the bolt creates would be tremendous and you would need a crash impact to defeat that. Sure it could be a double shear arrangment, but that doesn’t seem entirely necessary. Source: mechanical engineer ;)
I was thinking in the last video: come on, leave this 3/8 minus 4/6 multiplied by 4/7 and whatever and turn to metric, its way easier and intuitive! Glad you adopted it! 😁
Killer job man, crazy how far your fabrication skills have come.
Holy moly I just realized that I have been watching you for 6+ years crazy how far you've come from making forza content to doing real & insanely dope project like this one. From making crazy cars in forza to crazy (even cooler) cars in real life absolutely blown away.
The only thing I don't like are the intersecting holes but it'll probably be fine, if it breaks it'll probably just clunk a bit and be slightly lower.
If you're going to put the radiator under the bed, behind the rear axle, make sure to properly protect it from debris. If you're unlucky, popping a tyre could do some real damage to your radiator or hoses if you don't. Have you considered putting the fuel cell in the rear and the radiator between the axle and the cab?
Anyway, I love to see you build on this level, keep it going, you're absolutely killing it!!
Guys used to run coolers and stuff in the same location on mr2's and always copped damage from rocks and shit. So would hate to think about a tyre or something letting go.
You are a genius. Plain and simple.
Man this is so sick, these builds have been so impressive ever since you got into this new shop. Can’t wait to see the 1uz get dropped in!
it's so easy to follow exactly what you're doing in these vids
Your ability to design and fabricate has gotten to be so impressive. I started following when you first turboed Molly the Miata with the Flyin Miata kit and now you're building a custom truck from the ground up
That suspension looks soooo cool. Can’t wait to see it in action. Need some go pro angles of the suspension working when you first drive and then drift it. That’ll be so cool. Maybe if you get a outside angle and a cantilever angle. Such a satisfying build to watch.
That is a SWEET bellcrank suspension.
Nice work! The triangle part of your cantilever suspension is called a bell crank 😉
Those sharp angles on the frame "notch" are going to be stress risers. You should add some gussets in those corners.
designing effective bell cranks can be tricky, the weight of the bell cranks can effect damper response but in this application I dont think itll effect you too much
Best part of my week. When a new drift truck video comes out
Suspension looks savage! Love it
For good measures mount the tank behind the wall in the middle of the bed so it will be safe from side collisions. 👍
This is going to be my favorite build yet
HELL YEAH! Switching to metric is the best thing ever! You will love it!
It is looking very nice, the only thing that I noticed is that you welded the top mounting brackets of the springs of the cantilever setup strait to the bar. The springs are under a lot of pressure longways because they can not pivot at the end. If the bar can rotate or the springs have an pivot system in it, than it is ok. If not, you have springs that want to go in a banana like shape while they can only compress in 1 direction. I see it already in the video. That is why cantilever springs have at the bottom and at the top horizontal mounting bracket other than a vertical top and a horizontal bottom mounting bracket relative to the springs itself.
ᴛʜᴀɴᴋs ғᴏʀ ᴡᴀᴛᴄʜɪɴɢ👍
ʏᴏᴜ'ᴠᴇ ʙᴇᴇɴ sʜᴏʀᴛʟɪsᴛᴇᴅ ᴀᴍᴏɴɢ ᴍʏ ʟᴜᴄᴋʏ ᴡɪɴɴᴇʀs, ᴋɪɴᴅʟʏ ᴛᴇxᴛ ᴛʜᴇ ɴᴜᴍʙᴇʀ ᴀʙᴏᴠᴇ ғᴏʀ ᴍᴏʀᴇ ᴅᴇᴛᴀɪʟs!!
The coilovers really should be the double eyelet type in this application.
I’m glad someone else mentioned this, because it’s exactly what I was thinking.
The top has a pillow ball and the lower mount is a booted spherical joint, no?
This is the sickest parallel 4-link I've seen in a truck. I love the stance, too. Not to mention that a little squat will transfer some needed weight to the rear for better grip. Now, I know the front suspension is done, but I learned something really interesting recently about tire slip angle and how it relates to Ackerman steering geometry. Basically, the more load you have on a tire, the greater the slip angle can be without losing grip.
To that effect, Formula 1 actually uses ANTI-ackerman since their outside tire is seeing more load than the inside due to weight transfer and downforce. The reverse is also true, the LESS load on a tire, the LESS slip angle it can have. So I had an epiphany after a few moments of thinking and realized that DRIFT CARS load up the leading front tire, but UNLOAD the trailing front tire in a drift. However, with Ackerman steering, during a DRIFT, the outside tire (in regards to the direction you're turning), which is trailing behind you with less load is the one that has a greater difference of angle compared to the direction of travel. Which means it experiences more slip angle with less load and therefore drags along while adding no control the the steering.
Basically, it would give you WAY more front control if you switched your steering to ANTI-ackerman steering. It'll just drive a little strangely at low speeds when NOT drifting. Kinda like the front end equivalent to a welded diff skipping the tire. It'll also wear tires slightly faster in grip driving situations, though with high speed and good load transfer, it'll once again have MORE grip in the twisties with anti-ackerman.
ᴛʜᴀɴᴋs ғᴏʀ ᴡᴀᴛᴄʜɪɴɢ👍
ʏᴏᴜ'ᴠᴇ ʙᴇᴇɴ sʜᴏʀᴛʟɪsᴛᴇᴅ ᴀᴍᴏɴɢ ᴍʏ ʟᴜᴄᴋʏ ᴡɪɴɴᴇʀs, ᴋɪɴᴅʟʏ ᴛᴇxᴛ ᴛʜᴇ ɴᴜᴍʙᴇʀ ᴀʙᴏᴠᴇ ғᴏʀ ᴍᴏʀᴇ ᴅᴇᴛᴀɪʟs
This truck is coming put awesome I think the back half is my favorite part about it
ʟᴇᴛ’s ᴛᴀʟᴋ👍
ᴛʜᴀɴᴋs ғᴏʀ ᴡᴀᴛᴄʜɪɴɢ
New merch looks solid man! Great work 🤘
ᴛʜᴀɴᴋs ғᴏʀ ᴡᴀᴛᴄʜɪɴɢ👍
ʏᴏᴜ'ᴠᴇ ʙᴇᴇɴ sʜᴏʀᴛʟɪsᴛᴇᴅ ᴀᴍᴏɴɢ ᴍʏ ʟᴜᴄᴋʏ ᴡɪɴɴᴇʀs, ᴋɪɴᴅʟʏ ᴛᴇxᴛ ᴛʜᴇ ɴᴜᴍʙᴇʀ ᴀʙᴏᴠᴇ ғᴏʀ ᴍᴏʀᴇ ᴅᴇᴛᴀɪʟs!
Underrated RUclipsr.
if someone hasn't said it already its called a bell crank . cool project for sure cant wait to see it done !
THIS THING SO SOOOO SICK
ᴛʜᴀɴᴋs ғᴏʀ ᴡᴀᴛᴄʜɪɴɢ👍
ʏᴏᴜ'ᴠᴇ ʙᴇᴇɴ sʜᴏʀᴛʟɪsᴛᴇᴅ ᴀᴍᴏɴɢ ᴍʏ ʟᴜᴄᴋʏ ᴡɪɴɴᴇʀs, ᴋɪɴᴅʟʏ ᴛᴇxᴛ ᴛʜᴇ ɴᴜᴍʙᴇʀ ᴀʙᴏᴠᴇ ғᴏʀ ᴍᴏʀᴇ ᴅᴇᴛᴀɪʟs
I can’t wait until this thing is done, I think that box flares would look fantastic on this
Craftsmanship in this video is Art!!
You should do a wood bed floor it would look sick and add weight in the rear
All that work, you should make a plexiglass bed floor to show off all your work. Nice job🤘🤘🤘
ᴛʜᴀɴᴋs ғᴏʀ ᴡᴀᴛᴄʜɪɴɢ👍
ʏᴏᴜ'ᴠᴇ ʙᴇᴇɴ sʜᴏʀᴛʟɪsᴛᴇᴅ ᴀᴍᴏɴɢ ᴍʏ ʟᴜᴄᴋʏ ᴡɪɴɴᴇʀs, ᴋɪɴᴅʟʏ ᴛᴇxᴛ ᴛʜᴇ ɴᴜᴍʙᴇʀ ᴀʙᴏᴠᴇ ғᴏʀ ᴍᴏʀᴇ ᴅᴇᴛᴀɪʟs!!
So much respect to the amazing quality of your vids, and also the immense quality of the fabrication you do. Its so so so much better than you did in the old shop. Keep up the amazing work😍
Awesome, you are really taking it to the next level with this V2 build.
This is gonna be the cleanest coolest drift truck of 2023 🙌🏽😩it’s gonna be so nice 😍
Super impressive. Looks so sick
ᴛʜᴀɴᴋs ғᴏʀ ᴡᴀᴛᴄʜɪɴɢ👍
ʏᴏᴜ'ᴠᴇ ʙᴇᴇɴ sʜᴏʀᴛʟɪsᴛᴇᴅ ᴀᴍᴏɴɢ ᴍʏ ʟᴜᴄᴋʏ ᴡɪɴɴᴇʀs, ᴋɪɴᴅʟʏ ᴛᴇxᴛ ᴛʜᴇ ɴᴜᴍʙᴇʀ ᴀʙᴏᴠᴇ ғᴏʀ ᴍᴏʀᴇ ᴅᴇᴛᴀɪʟs
You may need spherical lower shock mounts as the rotation from the cantilever might blow out that rubber mount pretty quickly, also it might be better with rear mounted tank and rad might have to switch locations due to the drive shaft
ʟᴇᴛ’s ᴛᴀʟᴋ👍
ᴛʜᴀɴᴋs ғᴏʀ ᴡᴀᴛᴄʜɪɴɢ
comment on your welding ... adjust the wire feed to eliminate the splatter , clean out the nozzle , spray weld spatter eliminator.
the voltage changes will be minimal after the speed is adjusted
Why did that flow switch @14:07 hit so hard! 😅 Awesome fabricating and editing!
Love the pushrod set up in the rear. Looks sick!
ᴛʜᴀɴᴋs ғᴏʀ ᴡᴀᴛᴄʜɪɴɢ👍
ʏᴏᴜ'ᴠᴇ ʙᴇᴇɴ sʜᴏʀᴛʟɪsᴛᴇᴅ ᴀᴍᴏɴɢ ᴍʏ ʟᴜᴄᴋʏ ᴡɪɴɴᴇʀs, ᴋɪɴᴅʟʏ ᴛᴇxᴛ ᴛʜᴇ ɴᴜᴍʙᴇʀ ᴀʙᴏᴠᴇ ғᴏʀ ᴍᴏʀᴇ ᴅᴇᴛᴀɪʟs!!
Really coming along nicely! Also congrats from Canada for switching to metric. :P Seriously though I find myself using both... depends what I'm doing. But to measure something so I can cut something to match, metric is just so much easier.
ᴛʜᴀɴᴋs ғᴏʀ ᴡᴀᴛᴄʜɪɴɢ👍
ʏᴏᴜ'ᴠᴇ ʙᴇᴇɴ sʜᴏʀᴛʟɪsᴛᴇᴅ ᴀᴍᴏɴɢ ᴍʏ ʟᴜᴄᴋʏ ᴡɪɴɴᴇʀs, ᴋɪɴᴅʟʏ ᴛᴇxᴛ ᴛʜᴇ ɴᴜᴍʙᴇʀ ᴀʙᴏᴠᴇ ғᴏʀ ᴍᴏʀᴇ ᴅᴇᴛᴀɪʟs
Man I love this build!! I'd cut out the rear metal panel below the bed and but a sick bash bar with a jack point. Easy rear wheel swaps!
SHIRT PURCHASED 🎉
i love your channel so much. My inspiration for the future.
You are an absolute genius I love your channel
THATS LOOKS GREAT. Thank you for sharing...from South AFRICA
this truck has come so far! cant wait to see it finished for V2!
Racing dynamics and chassis geometry is so fascinating. It’s like art meets science then they meet racing lol
This thing is so cool!
ᴛʜᴀɴᴋs ғᴏʀ ᴡᴀᴛᴄʜɪɴɢ👍
ʏᴏᴜ'ᴠᴇ ʙᴇᴇɴ sʜᴏʀᴛʟɪsᴛᴇᴅ ᴀᴍᴏɴɢ ᴍʏ ʟᴜᴄᴋʏ ᴡɪɴɴᴇʀs, ᴋɪɴᴅʟʏ ᴛᴇxᴛ ᴛʜᴇ ɴᴜᴍʙᴇʀ ᴀʙᴏᴠᴇ ғᴏʀ ᴍᴏʀᴇ ᴅᴇᴛᴀɪʟs
the truck is looking good
cool video, I would have put the coilovers towards the cabin. Now, If you get tapped on a rear corner, your suspension may bind...
he tryna do a 50/50 weight distribuition
Funny looking printer. Grate work keep it up.
ᴛʜᴀɴᴋs ғᴏʀ ᴡᴀᴛᴄʜɪɴɢ👍
ʏᴏᴜ'ᴠᴇ ʙᴇᴇɴ sʜᴏʀᴛʟɪsᴛᴇᴅ ᴀᴍᴏɴɢ ᴍʏ ʟᴜᴄᴋʏ ᴡɪɴɴᴇʀs, ᴋɪɴᴅʟʏ ᴛᴇxᴛ ᴛʜᴇ ɴᴜᴍʙᴇʀ ᴀʙᴏᴠᴇ ғᴏʀ ᴍᴏʀᴇ ᴅᴇᴛᴀɪʟs!
It's a bell crank, nice work on the suspension
you build the coolest stuff man, thank you for making awesome videos
ʟᴇᴛ’s ᴛᴀʟᴋ👍
ᴛʜᴀɴᴋs ғᴏʀ ᴡᴀᴛᴄʜɪɴɢ
Think you'll ever head up to Shawano WI again? lol
Loved seeing the drift truck axle hop around those corners 👌
ʟᴇᴛ’s ᴛᴀʟᴋ👍
ᴛʜᴀɴᴋs ғᴏʀ ᴡᴀᴛᴄʜɪɴɢ
This looks way cooler than IRS. Glad you did this 😎
Exactly 😉
You know i was wondering why you considered taxes cool than i thought "hmmmm that's probably not the IRS he means"
My only concern is the chassis side of the coil-over flexing under load....
All other cantilever suspension systems I have seen used bearing joints.
Dang u right im glad i see your comment i was about to do the same mod..
U right glad i saw your comment i was about to do the same mod..
As someone who works in the automotive aftermarket this part hurts me a bit
this man makes me realize anything is possible
I had an idea for the bed set up with regards to keeping it flat for storage. You should have the flat floor with side storage binds like the ram bed storage. Just my two cents. Keep up the great work going you’re killing it
drawers and stuff like that isn't a good idea considering that it's a drift truck, it's going to get banged up sooner or later. Better to keep the bed simple and replaceable.
This thing is gonna feel so good drifting sideways in the track!!
Love this channel. Been a fan for a lot of years. It's always great to see the mathematics an actual build process an how evryhting works an functions is amazing. You don't see that very much anymore.. only other channel I know of is Jimmy oaks
ᴛʜᴀɴᴋs ғᴏʀ ᴡᴀᴛᴄʜɪɴɢ👍
ʏᴏᴜ'ᴠᴇ ʙᴇᴇɴ sʜᴏʀᴛʟɪsᴛᴇᴅ ᴀᴍᴏɴɢ ᴍʏ ʟᴜᴄᴋʏ ᴡɪɴɴᴇʀs, ᴋɪɴᴅʟʏ ᴛᴇxᴛ ᴛʜᴇ ɴᴜᴍʙᴇʀ ᴀʙᴏᴠᴇ ғᴏʀ ᴍᴏʀᴇ ᴅᴇᴛᴀɪʟs!
Great job man even though you say you didn't know what you was doing and look like you did
The link between the coilover and push/pull link is called a "bellcrank" awesome video btw
ᴛʜᴀɴᴋs ғᴏʀ ᴡᴀᴛᴄʜɪɴɢ👍
ʏᴏᴜ'ᴠᴇ ʙᴇᴇɴ sʜᴏʀᴛʟɪsᴛᴇᴅ ᴀᴍᴏɴɢ ᴍʏ ʟᴜᴄᴋʏ ᴡɪɴɴᴇʀs, ᴋɪɴᴅʟʏ ᴛᴇxᴛ ᴛʜᴇ ɴᴜᴍʙᴇʀ ᴀʙᴏᴠᴇ ғᴏʀ ᴍᴏʀᴇ ᴅᴇᴛᴀɪʟs!!
Favorite RUclips build by far awesome work
Nice work and great video as always! Have you considered making the top hat mount flexible? I am slightly worried that the non-linear movement of the cantilevers might exert too much sideways forces on the shock.
Thats an important concern for sure, I hope he sees this
I enjoy these 30 min video
ᴛʜᴀɴᴋs ғᴏʀ ᴡᴀᴛᴄʜɪɴɢ👍
ʏᴏᴜ'ᴠᴇ ʙᴇᴇɴ sʜᴏʀᴛʟɪsᴛᴇᴅ ᴀᴍᴏɴɢ ᴍʏ ʟᴜᴄᴋʏ ᴡɪɴɴᴇʀs, ᴋɪɴᴅʟʏ ᴛᴇxᴛ ᴛʜᴇ ɴᴜᴍʙᴇʀ ᴀʙᴏᴠᴇ ғᴏʀ ᴍᴏʀᴇ ᴅᴇᴛᴀɪʟs
I would definitely sleeve the frame bolts and support the cantilever bolts (maybe from one of the bolts below the panhard bar?).
Well done Caleb! You are now becoming a professional fabricator, You used to be a fabricator, now you are a close to be a master fabricator. 😃🤘🏼
Went ahead and got me the gingium truck shirt, That design looked soooo cool, I had to get it.
I strive to be this good at what I do, and hope one day my b2200 is on this level. Great job Caleb!
The bo1 concussion sound effect in the intro is a really nice touch 😂👍
You need some sort of bushings for the top of the rear shocks. It needs flexibility vs the frame and it needs some forgiveness for hard jolts.
The coil overs need to pivot on both ends, for sure, otherwise goodbye shock body. I’m interested to see if the cantilever bends the bolts it rotates on, I’m hoping not. Other than that, sweet setup!
I saw others saying the coil overs should be positioned Infront of the axel, you could but I would rather have suspension out back rather than the fuel tank. That sounds like it could be an eclipse repeat. Can’t wait to see the next episode!
Ah finally. I been waiting for you Gin!
ᴛʜᴀɴᴋs ғᴏʀ ᴡᴀᴛᴄʜɪɴɢ👍
ʏᴏᴜ'ᴠᴇ ʙᴇᴇɴ sʜᴏʀᴛʟɪsᴛᴇᴅ ᴀᴍᴏɴɢ ᴍʏ ʟᴜᴄᴋʏ ᴡɪɴɴᴇʀs, ᴋɪɴᴅʟʏ ᴛᴇxᴛ ᴛʜᴇ ɴᴜᴍʙᴇʀ ᴀʙᴏᴠᴇ ғᴏʀ ᴍᴏʀᴇ ᴅᴇᴛᴀɪʟs!
as a european, seeing you measure stuff in imperial hurts my brain, glad you're going metric
I always watch all your videos. continue the hobby. love from Finland
Awesome job! Even though I much prefer simple designs.
Congrats for changing to metric system, clearly a step forward
Your shocks are going to be bowing because the pivot joint lifts a little. Should add a pivot at the coilover hats. It doesn't seem like enough to show any issues, but after about 10-20k miles, it may wear out.
ʟᴇᴛ’s ᴛᴀʟᴋ👍
ᴛʜᴀɴᴋs ғᴏʀ ᴡᴀᴛᴄʜɪɴɢ
Agree 100 percent. Both ends need to pivot.
You, sir, deserve a like from me for finally switching to metric
I think that pan hard bar having the bends in it will make it clunk and flop around. So much weight off to one side causing it to twist and turn.
got here within 7 MINUTES of uploaded im so hyped
I know you’re in Georgia, but I had a car with heim joints on the front control arms up here in New England. They lasted 6 months before they were no good after daily use. Make sure you keep an eye on them if you plan on driving this thing around a lot
ᴛʜᴀɴᴋs ғᴏʀ ᴡᴀᴛᴄʜɪɴɢ👍
ʏᴏᴜ'ᴠᴇ ʙᴇᴇɴ sʜᴏʀᴛʟɪsᴛᴇᴅ ᴀᴍᴏɴɢ ᴍʏ ʟᴜᴄᴋʏ ᴡɪɴɴᴇʀs, ᴋɪɴᴅʟʏ ᴛᴇxᴛ ᴛʜᴇ ɴᴜᴍʙᴇʀ ᴀʙᴏᴠᴇ ғᴏʀ ᴍᴏʀᴇ ᴅᴇᴛᴀɪʟs
Not to be rude but the rear of the shock should also be able to pivot. The motion of the shock is not straight back to the mount it has a tiny radius, so your putting a lot of load on the shock when compressed. Not hating just some advice
ᴛʜᴀɴᴋs ғᴏʀ ᴡᴀᴛᴄʜɪɴɢ👍
ʏᴏᴜ'ᴠᴇ ʙᴇᴇɴ sʜᴏʀᴛʟɪsᴛᴇᴅ ᴀᴍᴏɴɢ ᴍʏ ʟᴜᴄᴋʏ ᴡɪɴɴᴇʀs, ᴋɪɴᴅʟʏ ᴛᴇxᴛ ᴛʜᴇ ɴᴜᴍʙᴇʀ ᴀʙᴏᴠᴇ ғᴏʀ ᴍᴏʀᴇ ᴅᴇᴛᴀɪʟs!!
Nice work mate!
Those brackets look amazing!
Also x * 25.4 ... x * 25.4 ... x * 25.4 ...
Those bolt "spacers" connecting the pivots for the cantilevers should be braced in the vertical direction, not just horizontal. Just one more gusset for each should be enough.
ᴛʜᴀɴᴋs ғᴏʀ ᴡᴀᴛᴄʜɪɴɢ👍
ʏᴏᴜ'ᴠᴇ ʙᴇᴇɴ sʜᴏʀᴛʟɪsᴛᴇᴅ ᴀᴍᴏɴɢ ᴍʏ ʟᴜᴄᴋʏ ᴡɪɴɴᴇʀs, ᴋɪɴᴅʟʏ ᴛᴇxᴛ ᴛʜᴇ ɴᴜᴍʙᴇʀ ᴀʙᴏᴠᴇ ғᴏʀ ᴍᴏʀᴇ ᴅᴇᴛᴀɪʟs
Cooool! I love this truck. I'm so glad its getting the attention it deserves. I cant wait to see you competing at klutch kickers with it ;)
I think you could fit 4 spare wheels between the roll cage bars , you could make specific quick release bars/mounts for those so you can easily and securely carry your drift spares with you.
I am 1000% buying a metric tape measure. I can't believe I never thought to do that before.
That bolt you’re using to mount the rear triangles to the frame looks very cantilevered out into space. It’s hefty, yes, but it looks like it’s asking to bend. Is there any way to tie the end of it to the crossmember?
Agreed. That bolt really needs to be in double shear, with the kind of forces it's going to take...
@@DullBoyJack I agree but with the overall weight in the rear, it may be just fine. The only thing I'd of done different, not knowing if single shear would be enough, is had the bolt removable. Especially since he sleeved inside the frame. Not gonna be a fun time if the single shear setup bends and you have to remove the welded bolt.
Is your rear mounting point of the shock aible to pivot? When the shock compresses, the front will move up a bit because of how your cantillever suspension works…
Crazy how far you have come in just a few years. Next project car needs to be another wrx wagon lol
ᴛʜᴀɴᴋs ғᴏʀ ᴡᴀᴛᴄʜɪɴɢ👍
ʏᴏᴜ'ᴠᴇ ʙᴇᴇɴ sʜᴏʀᴛʟɪsᴛᴇᴅ ᴀᴍᴏɴɢ ᴍʏ ʟᴜᴄᴋʏ ᴡɪɴɴᴇʀs, ᴋɪɴᴅʟʏ ᴛᴇxᴛ ᴛʜᴇ ɴᴜᴍʙᴇʀ ᴀʙᴏᴠᴇ ғᴏʀ ᴍᴏʀᴇ ᴅᴇᴛᴀɪʟs!