Router Table under $20 - DIY

HTML-код
- Опубликовано: 4 окт 2024
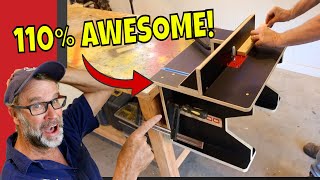
- I needed a router table, so instead of buying an expensive, bulky one, I designed and built my own. You can build one with a piece of 2'x4' 1/2 plywood and a piece of 2'x4' hardboard for under $20. If you want to get fancier, you can install a switch, and even a vacuum port. The top overhangs the base by 2" all around so that later, I can build a fence.
If you are interested in buying any of my wooden crafts, check out my Etsy store:
www.etsy.com/s...
Try Amazon Prime Free for 30 days: goo.gl/z1SWKR
Items used in the video:
[✓] Bosch Router: amzn.to/2h1UwpJ
[✓] Switch: amzn.to/2hyNXKF
[✓] Old Work box: amzn.to/2i5hSHj
[✓] 15 amp electrical cord: amzn.to/2h0V2mB
[✓] 2" Female Adapter: goo.gl/5muTLr


Thanks for the video. I built my table using your video in about 30 minutes. I used wood spray glue from 3M so I didn't have to wait for the other wood glue to cure. Much appreciated
Thank you James!
Jeez that was quick
James Eberhardt, good approach I like this. For your novice carpenter this is perfect.
James Eberhardt
@@bretlambky Yup, and that would be me☺ Thanks James.
I know that this is an older video, but I’ve always appreciated more down to Earth approaches to woodworking. It’s nice to see videos that are attainable for normal people to build and afford.
just watched a video of someone making a router table labelled as "easy" and it would've been impossible to build without a wide array of professional wood working tools. LOVE this video as a small time DIY person.
If the wiring is new to you, get a little $5 power strip with a switch on the end. Plug the strip into the power supply, plug the router into the power strip, use the power strip switch to turn the router on and off.
Your display of table dimensions is great!
A no bullshit build, kept the talking to a minimum. Excellent. Thanks mate.
Wow! Finally a router table without an insert plate (which nobody ever explains why they use it). Thanks!
Just to make sure that their router mounts up nice and wonky so there's no risk of the bit actually being perpendicular to the table.
I wanted to say something smart ass about having thousands of dollars worth of woodworking tools but spends 20 bucks andmakes a router table but, damn it I just couldn't do it. This was a damn fine video. Interesting, clear speaking, no overly loud music, and to the point. Thank you sir, I will be using your video for my DIY table today!!
Words cannot express how amazing it is to look up something... and find EXACTLY what you are looking for. Thank you for this vid.
Same here, I liked the simple dust collection idea too.
I know what I’m building tomorrow. 😊
I LOVE videos that get right to the point, move quickly, and don't waste time. Excellent.
I've been watching many vids on router table building trying to find the right design. So far I like this one the best.
Great solution for dust collection when using it without a fence. Adding a fence to this basic design should be a simple process too. Nice cheap, simple approach. Thanks!
Wow, dude, you are incredibly articulate. Informative, intelligent, and very to the point. This is an 11/10 video and you got a sub out of it. Most videos have that annoying 60s intro and they mumble with no real direction for the video like they did it last minute and this is a huge sigh of relief from me.
so here i am 5years after you made this thinking...wow awesome and cheap thanks for making this!
Excellent video and process
You saved me a lot of work
Thanks for sharing
NIce job. Clear and to the point. Thank you for not adding opening theme music, graphics, and bad scripted comedy.
That was concise and well produced.
I’ve learnt so much by watching your quick video. Thanks mate! 🇦🇺
Great video not to fast but fast enough to follow along and not a lot of extra talking. Well done!!!
Awesome, just saved ~$140 by watching and learning this is possible for my router. Thanks man!
I just used your video and built one like it. Great video. Great teaching. Thanks.
I'm going to redo my table and will certainly use some of your plans. I also added a speed control to mine for better control. Real easy Ebay ($20) addition ! Works great !! Thanks for real easy REAL WORLD video !!
As many other said: quick and to the point. Thanks!
Super simple...I like it. Going to do some base boards and do not want to get an expensive router table.
Thanks Mate from The UK
What can I say but; "Outstanding!"
Thanks,
Rich
I watched quite a few related videos. This is simplest, most understandable and doable. Thanks buddy.. I enjoyed watching it.
Great Video. So easy. Thanks so much.
The rocker switch is good for quick "off" but also very easy on. It would add $8-$10 to the build but an actual E-Stop switch/button available from your favorite online retailer would be well worth it.
Also, like others have mentioned...careful on those cross cuts with the miter gauge and fence...kickback is no joke.
I saw your videos image searching for a quick-fix table for some 1½" trim I had to rout. I had no hopes clicking the play button, but it turned out to be exactly what I needed! I don't need a fence and you explained why in the first 10 seconds! THANK YOU! Subscribed!
Wow Awesome Easy to Understand And Not Hard to put together For A Guy Who Don't Know wood I'm Mecnec So Working with wooden tools is Cool to do things with ya got my Vote And Keep up the Great Work And thanks For Sharin Your work Keep them Comin
I like this turorial,easy to follow and clear
I made a similar router table a few years back. I used a Harbor Freight foot switch to turn the router on an off. It cost about $14.
Wow, you’re so smart! Thanks for inspiring!
Bro-tein Shake, nice job!
Im on it tomorrow. You just stepped my game up and for that, I thank you.
NOW SHOW ME THE FENCE ADDITION!!!
Stephen Rangel cool comment Theodore Bro-sevelt..........haha
yes I would also know if you have added a fence and is there a video
Many years ago I picked up a sink cutout with a formica top for a couple bucks at HD. I built the frame out of 2x4's.
Carpentry law #44564: If you are interested in learning carpentry, you have to live through the torturous music in carpentry videos.
It is written
If you want to learn carpentry, go to school in an apprenticeship program. (There is no music). This is wood working and cabinet making. Carpenters can build houses and buildings.
@@tedrowland7800 he can easily re-phrase the statement and nothing will change... those musaks r still torturing...
@ manly studly (pun intended) "carpenters" bitching is annoying
Its music they find for free.
Nice and simple. I'm going to need to build one of these very soon.
I am building this with a couple of simple modifications. Mine is 18" x 30", (Had a laminate drop), and since my router depth adjustment is not like the 892 porter cable, I put a 2" x 4" strut across the front and back, and added a piano hinge on the back so I could just lift the top to make my adjustments, or change the bits. I then used an edge guide and installed a t-track for a miter.
This is the first video that I’ve seen from you. Wow!! Great wood working skills and great video making skills. I was able to easily understand. You also showed a cut diagram! You have inspired me.
This is my next job on lockdown thanks
Added some aluminum angle iron to the sides to make a smooth slide. Does work great! I can easily adjust w paper shims I make square.
oh gosh.... I whas trying to make a perect routertable ans spens hours on integate it to my workbench..... the easyer the solution rhe mor brilliant the craftman are. sorry for my broken english. in germany we say “a real craftsman makes his own tools. word
I actually made one out of a single piece of MDF and 2 600lb dewalt clamps, it's maybe 2 feet wide and works absolutely perfect for what I need it for. Super easy to throw on the bench and use it.
Great design, great video. Will give this a try. Thinking of adding a fence with a pair of 1x3s at a right angle, 1 flat on the table clamped to the sides and the other with a piece of white board glued to it so the routed wood slides against it. That should work well enough with a half circle cut out of the fence so it fits over the bit.
Nice work!
This was a very simple and well thought out video. I just purchased a DeWalt 618 router that I am thinking I need to put into a tabletop router table like you are making. I appreciate all of your tips. Your music wasn't too annoying, just interesting. I will investigate your channel later to see if I want to subscribe.
Great video, however I would never ever use that type of rocker switch for any power tool as it is far too easy to accidentally bump and turn on.
Awesome work and explanation! Made one this morning. Waiting to go to home depot to get the white hardboard.
I would have loved to see you you installed a fence, that you could actually set, and measure.
But why is it required if the router bit has the ball bearing??
Good video Like the dimension plan
Thanks for the awesome idea! Made mine from parts I had laying around. Works fantastic!!!
Easy job, very well done and documented... Liked
Great work! You've given me some great ideas for my router table. Thanks.
Nice video. Short clear. Ain't like others 8 mind video spent 4mins repeating their video title....lol
Just built it. Awesome!
I'm about to make a simplified version of this. Using MDF board as the insert on an old dining table that pulls apart in the middle. It is the perfect thickness to sit flush with the table top. I'm even drilling holes to accommodate the small dowels that keep the insert in place. I have to recut the bearing edges of my drum shells, so the large table top makes things easier. Luckily my awesome roommate has the same Bosch router in this video, just with different bases. He even has the 45° chamfer bit with the roller bearing needed for bearing edge cutting. I'm hooked up, now it's time to get to work!
This looks to be my next project.........thanks......
Great video. Very simple yet smart.
Neat little table. Thanks for sharing !
- Thanx a million for sharing the project. Just what I need for a quick, single project.
Very helpfull instructions video. Thank you very much.
Thank you you helped me allot. regards from down under.
Awesome man. Made one over the past 2 days which is an exact replica of yours. Thanks for the video.
I'm glad it helped Dan!
Good video. Succinct, simple, to the point. This is what I am going to build today. Thanks for the idea\plans.
came from E.C. to see hammer build then to this nice job on both. i soon will be making this for a job i have. thank you stay safe
Four years later this is still the simplest build yet. Except for the electrical part. My router is fairly new so will just use an extended surge protector with a switch that I can just tap with my foot.
Perfect for some drum bearing edges cut. thanks for sharing this man !
Okay but what is this killer soundtrack, I love the 80s vibes here. Anyone know this song? Lol
Very nice and clever build. Gave me a lot of inspiration and ideas how to finally make one myself.
Thanks. Liked & subscribed.
🙂👍🇨🇦
Awesome, thank you!
Really neat router table!
thanks, great video. gonna make one based on these awesome instructions.
I like the dust collection good job
Great project, thanks!
Hey - that's the same workbench I have - the garage floor! Seriously, until I built a nice one last year, that was my wood working bench for decades. Im getting too old to keep getting up and down and up and down..... That's a neat little router table. Works for me!
Nice design. Good job!
Thanks so much! I'm building a shop over the winter, and this table is definitely on my list.
I think its called antiskid material that the timber is placed onto while routing.
I am going to make one.
Make sure u go againts the rotation, i saw the piece of wood going abit back when u routed it. just a heads up.
i'm going through RUclips to find an easy DIY router table for incidental use - -- whom do I find talking after I start the video while looking away - -- -You! You the Man! Thanks so much my friend! Great video - you now have another subscriber!
Thank you for being such a great influence!!
Excellent video. If you intend to use cove/stick router bits even with 1/4” shank, the hole in the table should be at least two inches as these are fairly large diameter bits.
Very nice and simple build, thanks for posting. A router table is next on my list and this makes it a bit simpler.
Great idea. Time to build one. Thanks
Great project. Excellent video and process. Thanks for sharing
I like this Video, I am going to use it and build me a table, I was looking at buying one,but I like this better.
Cool build - my only tip is a safety tweak. Cross-cutting with miter gauge and end of stock against the fence is a no-no. Lucky you didn't get it ripped out of your hands - and hand sucked into blade. The only reason I'm posting - this happened to me, didn't get hurt but did leave a long brown streak in my undies, and could have easily lost part of my hand. It was close. And it happens before you can blink - there's no way to anticipate or think your way out of a kickback. The way to use the fence as a length gauge is with a stop block clamped on the fence - clamp ahead of blade so all it's doing is setting the length - then there's no way for the piece to bind up. Stay safe!
Tioga Fretworks
Tioga Fretworks w
i do not see what was dangerous
Yes. The tablesaw work at the first minute was pretty cringeworthy. A crosscut sled would have been much better, or just proper anti-kickback protocols.
very true...should use a spacer block in front of the fence so that the wood doesn't touch it as it slides...otherwise you would get kickback
Very good idea
You have the same assembly table that I do, a concrete floor... how crazy is that lol.
Thank you for sharing and like your video especially how you list the material and cut list.
Awesome job man. Short, sweet, and to the point. You didn't add in all the obvious stuff like "for a smooth edge, sand". QUESTION (for anybody) What brand and specifically model is that router?
I like what you did with the dust collection
I have a video that details my dust collection system as well.
Great instructions man, I’m building something similar and I think you’ve convinced me to add a switch! Thank you!
i'm going to add a switch to the one i built some time ago. reaching the switch is sort of unhandy now so adding a switch where i can easily get to it is smart. i don't know why i did not think of it myself because i am always wiring something up.
I enjoyed your video. It was very helpful. Thank you!
I made this using 3/4 melamine. One sheet of wood, slick surface, easy
You just reminded me what I have in my attic. Board to make router table out of - sorted!☺️
I'm Gonna Do This For My Lure Making.
Great video, but not everyone has a table saw and the tools you have. Can you do a video using simple tools to make it, please? (CIRCULAR saw, Jigsaw, Handsaw, etc)
nice one
Great video. Really helpful. Thank you.
thanks ever so much for creating the demo vid. This is perfect!
wow.. thanks dude.. you help me alot..
This is an awesome video thanks so much